Basic information about the tinning process
Tinning is divided into initial, carried out on a new or long-stored soldering iron, and working, performed immediately before soldering.
How to tin a soldering iron tip? First, the tip is mechanically cleaned of scale, oxide film, slag and other contaminants, then a thin layer of molten solder, most often tin-based, is applied to the prepared surface.
For mechanical cleaning the following are used:
- abrasive stone;
- sandpaper;
- another soldering iron.
Cleaning a soldering iron with a non-burn tip
For inexperienced soldering workers, craftsmen recommend starting with a file. As the solder strengthens his skills, he selects the most convenient stripping methods for himself.
Why tin and sharpen
Tinning the tip before soldering significantly simplifies all operations with a soldering iron, which consist of transferring molten solder to the contact area.
This procedure can only be avoided if the purchased soldering device has a tip covered with a protective film of silver. The silver-based coating holds solder well without compromising the thermal conductivity of the copper base.
However, products with such a coating cost a lot of money; In addition, the silver film comes off over time and exposes the copper base (they say that it dissolves in the solder). So in this case, after some time, the sting will have to be tinned, one way or another.
It is necessary to sharpen the tip with a file not only before tinning, but also in cases where it is necessary to give the tip a shape convenient for work.
Some users prefer the tip to be sharpened to a cone. Others try to sharpen its side parts in such a way as to obtain a flat, pointed shape.
Preparation and Maintenance
The more intense the work, the sooner the soldering iron tip burns out and becomes overgrown with scale scales.
During prolonged heating to high temperatures, the copper from which the tip is made partially transforms into molten tin, and partially abrades on the soldered surfaces and contacts. Physical and chemical erosion of the substance occurs. In addition, under the influence of heat, an oxidative reaction of copper with atmospheric oxygen occurs. On models that allow you to regulate the temperature, it is recommended to reduce it when there are breaks in soldering, or simply turn off the soldering iron during this time.
Sequence of operations to remove scale:
- Carefully remove the sting.
- Clean off the scale layer with fine-grained abrasive paper.
- Apply a graphite protective layer to the tip by rubbing it with a pencil lead. This will slow down the reappearance of the scale layer.
- Lightly tap the body of the electric heater and turn it to remove scale from the recess for the copper rod.
- Insert the tip back into the mount.
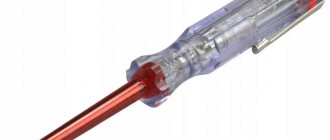
To ensure electrical safety, each time before starting work, you should inspect the insulation of the network cable for the absence of mechanical damage and melting.
From time to time it is also useful to measure the insulation resistance value. The measurement is taken between the plug contacts and the tip. The value must be greater than 10 mOhm.
Special means
As special agents, it is allowed to use active organic mixtures (fluxes), as well as pastes of a special composition. The use of fluxes makes it possible to increase the efficiency of wetting the tip material with solder and, accordingly, improve tinning performance.
Domestic manufacturers offer several types of flux, which are available for public sale in hermetically sealed plastic packaging. When working with a composition consisting of ethyl alcohol with added catalytic additives, the temperature in the processing area does not exceed 300 degrees. This indicator satisfies the requirements for choosing the correct tinning mode for most materials used for the manufacture of tips.
The procedure for using active paste additives differs only in the way they are applied to the surfaces being treated.
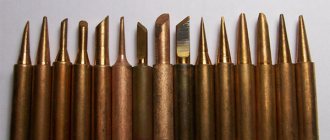
Features of the sting
The sting is the main (and only) working part of the device. It is heated by an electric heater and heats the solder, rosin (or other flux) and the parts to be soldered. During operation, an invisible oxide film forms on it, reducing the wettability of the material. Visually it looks like this: tin or rosin does not spread evenly over the entire area, but collects in a drop and flows down.
The size and geometry of the working body are chosen so that they correspond to the operations performed. So, when soldering parts of large sizes and thickness, choose a powerful soldering iron with a thick tip. To install microcircuit legs, on the contrary, a particularly low-power device is required, with a thin tip and good grounding, so as not to damage sensitive components due to static charge or overheating.
Soldering microcircuits
A universal soldering iron is sharpened with a spatula. Thin parts are soldered with the narrow side, and more massive ones with the plane of the blade.
Tinning at home
Almost every household breakdown can be easily fixed using a regular soldering iron. He is capable of breaking wires, disconnecting contacts, etc.
Websites are full of instructions on choosing the right tool, selecting flux and solder, but not all talk about the correct tinning of a soldering iron.
And poor-quality tinning will lead to the fact that your efforts will be in vain, and the contacts in the soldering iron will be unreliable.
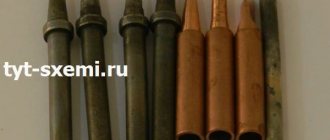
How to tin a soldering iron with a copper tip
Tinning a soldering iron is a simple job and usually does not cause any difficulties. If the surface of the rod is well prepared and cleaned, then both tin-lead and silver solders fit well on it.
Soldering iron with copper tip
It is necessary to clean the surface of the rod to the condition of a new part. First you need to work with coarse sandpaper, level the surface and give it the required shape. If it is technically possible, it is a good idea to polish the surface - this way it will oxidize more slowly.
There is another technique - binding. To do this, the tip should be pulled out of the heater and, like a blacksmith, forged with a hammer on an anvil (or a massive vice). A surface compacted in this way will also oxidize much more slowly.
After machining, it’s time to actually tin the tip. Experienced shareholders recommend various methods:
- Place a few pieces of solder in the rosin can. Heat the soldering iron and dip the stripped tip into it. Rosin melt will act as a flux additive and will prevent the metal from becoming coated with an oxide layer. Instead, it will be coated with a layer of tin. Next, you need to take a square of coarse natural cloth and wipe the freshly tinned tip. In this case, the tin will rub over the surface and stick to it perfectly. The disadvantage of this method is a lot of smoke and a strong smell.
- The next method of tinning the tip produces less smoke, but requires more labor. A piece of coarse natural cloth should be laid out on a smooth board, sprinkled with crushed rosin or a whole piece should be placed on it. Dip the stripped tip into rosin and rub the surface with a solder rod. This operation will have to be repeated several times, and then rub the working surface on rosin cloth.
A soldering iron with a copper tip must be tinned each time before soldering and always after storage without use.
How to cheat? What is it for
In this way, materials are protected from oxidation, the action of alkalis and acids. This process involves coating the metal that needs protection with a small layer of a material that is better able to resist oxidation.
Most often, tin is used for such purposes, which is practically unaffected by moisture and air and does not react at all to the effects of fats and vegetable acids.
The process of coating the protected material with tin was called tinning, and the tin layer was called half-doing.
- It is important to tin with high quality, ultimately obtaining a dense layer of tin that will provide the necessary protection for a certain surface.
- After tinning operations, electrical soldering is performed, which includes cleaning all parts, applying flux and, directly, tinning.
- First, those surfaces that need to be soldered are folded, flux is applied to the soldering site, then this place is heated well, then solder is applied.
- When the solder begins to spread, you need to remove the heat and wait until it completely crystallizes and cools down.
- If there are flux residues, the soldering area needs to be thoroughly washed.
Radio amateurs tinning flat surfaces, most often printed circuit boards. Here this process is significantly simplified - you can tin several elements at once and then “protect” each of them from influences.
A board with tinned tracks is a convenient component for further assembly, and it does not matter how long it lies idle. Tinned tracks hide small defects and increase their current load.
But tinning with such a soldering iron does not bring much pleasure due to the appearance of careless smears, needles, and an uneven layer of semi-solder.
- To tin small iron parts, you need to “send” them into the melt by preparing a small bath of “Rose” alloy, heated on a regular stove at a temperature no higher than 120-140°C.
- Tinning begins by gripping the board with long-handled pliers. Then they are pickled with 5% hydrochloric acid and washed well in running water for a couple of seconds. After this, you need to immerse the board in the melt itself for 2 seconds.
- For such work, installation of a hood and thermostat is required. Of course, there is no need to install such equipment at home. Here, upgrading the process can occur by purchasing a more powerful soldering iron and making a simple tool from scrap materials.
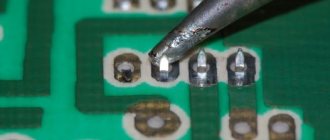
How to tin a soldering iron tip while working
If you carefully clean and tin the tip, then after half an hour of work, or even earlier, tin will no longer accumulate on it. The copper slowly began to burn, and slag residues accumulated on it. There is no point in pressing the soldering iron harder, stop for tinning. There are a number of techniques for tinning the tip.
Using a wooden block
A rough wooden block (spruce or pine, they contain natural resin, similar in composition to rosin). Pour a small amount of flux composition onto the block and put a small piece of solder. If you notice dross, you can strip and tin the tip again with little interruption.
In a metal sponge
This quick tin tip method will require some preparation. Place a household wire dish sponge in a metal cup. The lower part of the sponge should be coated with a thick flux, such as soldering lard. By slightly immersing the tip in the sponge, it can be cleaned of slag and scale. And if you pick up a drop of tin and immerse it deeper into the sponge, it will turn out to be tinned.
Tinning the tip with a metal sponge
This method can be used to clean and tin both a classic copper tip and modern ones made of nickel or ceramic.
In rosin
This traditional method of tinning requires a certain amount of dexterity and speed of movement. Copper oxidizes very quickly, and you may not have time to bring the tip from the point of mechanical cleaning to the container with flux. Therefore, they clean directly under flux, placing a file under the tip. You need to rub the tip over the file until the flux melts, after which you can tin it by holding a tin rod.
Tin the classic way
Another traditional method of tinning involves the use of refractory solder. The refractoriness of the solder allows it to evaporate more slowly from the surface of a tinned soldering iron and will remain on the copper longer. It will require:
- file with frequent notches;
- rough board made of coniferous wood;
- rosin;
- a piece of refractory solder.
The sequence of actions is as follows:
- put solder on the board;
- clean one side;
- dip deeply into rosin;
- quickly clean it on a board, running it over the solder;
- repeat for the second side.
Next, you should tin the round surface between the edges.
When a wet desoldering sponge won't do the trick
A sponge or rag moistened with water will not help remove carbon deposits from an eternal sting. These surfaces and water, on the contrary, worsen the situation.
Remember an important rule - the soldering iron tip should always be with solder . There is only one exception - when you need to remove excess solder from a board or part. For example, for high-quality use of copper braiding, you need a clean tip without solder.
There should always be solder on the soldering iron. It protects the surface of the tip from oxides while you are not using the soldering iron and are busy with something else. When you need a soldering iron and fresh solder, you simply clean the tip from the old oxidized solder with slag on a sponge or rag moistened with water, and take fresh solder.
If, nevertheless, there is a large deposit on the tip, due to which the surf is not taken, then this deposit can be removed in three ways.
Copper or metal thin shavings
Metal shavings simultaneously remove solder from the surface of the tip and erase the carbon layer. Copper shavings, which are sold at radio stores, work best, but a household metal sponge will also work.
The difference between them is in chip size and quality. Copper shavings remove solder better and gently remove oxides from the tip.
The shavings are very easy to use. It is enough to dip the tip into the shavings and run it several times over the entire area. The oxides and solder will remain there.
Swimming in solder and flux
You can burn off the oxides with a large amount of solder. It is necessary to “bath” the tip in a large amount of solder and flux. In the airless space inside the solder, the oxides will burn and the surface of the tip will be cleaned.
Twist several rods of solder into one ball and add flux or soldering acid.
Now dip your soldering iron into this lump and bathe it in it. And do all this on a wooden board or an unnecessary board so that the temperature does not leave the soldering iron and helps remove oxides.
After a couple of minutes, clean the sting with a sponge.
If oxides remain, repeat the procedure again.
Activators for stings
This method will be needed when everything else fails and nothing else can remove the oxides. If you still need a sting, you can try a sting activator. It is sold in online stores for radio amateurs or on AliExpress.
It is enough to dip the tip into the activators, and it will be clean again. (instructions may vary) But do not abuse this. Activators emit a lot of harmful substances, and why use it constantly when a metal sponge perfectly removes small oxides.
How to tin a modern soldering iron tip
According to manufacturers' declarations, tips made of ceramic or nickel do not require tin-plating. In real life, they are also susceptible to the formation of soot and scale. It will not be possible to tin such a soldering iron in the usual way. You will need:
- cotton rags;
- jar of rosin;
- solder rod.
Soldering iron with ceramic tip
You should wipe the tip on a rag and immediately immerse it in rosin. Along the tip you need to immerse a solder rod in boiling rosin. It will melt and stick to work surfaces.
Metal sponge
There are often soldering irons on sale with the working part coated with special protective compounds made of stainless steel (this coating is called “non-burnable”). It has a thickness of several microns, so sharpening and tinning the tip is completely unacceptable due to the possibility of destruction of the coating due to strong friction.
In this case, the simplest method of dry tinning and cleaning the tip is used, using a steel sponge.
Its spring cells ensure good grinding of the tip and allow you to quickly tin its working surfaces. This method can be used when preparing soldering irons equipped with ceramic and nickel tips, as well as those with a very thin tip.
The special steel mesh can be replaced with a regular kitchen sponge. To clean the sponge itself, simply tap the mesh on the table, after which all the remaining solder will fall out at the bottom of it. The cost of this cleaning accessory does not exceed fifty rubles, so you can buy it immediately with a reserve.
With any of the proposed options, damage to the soldering iron due to strong pressure is practically excluded.
Tinning methods
There are several ways to clean work surfaces before tinning:
- Using abrasive materials. Needle file, file, whetstone, sandpaper.
- Using forging. It is recommended to remove the tip before processing it.
- Using another soldering iron. The tips rub against each other.
After stripping, you should immediately, without waiting for the oxide layer to recover, immerse the tip in a container with rosin. A rod of solder is also immersed there, melting it and allowing it to spread over the surface of the rod. This operation should be repeated several times to ensure that the working surfaces are completely covered with solder.
Next, rub the tip on a pine or spruce board to ensure even distribution of the solder.
Tinning with rosin
The tip must be carefully inspected. If there are areas not covered with solder, the operation should be repeated until a dewy continuous layer is obtained.
You won't be able to tin it once and for all. Tinning needs to be repeated periodically.
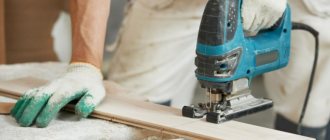
Preparing the wire for soldering
To solder copper wires, they must be tinned in the same way as the soldering iron itself. To work, you need to warm up the tip to operating temperature. The tip is dipped into flux or rosin, then onto solder, after which the wire is pressed tightly. All this must be done quickly so that the rosin does not have time to evaporate. This work will have to be repeated several times. As a result of the procedure, a high-quality layer of solder should be obtained on the surface.
The process of tinning oxidized parts differs in time. It is recommended to first remove oxides using an abrasive material. In very difficult cases, tinning acid, chemical compound or solder paste will be required. Solder wire is sometimes used for soldering. In this case, you need to dip the rod in rosin, then apply it to the surface that needs to be tinned, and put solder between them. Rub the edge of the solder with the tip of the sting.
https://www.parnikiteplicy.ru/www.youtube.com/watch?v=Jqkivy-uRpk
Some wires may be protected with enamel. To remove it, you can treat the wire with acetylsalicylic acid, that is, regular aspirin. The tablet is placed in place and pressed with a soldering iron. After some time, the tablet melts and the acid attacks the varnish and is destroyed. After such a simple procedure, tinning the wire is not difficult.
Tools and materials
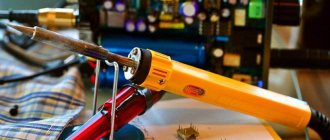
Soldering requires a high temperature heat source. The most common type of such equipment is a soldering iron.
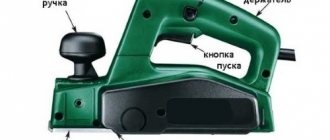
Soldering iron
Depending on the model and functionality, a soldering iron may have various additional components, such as a power and temperature regulator, a power button, a socket for changing tips, and others. Household soldering irons operate on a standard 220 V network.
Solder
Solder is a tin-lead alloy, usually sold in the form of wire of different diameters.
There is also tubular solder, which is a wire whose internal cavity is filled with flux.
Based on its composition, solder can have different markings, for example, POS-60, where:
The more lead and, accordingly, less tin contained in the solder, the easier it melts. There are also lead-free solders that require special high-temperature equipment or a high-power soldering iron to melt. Various additives can be used, most commonly cadmium and aluminum.
When soldering, a flux must be used that performs the following functions:
- Dissolution of oxides on the surface of mounting elements;
- Improved connection between solder and mounting components;
- Promoting the spreading of solder in a small layer over the surface of the contact parts.
The most popular flux is rosin. Suitable for wires and large radio components. An alcohol solution of rosin can be used for soldering almost any circuit board. For microcircuits and small parts, specialized paste-like fluxes are usually used.
Fluxes can be active or inactive. Active ones must be washed off after work, as they can corrode conductive elements, especially those made of copper.
Solder Removal Braid
Copper braiding is used to remove excess solder from the soldering area. It is a flat braid made of thin copper wire. It is applied to the soldering area and when heated with a soldering iron, it absorbs excess solder.
What kind of lighting do you prefer?
Built-in Chandelier
May vary in width, standard size is 5 mm. Instead of purchased braid, you can use a shielding mesh from an old coaxial (antenna) cable.
Expert opinion
It-Technology, Electrical power and electronics specialist
Ask questions to the “Specialist for modernization of energy generation systems”
How to solder correctly with a soldering iron: how to solder, soldering technology with rosin In order to control the temperature and power of the soldering iron, you can include a dimmer in its power circuit, which is a power regulator that is used in electrical circuits for indoor lighting. Ask, I'm in touch!
Tinning of modern coating
Ceramic and nickel tips do not need to be tinned. This is what manufacturers read, but this is nothing more than advertising. Modern coatings are also prone to oxidation, but the process occurs more slowly. It will not be possible to tin the soldering iron tip of a modern soldering station in the usual way - the coating will be erased.
Cleaning is done with a wet cotton cloth. They take solid rosin, where they put a little solder. The tip should be rubbed with a cloth and immediately dipped in rosin. A piece of solder is pushed vertically down. The solder melts and envelops the tip cone.
Working with solder
When heated sufficiently, the molten solder should become flowable. For small jobs, you can take a drop of alloy on the tip of the tool and transfer it to the parts to be joined. But it is more convenient to use thin wire (rod) of different sections. Often inside the wire there is a layer of rosin, which helps to solder correctly with a soldering iron without distraction from the process.
With this method, a hot tool heats the surface of the connected conductors or parts. The end of the solder rod is brought to the tip and pushed a little (1-3 mm) under it. The metal instantly melts, after which the remainder of the rod is removed, and the solder is heated with a soldering iron until it acquires a bright shine.
When working with radio components, you need to take into account that heating is dangerous for them. All operations are performed within 1-2 seconds.
When soldering connections of single-core wires of large cross-section, you can use a thick rod. When the tool is heated sufficiently, it also melts quickly, but you can distribute it over the surfaces to be soldered more slowly, trying to fill all the grooves of the twist.
Source: odinelectric.ru
Cleaning during operation
Properly tinning a soldering iron is important not only during preparation for work. After some time of soldering, it may happen that the material again does not stick to the base. This happens after about 15 minutes. The copper burns under the tinning layer. There are several ways to properly tin a soldering iron during operation.
A block of wood
A rough block of wood should always be at hand by the craftsman. Coniferous wood is used because such wood has natural rosin. I pour flux onto the wood and put a little solder on it. As soon as scale appears on the sting, rub it on wood. During this process, the base is cleaned and serviced.
Metal sponge
A method for instantly tinning the base of a soldering iron. Factory soldering units are equipped with a similar device in the form of a steel sponge in a container.
It is convenient for the master to use this method, but it can be improved. The bottom of the sponge is smeared with flux - soldering lard. When the tip is immersed shallowly, it will simply be cleaned. And if you apply solder to the base and dip it deeply, to the base of the sponge, then cleaning will be combined with tinning.
The method is optimal for modern tips with ceramic or nickel coating. Even soldering irons with a thin copper tip can be cleaned and tinned this way. It is difficult to damage the device even with strong pressure.
Using rosin
A method for a traditional tool with a simple copper tip. The metal quickly oxidizes and after 10-15 minutes the solder can no longer be picked up. If you clean it separately from the flux, the technician will not have time to carry the soldering iron - oxidation occurs so quickly.
Because of this, they clean the instrument in rosin. Place a file under the soldering iron, or you can use steel wire. Then the sting is rubbed until the flux melts. There shouldn't be any solder.
Electric soldering iron device
Using a soldering iron, parts are connected to each other using special solder, which melts under high temperature. A soldering iron is an electric tool with a special tip at the end, which is heated to a certain temperature, sufficient to melt the solder. A strong and high-quality connection of parts is obtained if you follow all the subtleties and features of working with a soldering iron.
The electric soldering iron consists of the following simple parts:
- A heating element.
- Sting.
- Electrical power cord.
The heating element of the soldering iron is enclosed in a housing made of a special non-flammable material that does not melt. The soldering iron tip is made of copper coated with special alloys of nickel or steel.
Some models of soldering irons are equipped with a temperature regulator. In the design of an electric soldering iron, the heating element converts electrical energy into heat and transfers it to the tip to melt the solder. For certain models of soldering irons there are replaceable tips.
The body of the heating element is a metal tube with through holes located along it, which remove excess heat. For the power cord, a two-core wire is most often used, the cross-section of which will allow you to safely use tools of varying power.
The temperature regulator can be built-in and located in the body of the soldering iron, or it can be located on the power supply. The latter option is preferred, used when installing electrical boards, is designed more often and is found in tools designed to work in the low voltage range from 12V to 36V.
Materials used for soldering
The work uses consumables such as solder and flux. The technology for connecting parts during soldering and welding is somewhat different. When soldering, the connection occurs due to the formation of a seam, which appears between the parts being connected and the solder material due to the formation of strong bonds.
The composition of solders varies depending on the materials used and their quantitative ratio. To work, you need to take solder of a composition that will meet the temperature requirements of the soldering mode and depend on the type of materials for the connection.
Fluxes are used in work depending on the types of materials and soldering conditions. Types of fluxes used for soldering:
How to prepare a tip for work
Before work, you need to check the soldering iron settings and its general condition, which can be determined by carefully inspecting the tool from all sides. Please note that the soldering iron tip must be kept clean and not heated. The supply wire must be encased in intact insulating material.
Study the instructions for the soldering tool; it contains information about the operating parameters of the soldering iron - power and voltage. The operating voltage value is indicated on the body of the soldering iron itself and is its marking characteristic.
When working with a completely new instrument, you need to start by warming it up well. It is necessary that the factory lubricant of the tool burns inside the body first; during this process, be sure to ventilate the work area well.
Using light, gentle blows of the hammer, shape and sharpen the tip of the new soldering iron. Thus, the end of the tip will become denser and will burn less during operation.
The next preparatory stage will be tinning the soldering iron tip so that the working solder does not roll off it, but sticks well. First, heat the soldering iron tip, then lubricate it with flux and immediately touch the already prepared tin solder so that it melts and covers the entire tip, using a wooden stick, carefully distribute the solder over the entire surface. This preparation will prevent oxidation of the material from which the tip is made, and the tip itself will be covered with a thin film of tin.
After careful completion of the preparatory measures, the soldering iron can be used to perform soldering work.
Preparing parts and soldering them
Before the soldering process, all parts must first be cleaned and then tinned for a neat and durable connection. If soldering is carried out using rosin, then the part is first heated, then coated with flux or molten rosin and solder.
When soldering with liquid flux, the cold surfaces of the parts are first coated with it, then the soldering iron is heated and a layer of solder is covered with it.
To hold small parts to be soldered while working with a soldering iron, it is convenient to use small tweezers. You can also use special soldering tables, pliers or various clamps to fix parts.
Parts that have already been tinned are connected to each other and fixed in the desired position. Then it is heated to a temperature at which the solder will melt and the solder is applied on the soldering iron tip or using a wire. The melting solder is distributed in an even layer over the entire connecting seam.
Then, with the joint of the parts being connected completely immobile, wait for it to cool completely. Do not wet the seam with water or blow it with a stream of air to make it cool faster. Next, you need to wash off the remaining flux, except for the neutral one, which does not need to be washed off.
What needs to be done to ensure that solder sticks to the soldering iron tip?
with a soldering iron you need to melt the rosin around the solder so that it sinks; under a layer of liquid hot rosin, touch the solder. It will immediately cover the entire working surface of the tip.
Interesting materials:
How to delete your profile from blah blah car? How to permanently delete your profile from the site? How to delete your question in Brainly? How to delete your history in Odnoklassniki? How to remove your mark on a photo in Odnoklassniki? How to remove your mark in Odnoklassniki? How to delete your old Odnoklassniki page? How to delete your page in contact and then restore it? How to delete your Odnoklassniki page if you don’t remember your password? How to delete your VK page in the application?