How to make a wax press with your own hands - drawings, video
Amateur beekeepers often make wax presses with their own hands. Wax, which is purified in industrial and home conditions, has high performance qualities, and varies in the number of the purest product at the very end.
What is a wax press and what is it used for? A self-made wax press is a very reliable and economical mechanism. A wax press can be called a device for separating wax mass from frames.
The device makes it possible to obtain a pure substance, almost without impurities, by separating and compressing solid raw material residues. The operating principle of all wax presses is the same.
Voskopress
Good day, dear subscribers of my blog.
I am glad to meet you again. Today I want to discuss with you a homemade wax press - a device designed for extracting wax from honeycombs.
It, as you may have guessed, can be done with your own hands. To do this, you will need basic skills and simple plumbing tools. A drawing of a homemade wax press can be found on the Internet, as well as video tutorials on how to make it.
If you don’t want to bother or are limited in time, then wax press, both new and used in Russia, can be bought in a specialized beekeeping store or on trading pages on the World Wide Web.
Voskopress is necessary for all self-respecting beekeepers. It allows you to easily separate the wax from the frames, obtaining a pure substance, almost completely free of foreign impurities, suitable for further use, by pressing the solid residues of the honeycomb after honey collection.
Barbecue from a gas cylinder
Not everyone needs a large barbecue, which is difficult to carry alone and takes up a certain place on the site. You will also need additional material to make powerful legs.
Therefore, many people opt for small grills or barbecues. You can easily throw them into the trunk and take them with you during outings. Some even make camp stoves.
A barbecue can be either the simplest or the one with “troubles” - for example, made in the form of some kind of decorative element to decorate a summer cottage.
Of course, in the second case, a lot will depend on the imagination of the master himself. But we are happy to share with you an original idea. For example, from a 27 liter gas cylinder you can make a barbecue grill in the shape of a bus with your own hands.
Yes, you will have to tinker a little, but the end result will be worth all your effort. With such a grill, the process of cooking meat on coals will give you real pleasure.
But if you don’t have the desire and time to bother so much, then you can make the simplest portable barbecue grill.
Moreover, in this case it is allowed to use both a propane and freon cylinder as a basis.
But again, the thickness of the metal wall of the container is of no small importance
A homemade country barbecue made from a refrigerant cylinder (freon), with frequent and intensive use, will last less than if you use a thick-walled propane cylinder as a basis.
But if you are going to use a barbecue grill made from a freon cylinder not often, then this option is quite suitable.
The main advantage is that there are no explosive substances in the refrigerant containers, and they can be safely cut with a grinder without first filling them with water.
The grill itself is easy to make. First, cut the container into two halves. We use one of them as a basis. We weld folding legs to the lower part (bottom).
Then, inside the cylinder itself, we weld a folding grill, which can be easily transformed into a multi-tiered stand for skewers with meat.
What is a homemade wax press?
Modern beekeepers use homemade wax presses of various types, which we will talk about below, but now let’s look at the principle of operation of this device, which is important for any home apiary; it is identical for all models, regardless of their design and material of manufacture.
The remains of wax honeycomb on the used frames are heated to the required temperature, after which they are easily removed from the wire and sent to the pressing compartment, where the liquid component is expelled from them by centrifugation or under pressure, solid waste is removed, and clean wax is drained through a chute into a prepared container.
The full cycle spin time when using such a device takes 3 – 4 hours.
A homemade wax press allows you to obtain highly purified wax, and this is not its only advantage. Other strengths of this mechanism, without which not a single home apiary can do, include:
- Light weight and compact dimensions;
- Ease of use and care;
- Energy saving;
- Decent performance.
And, most importantly, this device can be made independently based on training videos that are available on the World Wide Web.
Industrial
This device is considered the most difficult to use and is only suitable for large production plants for wax extraction and foundation making. The main difference from all wax presses is the output wax tape.
This unit is a large hopper with an electric heater, which contains a special drum. The wax ribbon is removed from this drum at the exit. This industrial installation requires certain maintenance skills and a lot of material. All processes take place in vacuum tanks, so the separation of water and air in them helps to achieve the highest quality results. In this case, the width of the outgoing tape is regulated by special removable disks and attachments.
Types and models
You can easily make a manual bee wax press with a productivity of up to 2 kg of pure wax in one cycle:
- From a jack;
- From a gas cylinder;
- From a metal can;
- From a washing machine drum.
We are talking about the Lisitsa wax press, popular among amateur beekeepers, which is actively used in home apiaries, the main structural element of which is a gas cylinder.
A worthy alternative to it could be the Kulakov wax press - something between a manual and an industrial mechanism
. In one working cycle it will produce up to 8 kg of pure wax. Regardless of which version of the wax press you choose, whether you make it yourself or buy a ready-made one at a beekeeping store, this device will be useful in your home apiary.
That's it for all my friends! Subscribe to my blog, and if you liked the article, don’t forget to like it so that your fellow beekeepers can read it.
Required Tools
What does it take to make a press from a jack? Its assembly is not difficult at all. The main thing is to ensure that all the necessary tools are available in advance.
Required:
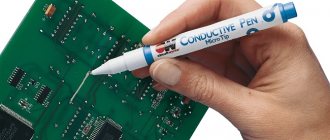
- Inverter device.
- Lots of electrodes.
- Grinding machine.
- Hammer.
- Grinder or metal saw.
The materials you need to purchase are steel profiles. As for the jack, the best option would be a bottle model - it is more durable than others. Although other types of car jacks are quite suitable.
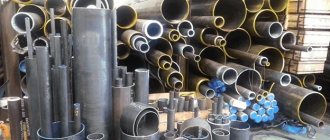
Tools and materials
- Iron pipe with an internal diameter of 25 cm and a height of 70-80 cm.
- Metal disk for the bottom, 20 cm in diameter.
- A thicker metal disc for a press with a diameter of 20 cm.
- Hairpin with ribbon thread 80 cm long.
- A table without a lid, 60-70 cm high.
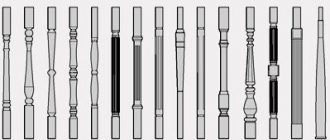
- 3 metal rods, 2 of equal length approximately 15 cm, the third approximately 20 cm.
- Wooden sticks with a section of 3 cm by 2.5 cm (WxH). The length of the bar will correspond to the height of the pipe, that is, approximately 70-80 cm.
- A thin metal bar, 30 cm long.
- Metal rocker 30 cm long.
- Wooden disk, 18–19 cm in diameter. Used already during the practical use of the wax press.
- Bucket and burlap.
Tools and materials
To make a wax press yourself, you will need:
- Iron pipe, height (70-80 cm), diameter 25 cm.
- Round sheet of metal for the bottom, 20 cm in diameter.
- The thicker metal disk that will be used for the press is also 20 cm in diameter.
- 80 cm hairpin with tape thread.
- A table without a lid, the height of which is 60-70 cm.
- Three rods made of metal or steel (2 x 15 cm, one – 20 cm).
- Wooden blocks with a cross section of 3x2.5 cm and a length of 70-80 cm.
- A thin metal bar, 30 cm long.
- 30 cm metal rocker.
- Wooden disk, 18-19 cm in diameter.
- Sackcloth.
- Basin or bucket.
Step-by-step instruction
- We place wooden blocks along the inside of the pipe at a distance of 1.5–2 cm from each other. We fix them firmly inside. As a result, the diameter of the pipe becomes 20 cm (from one bar to another).
- We will make the bottom from a metal disk. We weld an iron block about 30 cm long to the disk. Then, by welding the edges of this iron block to the lower edge of the pipe, we get the bottom. So, there remains a hole between the edge of the pipe and the edge of the metal disk. Everything will be squeezed out through it and go into the bucket. The details of fastening are in the video below.
- We weld iron rods on the sides of the pipe on top. The edge of the rod should be slightly higher than the edge of the pipe. We do this procedure so that in the future it will be easy to “hang” the rocker arm on them.
- We place two thin iron bars parallel to each other on a table without a lid. We place the pipe vertically between them and fix it tightly. You can additionally take iron corners to secure the pipe in a circle. As a result, part of the pipe must be below the level of the table top. To better understand the described instructions, we suggest watching the following video, which clearly shows all the clarifications and nuances.
- We make the design of the press itself. We weld the metal disk for the press to a stud with a tape thread. They should be placed perpendicular to each other. The pin is in the center of the disc. Next, screw the rocker arm onto the stud. We fix the metal rod on top (from the other edge of the hairpin), parallel to the disk (which is already placed on the lower edge of the hairpin). This will be our so-called handbrake.
- We place a bucket for the final product under the table.
- Place burlap on the inside of the pipe.
Step-by-step instruction
The scheme for assembling this version of the wax press is as follows:
- Wooden blocks are placed from the inside of the pipe, so that the distance between them is 1.5 - 2 cm. They must be fixed from the inside. After this, the diameter of the pipe from block to block should be 20 cm.
- The bottom of the structure will be made of a metal disk. It is necessary to weld a metal block about 30 cm long to it. After welding the edges of this block to the bottom of the pipe, we will get the bottom. Through the remaining hole at the bottom, the wax will be poured into the container located below.
- Iron rods are welded on the sides of the pipe. With the help of these rods, the device can be hung on a rocker.
- Iron bars (thin) are placed on the table parallel to each other. Vertically, we place a pipe between them and secure it.
- Now you can start assembling the wax press itself. A strip-threaded stud is welded to a metal disk. These parts must be placed parallel to each other, the pin should be in the center of the disk. Now we screw the rocker arm to the stud, and attach a metal rod parallel to the already attached disk to the opposite edge of the stud. It turned out to be a handbrake.
- At the bottom we place a container in the form of a bucket or basin, and place burlap inside the structure.
Making the base
The first point in any instructions for making a press is creating the base. It is assigned the role of support, so it must withstand the load of the unit.
The strength characteristics of the platform are the guarantee that the device will be of high quality. Its width must correspond to the dimensions of the objects that you want to process.
And yet, it cannot exceed the sum of all dimensions of the device. The installation height should be selected depending on the size of your jack.
- The car jack must be attached to the base of the press so that the elements rest against the steel frame, and a work table must be installed on top. The latter will move thanks to the frame.
You can give the unit the necessary properties of rigidity and strength by reinforcing it with profiles. Instead, it is permissible to use sheets of metal, having previously bent them into a corner and welded them.
To make the equipment more stable, you need to attach an additional metal plate 20*25 cm with a thickness of 0.8-1.2 cm to it. Then you will need to install a pair of springs on both sides of the jack. They must connect the work table to the bed.
Creating the thrust part
For it we take the same profiles as for the racks. You will need to cut two pieces, the length of each of them must be equal to the width of the platform. We weld them and connect them to the support.
Next, we weld a couple of corners 300-500 mm long. We weld everything together and fasten it in its place. The elements must be connected at right angles. It is important.
Advantages of a removable stop
The removable stop allows you to transfer the direction to the component as it moves along the guide.
To make it, purchase sections of profiles 10 mm thick and slightly shorter than the distance between the posts. All you have to do is weld the stop to the two posts.
Homemade press from a jack is a reality. To create it you will need skills in working with a welding machine and desire.
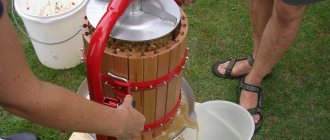
How to use?
First you need to boil the dry product - turn it into a liquid mixture. Next, we pour this liquid form of raw material into a device lined with burlap. At this stage, the wax is already beginning to flow into the bucket. After pouring the product into the pipe, cover the raw material with the edges of the burlap, and then press it down with a wooden disk with a diameter of approximately 18–19 cm. We do this so that later in the process we do not stain the oppression parts with wax.
We install the bend on the side rods and turn the handle. The wax is poured under pressure into a bucket from the ducts between the wooden beams inside the pipe. To better understand the entire operation of the constructed device, according to the instructions described above, we suggest watching the video.
The process of creating a wax press with your own hands
Every professional beekeeper must know such a device as a wax press, since thanks to it you can squeeze wax out of bee honeycombs. This equipment is very easy to use. It is an important element in the apiary; with its help, products are processed that can be successfully sold. Wax presses vary in strength, pressure, parameters, and additional functions.
General information
Raw materials should be brought to the required temperature level
Hot wax in a special bag is placed in a pressing compartment, where, under the influence of pressure or even by centrifugation, they try to expel the liquid raw material fraction. Wax in its pure form should be drained through a special chute or even through created holes into a pre-designated container. The remaining solid waste will be removed. All elements of the mechanism should be thoroughly washed and dried.
Please note that care must be taken when working with hot materials as wax is a flammable substance
Compound
A homemade device is an economical way to obtain a substance of sufficient purity. The operating time of all kinds of wax presses is almost the same. Full 1 cycle of push-ups takes from 3 to 4 hours. However, the quantity of processed products differs:
Specifics of manual wax press
The manual wax press is quite easy to use. The characteristic difference is compactness. The shape is conical and tapered, and the height does not exceed 43 centimeters.
A manual wax press consists of the following parts:
- pressed gratings;
- wooden frame;
- pressure screw;
- iron mortar.
The conical iron body includes 5 socket frames. A wax press like this continuously processes bee honeycombs without much time investment. Due to the fact that the iron part is made of steel, there is excellent susceptibility to high temperatures. The pressing screw has a specific shape, thanks to which it is possible to obtain a sufficient amount of beekeeping product.
Let's consider the typology of pressing equipment for an apiary:
- Manual apiary wax press is a barrel (usually made of aluminum or stainless steel), in the middle of which there are meshes, they move in the mortar under the influence of a pressure screw, which in turn is driven by a handle, which is turned by the beekeeper.
- The Kulakov apparatus (VPK 1) is a rather complex mechanism; it is compared with industrial ones, because it is almost impossible to assemble the unit at home. It consists of a metal reservoir (dimensions vary), a separator that is electrically operated, a grid and a pressure lever.
- Factory or industrial - can be found exclusively in enterprises with high product turnover. They are a room-sized installation with a tank into which honeycombs are thrown in large quantities without processing, the firebox is heated by electricity, and the output is a cast or pressed wax tape, the width of which is adjusted by equipment settings.
Operating principle of a manual wax grinder
The apiary wax press works as follows:
- It is necessary to melt the appropriate raw materials in a special container. Take a special bag and place 2 kilograms of beeswax in it. Before doing this, place the pressing grid at the bottom of the bag, then pour water into the mortar. It should be remembered that the water level should not exceed the height of the wax bag. Heat the mortar over the fire until the contents boil thoroughly. After twenty minutes you will get a homogeneous structure.
- The next step is the pressing procedure. The mortar is removed from the heat and placed under the appropriate screw intended for pressing. A special grid is placed on top, a screw is attached, and then the bag containing the raw materials is pressed with all force. At this moment, you can notice the appearance of wax in the water in the mortar. The water is drained into a separate vessel, and the process continues further. It is important to note that the wax remains in a liquid state, so hot water is periodically added and the mortar is heated on the stove. Manipulations are performed until the wax runs out.
Advantages of a manual wax grinder:
- efficiency;
- compactness and lightness;
- high performance.
How to use
Before using the wax press, the dry product must be boiled to a liquid consistency. Afterwards, the resulting mixture is poured into a machine with burlap. Almost immediately, the wax begins to gradually flow into the container installed below.
Now you need to cover the liquid product with the edges of the burlap and press it down with a wooden disk on top. This is done so that the oppression parts do not get dirty while working with wax. Now you need to install the bend on the side rods and turn the handle. The pressure applied causes the wax to flow into the bucket.
Having a wax press in your apiary is an excellent way to earn extra money, even for amateur beekeepers.
Characteristic features of Kulakov’s design
Kulakova's Voskopress is in demand and respected at many apiaries in various regions. A name such as VPK-1 is often found. This design meets all necessary requirements. Thanks to this design, the beekeeper does not have to spend extra time processing the wax, since it is produced clean. According to many beekeepers, Kulakov’s design is a real godsend for beekeeping.
Making such a design with your own hands is quite difficult. The total weight of the device is 12 kg. Capacity – 45 liters of liquid wax. As for the manual wax grinder, its performance is much lower. The kit should include a corresponding heater responsible for heating, which occurs automatically.
Why do you need a receiver in a compressor?
In this case, a gas cylinder is used as a receiver. This element can be called quite important, since it provides certain operational characteristics of the device. The tasks that the receiver solves are the following:
- The differences in flow that occur when the unit is turned on and off are equalized.
- Used as a storage tank for storing compressed air. This ensures an uninterrupted gas supply and reduces the required number of on and off cycles.
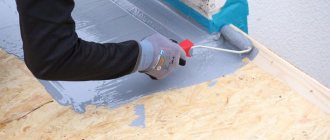
- Reduces the likelihood of condensation. Water that enters the system can cause significant deterioration in performance. An example is that the applied paint coating deteriorates significantly. A special filter can be installed to separate water.
The gas cylinder is made in most cases from a material with low corrosion resistance, which is why the surface is protected with paint.
The principle of operation of the Kulakov wax press
The device is much more effective than the manual version, as it works as follows:
- water is poured into a metal tank, which heats up on its own to 90 degrees;
- The wax must be thoroughly crushed to be placed in a linen bag located in the separator. The advantage of this design is that you do not need to adjust and control the temperature, it is set automatically;
- a sieve is installed;
- a push mechanism is used;
- the separator must be placed at the bottom of the tank; by that time the raw material becomes hot and molten. Pour in a small amount of water to boil for 30 minutes;
- When a characteristic film appears on the surface of the water, you can proceed to the next step.
It is important! The pressing process in such a device is quite long. It continues for forty-five minutes. As a result, the beekeeper receives very high quality and pure wax.
- excellent and high performance;
- excellent quality of finished products;
- automatic operation;
- industrial production.
As for the use of Kulakov’s wax extraction, this process is complex and problematic. It is best used in special enterprises involved in the production of foundation and wax.
Devices for straining wax
To strain out the wax, the easiest way is to use a wooden box, to which, instead of the bottom, a metal mesh with cells measuring 2X2 or 3X3 mm is nailed. Two bars are attached to the sides of the box, protruding beyond its edges, with the help of which the box is suspended on the edges of the sump. An ordinary wooden tub can serve as a sump. It is recommended to place a thin piece of burlap on the mesh, and pour the boiled raw materials onto it in portions. Burlap provides better wax release. In this case, the raw materials must be mixed with a wooden stick, washed several times with boiling water and lightly squeezed.
The simplest way to strain wax from boiled raw materials:
1—raw materials; 2—wax; 3—water.
Sterilizer. It serves to disinfect (sterilize) wax obtained from foulbrood bee colonies by boiling it at 120°. The most acceptable sterilizer in apiary conditions is the Shishkin design, which is a tank with double walls, between which some mineral oil (for example, autol) is poured. Wax is loaded into the internal tank (made of aluminum). Then, when heated on the stove, the temperature in it is brought to 120° and the wax is kept for 30 minutes, after which it is drained through the bottom tap into the wax sump. The diameter of the internal tank is 340 mm, height 525 mm. The sterilizer is also used to evaporate water from wax and remove foreign impurities from it.
Wax sterilizer: 1 - internal boiler; 2 - external boiler; z—autol; 4—grid; S—sediment; c - firebox; g - melted wax.
To disinfect wax and other purposes, many beekeepers use a sterilizer of a simpler design. A cauldron is placed in a small brick oven. Another one of the same shape, but smaller in aluminum, is inserted into it. Autol or other mineral oil is poured into the space between them. The wax is placed on top of the inner cauldron. It is better to provide the latter with a tap for draining sterilized wax. In order to clean the wax from mechanical impurities, a metal grate is installed in the internal boiler.
Homemade wax press
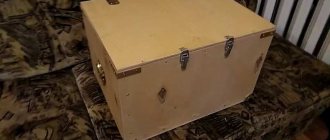
Every beekeeper can make a wax press. This design can be made with your own hands using special drawings. For production, improvised means are suitable, for example, parts of a washing machine.
You will need housings that belong to two washing machines. If desired, you can also use the lid, since it is aluminum. You need to cut off the bottom part of one washing device. The curved bottom should not come into contact with the floor. The lower machine must be sealed, so you need to get rid of the impeller. Using stainless steel, it is worth welding the resulting hole, since the resulting vessel will stand on the stove. The liquid will boil in it.
The second machine is completely disassembled, leaving the lid and the upper stainless cylinder. To strengthen the upper part of the device, you can use stainless thirty-centimeter pipes. They need to be welded crosswise and the screw attached vertically. The pipes will play the role of amplifiers. One part of the machine is installed on another. Thanks to the wax press, you can get additional profit from your apiary. In addition, this device saves time and money.
If you are a novice beekeeper, then you will find an interesting topic about creating a wax melter with your own hands at home.
Blueprints
Before starting work on creating a hydraulic press, it is strongly recommended to draw up a drawing. The dimensions of all parts of the structure must completely coincide, otherwise the first time you use the unit, the structure will move to the side.
Photos of hydraulic press drawings can be easily found on the Internet.
Step-by-step instructions for creating your own hydraulic pressing equipment.
One of the main actions associated with making a hydraulic press with your own hands is preparing the frame. It has the name “bed” and it is inside it that the future press will be located. Its strength must have some reserve, since the pressure inside the frame is carried out in both directions (up and down), so there is a possibility that the frame will break.
The first thing you need to do is cut all the main parts of the structure according to the drawing data. You need to drill holes in the structure. Next, a special plate is installed by welding.
The next step is to assemble the model. Mounting the jack into the structure is the last stage of constructing the structure.
To design a more reliable system, it is recommended to use a channel and mounting angles, and for more stable operation of the press, you can add a portable support beam.
Thus, creating a press yourself is an exciting activity that will not only allow you to save on the purchase of new equipment, but also adjust such parameters as the dimensions and power of the tool to your own needs.
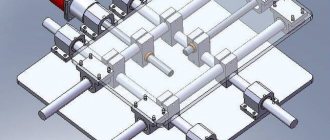
Types of equipment, their design and principle of operation
There are three main types of wax press: manual, Kulakov, industrial (factory). They have the same purpose, but the dimensions and design are different:
- Handmade design . This device has the simplest design. This is a 43cm cylindrical container that holds 5 frames from a slot. The design is equipped with an iron mortar with gratings, a special pressure screw and a wooden support. A manual wax press works simply: the raw material is heated in water, turns into a liquid state and is squeezed out.
- Voskopress Kulakova . This design is represented by an electric tank with a water heating element and a drain tap, a separator, an upper and lower sieve, a power drive and a filter bag (usually made of flax). The principle of operation of the Kulakov wax press is similar to manual equipment, but the process is automated - the water is heated by a heating element, which also maintains the temperature in the future. You can download the patent describing Kulakov’s design at this link.
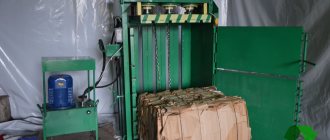
- Industrial (factory) type wax press . This type of equipment is the most complex. It is used by large production-scale enterprises, but in small apiaries its use is unjustified. A special feature of this type of device is the type of output product - wax tape. The design of the equipment consists of a large-sized hopper with an electric heater and a special drum from which the wax tape is removed. Vacuum tanks, special attachments and discs for varying wax strip widths are also provided. This installation is used for large volumes of raw materials and requires special operating and maintenance skills.
Modern industrial wax press
The quantity and quality of the raw materials obtained depends on the type of equipment used. With a manual type of construction, processing 2 kg of honeycomb will take 3-4 hours. During the same time, Kulakova’s Voskopress will process twice as much raw material, and industrial equipment processes 5 kg of raw material per hour.
A factory wax press cannot be assembled and used in a regular apiary, and for Kulakov’s device, voltage stability is important - its fluctuations shorten the service life of the equipment.
Instructions for use
Features of using a wax press depend on its type. The manual device is used according to the following algorithm:
- Place a grate on the bottom of the mortar.
- Place a bag of 2 kg of honeycomb in a mortar.
- Pour in water – the entire bag should be filled.
- Place the structure on the fire, keep the boiled raw materials on the fire for another 15 minutes until the mass becomes homogeneous and mushy.
- Remove the mortar from the heat, install the pressing grid and screw.
- Press on the raw material bag, pour the wax that floats to the surface into a container.
- Add hot water and heat the mortar - this is necessary for the wax to become liquid.
When using a manual wax press, you must always act according to the same algorithm. When the wax no longer floats to the surface, the process is complete.
Kulakov's wax press should be used as follows:
- Place the structure on a flat surface.
- Pour hot water into the tank – fill it halfway (at least 30 l).
- Turn on the heater.
- Insert the bag into the separator.
- Grind the raw materials by hand, place them in a bag in layers of 3 cm, each lined with drainage material.
- Close the filled bag by pressing it with the upper sieve.
- Install the separator in a tank of water.
- Boil the raw materials for at least 2 hours.
- Install the power mechanism, use the lever to set the rod to spin mode - the process lasts at least an hour, the frequency of the efforts slowly increases.
- Open the tap at the top of the tank, placing a clean container in advance - the squeezed wax will drain here.
Watch the video instructions for using the Kulakov wax press:
When working with the Kulakov wax press, the amount of raw material directly depends on the spin time. To speed up the process, add hot water (90 degrees) and pre-boil the raw materials for at least 2 hours.
Regardless of the type of wax press used, the final stage in working with it is cleaning the device. After thorough cleaning, all equipment is completely dried. Ignoring this measure will shorten the life of the device.
Voskopress – equipment for obtaining wax. It can be manual or automated, you can buy it ready-made or make it yourself. Wax presses are designed quite simply. The quality of the output product and the speed of its production depend on the type of equipment used.
0
0
Copy link
Advantages of the military-industrial complex
A huge advantage of this device is that all processes performed by it are automated. This makes the work easier and allows you to easily obtain finished raw materials. Also, the Kulakov wax press has a large capacity, so in a short period of time you can get a large amount of finished high-quality product. Therefore, high performance, as you already understand, is another advantage of the device.
You can buy the Kulakov VPK wax press at an affordable price in various online stores or by calling direct suppliers.
Stationary barbecues
A stationary barbecue is made in different ways, although such differences are not significant.
First option: minimum welding
This option can be implemented if there is a sheet of metal on which the entire pattern can be placed, both the bottom and the walls. Excess elements are cut out using a grinder, after which the bends are also cut to a small depth with a grinder to make bending easier.
We start everything by drawing dimensions on a sheet of metal, then cutting out the extra corners
After the sides have appeared in the grill, they should be secured using electric welding, using a welding machine of any design. Even a novice welder can handle this job, since no sealing is required. Even if some kind of hole appears, it will only be beneficial: oxygen will flow to the combustion site. By welding the seams in 4 corners, you get a kind of box.
Bend the workpiece, then weld the seams
If too thin metal is used, about one and a half millimeters, then the bottom and walls may warp under the influence of high temperature. To prevent this from happening, the structure is reinforced with corners or a profile pipe.
All that remains is to weld the legs using corners or pipe sections. In the photo you can see how pipe legs are welded to a metal grill. The collapsible barbecue is assembled according to the same scheme, but it is necessary to accurately select the dimensions of the pipes so that the connection is tight and reliable
This is very important, since an unstable structure will not improve the process of preparing barbecue outdoors
How to attach pipe legs to the bottom of a metal grill
Corner legs are a simpler option, especially for a stationary structure. They are simply welded in the corners of the box, especially since they fit perfectly together. The same can be said about the profile pipe. By the way, it is easier to use a profile pipe in a collapsible barbecue, since it is more technologically advanced compared to an ordinary pipe.
As legs for the barbecue, you can use an iron corner or a small-section profile pipe
Second option: using welding
If you have pieces of metal, you can make a grill only using electric welding. All pieces of metal are adjusted to certain sizes, cutting off the excess with a grinder. This option requires higher quality welding, since the entire structure will be held together by welding seams.
The second way to make a metal grill with your own hands is to cut all the necessary parts for the box and then weld
The manufacturing sequence is the same, therefore, after welding the box, they begin to attach the legs, also by welding, if the structure is not collapsible.
DIY barbecue with removable legs
Watch this video on YouTube
Third option: using a frame made of corners
When making such a structure, the sequence of making the barbecue is somewhat different, since first of all, a frame from corners (pictured on the left) or a frame from a profile pipe (pictured on the right) is welded. This design is more durable. The manufacturing sequence is as follows:
- The frame is welded.
- The bottom is welded, and then the walls.
If the structure of the barbecue is stationary, then it can (even should) be supplemented with a frame in the form of a tabletop, where you can place skewers and more. The photo below shows just such options. To do this, it is enough to strengthen the upper edge of the fryer using a profile pipe. As a result, there are holes along the edges of the roasting pan into which you can insert additional elements, in the form of a grid for skewers or in the form of a solid stand, on the other side, on which you can install a frying pan, saucepan, etc.
Homemade metal grill with options: table and stand for skewers
There is an option for a more substantial design, which includes not only a grill, but also a cover, a rack for skewers and a tabletop. This option looks great. The advantage of the design is that it can be welded by a novice welder. Alternatively, you can practice welding technology on such a structure. Excellent, both the idea and the execution.
Homemade barbecue under a canopy with a “kitchen” corner
There is another simple option - making a barbecue from a gas cylinder.
DIY barbecue from a cylinder in 2 hours! DIY idea!
Watch this video on YouTube