1 / 1
The availability of inexpensive, lightweight and high-quality welding machines on sale has become the reason that welding work is now carried out independently by many home craftsmen. Unlike factory conditions, home craftsmen cannot afford a lot of complex universal equipment. And there is often nowhere to find extra hands (in the sense of an assistant).
Why do you need a magnetic angle for welding?
A good, proven clamp cannot be considered a universal equipment, and it requires a lot of time and effort to use. There was an urgent need to create something very convenient, universal and not expensive. It would be even better if you could do it yourself. The solution to the problem was a magnetic corner (square) for welding.
The vast majority of welded structures require strict adherence to angles between the elements being connected. Previously, this was achieved by using simple devices in the form of a vice, clamps and even special equipment. The emergence of a large number of holders based on permanent magnets has greatly simplified this process. Having a set of such equipment in your arsenal, you can assemble structures of any complexity yourself without resorting to outside help.
Of course, there are many similar products made industrially, but welders know how to handle metal and try to make homemade devices. Which option is preferable? You will find the answer to this question in this article.
Benefits of using squares
- Freedom of maneuver. Since the parts to be joined are held securely together by the squares, the master welder can work in more comfortable conditions, with sufficient freedom of action.
- Magnetic corners allow you to do without outside help. First, the parts are connected together and held with squares, then the welder can safely apply seams to the joints.
- The corners will hold the parts strictly at a certain angle and will not allow them to move away from each other. This makes the seam much neater and more precise. If the work requires high precision, and the permissible error is small, then using squares becomes simply necessary!
- If you need to perform standard operations many times, the square will allow you to get a big gain in time, and therefore increase labor productivity.
- A magnetic square
is a universal tool. It can be used not only for welding work. Reliably holding the workpiece in a given position is important when processing metal, for example when cutting, marking or drilling holes. This means that such a tool can also be used in a locksmith workshop. - If the parts being welded have a non-standard configuration with a large number of edges or corners, then it may be almost impossible to keep them in the desired position. Squares can be of great help in such a situation.
Types of magnetic corners
To fully understand the issue, it is necessary to distinguish between two fundamental types of magnetic corners used in welding: corner (permanent) and switchable.
Corner magnetic holders are the most widely used. Their main advantages are ease of use and low cost. They are produced by industry to hold metal structural elements of various sizes and at various angles. Of course, it is necessary to understand that the corner cannot support a beam weighing 1000 kg. Basically, we are talking about kilograms and tens of kilograms, which is more than enough. The number of angles offered is six, which is also more than enough.
Switchable corners are several times more expensive, but they are also the most versatile and convenient to use. The essence of this product is that the magnetic field can be turned off at the user's request. Physically, this is done with one movement of the hand, moving the rotary lever from one position to another. The work becomes faster and more comfortable; no effort is required to remove the corner from the structure. Prices and the full range of magnetic angles can be viewed in the catalog of the KEDR manufacturer’s website.
To decide which type to give preference, one should proceed from the following considerations:
- how often do you weld metal structures;
- How critical is labor productivity to you?
- Are you willing to pay for comfort or are you willing to endure inconvenience?
Review of professional magnetic squares from Smart&Solid
Smart&Solid magnetic clamps have become very popular among professional welders. Let's look at the advantages of some models.
- Magnetic square Smart&Solid
MAG 605/606 is a reliable professional square with a switchable magnet. The square can withstand up to 13 kg of pull-off force. The powerful magnet disengages with one click, making it easy to install and remove the clamp, as well as clean out debris. The 605 and 606 series have the same shape and size. Only the power of the magnet is different. Clamps of this series are well suited for welding and metalworking manipulations of medium complexity. They allow you to work with angles, pipes, and sheet metal. The price fluctuates around 1,700 rubles.
- MAG 601/602/603 – a series of non-switchable angles. Magnets of this series can withstand pull-out forces from 11 to 34 kg. Angles 45°, 90°, 135°.
- MAG 613/614/615 series – permanent ferrite clamps. The hexagonal shape of the square provides six fixed installation angles. The most powerful square in the series guarantees reliable fixation with a pull-out force from 11 to 34 kg. Angles 30°, 45°, 60°, 75°, 90°, 135°. The cost of magnetic clamps of this series is about 800 rubles.
Required materials and tools
List of tools for making a magnetic square:
- Bulgarian;
- drilling machine;
- drill;
- clamps, vices;
- calipers;
- ruler, square.
This is the maximum list of tools. If necessary, you can get by with a much smaller set. If you don’t have a grinder, you can cut out blanks from a two-millimeter sheet with a chisel. Drill all the holes with a drill, and the accuracy of a caliper may be excessive. In general, each master himself can choose a tool from among the available ones.
We offer a set of materials necessary for the manufacture of a magnetic square. It is not difficult to guess that this list is very arbitrary, and, in the absence of specific material, it can be replaced with a similar one.
Materials:
- ring magnet;
- steel rod Ф24 mm;
- steel sheet 2 mm thick;
- steel tube Ф15 mm;
- bolts, nuts, washers M6.
Ring magnets are most often obtained from powerful Soviet speakers. Although they are keeping silent about where to get these speakers. This can become a problem, especially if you need not one square, but two or three. In this case, powerful neodymium magnets, which can be found on the market, can help out.
How to assemble a magnetic corner for welding with your own hands? : 1 comment
Your site is useful, a lot of interesting and useful information. Thank you for your work.
Comfort and convenience in any work have never bothered anyone. This also applies to welding. Among the welding tools, there are basic ones and there are auxiliary ones. These include the smallest auxiliary part in size - a wonderful magnetic corner, or, more correctly, a magnetic angle for welding.
Such corners are extremely useful for both artisans and professionals working on stream. Small in size but not in function, these special welding triangles improve the quality of products in general and welds in particular.
Manufacturing process and order
In accordance with the drawing, we mark the parts. We cut out the triangles with a grinder, and cut off three bushings from a steel tube with a hacksaw. For precision drilling, we drill two workpieces at the same time, having previously tightened them with clamps. We got a magnet with a hole in the center, so we attach it using a cylinder of the appropriate diameter, cut from a round piece of wood. We clean the resulting parts, paint them and begin assembling them.
Assembly
Assembling the finished product is not particularly difficult and does not require a detailed description. Briefly, the process goes like this:
- We insert bolts into three corner and one central holes.
- We put bushings on the bolts coming out of the corners of the triangle, and put a cylinder on the bolt in the center (if you didn’t forget to drill a hole in it).
- We put the magnet on the cylinder.
- We place the second triangle on the four bolts and secure the structure with nuts, having previously placed washers under them.
Assembly is complete, the product is ready for use.
Criterias of choice
The use of correctly selected magnetic clamps for welding work reduces the time for assembling and adjusting the structure to the corners with high precision. You should analyze the type of work in advance and decide on the devices that are most needed.
When choosing welding magnets, the technical characteristics of the devices are taken into account:
- power;
- weight;
- number of corners;
- size between outer plates.
Depending on the amount of work, non-switchable ones are chosen for home welding. If there is a small number of parts to be welded, there is no point in purchasing expensive magnets for welding in order to quickly turn them off.
The power depends on the weight of the structure; it is indicated in kg of the part that the device can hold in any position.
A high-quality square has a durable body that does not deform during work. It holds the weight specified in the passport with magnets and does not react to the welding arc located nearby.
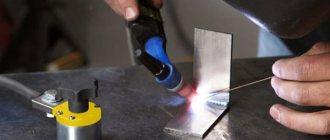
Do-it-yourself switchable magnet - Metals, equipment, instructions
When welding small metal parts, it can be difficult to keep them stationary. To fix the elements in this case, the welder most often has to resort to the use of additional mechanisms and devices so that the parts do not move during welding.
The use of vices and clamps allows them to cope with this task perfectly, but the main disadvantage of such products is the need to carry out a large number of additional movements to install the part in a static position. And also the inability to fix parts at a certain angle.
A magnetic holder for welding does not have such disadvantages, so if you often have to weld parts in this way, it is recommended to purchase or make this device yourself.
Types of magnetic holders for welding
When performing welding work, magnetic devices of the following designs are most often used.
Angular: permanent
The advantage of this model of angles is the ability to quickly fix the parts to be welded in 6 positions. The device consists of 2 plates with a powerful magnet located between them.
If you often have to weld parts at different angles, it is recommended to purchase an adjustable holder.
A design with fixed angles will be much cheaper, but such a device should be purchased when the main part of the welding work involves fixing elements in the most frequently used position.
Disabled
The switchable magnetic welding holder is a device in which the magnetic field can be neutralized using a rotating lever.
Such devices cost several times more than a regular angle, but thanks to the shut-off function, using the product is easier and more comfortable.
Also, switchable models can be easily cleaned of metal shavings and other small parts.
Which type of welding holder to choose depends on many circumstances. If the corner is needed for frequent use, it is recommended to purchase a switchable model with a tearing force of at least 20 kg.
Main selection criteria
If a magnetic holder is needed for professional use, then it is difficult for a beginner to understand the models on the market.
Below are the main criteria for selecting such a device, taking into account many factors.
- Purchasing a low-quality product will complicate the performance of welding operations at a high level. The holders are exposed to high temperatures, which can lead to a significant decrease in the magnetization coefficient of poor products. When purchasing, you should inspect the product for mechanical damage. Even a small recess or unevenness of the tool at the point of contact with the fixed elements will not allow the work to be performed at the required angle.
- If you often have to weld parts at different angles, it is recommended to purchase an adjustable holder or a set of several triangles.
- Not the last selection criterion is the price. The cost of many Chinese-made models can be very attractive, but often such devices fail after the first use.
To purchase a high-quality magnetic holder, it is recommended to consider products made in Russia and Europe.
Homemade magnetic corner
If you don’t want or have the opportunity to purchase a fixing device in a store, you can make it yourself from scrap materials.
A magnetic holder for welding with your own hands can be made using the following materials:
- magnet from a powerful speaker;
- steel sheet 2.5 mm thick;
- heat-resistant glue for metal;
- rivets.
To carry out the work you will need the following tools:
A homemade magnetic holder for welding work is made in the following sequence:
- A triangular blank is marked on a metal sheet using a square and some sharp object.
- Using a grinder, the workpiece is cut strictly along the intended stripes.
- The cut blank is applied to a metal sheet and the sheet is marked again.
- An exact copy of the previous part is cut out.
- Both triangles are filed with a file so that their side planes are perfectly even and the parts are absolutely identical.
- The triangles are aligned with each other, clamped in a vice, and holes are made at their corners with a diameter equal to the thickness of the rivet used.
- A magnet from the speaker is placed between the two triangles, onto the plane of which glue is first applied.
- The square is placed in such a way that the holes of the plates are aligned and they are fixed together with rivets.
- Once the glue is completely dry, the product can be painted in any color using special heat-resistant enamel.
The assembled product will allow you to qualitatively fix a mass of up to 3 kg at a certain angle.
If a more powerful holder is required for welding work, then the device can be made according to the above diagram. Only use neodymium magnets from a computer hard drive as a magnetic material. In this case, you can get a free and high-quality device with increased power.
When making a homemade structure, using glue and rivets is the best option. If you use bolted connections, then over time the fastening will weaken due to vibration and high temperature.
Conclusion
Using magnetic angles for welding allows you to perform work more efficiently.
The cost of non-adjustable models with the ability to place workpieces in 3 positions will be about 500 rubles, so every welder can afford to purchase such a product. If you want to save money and improve your DIY skills, then the instructions provided will help you make a magnetic device with your own hands.
Clean Water Welding Gadgets
Here's how they do it:
- While the metal workpieces are precisely and securely fixed, you have more freedom in your actions. Your hands and your attention are concentrated only on the welding seam. Hence the increase in its quality.
- Using a magnetic welding angle, you can prepare and perform all welding work yourself, without outside help. That's labor savings for you. And you also don’t depend on anyone.
- The seam will be neat and precise thanks to the optimal and reliable installation of the workpieces using corners. If your work requires special precision, then the use of angles becomes not a recommendation, but a mandatory condition for welding.
- If you have a large amount of work, you cannot escape without fixing triangles: they will allow you to save your working time to a significant extent.
- It is easiest to weld workpieces of unusual or non-standard shapes using a welding angle with a magnet.
- With corners you can cook not only on horizontal surfaces, but also on vertical ones.
- These squares are useful not only for welding and soldering, but their ability to firmly hold parts is useful when cutting metals.
Magnets for welding
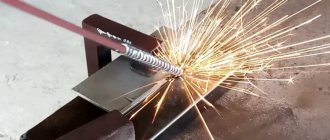
Welding is a fast and reliable way to create permanent connections between metal parts.
The process itself does not last long; it often takes a lot of time to correctly position the workpieces relative to each other. They must be fixed accurately and securely so that there is no displacement during the welding process. Many devices have been developed for this.
Magnetic fasteners - angles and holders are very quick to install and remove and save the welder a lot of time.
Magnets for welding
Types of fasteners and their purpose
In order for the weld to be strong and reliable, the workpieces to be welded must be fixed. For this purpose, there are many different types of equipment, universal and specialized. These include:
- switchable magnets for welding;
- screw clamps;
- screw spacers;
- magnetic corners.
Switchable magnets
In this type of equipment, it is possible to control the intensity of the magnetic field, turning it on and off. This effect is achieved by rotating one magnet inside the housing relative to the other so that their magnetic fields either mutually enhance or neutralize each other, and the field does not pass beyond the housing.
Switchable magnets are placed and removed from workpieces with one finger movement. Such devices are especially convenient when it is necessary to correct the position of workpieces.
Another advantage is that after turning off such a holder, all sawdust, trimmings, shavings and other small metal waste fall off it, making cleaning easier
Switchable magnet
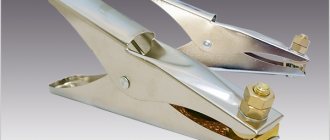
Clamps
The equipment is designed to reliably press the workpieces against each other.
Its outer part, made in the shape of a right (or other) angle with a cut out top, is the fixing part, and the inner part, equipped with a screw feed device, is a clamping device.
Essentially, this is a vice with jaws bent at an angle. The parts (profile or rod) are placed in a clamp and pressed against each other with a screw.
The dimensions and shape of the parts are limited by the size of the clamp. It can be used not only for welding, but for other plumbing work.
Clamp
Spacers
Spacers are used to create the required gap between the workpieces to be welded.
Home craftsmen choose for this purpose cutting pipes and profiles from a waste box, but it is much more convenient to use an industrial product. The spacer is also equipped with a screw and is a “reverse clamp”.
It can be adjusted to any required clearance within the screw stroke. Spacers and welding magnets are often used together.
Magnetic corners
One of the most commonly used devices is a corner. Its main advantages:
- Reduces the labor intensity of the welding process. The time for fixing workpieces is reduced several times.
- Parts can be fixed at almost any angle between them.
- The device is compact and does not interfere with welding work.
- The time for removing equipment is also reduced several times compared to clamps.
Magnetic corner
Magnetic corners are available with both fixed angles and freely variable angles. To do this, they are equipped with a hinged device with a lock.
Structurally, the equipment consists of two metal plates cut from sheet metal and permanent magnets fixed between them. The most popular are universal flat corners, reminiscent of a house with a cut off roof.
But there are also three-coordinate spatial clamps in the form of polyhedra or cylinders. They allow you to assemble very complex spatial structures, such as power line supports, spatial trusses, etc.
Purposes of use
The main goals pursued by the use of magnetic holders for welding work are the following:
- convenient and reliable fixation of workpieces;
- placing them in space in strict accordance with the product drawings;
- precise alignment of angles between parts;
- reducing the labor intensity of welding and improving its quality;
- replacement of obsolete screw clamps and clamps.
Magnetic corners for welding have a clamping force from 5 to 60 kg and are used with sheet metal and rolled profiles.
According to the degree of versatility, equipment is divided into two types:
- universal;
- corner magnets.
Universal equipment has one or more degrees of adjustment and allows you to work with workpieces of flat, cylindrical and multifaceted shapes, connecting them at arbitrary angles in several planes simultaneously. Such devices are indispensable when assembling complex spatial structures. They are given increased resistance to heat and splashes of molten metal.
These advantages of professional-grade equipment come at the price of a high price and limited availability in regular hardware stores.
The square is much simpler in design, easier to learn and allows you to cover most of the needs of the home craftsman.
Triangular Welding Magnets Hexagon Welding Magnets
Angles are available in three main forms:
- sagittal (“house”);
- triangular;
- hexagonal.
Arrow-shaped and triangular ones allow you to weld workpieces at angles of 45°, 90° and 135°. Hexagonal, in addition, support angles of 30°, 60°, 75°.
Using magnetic squares when working with simple structures saves even more time than using universal ones. The disadvantage of such devices, especially their budget models, is the low magnetic force.
Advantages of magnets
The main advantages of magnets compared to screw and wedge equipment are:
- Easy and quick rough assembly of the structure.
- Possibility of fixing parts at the most common angles of 45°, 90°, 135°. Advanced models of magnetic fasteners for welding will allow you to fasten workpieces at angles of 30°, 60°, 75°, and universal ones - at any angle.
- Saving time on preparatory operations several times.
- The fasteners are small in size and do not interfere with welding.
- Switchable welding magnets make it easier to install or remove.
- Easy to clean from shavings, sawdust and slag. (especially switchable ones).
The disadvantage compared to screw and wedge fastenings is their inapplicability to wood, plastic and other non-magnetic materials.
Criterias of choice
Before you start buying a magnet for welding, you should think about what specific operations you are going to use it for. In addition, the volume of this work and its frequency are important.
If you need to weld the frame of a fence or greenhouse once a year, or replace the trim of a trailer body for a walk-behind tractor, there is no point in buying a professional model with fixation at an arbitrary angle in three planes, but you can get by with a couple of squares.
If you are opening a business and the scope of welding for six months to a year is clear, then a professional device will pay for itself by increasing labor productivity.
There are also several general rules and recommendations for selection:
- The higher the class of equipment (and its price), the longer it will retain its working qualities, primarily its geometric dimensions and clamping force.
- High magnetic field power allows you to hold workpieces of greater mass or length. Mid-level models hold up to 35 kg.
- A larger number of angles will allow welding of a variety of structures.
Modern high-quality devices do not have a negative impact on the stability of the welding arc. Unfortunately, some cheap Chinese holders have this effect on welding quality and are best avoided.
Switchable magnets are several times more expensive than permanent ones. But they are also much more convenient.
It becomes possible to weld without an assistant. With them, it is possible to precisely adjust the position of parts with millimeter precision - just turn off the magnet for a second and move the workpiece.
It is also much easier to remove them from the finished product after welding. Another advantage is that when the magnet is turned off, all the iron debris stuck to it falls off on its own.
Whether such convenience and performance is worth the money requested is something everyone decides for themselves.
The quality of the switched-off magnet must be high. If it switches off spontaneously during welding, the structure may disintegrate into blanks and the work will have to be redone.
A simple DIY magnetic square
The magnetic square has a very simple structure and is quite accessible for self-production by a craftsman with metalworking skills. Usually they are made by hand in three cases:
- testing your strengths and abilities;
- There is no suitable size on sale;
- for welding non-standard products.
Do-it-yourself magnet for welding
For production you will need:
- sheet metal 2-3 millimeters thick;
- round magnet (from an old speaker);
- bushings made of non-magnetic material (plastic, hard rubber, etc.);
- nuts, countersunk head screws.
The manufacturing sequence is as follows:
- Draw the outlines of the holder on the sheet. You need to be especially careful and use only a high-quality and certified square and ruler for marking. The accuracy of the assembly of your future structures will depend on the accuracy of the angles when marking.
- Using a grinder or jigsaw, cut out the parts and align their edges.
- Cut the bushings to size. It is important that they are strictly the same in height and have smooth edges.
- Pick up a piece of elastic plastic and fix the magnet along its inner hole.
- Mark the places for fastening, drill the plates (preferably together).
- Assemble the product by putting the bushings on the screws and placing them and the magnet between the plates.
The clamping force of the product depends on the accuracy of the assembly and the magnetic properties of the metal; before welding, it will have to be determined experimentally.
Magnetic holder for DIY welding
This is another design option for a magnetic corner for DIY assembly. It will require:
- metal sheet 1-3 mm;
- neodymium magnets (so-called “screw magnets”);
- dry board;
- nuts, countersunk head screws, self-tapping screws.
Manufacturing of magnetic holders for welding
The manufacturing procedure is as follows:
- Mark and cut two identical blanks from the sheet, carefully monitoring the accuracy of the angles.
- Make the central part of the holder. Cut it out of the board so that it follows the contours of the metal plates, but recedes inward to the height of the magnets plus a millimeter to one and a half.
- Fasten the metal and wooden parts of the product together.
- Using self-tapping screws, screw the magnets to the wooden spacer around the perimeter so that they are at the same distance from each other.
Before starting work, you need to check the geometry of the resulting equipment - its angles and dimensions.
The cost of magnets for welding ranges from hundreds of rubles (household models made in China) to tens of thousands (switchable universal professional devices from well-known brands with the ability to work in many planes and arbitrarily set angles). But it is possible to make their analogue yourself:
- Cut two triangular-shaped plates from a sheet of metal (or in the shape of a house with a cut off roof). You need to carefully monitor the exact alignment of the angles.
- File the edges.
- The magnet can be used from faulty speakers or a microwave oven.
- Mark and drill through holes in the corners of the triangle and in its center.
- Using four screws and nuts and bushings equal in height to the magnet, fasten the structure so that the magnet is clamped in the center.
- To reduce contamination, plastic plugs can be placed along the end faces.
DIY switchable magnet
The shape of the magnet for welding may not be triangular. It is selected depending on the needs of the assembled welded structure.
, please select a piece of text and press Ctrl+Enter.