The arrangement of suburban areas near private houses is not complete without the construction of reliable and beautiful fences, and such structures must necessarily have gates. Even if the owner does not yet have a personal car, the gate will allow guests’ cars to enter and various goods to be delivered to the site by truck.
There is no need to rush to make a final decision; carefully read the maximum number of different options, analyze them taking into account your own wishes, terrain features and the size of the site.
It is imperative to take into account financial possibilities, because the cost of existing options differs significantly. By the way, what is more expensive is not always the best in practice from an operational point of view.
DIY gates: drawings, photos and videos
Types of fencing
Before you make a gate with your own hands without welding, you need to consider all the advantages and disadvantages of the profile sheet. Main advantages:
- ease of installation;
- profitability (corrugated sheeting costs much less than wood or brick);
- attractive appearance (products are made in a different range of colors, so you can easily choose exactly what best complements the exterior of a country house);
- practicality (gates can be different in design and control methods);
- long service time.
Location on
Taking into account the opening method, the design can be:
- swing;
- recoil;
- lifting;
- sliding
The most popular are sliding and swing systems.
Retractable design
Swing design
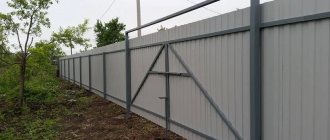
This is a classic fencing method. In this case, there are sashes on two supports, which are then sheathed with corrugated sheets. The gate has a soft move due to the fact that there is a hinge with a bearing on the supports. The entrance door in these designs is most often placed separately, but sometimes the gate can be located on one of the leaves.
Fences can be closed and opened manually or automatically. An electric drive design is usually installed in industrial areas where there is constant movement of vehicles.
The main advantage of swing systems is their affordable cost and ease of installation. But to open the doors you need a certain space. This is the only drawback of such designs.
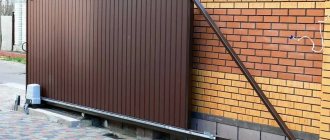
Sliding gates
It is much more convenient to install sliding systems. In this model, the doors do not open, but are retracted behind the fence. This prefabricated structure does not have guides in the opening. This makes it possible for cars of any height to drive freely. Also, unlike swing gates, in winter you will not need to regularly remove snow in order for the doors to open normally.
Typically, sliding gates are made with automatic control, since it is very difficult to roll back large doors.
Sliding gate diagram
The disadvantages include the following:
- assembly and fastening of the finished structure is much more expensive in contrast to the swing type;
- you need to additionally purchase special components;
- Before making a gate without welding with your own hands, you need to fill the foundation.
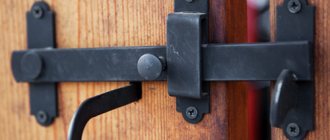
Sash design
A gate leaf or wicket can be made in different ways, using various options. The location of the jumpers can be:
- Slanted.
- Horizontal.
- Cross-shaped.
Each of the options has sufficient rigidity, so it can be recommended for use. In this case, an individual approach plays a role.
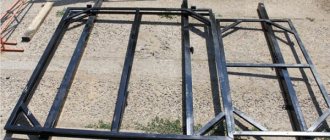
Gate design made of metal profiles with jibs
The design of the gate itself can also be different: with a classic frame, with or without an upper lintel. With the top crossbar, a more rigid structure is obtained, but the structure itself has some height restrictions. In this case, it is unlikely that special equipment or any other tall vehicle will be able to enter the yard. You can refuse the top crossbar, but then you will have to pay full attention to the reliability of the installation of the racks, as well as the quality of the frame.
Gate design with top crossbar and crossbars
Installing a gate with a top lintel requires more metal consumption, but it does not require additional reinforcement of the posts.
Cross-shaped lintels on metal profile gates
A more convenient fastening of corrugated sheets is obtained if sections of a thin-walled metal profile about 1 cm wide are welded along the inner (or outer, depending on the method of fastening) perimeter of the sashes. This option should be taken into account at the gate design stage.
As a rule, a less rigid structure will “walk”, which means it will make noise when there is gusts of wind. To prevent this from happening, the structure is reinforced with metal corners that are welded at the corners of the frame. Again, there are two methods you can use. The corners can be cut out of metal or you can use sections of profiled pipes from which the frame itself was made, and weld them at the corners and at an angle.
Reinforcement of sashes with metal plates
The second method of strengthening gate leaves
As an option, sections of profiled pipes are welded not at an angle of 45 degrees, but end-to-end, as this is simpler, although at an angle it is more reliable. Some assembly methods do not provide for an angled connection, since it is possible to assemble a one-piece structure, after installation of which it is sawn into two parts.
Different methods of joining pipes
There is another twist that takes into account the amount of snow cover in winter. As can be understood from the image, the lower jumper can be raised to different heights. This height depends on the depth of the snow cover. If the bar is lowered too low, then in winter it is unlikely that you will be able to open the gate after heavy snowfall. In the summer, any unnecessary living creatures can enter the lower space into the yard, so this space can be closed by screwing some kind of strip onto self-tapping screws. In late autumn this bar is removed.
If swing gates are equipped with automation, they can be opened remotely without going outside, in the snow or rain.
Selecting a profiled sheet
When purchasing a profiled sheet, you need to pay attention to the markings and method of surface treatment. Profile flooring can be different in thickness, have different shapes and “wave” sizes. Taking into account the height of the “wave”, the rigidity of the structure is determined.
Profiled sheet options
Marking:
- “C” – wall corrugated sheeting. It has a small thickness and “wave” height. Used to construct barriers.
- “NS” is a universal profile. Used as roofing, construction of fences and gates.
- “N” – load-bearing corrugated sheeting. Used for the construction of hangars and for roofs of large premises. It is not advisable to choose to install a fence.
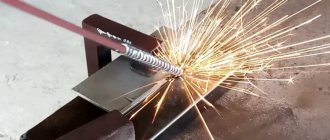
General rules for welding hinges
In order for the installed hinges to work properly and last a long time, and for the gates not to sag under their own weight after time, all work should be done according to the rules and very carefully.
So, what should you focus on when welding:
- The evenness of the seam and its continuity. The weld should be as complete as possible, without gaps.
- Maximum welding depth. Ideally, it is necessary to weld the hinges with the entire plane that is adjacent to the surface of the post.
- The canopies should be welded very evenly so that there is no excessive pressure on them during operation and in a standing position.
- For heavy structures, it is necessary to supplement the hinge system with an additional pair, which is located slightly below the upper load-bearing hinge.
In general, there are no more rules, but these should be adhered to and taken with complete seriousness.
Gate installation: step-by-step instructions
To make a gate without welding with bolts, you need to decide on the dimensions. The maximum width of the opening is chosen to be no more than 3.5 m. Any car can easily drive through these gates. The greatest height is up to two meters.
Bolting
Installation of supports begins with choosing a pipe. As a rule, a metal pipe with a cross section of 9–10 cm is used for this. Then you need to dig a pit where the support is installed. The pipe is leveled using a level and filled with cement mortar. While the cement hardens, the frames for the sashes are prepared.
Corrugated pipe sashes can be made without welding. What you need is a 45x45 mm profile pipe for the frame, M10 bolts, nuts and washers. It must be remembered that the use of spring washers will prevent spontaneous unscrewing and will increase the strength of bolted fasteners.
Frame drawing
First, the pipes are cleaned of corrosion and degreased, after which they are treated with a primer and painted.
For manufacturing you will need an electric drill with drills for the diameter of the bolts, as well as a wrench.
Hinges for sashes
The steps for assembling gates without welding are similar to the sequence described above for welded gates, except for a few points:
- connecting elements are used to fasten corrugated pipes;
- corner gussets are connected to all frame elements through pre-made holes;
- use pads for bolted connections in areas where profile elements are fastened;
- swivel hinges are secured with bolts and washers.
Installation diagram
During operation of gates on bolted connections, the fasteners weaken over time. To maintain rigidity, you need to regularly check the tightening of the bolts.
When the frame is assembled, they begin to line it with corrugated sheets. It is best to choose special bolts for fastening profiled sheets or self-tapping screws with a rubber gasket.
An important part is the locking rods, which bend in the shape of the letter “G”. These pins are installed at the bottom of both sashes at their junction. To fix closed doors under them in concrete, a wide profile with holes under the pins is first laid, teeth down. The optimal rod size is up to 50 cm.
Sketch with dimensions
If a structure is planned using hanging poles, then they are secured with anchors (4 pieces per support). After attaching the pillars, the prepared sashes are installed for fitting to determine the location of future hinges. The installation location is marked with a punch, holes are made for the bolts, threads are cut into them, after which the hinges are secured. The standard loops are 3–4 cm in diameter.
Materials used
The pillars can be made from a welded profile pipe measuring 80 x 80 mm, which has a wall thickness of at least 3 mm. It is necessary to take into account the fact that they need to be dug into the ground to the depth of its freezing. In addition, it is necessary to ensure that they stand strictly vertically, after which they are filled with concrete. Work should continue after the concrete has gained about 50 percent of its strength. At an ambient temperature of about 20 degrees Celsius, one week is enough for concrete, and if the temperature is below this mark, then you will have to wait two weeks.
To make gate leaves, a profile pipe of various sections is suitable, depending on the strength of the wind, as well as the size of the gate. You can use a profile pipe measuring 60x40mm or 40x20mm, which depends on the operating conditions. It is permissible to use a profile pipe with a cross section of 20x20mm as jumpers. The wall thickness of these pipes can be from 2 to 3 mm. Naturally, the thicker the pipe walls, the more expensive they are, but it is easier for beginners or amateurs to weld them.
Prepared metal
The gates are sewn up with the same material from which the fence is made - from corrugated sheets. Fastening to the base is carried out using the same technology and using the same screws. The work begins with the process of preparing metal surfaces, which are cleaned and then coated with Anti-Rust. Work continues after the surfaces have completely dried.
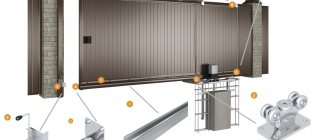
Manufacturing of sliding gates
The installation of these structures is a little more complicated, but by studying the technology, you can make durable sliding gates.
Sliding sash
To make a fence of this type, you need to additionally purchase some components. This set must certainly contain the following parts of the structure:
- The supporting beam is one and a half times larger than the width of the gate. The thickness is selected taking into account the width and total weight of the sash.
- Guide rollers – 2 pcs.
- Catcher (prevents the canvas from swinging).
- A board for reducing swing of the sash during closing or opening.
- An end roller is required for quiet operation and reduced weight of the blade when open.
Advantages and disadvantages
Like every design, such gates have their own advantages and disadvantages; we will consider them in more detail below:
- Advantages:
- relatively low cost, which will be a pleasant bonus to the installed gates;
- ease of installation;
- long service life of the installed structure;
- installation can be done on your own;
- installation can be done with your own design modifications;
- if there are no restrictions in volume, then accordingly there will be no restrictions on passing transport;
- you have the opportunity to choose on your own what material you will make the structure from, respectively, from suitable options.
- Flaws:
- for durable installation, it will be necessary to bury the pillars quite deeply, and this is not always easy to do with your own hands;
- concreting these pillars takes a lot of time, and if concreted incorrectly, the pillars may warp over time;
- a very large space will be required to install such a barrier;
- it is unsafe to use such structures in strong winds, because it will be almost impossible to control the doors;
- When installing an electric drive, you must purchase several wires to close/open the gate, which will increase the cost of your purchase.
As you can see, the advantages of such structures outweigh the disadvantages, and if you live in a region where strong gusty winds are not the norm, feel free to proceed with the installation of swing gates on your site.
What not to do during welding
In order for welding work to proceed without incident, it is necessary to adhere to certain rules:
- Be sure to use protective equipment to avoid harm to your health. This kit includes a protective mask, gloves for welding, a thick jacket or shirt, and pants.
- Never touch a hot welding seam with oil-soaked rags, as they may catch fire.
- It is strictly forbidden to carry out work by eye, even if you are confident in your eye and skill, double-check everything with special tools, then the result is guaranteed to be of high quality and durable.
Now you know how to weld hinges yourself and you can share this information with your neighbors or friends who are still wondering how to weld hinges on their gates without any problems.
Watch the video: Tips and tricks
Preparatory work
Every design idea should begin with a work plan and detailed description. When drawing up a drawing for a garage door, you should take into account all the requirements that apply to them. If installation is required in an existing opening, then its measurements are first taken, after which the sashes are created. However, if it is possible to increase or decrease the opening, then the following rules must be followed:
- The minimum distance from the gate post to the side of the car should be 30 cm. It is better to do it with a margin, because in the future it is possible to purchase a new car with larger dimensions.
- The height of the opening should be 2 m.
- The thickness of the steel sheet required for the garage is 3 mm.
who decides to take on such work
must know these If these requirements are met, the question of how to correctly make a drawing for a garage will never arise. The work will also require welding. Before you start using it, you should take care of the necessary materials and tools. To create a standard design you will need:
- steel corners;
- valves;
- loops;
- a metal sheet;
- profile;
- locks.
Required tools:
- roulette;
- square and level;
- welding machine and grinder.
Welding without unpleasant consequences
To ensure successful welding of hinges to gates, follow these recommendations:
- do not work with a faulty welding machine;
- you can cook only after the paint has completely dried;
- clothing should not contain traces of grease, gasoline, oil or any other flammable liquids;
- Do not cook parts under pressure;
- Do not hang rags soaked in flammable liquids on the welding machine cylinder. This often caused a fire.