DIY spring ties
Homemade ties for shock absorber springs, description of how to make a homemade product.
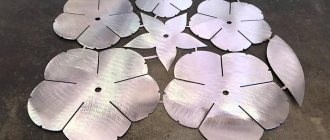
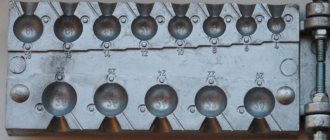
Hello to all DIYers! I decided to make ties for the springs. I looked on the Internet for various options for this device and got to work. First, I drew this stencil of a plate for making hooks.
Then I took a sheet of metal 3 mm thick and cut out the blanks using a grinder.
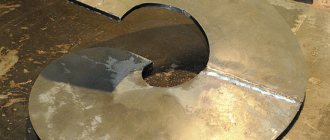
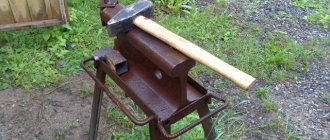
He bent the hooks, secured the workpieces in a vice, placed the pipe and bent the hooks with a hammer.
Then I bent the plates vertically to give them a rounded shape for the spring.
I cut two tubes 5 cm long.
Next I took a stud for 12 and 10 nuts.
I screwed the nuts onto the stud, then welded the hooks to the nuts.
Cleaned and painted.
I cut the pin at 22 cm for each tie. The homemade product successfully passed the tests!
Homemade author: Roman Pavlichenko. Poltava.
Source: avto-samodelki.ru
Device for removing springs from car shock absorbers
For convenient, quick and, most importantly, safe removal of springs from car shock absorbers in a garage, it is best to use special devices (racks) that will make the work easier.
Factory models are not cheap. And why overpay if there is always an alternative option? For example, you can make your own homemade device for removing springs from a mechanical jack.
The first step is to lengthen the jack stand by 2-3 times. To do this, the master first cuts off the supporting “penny” and welds a piece of profile pipe of the required length to the rack.
Main stages of work
Then the base of the jack will need to be welded to the bottom of the profile. Next, a flywheel is welded to it (it is advisable to choose one so that the internal hole is slightly larger in diameter than the supporting part itself).
Next, using a grinder, you need to cut off the standard hook on the jack, and instead weld a U-shaped part welded from pieces of the profile.
Then at the top of the jack you will need to make another hook, but from a metal plate 7 mm thick.
In principle, the hook in the lower part can also be made of thick metal - then the structure itself will be more reliable.
Then all that remains is to clean the device with a grinder and paint it. We recommend watching a more detailed process of manufacturing a device for removing springs from car shock absorbers in the video on our website.
Rate this post
Source: https://sdelairukami.ru/ustrojstvo-dlya-snyatiya-pruzhin-s-amortizatorov-avto/
How to make a spring tie for shock absorbers with your own hands
Sometimes it is necessary to compress the suspension spring without removing it from the car. For this you need zip ties. In a simple case, two or more rods equipped with so-called hooks can serve as ties. The hooks with their hooks cling to the spring from the outside. All ties are usually placed on opposite sides of the spring. And then, by turning the threaded rods with a wrench, you can easily perform compression.
Required material and tools
To make a screed yourself, you will need a metal rod (reinforcement), two threaded rods (M16), as well as extended nuts and a metal tube with an internal diameter of 16 mm. This will be quite enough to make a full-fledged screed.
It is also advisable to have a grinder on hand for cutting reinforcement and several wrenches for the nuts. The set of tools is minimal; all this can be found in the garage of any motorist. Well, now let's take a closer look at the process of assembling the product.
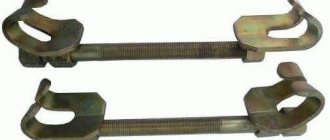
Branded spring tensioners
Of course, there is special equipment used when repairing cars of a certain brand. To compress springs, however, universal ties are more often used. The appearance of these devices is shown in the figure:
Branded spring ties
It is clear that a set of universal zip ties can be bought in a store. However, the cost of such equipment is higher than the price of all the components in total.
We cook the screeds ourselves
In general, it makes sense to make shock absorber spring ties yourself. How to do this is discussed further.
Four nuts and two threaded rods
The metal products listed below are easy to find in almost any supermarket. For example, you can buy two M16 threaded rods. You will also need four extended nuts, as well as a steel plumbing pipe. Its internal diameter is 16-16.5 mm.
The end result is what is shown in the pictures. You will also need a steel rod, which is used to make reinforcement. Let's look at how screeds are made:
- Two identical cylinders are cut from the pipe, the length of which is 80-120 mm;
- Threaded rods can be shortened if necessary;
- 8 rods approximately 30 cm long are made from reinforcement;
- Using any bending equipment, the rods are bent to obtain hooks;
- Four rods are welded to two nuts, another four - to pipe sections;
- The set of components is completely ready for use at this stage.
It is easier to weld by placing the workpieces on a plane. The essence of these words is illustrated by the picture:
How to weld hook rods
Actually, what follows is a film where the technology is shown “inside and out”. The author even solved the problem with the lack of a bending machine: to bend one rod, you need two similar rods welded to a steel profile.
If the reader thinks that using welding is difficult, then it is better not to take risks. Welded joints can withstand significant loads, but only if they are performed according to all the rules. Spring ties can be made without welding. A suitable drawing is given below.
Two ties in 10 minutes (video)
Drawings of universal threaded ties
Let's return to the question of how to make a device for tightening shock absorber springs yourself. Below is the appearance of the finished devices:
Factory-made threaded ties
On one side of the rod there is a left-hand thread, on the other - a right-hand thread. The standard thread pitch is M18. But buying threaded rods is not enough here. And to cut the thread yourself, you will need special equipment.
Drawings of the components that make up the entire structure are shown here:
Threaded tie (3 parts)
To make parts, you need a lathe, drilling and, probably, milling machine. It may be easier to contact a workshop. Print the drawing by downloading it from the website.
Most likely, there are no other drawings of universal ties on the Internet. And what is shown above is taken from a book on repairing domestic cars. You can use it.
Let's say the ties were made according to the drawings and all the parts fit together. But even then the advice about using lubricant remains valid. You need to take solid oil or cyatim and apply this material to the threads of the nuts.
Cyatim-201 lubricant is a rather expensive material. You can reduce consumption by mixing it with machine oil in a 50/50 ratio. Good luck.
Source
How should the spring be tightened?
Let's list the steps involved in tightening the shock absorber springs yourself. Everything looks simple:
- When the body is supported by a jack, two ties are brought to the spring from opposite sides;
- By rotating the nuts with your hands, you achieve confident engagement of the hooks and springs;
- Using a wrench, the nuts on different rods are rotated in turn;
- It is better to play it safe and secure the compressed spring with straps or wire.
Video of spring tensioners on shock absorber
No explanation required here. The result is shown in the photo.
Spring compressed by ties
When using homemade and even purchased equipment, follow these simple tips:
- Before using ties, threaded connections are lubricated with cyatim or grease;
- The ties cannot be removed from the compressed spring, even if it is additionally fixed;
- When carrying out work, exercise maximum caution. It is better to sacrifice body parts than your own health.
Features of the suspension of Lifan cars are discussed in these articles:
Screed process
The process of tightening springs is exactly the measure that drivers face. That category of enthusiasts and craftsmen who prefer to make shock absorber spring ties with their own hands from scrap materials rather than take their car to a service center knows what the tying process involves. For beginners, we will describe the algorithm of actions for familiarization.
It must be remembered that designs can be of different configurations: the factory version differs from a self-designed product. But in one case or another, you cannot do without a device. The work process will turn into a long nightmare with unpredictable consequences. However, enough of the horror stories. Let's take a look at the algorithm of actions.
- After placing the car on a lift, inspection hole, or placing the car on an overpass, you need to put the handbrake on and put shoes under the wheels.
- Remove the strut with shock absorber.
- Fix the puller on the upper and lower coils of the spring. Next, the compression process is performed by hand. It all depends on the design. This could be a frog or hooks.
There is no need to tighten the working element completely. There is a high probability of breakage of the working element or compression device.
Compression is carried out until the working element can be removed and repair work carried out.
If we work with a set equipped with hooks, the actions are almost the same as the removal process using a “frog”. Only in this case, after installing the car and fixing it, the ties must be placed on opposite sides.
The nuts are rotated by hand to tightly fix the tool on the working element. The nuts are tightened alternately on different rods. Many people, to be on the safe side and maintain their own safety, tie the spring element with belts or wire.
Security, security, and once again security. This is the main thing you need to pay attention to when carrying out “technical treatment”. The process itself requires physical effort and sequence of actions.
Do-it-yourself spring remover in a car suspension
When repairing or adjusting a car's suspension, it becomes necessary to fix the spring in a certain position.
There is a service tool for this work: a spring remover, with which you can remove chassis elements both in a specialized workshop and in a garage.
Various tool concepts:
- Passive: Represents two brackets connected to each other either rigidly or using a threaded rod.
Simply secures the spring, compressed using the weight of the vehicle. After lifting the body with a jack, the elastic element remains in a compressed state. - Active: The compression mechanism can operate under load when the shock absorber is under operating tension. The position of the body relative to the ground does not matter.
Let's consider the second option in more detail.
What is a puller
Shock absorber spring pullers are a special device that can be used to compress the springs of a shock absorbing element. After compressing the element, you can continue the dismantling activities that have begun. There are many options for the device in question. We may be interested in the simplest version of a removable device.
The object in question is two slats made of metal.
The entire length is threaded. There are hooks installed along the edges of the product, which, when turned, move towards each other. In other words, when you need to compress the spring element, you just need to turn the rack. At this moment, the hooks tighten the spring structure.
There is another option for tightening the shock absorber spring struts - a belt.
The design consists of 2 “frogs”, which are tucked into durable belts made of fabric. They are thrown onto the upper coil of springs. After this, you need to work with the “frogs”, alternately clicking on each of them.
The process of the movements performed involves gradual tensioning of the belts, tightening them into a spiral. After compression, the workflow continues.
How does a spring remover work, and what types are they?
What is a puller used for? It overcomes the straightening force of the springs. The applied force on the puller brackets is commensurate with the weight of the car, but this does not mean that its design is too expensive and high-tech.
There are many options, but they are divided into only two types: mechanical and hydraulic drive.
Mechanical spring remover
Most often it has a threaded drive mechanism.
With a sufficient diameter of the pin (providing a good gear ratio on the thread), and a long handle of the key, you can compress the springs manually without excessive effort.
The technology is as follows: two pullers are symmetrically put on the rack. By turning the threaded rod, you bring the claws to the middle of the spring directly on the shock absorber, compressing it to the required size.
Installing one puller on a spring will cause it to break.
Pullers placed on both sides ensure uniform compression. When working with the suspension of trucks or heavy SUVs, experienced craftsmen install 3 or even 4 pullers.
Correct installation of pullers on the spring
Semi-permanent racks
Service stations often use semi-permanent struts to remove springs from shock absorber struts. The tool is quite universal and fits most pendants. Thanks to the drive mechanism gearbox, working with it is convenient and safe.
The only drawback is that it is not always possible to compress the spring directly on the car. After all, this is a bench device: the puller works with the suspension removed from the car.
Lever type
Lever type pullers have a similar “problem”. The mechanism is reliable and safe, but its dimensions do not allow it to fit into the space under the wing of the car.
Hydraulic puller
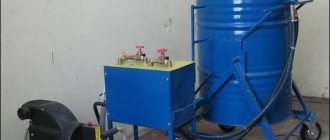
Can be portable or stationary. It works on the principle of a jack: there is a main and a working cylinder. By pumping liquid using a lever handle, the operator compresses the power brackets, between which there is a spring.
A compact two-section puller can also become a helper in a home garage, but a floor-mounted stationary machine is only suitable for a car service center. The hydraulic system is pressurized using a foot lever. At the same time, the car mechanic’s hands are free, working comfortably and safely.
Of course, there are pullers with compressors, electric drives, and other devices that make life easier when servicing a car. This is all good until you see the price tag.
Sometimes it is more profitable to visit a car service center several times than to purchase an industrial puller for personal use. Which exit? Make your own instrument.
Manufacturing a shock absorber spring remover
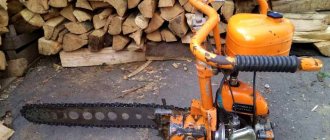
Many car enthusiasts use a regular chain: they wind a few turns around the coils of the spring and tighten the chain. After lifting the car with a jack, the shock absorber strut is stretched, but the spring remains compressed. This is a dangerous method: if the chain slips, the spring may spring back and cause serious injury.
How to make a simple puller similar to an industrial one
A mechanical semi-stationary “machine” can be created from a “Volgovsky” jack.
- old jack from Volga-24, Moskvich 412 or other Soviet passenger car = 0 rub.
- old connecting rod from any engine = 0 rub.
- steel corner from a landfill 1 meter = 0 rub.
- a pair of rods from broken shock absorbers = 0 rub.
- a handful of bolts and nuts M12 - M14 = conditionally free.
Drill, grinder, file, welding machine - such a set is either in the garage or available from a neighbor for a couple of beers. A platform from a corner is assembled to the top of the jack (where the turntable with the gearbox is located). Then a bracket according to the size of the support cup is welded to it. We screw the connecting rod to the standard support arm of the jack; the shock absorber strut will fit into it.
No need to worry about the strength of the structure. The jack lifts the car, the connecting rod also withstands a huge load. And to strengthen the cantilever structure of the bracket, we weld rods from the shock absorber rods. The puller is universal: the length of the shock absorber allows you to service any struts for passenger cars, as well as most SUVs.
The next spring remover, which is easy to make with your own hands, is a tightening type. Suitable for small spring sizes, since it is unrealistic to develop a large force on such a device.
The components are even more affordable than in the previous design. A piece of pipe, an angle and a long bolt M14 - M18. You can use a hairpin. We weld brackets from a corner and sawn pieces of an inch pipe. The puller consists of two identical ties, so there should be four brackets.
Be sure to weld the guide bushings for the studs. Otherwise, when tightening, the brackets will jam.
The spring is tightened by synchronously tightening the nuts on the studs. If you use a set of 2 ties, they should be installed strictly symmetrically.
Communities › Do It Yourself › Blog › Strut Spring Tie
After replacing the struts all around for my son and the front struts for my son-in-law, I realized that zip ties are no good at this age
compress the springs (the springs are still original, the struts are leaking). A trip to the ferrous metal. It looks like an unfinished grill.
Hmmm. when there is nothing to do why not...
done perfectly! but I think for myself this one is easier and faster!
Everyone goes their own way. I went mine. And I wish you to get there and receive satisfaction from what you have done!
Engineering thought never sleeps! But is the manufacture of such equipment justified for non-permanent work? It’s okay if the springs need to be compressed 5 days a week from 8 a.m. to 5 p.m., or even in 2 shifts. Although, from the point of view of self-improvement, it’s very good!
Once upon a time, when you were still on a penny, you had to take out the engine. I took it out with a neighbor, moved it on the wheel and installed it myself. Because I made a crane for unloading, then a tilter. And I no longer experience problems with this on subsequent machines. I think it’s better to have a tool when you don’t need it than not to have it when you needed it yesterday.
Engineering thought never sleeps! But is the manufacture of such equipment justified for non-permanent work? It’s okay if the springs need to be compressed 5 days a week from 8 a.m. to 5 p.m., or even in 2 shifts. Although, from the point of view of self-improvement, it’s very good!
“Is the manufacture of such equipment justified for non-permanent work?” Every garage has a hammer and chisel, 99% of garages have a drill, 70% have a semiautomatic welding machine, 50% have a compressor. And at best, only ten percent of all those who have this tool use it every day! The rest simply have it and money was spent on this instrument.