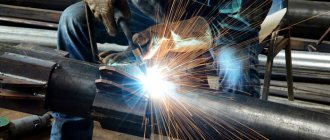
This article contains the most necessary information about semi-automatic welding.
Everything is presented in an accessible form and divided into sequential blocks for better assimilation of the material. To make it easier to find the information you need, use the article navigation: Theoretical part:
- Construction of a semi-automatic welding machine
- Choosing gas for semi-automatic welding
- Wire for semi-automatic welding
- Semi-automatic welding without gas (with flux-cored wire)
Practical part:
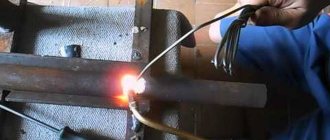
- Preparing the device for operation - ASSEMBLY | How to thread wire into a semi-automatic machine
- Setting up a semi-automatic welding machine using a live example
- Preparatory stage and process of welding with a machine
- Direction and speed of movement for a perfect weld seam
- Conclusion + VIDEO
Despite the opportunity to jump straight to practical advice, we recommend that you read the material in its entirety. You will probably find something new for yourself or refresh your previously acquired knowledge.
Semi-automatic welding machine - briefly about the device
Semi-automatic welding requires a basic understanding of the design of the welding machine. The inverter provides space for installing a coil of wire, which serves as an analogue of a consumable electrode, and also has an automatic feed mechanism. The device allows you to independently set the current strength and wire feed speed depending on production needs.
Semi-automatic devices vary in functionality depending on their purpose. For novice welders, the best choice would be reliable and easy-to-operate devices without excesses (for example, IRMIG 160) or options with synergetic control, which will greatly facilitate setup (for example, INMIG 200 SYN). For experienced professionals, powerful three-phase semi-automatic machines, such as the INMIG 500 DW SYN, are suitable for continuous production.
Regardless of the type of device, the operating equipment remains standard:
- Welding machine
- Semi-automatic welding torch
- Gas cylinder and reducer
- Gas hose
- Cable with ground clamp
Of course, the work will require specialized wire, as well as standard protective equipment that is absolutely necessary for the safety of the welder.
The choice of gas depending on the metal being welded
The main function of shielding gas is to isolate the weld pool, electrode and arc from the influence of ambient air. In order to select the appropriate gas, it is necessary to take into account the type of material and its thickness. Depending on this, inert, active gases or mixtures thereof are selected. The most commonly used are CO2 and argon. The latter reduces metal spatter and contributes to better weld quality.
Pay attention to the table:
| Material | Gas |
| Structural steel | CO2 |
| Structural steel | CO2 + Ar |
| Stainless steel | CO2 + Ar |
| Alloy steels (low carbon) | CO2 + Ar |
| Aluminum and its alloys | Ar |
HELPFUL ADVICE.
When searching for gas, you can come across cylinders of various sizes. The larger the volume, the cheaper a liter of gas will be. For rare use of a semiautomatic welding machine, mobile packaging of 5-10 liters is suitable. In this case, it is best to take an additional supply of gas to insure against a sudden shortage.
Relationship between metal thickness and wire diameter
There are many wire options for semi-automatic welding on the welding materials market. It is important to remember the rule - the composition of the wire must match the composition of the material being welded. The welding wire SV08G2S, which is used for carbon and low-carbon steels, is most often in demand.
The table will help you choose the diameter:
| Metal thickness, mm | The diameter of the wire |
| 1 — 3 | 0,8 |
| 4 — 5 | 1,0 |
| 6 — 8 | 1,2 |
The usual packaging for wire is 200 or 300 mm.
IMPORTANT!
The wire diameter is indicated when setting up the semi-automatic machine, which we will talk about in the practical part of this article.
How to weld semi-automatically without gas
Shielding gas is essential to the welding process. It ensures quality welding work while creating a protected environment. However, if you use the device quite rarely, then it is simply not profitable to spend too much money and buy a cylinder. To avoid unnecessary costs, you can always use a special welding wire - flux-cored or flux-cored. It consists of a steel tube containing flux inside. During welding, it burns, forming a cloud of shielding gas in the welding zone.
It is worth remembering that work with flux-cored wire must be carried out with a current of straight polarity (plus is supplied to the product) - this is due to the need for more power to melt the flux-cored wire. It is worth paying attention to the fact that in addition to the obvious advantages of use, there are also disadvantages: when welding with flux-cored wire, a cloud of smoke is usually formed, which complicates visual control of the process. It cannot be used for ceiling seams.
What is gas welding
The essence of gas welding is that the metal of the workpieces and filler material being joined is melted by the heat generated by the combustion of flammable gases. To obtain a high temperature, they are mixed with pure oxygen in a gas burner mixer. The ratio of components can be quickly changed by adjusting the volumes supplied to the mixer. This allows you to set the optimal welding or cutting mode.
Gas welding diagram
In gas welding, compared to arc welding, the heating rate of the working area is lower. This feature is considered an advantage when working with tool steel, cast iron, and non-ferrous metals. Welding of these metals should be carried out with slow heating and cooling. These also include some grades of alloy steel.
A distinctive feature of gas welding is the ability to weld almost all metals.
Let's sum it up
Electric welding is a useful skill in everyday life and construction. It is possible to master it on your own. Such training will be based on:
- understanding the theory of the welding process, necessary for correctly setting up the welding machine and carrying out metal welding work;
- compliance with safety rules when welding, which boils down to the use of a protective suit, goggles or mask, and welding away from flammable objects;
- practical experience, which begins with the ability to strike an arc and weld beads.
Do not despair if your first experiments with electric welding do not please you with beautiful seams. Believe me, every experienced welder has similar welding skeletons. The ability to create not only high-quality, but also visually attractive seams will come with experience and frequent welding practice.
Advantages and disadvantages
The advantages of gas welding include:
- low price of equipment;
- possibility of welding and cutting in field conditions;
- regulation of flame power over a wide range;
- welding of most types of metal and alloys - from aluminum to alloy steels;
- smooth heating, preventing the deformation of parts and the formation of cracks.
Flaws:
- Low efficiency due to high heat dissipation. For the same reason, the technology is not cost-effective when welding workpieces thicker than 5 mm due to excessive gas consumption.
- Heating a large area of areas adjacent to the seam contributes to the formation of residual stresses in the metal.
- When joining with an overlap, there is a high probability of deformation of the parts.
- Due to the peculiarities of the operating principle, the gas welding process is difficult to mechanize.
- The use of flammable gases is associated with a high explosion and fire hazard.
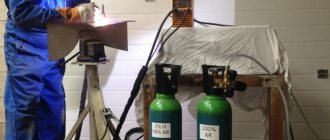
Setting up a semi-automatic welding machine
For the example, not only the model of the device is required, but also certain conditions. The material will be steel plates 2.5 mm thick, to which wire with a diameter of 1 mm and gas - a mixture of argon (80%) and carbon dioxide (20%) will be ideally suited.
On the gearbox we set the gas flow rate to 10-12 l/min - this will be enough to work with a given metal thickness. The consumption of shielding gas greatly affects the quality of the seam. If the shielding gas flow is insufficient, pores may form in the seam. If there is too much gas, turbulence occurs, which also interferes with normal protection.
We configure the parameters of our device. For a device with synergy it is very simple:
- Select the welding type on the panel – MIG SYN
- Choose a gas - a mixture of argon and carbon dioxide
- Select the diameter of the welding wire – 0.8 mm
- We select the 2-stroke burner operating mode, because We don’t plan long, continuous welding.
HELPFUL ADVICE.
If there are long seams to be made, then it is better to choose a 4-stroke method - then by pressing the start button on the torch once when starting work, you can then release the button so that your hand does not get tired. If short seams are to be made, then it is better to regulate the start and stop button, selecting the 2-stroke mode.
5. Set the welding current. For our case, this is about 100 Amperes.
HELPFUL ADVICE.
In semi-automatic welding, there is a direct relationship between the current strength and the wire feed speed - the higher the current, the higher the wire feed speed and vice versa - the slower the wire feed, the lower the current strength.
Our semi-automatic welding machine with synergetic control automatically sets the arc voltage. At the same time, if necessary, the welder can adjust the voltage to suit his working style and feeling of the process.
This device has inductance adjustment. This setting allows you to adjust the rigidity of the arc - adjust the shape of the bead and the depth of penetration, achieving a uniform, aesthetically beautiful seam. This function will make life easier for a novice welder and will allow him to achieve an even, high-quality seam in the shortest possible time.
In the presented example, we prepared the apparatus for working on our workpiece. Use a cheat sheet that will help you quickly configure the necessary parameters in the future. Save it to bookmarks, it will be useful to you:
| Metal thickness | Current strength | The diameter of the wire |
| 1.5 mm | 70 - 80 A | 0,8 |
| 2.0 mm | 90-110 A | 0,8 |
| 3 mm | 120 - 140 A | 1,0 |
| 4 mm | 140-160 A | 1,0 |
| 5mm | 160 - 200 A | 1,2 |
Application area
Gas welding of metals is used to perform:
- assembly and repair of steel products up to 5 mm thick;
- installation of small diameter pipelines;
- surfacing of hard alloys and non-ferrous metals on steel and cast iron;
- installation of structures made of thin-walled pipes;
- sealing defects on cast workpieces.
Gas-flame welding has become widespread in construction, agriculture, and repair shops.
Fiberboard or MDF?
For a final definition of what MDF is and how it differs from fiberboard, a description of the production technology is sufficient. Fiberboard, known as hardboard, stands for fibreboard, produced by wet pressing of wood dust. Manufacturing technology does not allow fiberboard to be thick. The common thickness of fiberboard is 3.2 mm. The thickness of the MDF board can exceed 20 mm.
When making shaped and bent products from MD semi-finished products, the thickness is determined by the dimensions of the part. Fiberboard serves as a furniture element in the form of a back wall or bottom of pull-out shelves of cabinet furniture. Fiberboard is fastened without pre-drilling holes. To fasten MDF boards, dowels or hardware are often used, for which it is necessary to prepare a hole by drilling. The thickness of the slab allows surface milling. Wood glue is excellent for gluing.
Equipment used
The set of equipment for gas welding includes:
- Water seal to prevent damage to equipment components from backfire. Installed between the burner and the acetylene source. As evaporation occurs, water is added.
- Oxygen and flammable gas cylinders or acetylene generator. According to safety regulations, the gas should not come into contact with the paint. Therefore, the top of the cylinders is not painted. To prevent an explosion when acetylene comes into contact with copper, valves made of a different metal must be installed on cylinders with this gas.
- Gas burner, regular or injection.
- Reducers to reduce the pressure of gas and oxygen at the outlet of the cylinders.
- Hoses for connecting the gas burner to cylinders. Hoses for flammable gases have a yellow stripe.
Gas welding equipment
If gas welding work is carried out in different places, the equipment is installed on a trolley with appropriate fastenings. Enterprises install stationary gas stations with ventilation and cabinets for storing cylinders.
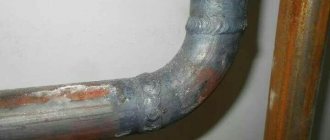
Fistula removal
How to weld a water pipe using electric welding with the maximum degree of reliability? The exact instructions depend on the nature of the damage. Let's start with how to eliminate a fistula in a water pipe, that is, a round hole from which liquid oozes.
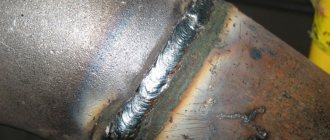
In this case, you need to take a position that allows you to clearly observe the boundaries of the damage, and the electrodes are held perpendicular to the base to minimize the volume of water falling on them. Work is carried out from top to bottom until the hole is completely hidden by the deposited metal.
The procedure is as follows:
- metal is fused to the upper part of the fistula;
- 2 blows are made with a hammer immediately after the arc goes out. This promotes compaction of the material and eliminates pore formation;
- the cycle repeats from top to bottom;
- if there is thinning of the walls along the edges of the hole, they are strengthened using the method described above;
- when steam stops oozing out, the pipe wall becomes stronger. The current is set to a minimum to prevent through burning. The required volume of material is gradually deposited;
- To increase strength, the formed seam is tapped.
What gases are used in welding
In order for gases to burn with maximum efficiency, oxygen without impurities is needed. Depending on the degree of purification, it can be:
- premium grade (concentration 99.5%);
- 2nd (99.2%);
- 3rd (98.5%).
Since gas welding is not done under sterile conditions, it should be taken into account that spontaneous combustion may occur when oxygen comes into contact with technical oils. Cylinders should be stored in a room where there are no sources of open fire in a place where the sun's rays do not reach.
Most often, acetylene is used in tandem with oxygen, since its combustion temperature reaches 3400⁰C. It is obtained from calcium carbide when dissolved in water.
Note!
At high pressure or temperature, acetylene explodes. Therefore, according to safety regulations, installing a water seal is mandatory.
Propane takes second place with a combustion temperature of up to 2800⁰C. Gas mixtures of oxygen with methane, hydrogen, kerosene vapor, and blaugas are significantly inferior in temperature to the leaders. Used only for working with non-ferrous metals with low melting points.
Classification by characteristics
The distinctive features of the equipment are the type of power supply and design. Additional features include:
- type of feeding mechanism;
- cooling method;
- operating voltage;
- availability of additional functions.
We recommend reading: How to choose gas for welding
The devices differ in the type of protective environment. The devices are also classified according to the type of protective environment: those operating with active gases, those combined with inert substances, and universal. According to their design, the devices are divided into:
- Single-body, where the power source, feed mechanism, and gas valve are located in one block. Single-body semi-automatic machines are equipped with holders for internal or external installation of the reel.
- Double-hulled, where each component is placed in a separate module to which a cable-hose is connected.
Consumables
Consumables are welding materials needed to form seams. Filler wire is used to fill the gaps between the parts being joined. Its diameter is selected depending on the thickness of the workpieces and the welding method. If there is no wire of the required grade, it can be replaced with a strip of metal from which the parts are made.
To protect the molten metal from oxidation upon contact with air, flux is used, which creates a protective environment due to the release of gases when heated. This is especially true when welding copper and aluminum, as well as their alloys. For carbon steel such protection is not necessary. All types of flux include boric acid as the main component. The compositions are prepared in the form of paste, powder, solution. Flux is applied to parts or filler wire.
Heating installation with iron pipes
Heating installation with iron pipes is highly reliable. They are able to withstand large temperature changes.
The advantages of using an iron pipe system are as follows:
- High level of strength;
- Rigidity that allows you to withstand highway slopes.
The disadvantages of iron pipes are as follows:
- Expensive;
- Complex and lengthy installation;
- Susceptibility to corrosive processes.
Installation of pipes should be carried out after studying the wiring system. You need to know exactly where the radiator, additional equipment and boiler are installed. It is necessary to select pipes with a maximum diameter that must correspond to the diameter of the boiler outlet or pipe. After this, you need to decide on the heating wiring diagram. For iron pipes, a two-pipe scheme is usually chosen. This scheme has an average value for material consumption and allows for uniform heating of the radiators.
Heating pipes can be connected in the following ways:
- Muftov;
- Welding;
- Flange;
- Rezbovym;
- Welding.
The most complex, and at the same time widespread method is gas welding. In this case, manual electric arc welding can be successfully used. Gas welding is ideal for creating a bend in a pipe and taking it into the desired shape. Connecting iron heating pipes using welding requires a high level of skill from the performer. This type of work should be entrusted to a specialist.
When performing this type of work independently, you should adhere to a number of rules:
- The preparation of iron pipes and connecting surfaces should be carried out;
- Clean and degrease;
- Edges must be protected inside and out;
- The joints should make an angle of 60 degrees;
- The welding layer should be thoroughly cleaned of any slag that has formed.
A minimum of two layers of welding are used to connect pipes. The number of layers depends on the thickness of the pipes used. The first welding layer must be applied carefully. The edges must be completely melted, and the pipe elements must remain in position. It is possible to apply a second layer only after clearing the first layer of slag.
Threaded connections can be used to connect various devices and during installation of the main line. To perform this connection, many ready-made elements are produced. Threaded connections should be sealed using sealant and tow.
Using tow is the most reliable option, which has been tested by experience and time. You can also use quick-release connectors. They provide easy fixation of all connected elements. Also, threaded connections can be made using flanges and couplings. After installing the pipes, you can fill them with water and check the tightness of the joints. If there are leaks, appropriate measures must be taken to eliminate them. If small leaks are found, they can be sealed with epoxy mixture.
Step-by-step instructions for implementation
Semi-automatic welding scheme
Getting started, it is recommended, as always, to start with organizing the workplace:
- The room is cleared of unnecessary objects, prepared in a fire safety plan - all flammable materials and liquids are removed.
- The maximum possible illumination of the workplace is turned on.
- Material and tools are being prepared.
- The connections of cables and hoses and the integrity of extension cords are checked.
Next, you need to prepare the semi-automatic device itself:
- The welding sleeve is unwound and the gas cylinder is connected.
- The gas supply is checked.
- The burner nozzle is checked.
- The parts are laid out, combined and secured.
- Dress in welder's work clothes and prepare a protective mask.
- The device's power is turned on.
- The burner is brought to the connection point and the handle is pressed - the process has begun.
When connecting small parts, it is recommended not to turn off the machine during the break, but for large volumes it is recommended to periodically stop the work to check the quality of the seam and remove carbon deposits from the nozzle.
Upon completion of work you need:
- Remove your fingers from the wire feed key and stop the gas supply.
- Turn off the power to the device.
- Allow the resulting seam to cool for 1-2 minutes; if defects are detected, remove slag and repeat welding in this place.