To perform such technological operations as pressing and pressing out bushings and elements of bearing units, bending reinforcement or sheet metal blanks, and compressing products made of various materials, you can make a garage press with your own hands in a domestic environment. An alternative to this equipment is a conventional bench vice. However, the latter are not able to create the pressure that presses generate, and also cannot be used for pressure processing of parts characterized by large dimensions.
It’s quite possible to make a press of this design yourself
On the modern market there is a wide variety of press models that can be used as garage devices, performing various technological operations with their help. To save on purchasing such equipment, you can make a press yourself. To do this, it is enough to find the corresponding drawings and design diagrams. If you approach this problem correctly, the characteristics that a homemade press for a garage will have will differ very slightly from the parameters of serial equipment.
What is the purpose and functions of the press in everyday life and its varieties
Such devices have a very wide range of applications.
This can be not only squeezing out various parts, but also a device for a walk-behind tractor that collects hay and lays it in even rolls. Perhaps the manufacture of some durable concrete products is required, or perhaps a lot of sawdust has accumulated, from which good fuel can be made. Let's look at the main jobs that the press can perform in everyday life. This equipment can be divided into several types. The design of some types is similar, while others have fundamental design differences.
The simplest table press
Press for extruding parts from any base or shell
Such equipment will come in handy in garage conditions. It is not profitable for an ordinary motorist to purchase it, because... the cost is quite high, and they rarely perform the work. But making a press for the garage with your own hands at minimal cost is quite acceptable.
You can use a similar press for silent blocks or bearings, i.e. for those parts whose installation and dismantling cannot be done manually. Having spent a little time, you can design and assemble a device, the cost of which in a store can exceed 50,000 rubles.
Wooden press for making fuel briquettes
Device for compacting various materials into dense briquettes
Such a device will help put old newspapers into use, which will make good fuel for the stove. A waste paper press will help you save on purchasing coal or firewood. In addition, the need to dispose of unnecessary correspondence, of which many have accumulated a huge amount, disappears.
Approximately the same principle can be used to make a sawdust press. The excellent fuel that will be obtained when using it has proven itself well not only in stove heating, but even on vacation. Long burning, intense heat and lack of smoke – these are the advantages that helped fuel briquettes made using a press gain popularity. Shish kebab, barbecue or a hot fire with minimal flame - what else is needed for a good rest?
And this is a schematic representation of it
There is another option to compress coal chips instead of sawdust. In this case, it will be a fuel that burns for a very long time and produces a huge amount of heat. And there is usually a lot of such crumble in the coal sheds of houses that are heated with it. So why not put him into action?
Press for recycling plastic and cardboard
Surely many have seen cardboard boxes that are tightly compressed into a tight stack. This is also the work of the press. After all, it is much more convenient to export such material when it is compactly packaged. A cardboard press is one of the easiest to make with your own hands. Other solid materials can be disposed of using approximately the same principle. For example, with the help of a press, plastic bottles are transformed into neat layers that are convenient for transportation.
A mechanical cardboard press is a very convenient device.
But still, pressing plants bring the greatest help in agriculture.
Mechanized harvest assistant
To collect the straw remaining on the field after harvesting, or forage hay, it is optimal to use a homemade pick-up press. Moreover, it will not only make work easier. Straw will be rolled into neat, dense rolls that are convenient to transport and store.
In the drawings of a do-it-yourself hay press, it is necessary to indicate the dimensions - this will help in the end to assemble everything correctly. Although there are options for very simple units, more on that below.
The simplest wooden hay press - minimum material and manufacturing time
Well, for starters, before you start making such a unit yourself, it is important to understand the designs of its various types, understand their differences and decide on the necessary material
What is a garage press for and how does it work?
A garage press can generate force from several tens to several thousand tons. This value is calculated individually. The device is actively used for:
- Metalworking (stamping, straightening, bending, forging);
- Manufacturing of steel profiles, wood chip products;
- Pressing of all kinds of materials (plastic, rubber, etc.);
- Briquetting.
How to use a garage press in your home workshop? By spending a little time, effort (and a small amount of money), you free yourself from expensive visits to car services to replace a silent block or bearing.
You can easily make any metal blank, straighten it, glue several parts (from plastic, iron, cardboard), and even squeeze out oil. A homemade garage press is a necessary and multifunctional device.
However, before you start creating a hydraulic press with your own hands, it is important to understand the principle of operation of the mechanism. The unit consists of two chambers of different sizes
Pressure transfers fluid from the smaller cylinder to the larger cylinder.
Diagram of a homemade press
Both chambers are connected to each other by a special channel through which the working solution circulates. The larger container contains the piston. When the liquid used (usually a special oil) fills the large chamber, the piston is lowered and thereby operates the actuator.
In most cases, the working cylinder is fixed in a vertical position, but sometimes it is more rational to install the container horizontally. How to do press correctly? What do you need to buy to build a useful homemade product? Let's figure it out.
When to buy
Tabletop manual mechanical mini press
But when you under no circumstances need to make a press yourself, it is when you are engaged in precision mechanics, optics, or jewelry work. All homemade presses are not particularly accurate: you can’t make them better at home and/or homemade conditions. And an inaccurate mini-press can break or irreparably damage a tiny irreplaceable part, crack a lens, a gemstone, etc. In these cases, it is still better to purchase a desktop mini-press; Of these, manual mechanical rack and pinion (see figure on the right) are widely available and their prices are reasonable.
Project development
The bed is the most important design element of a hydraulic press. This is a kind of frame, with driven slats along which a horizontal beam moves. Working surfaces are attached to it to compress parts. The frame must be strong enough to withstand the force created by the jack, and have a safety margin, because the design pressure on the moving beam has a counteraction in the opposite direction. If the calculation is incorrect, the design of the press may simply collapse due to rupture.
It is better to design the frame of a homemade press with a platform-type base with a movable table. Their dimensions are calculated in accordance with the dimensions of the materials being processed. In any case, the width and height of the frame opening must be larger than the total dimensions of all working elements of the equipment. To determine the width and height of the opening, you need to add up the following parameters:
- thickness of the moving table and platform
- jack dimensions
- rod stroke value
- dimensions of processed workpieces.
In this design of a hydraulic press, the jack is attached to the base of the frame between the platform and the movable table, and its upper part takes on the function of support. The work table transmits force from the jack to the workpiece. The table should move up and down on the frame along the side rails without obstruction.
To ensure the table moves in the opposite direction, tension springs with sufficient tensile rigidity are used. They are attached at one end to the base of the frame, and at the other to the movable table on both sides. The springs must be selected so that their stiffness matches the characteristics of the jack.
The stroke of the hydraulic jack rod can be adjusted using the following methods:
1. A screw drive is installed at the top of the frame. This element is equipped with a special steering wheel, similar to a drilling machine. During the pressing process, you will have to quickly screw in the screw, thus reducing the clearance between the workpiece and the moving element of the press. Thus, it becomes possible to change the clearance within a wide range for the location of pressed objects inside the frame.
2. Equip the structure with a removable movable table. In this case, it is attached to a movable horizontal beam using special locks, and holes are drilled in the vertical side posts of the frame with a height increment slightly less than the stroke of the rod.
3. Use replaceable steel pads. Steel sheets of various thicknesses are perfect for these elements.
All these methods can be used in combination. The dimensions of all parts must be included in the drawing, taking into account the dimensions of the parts being processed and the characteristics of the rolled metal for assembling the frame.
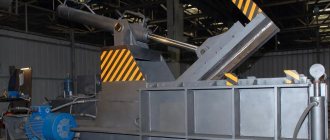
Mechanism for producing briquettes from sawdust
Private households and cottages are heated with briquettes. The main advantages of such fuel are simplicity and efficiency. To obtain it, they use a pressing unit.
Photos of a homemade press clearly illustrate its design. The main components of the device are:
- base;
- Desktop;
- power frame;
- drive (mechanical or manual type).
The manual drive requires the use of a car jack; the mechanical model requires an electric motor.
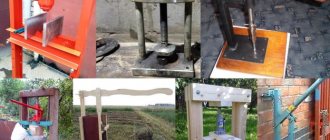
Manufacturing
The most important characteristics of a homemade garage press are reliability and safety margin. The device is always made well, with a large margin of safety, since almost all components are subject to serious pressure and load. Therefore, any mistake during the manufacturing process will lead to inevitable breakdown.
How to make a garage press with your own hands?
You should start by creating a frame and platform. To make it, they take channels that have numerous stiffening ribs.
A rectangular metal pipe is also used as a blank.
4 pieces are cut out of it according to the dimensions of the drawing. Metal pieces are welded into one element.
The welds should go on the sides to increase the rigidity of the mechanism. Vertical posts and stops are also made from pipe. After this, you can start welding the frame. Its main elements are a platform, two posts, and a lower stop. The frame will take the force, distribute it and ensure the stability of the entire structure.
The platform must be supplemented with a retainer. A pipe 15-20 millimeters long is suitable for this role. The diameter of the pipe is determined based on the dimensions of the jack rod. To secure the fastener, welding is used.
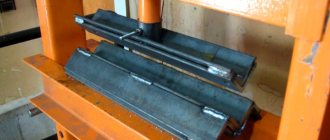
Then a removable stop is made. The emphasis will ensure the movement of the press and create the necessary force on the product placed in the device. This unit is made using steel strips. The stripes should be slightly shorter than the distance between the posts.
The minimum thickness of metal strips is 10-15 millimeters. The strips are welded on both sides. Fixation of the stop will be ensured by two holes that are drilled in the strips themselves.
After creating the frame, a hydraulic bottle jack is placed in it. During installation, the stops are pulled back and fixed. The jack is placed inside so that the rod fits into the lock. Fastening is done with bolts or welding. It is advisable to use bolts; they will allow you to remove the jack if necessary. This way you can use it for other purposes.
Read about how to make racks, shelves, a workbench and a car lift in your garage.
What is the structure of a hydraulic press and how to make it
A hydraulic press is absolutely indispensable in rural areas. And it was invented back in 1975. The principle of its operation is to use communicating cylinders with pistons of different diameters. Moreover, the less pressure, i.e. the hydraulic pump and the more receiving hydraulic cylinder, the stronger the pressure will be created with less force. In essence, this can be compared to the movement of a car in a low gear.
The operating principle of hydraulics is much clearer this way
The most common form of hydraulic press, as already mentioned, has become a rectangular frame. And the main task in its manufacture is accurate calculations. The first step is, of course, to draw up a diagram of the future press, because Without it, it will be difficult to figure out all the connections. Both the quality and speed of assembly of the unit depend on how detailed it is.
All structural elements must be made of steel, with a thickness of at least 15 mm. This is done so that the frame does not move during operation, because significant force will be applied. The main thing that needs to be considered is the design itself. It is necessary to remember that hydraulic jacks are designed specifically for working in a vertical position and cannot be placed on their side, nor can they be installed with the rod down.
Mechanical work with a hydraulic press becomes much easier
Ideally, you should get the following design. A rectangular, elongated upward frame is fixed to the frame. Inside the frame, vertically along the edges, there are 2 guides along which a horizontal crossbar runs up and down. A hydraulic jack is fixed on top of it, and the transverse beam itself is suspended from the upper part of the frame by springs, which ensure that the transverse beam is pressed back when the jack is loosened.
An ideal example of a homemade hydraulic press
The hydraulic press produced in this way will press down when the jack is “pumped up” and rise up when it is loosened using springs. A large nut can be welded to the bottom of the beam, into which various tips needed for a particular job will subsequently be screwed.
If you have a separate hydraulic cylinder and hydraulic pump at hand, then you can make a more convenient unit. Indeed, in this case, it becomes possible to install a pedal, and during work both hands remain free, which is sometimes extremely necessary.
In general, how to make a hydraulic press is everyone’s business. And the answer to this question is limited only by the imagination and wishes of the master. A little ingenuity and now an exclusive device is ready that meets all the requirements of convenience.
Drawing diagram of a hydraulic press - everything is clear and clear
The importance of drawing up drawings of a self-made hydraulic press
The main task in such work is accuracy and attentiveness. And if the dimensions of, for example, vertical posts do not match, the unit may press slightly to the side, which in some cases can be critical
That’s why drawing up drawings of a manual hydraulic press with your own hands is very important. Moreover, all dimensions on them must be written down and calculated down to the millimeter.
And during manufacturing, deviations from the drawing are unacceptable.
A hydraulic press drawing of which is drawn up correctly and will function perfectly. For a typical garage installation, the ideal size would be a supporting frame 50 cm wide and up to 1 m high.
FakeHeader
Comments 71
Calculate the design according to strength of material - 10t is the limit... Not enough, although it’s unlikely that more is needed in the garage.
My friend, what do you use to drown the batteries in the garage?
At that time, everything was heated by the working furnace with a mini-boiler. and now everything is disassembled and awaiting installation in the box
Please tell me which channel you used? but it will be good if you help with the size of your press, not only to me but also to other participants, I will be very grateful for the drawing
unfortunately, all the dimensions were from my head - I didn’t draw anything, I just adjusted it according to the availability of material.
I can only write what I remember: in the first photo on one stand it says L - 2330, I bought it in addition, as far as I remember, this is the height of the press, the width of the table is 270 mm, the length of the legs is 1000 mm, the width is 530 mm. and when marking the holes, I started from the posts - I made a line in the center of the ends, and then oriented all the other holes along it.
channel 16 for racks, channel 12 for cross beams and for the table, channel 10 for the press platform and channel 7 for legs + M30 bolts
thank you =))) we will buy the material and try it))) now is the time to create a drawing based on the finished tool))
Operating principle and design features
A hydraulic press is a type of special equipment for a home garage that is used to process workpieces or other parts under high pressure. It is often used by car service workers when repairing cars. The press can be used to make briquettes from waste or to bend metal objects.
A professional car press is not cheap, which is why some people try to make one themselves. However, before doing this, it is better to familiarize yourself with the features of its design and basic functional principles.
The design includes two main chambers, which are made in the form of cylinders. In the smaller of them, pressure increases due to oil pumping into the second, enlarged cylinder. Liquid is pumped between the cylindrical chambers using a pipe-shaped channel connecting the chambers. When oil enters the second cylinder, the pressure on the piston responsible for the operation of the press increases. The device is also equipped with special supports into which the product being processed is placed.
Using the device at home
At home, you can use the device to perform a wide variety of tasks. The small size of the unit allows it to be placed in a garage or other small room and used when repairing a car or motorcycle. It can also perform the following functions:
Stamping;- Forging;
- Profile production;
- Creating bends;
- Pressing and pressing out bearings and other parts;
- Used for culinary purposes, such as making juice from vegetables and fruits.
There are many known cases when the press is used as an oil press, and also with the help of equipment they perform repressing of silent blocks. In addition to repair work, a hydraulic press can be used to bend metal, glue products using pressure, make briquettes from various types of waste, and also squeeze out oil and other liquids. Equipment for performing such tasks, even with a simple design, costs a lot of money, but the device can be made independently, using simple materials and tools.
Installation of an adjustable support beam for a return mechanism for a homemade hydraulic press
The lower and upper beams must have the same cross-section. The elements differ only in design. To make the lower support element, two channels are used, which should be turned with their ribs outward. They must be placed on opposite sides of the racks and welded to their central part using inserts from corners or thick reinforcement.
Fixation of the beam on the racks is carried out using massive steel fingers. Under them, a series of circular cuts should be made at different heights with parallel placement in vertical channels. The diameter of the holes must correspond to the cross-section of the bolts.
Another structural element of a self-made hydraulic garage press is a spring mechanism, thanks to which the jack returns to its original position when the bypass valve opens. Simple springs for finishing doors, which can be purchased at a hardware store, are suitable for this.
The springs used for finishing the doors ensure the operation of the adjustable support beam of the return mechanism.
The task is complicated by the upper pressure beam, which has significant weight, as a result of which the spring may not compress. You can get out of this situation by increasing the number of spring elements to 4-6 pieces, which is acceptable for a self-made desktop hydraulic press. You can also use more powerful elements designed for doors, which is more relevant for floor installations.
If there is no top block, the springs are attached to the jack rod. Fixation is performed using a washer whose internal hole is larger than the rod adjusting screw, but smaller than the diameter of the piston. The spring should be fastened through two small outer holes and fixed to the upper beam in the same way. The spring may not be installed strictly vertically. Excess length of the element can be compensated by its inclined arrangement.
On a note! Welded hooks can also be used to secure the spring.
Vibropress
This mechanism is used when it is necessary to strengthen cinder blocks and similar concrete products. A cement-sand mixture and crushed stone are placed inside a special form. Then they apply pressure to it and turn on vibration. As a result, excess air is removed, due to which the strength characteristics of the product are improved.
Creating a brick making press in a workshop is quite feasible. However, you should be prepared that you will need to spend more than one hour of your personal time and make a lot of effort.
Relevant knowledge will also be needed. Therefore, if you need to work on sidewalk tiles or something similar, experts recommend making a standard vibrating table.
Essentially, nothing will change if the composition in the mold is not compressed by a press, but simply loses excess air under the influence of vibration.
What to consider when developing a drawing of a homemade press
The supporting element of any press, including a homemade one, is the frame, the development of a drawing of which should be approached with the utmost responsibility. Structurally, the bed is a frame, inside of which there is a jack with a working tool that exerts pressure on the part or workpiece.
The type of bed may vary significantly depending on the purpose of the press
The lower part of the frame - its base - is designed taking into account the fact that it must ensure high stability of the entire structure. When calculating the width of the internal opening of the frame of a homemade press, they take into account both the dimensions of the parts and workpieces that will be processed on it, as well as the total dimensions of all the components of the future press.
Another bed option with a simple base design to ensure stability
When calculating the height of the internal opening of the frame, the following parameters are summed up: the height of the jack, the desired amount of free play of its rod, the thickness of the working element and the part that needs to be processed. If a homemade press is made according to the first scheme, then its design is as follows: the jack is installed on the lower base, and the part is installed in the upper part of the frame; the force from the jack to the part is transmitted through its rod and a movable working platform moving along guides in the side elements of the frame.
In order to ensure that the rod returns to its original state, two springs are used, the lower part of which is attached to the base, and the upper part is attached to the movable working platform
If you decide to make a press from a jack with your own hands, then it is very important to correctly calculate the stiffness of the springs so that they effectively perform all the functions assigned to them
When implementing the second scheme, a part is placed on the lower base, and the jack is installed on a movable platform, to which springs are also attached, connecting it to the upper crossbar of the frame. In both the first and second cases, a so-called socket is made at the point of contact of the rod with the movable platform or the upper crossbar of the frame, for which a piece of pipe of the appropriate diameter can be used.
The inability to adjust the height of the working area simplifies the design, but significantly limits the options for using the press
A self-made hydraulic press will be much more convenient to use if it includes the ability to adjust the free jack rod, which also affects the permissible height of the workpiece. To do this, you can do the following.
- In the upper part of the internal contour of the frame there is an additional plate, which can move along the guides due to a screw drive with a steering wheel. Thus, it is possible to change the clearance within a fairly wide range for the placement of parts inside the frame.
- You can make a removable stop, which is most often used as a mobile removable platform. The position of such a stop inside the frame can be fixed using bolted connections, for which holes are drilled in the frame at a certain pitch. In this case, the height spacing of such holes should not exceed the free play of the jack rod.
- From a solid piece of metal or a metal profile, you can make several replaceable inserts-gaskets of different thicknesses.
- You can also use several of the methods described above at the same time.
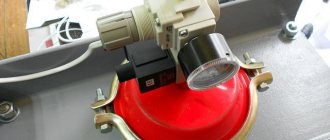
Pocket crimper according to GVK recipe
Good afternoon, dear forum members. Inspired by the “competition work” of forum participant Grigory aka GVK (Here is the description » > ) I decided to repeat his “tool”. Of course, I was slightly gnawed by doubts “will such a plastic thing be able to withstand so many atmospheres”, but the farm needs a crimping machine, but there is no money for a branded one. The manufacturing process is very simple (I also learned the details from Gregory). We buy an ordinary flower sprayer (which can be screwed onto a standard "one and a half" one. We unscrew the head of the sprayer (photo 1). A fitting with a fine thread opens to our attention. Having wound a little bit of flax on it, I put an ordinary oxygen hose on top and tightened it with a clamp. Since I plan to use the design many times , then assembled the structure shown in the photo. From left to right there are 1 10mm fitting for 1/2" 2 Check valve for 1/2" 3 Ball valve for 1/2" 4 Tee with a Mayevsky valve (to bleed air from the pressure tester and to remove there is pressure in it before disconnecting from the system) 5 Tee with a pressure gauge (I bought the cheapest one, and it has a maximum of 6 atm. Well, that’s enough for now) 6 Fitting 10mm by 1/2″ Next, the hose goes into a fitting 10mm by 1/2″ from the inside thread (for connection to the system)
Actually in the photo the pressure of 2.5 is the pressure in my heating system. When the sprayer was directly connected to the pressure gauge, up to 6 atm was pumped up in seconds.
In general, as they say, God bless Gregory aka GVK for the idea