DIY grain crusher
articles:
- 1. Let’s understand the materials used to make a grain crusher
- 2. Grain crusher from a grinder
- 3. How to make a grain crusher from a washing machine
Everyone who does housework must have a grain crusher in their arsenal. Surely many people know that independently prepared animal feed is much higher quality and healthier than any compound feed.
So, the homemade grain crusher discussed in this article will allow you to easily grind wheat, barley, oats, and many other grains. As for functionality, it will differ little from standard purchased products.
Before making a grain crusher with your own hands, you will need to consider what main components it consists of, and what engine would be best to use for these purposes.
We understand the materials for making a grain crusher
We must immediately make a reservation and say that the design of a homemade grain crusher can be completely different.
That is, if you have an old unnecessary grinder or washing machine on hand, then they can easily be used in the design of a grain crusher.
Also, to make this homemade product, you can use an electric motor from a vacuum cleaner; it has very high speeds, so it’s perfect.
Now regarding the materials of manufacture. In any case, if the grain crusher is made on the basis of an angle grinder or an electric motor from a vacuum cleaner, you will need:
1. Thick plywood - used as a base for the grain crusher. Also, a bunker for loading grain is made from plywood; 2. Hardware products - staples, bolts and self-tapping screws, with which you could screw an angle grinder or an electric motor to the base; 3. Mesh - will be used as a sieve;
4. A metal plate or disk from a vegetable cutter.
So, let's look at how you can make a grain crusher with your own hands, using for these purposes an old washing machine, an angle grinder or an electric motor from a vacuum cleaner.
Grinder grinder
Perhaps the simplest design of all those available for self-production is an electric grain crusher made from a grinder. In order to make a grain crusher in this way, you will need to secure the grinder to a wooden base with metal brackets and bolts.
Before this, you will need to make a hole in the base for the shaft, on which a knife made from a metal disk will be installed (for these purposes, the disk will have to be cut on both sides, as in the pictures), and a hopper.
The part where the grain will be ground (the working chamber) is made from a piece of tin, after which holes are drilled in it, no more than 3 mm in diameter (like in a sieve). Then the working chamber is screwed to the base using screws, where the knife of the homemade grain crusher is installed.
An important component of any grain crusher is the grain loading hopper. You can make it from any available container of suitable size. It is recommended to use a 5-10 liter plastic canister for these purposes. First you will have to cut off the bottom of the canister, after which it can be installed with the neck in the hole on top of the grain crusher.
How to make a grain crusher from a washing machine
If you have an old washing machine at home, then it can be adapted to the needs of the homemade product in question.
Making a grain crusher from a washing machine is quite simple:
1. To do this, you need to attach an additional motor with knives to the top of the washing machine drum, using metal corners.
The main electric motor, which is located under the drum, is also modified; knives made of a thin strip of steel are installed on it.
It is very important that the engine blades rotate in different directions, since only in this way will the best efficiency of a homemade grain crusher be ensured.
2. Then, in the top cover of the washing machine, you should cut a small hole for filling the grain, and place a metal funnel on top for easy filling.
3. In the lower part of the washing machine, right in the body and drum, you will also need to cut a small hole for the exit of crushed grain. As with the loading hole, it is better to immediately provide a metal receiver under which an empty container can be placed.
As you can see, making a grain crusher is not so difficult; if you would like to design something with your own hands. Stay with SAMASTROYKA magazine and have a good day everyone!
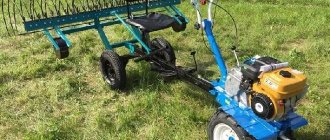
How to make a grain thresher with your own hands
Compact threshers are used to thresh grain crops on private farms.
They are more convenient and practical than large combines when it comes to processing a small volume of grain.
You can not only buy a thresher, but also make it yourself from scrap materials.
- 1 Thresher device
- 2 Homemade threshers
Thresher device
Threshing, for which machines are used, means separating the grains from the ears, grinding the ears and extracting the grain from the resulting mass.
The effectiveness of threshers is determined by the harvested crop, the ears of corn left in the field, and the under-threshing or incomplete extraction of grain.
High-performance devices process and preserve up to 99% of raw materials.
For the productive operation of the device, the moisture content of wheat, rye or corn is important. Optimal humidity is from 15 to 20%. Main components of the device:
- Bunker for receiving raw materials,
- Working chamber with drum and deck,
- Transporter of incoming raw materials,
- A device for separating grains from the resulting straw and removing them from the working chamber.
The raw materials enter the bunker and are divided into three parts: chaff, straw and grain.
In the straw walker, the straw is separated, and the chaff and grain are further processed.
Whole grain is cleaned of film and dirt, and blown out of the drum using air flows from a fan.
Simpler models may not have a built-in fan, and the grain must be sown manually from the resulting mass.
Homemade threshing machines
You can make a thresher with your own hands in two ways. One of them involves attaching the device to a frame, the second allows you to make a device with a fan.
Thresher on frame
Work begins with the manufacture of a metal frame. It is usually made from a strong corner. Average frame dimensions:
- Length: 75 cm,
- Width:60 cm,
- Height: 100 cm.
The drum is made from a piece of metal pipe with a diameter of 18 cm and a length of about 65 cm.
They attach it closer to the middle of the frame, and six rows of twenty steel teeth are mounted along the drum.
The distance between the teeth is about three centimeters. Recommended sizes:
- Diameter: 1.2 cm,
- Length: 5 cm.
The drum shaft is supported by double bearings. And several metal rods are welded over it.
It is very important that the length of the teeth is two centimeters longer than the rods.
This will ensure better grip of the processed mass.
The frame of the bunker for receiving raw materials is made of wood, and the ribs are reinforced with a metal corner. A frame is placed above the drum, and under it there is a tin tray to release the already crushed raw materials.
The operation of the device is ensured by an engine with a power of about 1500 rpm.
You can increase the shaft rotation speed to three thousand revolutions by installing a pulley on the motor that is twice as large as the one installed on the shaft.
Homemade thresher with fan
Manufacturing begins with assembling the body from a sheet of steel. The front wall of the housing and the hopper for receiving raw materials are made removable. A threshing drum is placed in the front part of the working chamber.
It can also be made from a piece of pipe with a diameter of about 18 cm. It is necessary to make a valve in the receiving hopper, which will enter the neck of the working chamber at its lower end.
This will prevent unwanted release of raw materials during loading.
The shaft passes through the entire structure of the device and is an important connecting link.
It is made of durable steel, and a through slot is cut out on the longitudinal axis using a milling cutter.
Elastic wooden whips are installed in it, positioning them with a slight offset for better movement of the mass. A fan is welded on the other side of the shaft.
During operation, wooden whips hit the processed raw materials, grain and chaff fall into air currents and are carried out. The thresher is equipped with a replaceable deck in the form of a lattice.
The shape can be either oblong or square. If you plan to thresh durum varieties of rye and wheat, then it is better to use a steel grid with a cell of 7 * 16 mm.
For softer grains, you can use a nylon grid with a cell of 6*10 or 10*16 mm.
A special slot is made under the deck, the function of which is to separate plant fibers from the grain. This design also increases the speed of air flow.
A replaceable box made of metal or wood is mounted at the bottom of the apparatus, and a vertical sheet of plywood or tin is welded above it.
To regulate the air flow, a small damper is installed at the slot.
The device operates from a conventional engine, which produces about 1800 revolutions per minute of operation.
What is a thresher?
Many people associate a thresher with an element of a combine harvester. However, do not forget about individual units that are designed for threshing agricultural crops.
At first glance, such equipment is not needed on the farm, because there are specialized machines that perform harvesting and threshing of grain crops. If you look at the situation from the other side, it becomes obvious that combines are only suitable for large areas.
What should farmers or owners of household plots with relatively small crop areas do? Here, using a combine harvester is impossible: large equipment will not be able to turn around in a small area.
In addition, the cost of servicing the equipment will not be justified by the harvest. In this case, compact threshers come to the rescue, which we will introduce you to.
Design Features
All modifications of threshing machines work on the same principle: agricultural crops are fed into the threshing hopper, and the output is a purified product.
From here we can highlight the main design elements: a drum with a concave, a straw walker and a beater device.
Some modifications consist of a multi-stage cleaning system, which includes a fan, elevator and sieve mill. Let's look at units designed for processing various crops.
For grain
The productivity of such technology directly depends on the complexity of the design. In addition to threshing, complex units can perform additional functions, including sorting the purified product. This is what it looks like:
- At the first stage, the plant mass is fed into the threshing hopper. After this procedure, an unusable mixture consisting of chaff, grain and straw is obtained.
- This mixture enters the straw walker, where fractional separation occurs. Here the straw is sifted out, and the chaff and grain are sent for further processing. Usually this is a fan, complemented by several grid frames. Here, excess impurities are removed: damaged grain, soil residues and plant particles.
- The cleaned grain is sent to the next stage - polishing. Here films and adhered particles of dirt are removed. The grain is supplied for polishing via an elevator.
Thresher device
Threshing, for which machines are used, means separating the grains from the ears, grinding the ears and extracting the grain from the resulting mass. The effectiveness of threshers is determined by the harvested crop, the ears of corn left in the field, and the under-threshing or incomplete extraction of grain. High-performance devices process and preserve up to 99% of raw materials.
For the productive operation of the device, the moisture content of wheat, rye or corn is important. Optimal humidity is from 15 to 20%. Main components of the device:
- Bunker for receiving raw materials,
- Working chamber with drum and deck,
- Transporter of incoming raw materials,
- A device for separating grains from the resulting straw and removing them from the working chamber.
The raw materials enter the bunker and are divided into three parts: chaff, straw and grain. In the straw walker, the straw is separated, and the chaff and grain are further processed. Whole grain is cleaned of film and dirt, and blown out of the drum using air flows from a fan.
Simpler models may not have a built-in fan, and the grain must be sown manually from the resulting mass.
How to make a grain thresher with your own hands - Metalist's Guide
Compact threshers are used to thresh grain crops on private farms. They are more convenient and practical than large combines when it comes to processing a small volume of grain. You can not only buy a thresher, but also make it yourself from scrap materials.
- 1 Thresher device
- 2 Homemade threshers
Do-it-yourself homemade grain crusher: drawings, dimensions, video
Grain crusher: drawings, diagrams, dimensions, photos and videos of a homemade grain crusher. A grain crusher is an indispensable thing in the household; it is used for grinding grains of cereal crops - corn, wheat, barley, oats, for preparing dirt or feed for poultry and animals.
Households usually do not require a powerful mill; a small grain crusher is quite sufficient, which we will manufacture in this article.
There are quite a few types of grain crushers; we will look at the simplest version of a homemade grain crusher that you can make with your own hands.
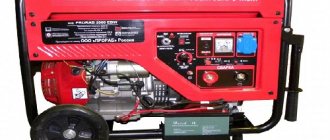
To make a crusher you will need:
- Electric motor with a power of about 1 kW.
- Sheet metal 3 mm thick.
- Hardened steel for a knife.
- Bolts, nuts, washers, screws - M8.
- A metal barrel or container of suitable size.
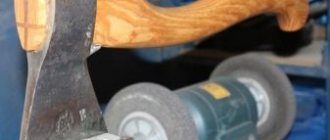
Tool:
- Grinder with cutting wheel.
- Electric drill.
- Grinding machine.
- Welding machine.
- Locksmith's tool.
Homemade grain crusher: diagram
The grain crusher consists of the following units:
- Gate valve for regulating the flow of grain into the working chamber.
- Grain bunker.
- Electric motor on/off button.
- Electric motor.
- Sleeve.
- Axis.
- Washer.
- Screw.
- Screw.
- Base.
- Working chamber housing.
- Container for crushed grain.
- Bolt.
- Screw.
- Metal mesh (sieve).
Diagram of the crusher working chamber.
- Base.
- Working chamber housing.
- Screw.
- Sieve.
Making a homemade grain crusher
For the grain crusher, you can use a water pump engine with a power of about 1.5 kW 3000 rpm.
The engine is installed on a base, a metal sheet with a thickness of at least 3 mm. You need to drill a hole in the sheet with a diameter slightly larger than the diameter of the motor shaft. We fasten the engine to the plate with bolts.
The working chamber can be made from 3 mm sheet metal, cut out a strip 40 mm thick and bend a ring with a diameter of 300 mm from it. The ring is welded to the base.
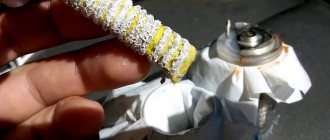
To attach the knife to the motor shaft, you will need a coupling; you can order the coupling to be turned by any turner.
A grain crusher blade can be made from a lawn mower blade or a circular saw blade. The length of the knife should be accordingly 10 - 20 mm less than the diameter of the working chamber. The knife is attached to the coupling with M 8 bolts, the coupling is placed on the motor shaft.
We close the bottom of the working chamber with a sieve; the sieve can be made from a metal mesh with a hole size of 3 - 3.5 mm. We attach the sieve to the working chamber with studs and nuts; if you need to change the grind size, just change the sieve to another one with holes of the required diameter.
Installation of a bunker for filling grain. You can use any cone-shaped container for the hopper; to do this, you need to make a small hole with a diameter of about 30 mm in the upper plate of the working chamber, weld the hopper onto it and make a valve to regulate the flow of grain from the hopper to the chamber.
We install the grain crusher on a metal barrel or other suitable container.
The principle of operation of a homemade grain crusher
We close the valve in the bunker and pour grain into it, turn on the electric motor and gradually open the valve. The grain will gradually begin to spill into the working chamber and be crushed by a rotating knife.
When the grain is crushed, it will begin to spill into the lower holes of the sieve of the working chamber and end up in the barrel. Depending on the diameter of the sieve holes, you will get either a coarse grind or a fine grind, until the grain is crushed to such an extent that it begins to fall into the holes, it will remain in the drum and be crushed with a knife.
The valve on the hopper is needed to regulate the grain supply; if the engine begins to lose speed, then it is necessary to reduce the grain supply by closing the valve, thereby reducing the size of the inlet hole.
The working knife gradually wears out during operation, so it needs to be changed periodically.
When pouring grain into the hopper, you need to ensure that stones and metal objects that can damage the knife and damage the engine do not fall into the crusher along with the grain.
I recommend watching a video that shows a homemade grain crusher in action.
Video grain crusher device.
Homemade threshing machines
You can make a thresher with your own hands in two ways. One of them involves attaching the device to a frame, the second allows you to make a device with a fan.
Thresher on frame
Work begins with the manufacture of a metal frame. It is usually made from a strong corner. Average frame dimensions:
- Length: 75 cm,
- Width:60 cm,
- Height: 100 cm.
The drum is made from a piece of metal pipe with a diameter of 18 cm and a length of about 65 cm. It is attached closer to the middle of the frame, and six rows of twenty steel teeth are mounted along the drum. The distance between the teeth is about three centimeters. Recommended sizes:
- Diameter: 1.2 cm,
- Length: 5 cm.
The drum shaft is supported by double bearings. And several metal rods are welded over it. It is very important that the length of the teeth is two centimeters longer than the rods. This will ensure better grip of the processed mass.
The frame of the bunker for receiving raw materials is made of wood, and the ribs are reinforced with a metal corner. A frame is placed above the drum, and under it there is a tin tray to release the already crushed raw materials.
The operation of the device is ensured by an engine with a power of about 1500 rpm.
You can increase the shaft rotation speed to three thousand revolutions by installing a pulley on the motor that is twice as large as the one installed on the shaft.
Homemade thresher with fan
Manufacturing begins with assembling the body from a sheet of steel. The front wall of the housing and the hopper for receiving raw materials are made removable. A threshing drum is placed in the front part of the working chamber. It can also be made from a piece of pipe with a diameter of about 18 cm. It is necessary to make a valve in the receiving hopper, which will enter the neck of the working chamber at its lower end. This will prevent unwanted release of raw materials during loading.
The shaft passes through the entire structure of the device and is an important connecting link. It is made of durable steel, and a through slot is cut out on the longitudinal axis using a milling cutter. Elastic wooden whips are installed in it, positioning them with a slight offset for better movement of the mass. A fan is welded on the other side of the shaft.
During operation, wooden whips hit the processed raw materials, grain and chaff fall into air currents and are carried out. The thresher is equipped with a replaceable deck in the form of a lattice. The shape can be either oblong or square. If you plan to thresh durum varieties of rye and wheat, then it is better to use a steel grid with a cell of 7 * 16 mm. For softer grains, you can use a nylon grid with a cell of 6*10 or 10*16 mm.
A special slot is made under the deck, the function of which is to separate plant fibers from the grain. This design also increases the speed of air flow.
A replaceable box made of metal or wood is mounted at the bottom of the apparatus, and a vertical sheet of plywood or tin is welded above it. To regulate the air flow, a small damper is installed at the slot. The device operates from a conventional engine, which produces about 1800 revolutions per minute of operation.
What is a thresher?
Many people associate a thresher with an element of a combine harvester. However, do not forget about individual units that are designed for threshing agricultural crops.
At first glance, such equipment is not needed on the farm, because there are specialized machines that perform harvesting and threshing of grain crops. If you look at the situation from the other side, it becomes obvious that combines are only suitable for large areas.
What should farmers or owners of household plots with relatively small crop areas do? Here, using a combine harvester is impossible: large equipment will not be able to turn around in a small area.
In addition, the cost of servicing the equipment will not be justified by the harvest. In this case, compact threshers come to the rescue, which we will introduce you to.
For flax
Flax processing consists of separating the seed ovaries from the stem, followed by cleaning the seeds from foreign impurities. Let's consider the operating principle of such units using the example of the mobile model ML-2.8P. The technical side of the process is as follows:
- Sheaves of flax are sent to the clamping conveyor. In this case, only seed boxes should enter the stripping chamber. The seed part is separated from the stem by a stripping drum, the stems are thrown to the opposite side by a clamping conveyor.
- The seed pods are thrown into a grinding apparatus, where they are destroyed, and the plant mass enters the screen. Here large plant debris is removed.
- Grain and small debris enter the grain winnower, where air cleaning occurs.
- The finished and purified product is poured into a special bag.
Threshers are quite complex, multi-stage units, however, many farmers make such units themselves. Let's look at an approximate installation diagram.
Homemade design
If you decide to make a thresher with your own hands, you can use the design of L. A. Ditke. This is a three-section model, where the drive units are located on the first tier, the fan is located in the middle, and the threshing mechanism and winnowing machine are located in the upper part.
https://www.youtube.com/watch?v=w7eU1mYSESs
Here is the assembly diagram:
- A frame is welded from a metal corner. Recommended parameters: 925*565*410 millimeters.
- Then the housing and the receiving hopper are made from a metal sheet. To make a threshing drum, we take two steel disks (radius about 300 mm), weld metal corners onto them, and tighten the structure with oak whips.
- To make a deck you will need two pieces of sheet iron and fine mesh. The mesh must be bent to the desired radius and supplemented with six oak sticks. The structure is attached to the thresher frame using threaded connections. This approach allows you to adjust the distance between the whips of the threshing drum and the deck. This is necessary to configure the unit for various crops.
- Sieves are made by analogy with a straw walker. A two-level cleaning system is used here: the upper sieve has 3 mm holes, the lower one has 1 mm holes.
- The structure is driven by an electric motor, from which there is a belt drive to the threshing drum. In addition, you will need another motor to operate the sieves.
The design is quite complex, but in principle any farmer with minimal knowledge of mechanics can cope with it.
TELL YOUR FRIENDS
Design Features
All modifications of threshing machines work on the same principle: agricultural crops are fed into the threshing hopper, and the output is a purified product.
From here we can highlight the main design elements: a drum with a concave, a straw walker and a beater device.
Some modifications consist of a multi-stage cleaning system, which includes a fan, elevator and sieve mill. Let's look at units designed for processing various crops.
For grain
The productivity of such technology directly depends on the complexity of the design. In addition to threshing, complex units can perform additional functions, including sorting the purified product. This is what it looks like:
- At the first stage, the plant mass is fed into the threshing hopper. After this procedure, an unusable mixture consisting of chaff, grain and straw is obtained.
- This mixture enters the straw walker, where fractional separation occurs. Here the straw is sifted out, and the chaff and grain are sent for further processing. Usually this is a fan, complemented by several grid frames. Here, excess impurities are removed: damaged grain, soil residues and plant particles.
- The cleaned grain is sent to the next stage - polishing. Here films and adhered particles of dirt are removed. The grain is supplied for polishing via an elevator.
If the design consists of one drum with a pre-drum (simple models), the output is a mixture of grain with plant matter, which requires manual separation. This is quite enough for preparing feed for livestock and poultry. For other needs, more modernized units will be required.
For flax
Flax processing consists of separating the seed ovaries from the stem, followed by cleaning the seeds from foreign impurities. Let's consider the operating principle of such units using the example of the mobile model ML-2.8P. The technical side of the process is as follows:
- Sheaves of flax are sent to the clamping conveyor. In this case, only seed boxes should enter the stripping chamber. The seed part is separated from the stem by a stripping drum, the stems are thrown to the opposite side by a clamping conveyor.
- The seed pods are thrown into a grinding apparatus, where they are destroyed, and the plant mass enters the screen. Here large plant debris is removed.
- Grain and small debris enter the grain winnower, where air cleaning occurs.
- The finished and purified product is poured into a special bag.
Threshers are quite complex, multi-stage units, however, many farmers make such units themselves. Let's look at an approximate installation diagram.
How to make a grain thresher with your own hands - Metals, equipment, instructions
The smell of freshly baked bread evokes pleasant feelings in every person, especially if it is made from healthy whole grain flour, but it is very rare to treat yourself to such a treat. In stores you can find flour of any grind, but its quality sometimes does not correspond to the high cost.
The surest and most logical solution to this problem would be to acquire your own mill, and if, after reading these words, an image of a huge building and massive millstones appeared in your head, we hasten to console you - today you can make a compact machine that will fit in any kitchen.
In this article we will tell you how to build a homemade grain mill with your own hands.
Device characteristics
Any housewife who wants to feed her family healthy and tasty dishes dreams of owning a mill. The manufacture of this device is not so difficult from a technical point of view, but it will require the master to have the ability to handle turning equipment and drilling tools.
A home grain mill allows you to obtain flour of any grind size - coarse, medium or very fine (depending on the settings). It sounds quite tempting, especially when you consider that the cost of whole grain flour is incommensurate with the costs of its production.
If you look at it, whole grain “real” flour is grain that has undergone rough processing without removing the grain shells. They are also known as bran.
White flour, on the contrary, undergoes multiple processing, filtration and other procedures, as a result of which, in fact, all useful components are removed. It is logical that the production costs of white flour are higher, but for some reason it is cheaper than “unrefined” flour.
This is a clear example of skillful marketing that follows modern trends in a healthy lifestyle. If you want to eat healthy organic food, spend more money.
The grain itself costs mere pennies, so to produce flour at home using a household mill you will spend a minimum of money. The most common model is the “Malyutka” mini-mill. It was invented many years ago in Udmurtia by two engineers.
With the help of “Malyutka” you can not only grind grain to the required size, but also make feed for livestock, poultry, produce corn, buckwheat and any other flour. Agree, this is an indispensable device for a family living in a private house and keeping pets.
The dimensions of this homemade grain mill are very modest, but the performance is truly impressive - in just 5 minutes you can grind a whole bucket of corn, and it can handle a bucket of wheat in 2-3 minutes.
Technical characteristics of “Baby”:
- body dimensions without hopper and pipe – 320x160x170 mm;
- capable of producing 2 types of grinding (coarse and fine);
- low engine power - 180 W (high performance with significant energy savings. For comparison, a regular electric kettle or heating element electric stove consumes 2000 Wh);
- productivity: corn – 0.2 buckets/min, wheat, oats and other crops – 0.5 buckets/min;
- rotor-stator chopper, reversible;
- The total weight of the assembled device is 15 kg.
The most important task on which the efficiency and durability of the mill depends is the manufacture of the rotor and stator.
Mill diagram
In the image below you can see a detailed diagram of creating a compact “Malyutka” mill, indicating all the components used. Before assembly, prepare a complete list of required parts.
Parts for assembling “Baby”:
- Electric motor (you can take the motor from an old washing machine, since little power is needed).
- Mounting points for the electric motor (you will need 12 pieces of M6 bolts with spring washers).
- Engine support made of two steel angles 45x45 mm.
- The frame (base of the mechanism) is made of sheet steel 6-8 mm thick.
- Ties (studs with nuts).
- Reception box made of roofing iron.
- Coupling for transmitting rotation of shafts.
- Rotor.
- Cover for bearing assembly.
- Stator.
- Iron pipe.
- Cover made of sheet steel 3 mm thick.
- Fastenings for the cover (4 M6 screws).
- Distance ring.
- Reception box fasteners (2 M6 bolts).
- Two bearings No. 203.
- Places for fastening the cover for the bearing assembly (3 M6 screws).
- M6 screws with nuts for installation.
- Handle brackets made of 2 mm thick steel.
- Loading box
- Axle (M6 stud and nuts 2 pcs).
- Wooden handle.
- Places for fixing the pipe with M6 bolts.
Making a rotor
The design of the “Malyutka” itself is outrageously simple, so anyone can handle the assembly if desired, but for this you need to be able to handle a lathe and drilling equipment. If you don’t have the skills and you don’t plan to acquire them in the near future, you can order the necessary parts from a turning workshop. You will need a stator, rotor, and bearing cover.
If you want to do everything yourself, you should take into account several technical nuances:
- Make a rotor immediately with a variable-section shaft.
- Make the shaft from forging M45 (length 9 cm, diameter 12 cm) or from round timber (steel).
- Divide the whole process into several parts: preparing metal blanks (in a 105 mm circle, drill holes with a radius of 5 cm at an equally distant distance), removing the outer layer of the circle so that the groove size is reduced to 104.5 mm, and the working teeth are opened, after which the finished The rotor must be hardened.
The rotor should also be hardened correctly: first heat it in an oven to a temperature of 800C, then lower it into an oil container. In this particular case, it is not recommended to cool the metal with water, since it will crack and become very brittle.
Then you need to do a vacation, that is, heat the rotor again, but to a temperature of 400C, and leave it to cool at room temperature. The result is a very hard and durable piece that will last for many years.
To check whether the hardening is done well, run a file along the cutting side of the tooth - if it slides easily and does not leave a mark, then the hardening is good.
In the Malyutka mill, the rotor will spin on two radial bearings. This will increase the rigidity of the unit and the strength of the entire device several times. A 0.5 mm spacer ring must be attached between the bearings to the shaft - it will allow the bearings to move slightly and will create the tension that is necessary for the unit to adapt to the tension inside the mechanism.
Making a stator
The stator is a little more difficult to make than the rotor, as it requires extreme precision. The work can be divided into several stages. First grind the workpiece on the machine, then leave a small technological allowance.
To do this, drill out the opening in the center to 70 mm, mark a circle with a diameter of 105 mm on the workpiece, and mark the central points of future openings. Subsequently, they will create the stator work plane.
Markings should be applied strictly according to the drawing.
Mark the outlines of the holes at the top and bottom, and then drill out blind “windows” about 26 mm deep. On the machine, remove the allowance that you left earlier and bore the place where the working chamber will be located (105 mm).
You will also need to machine a groove for the sealing lip if you are installing one, but in practice the unit works just fine without this part.
When the stator is ready, you can start creating threaded holes for the bearing and stator covers, the nozzle and the loading box. Finally, the stator, like the rotor, must be subjected to heat treatment using the technology described above.
In order for the grain grinding mill to work properly, it is necessary to correctly and precisely set the stator coordinates. Bolts are used for this.
During operation, the rotor should move easily and smoothly, without jerking or jamming. Only when you are sure that all the parts are moving as they should, can you test run the mill.
To do this, it must be fixed on a table or stool so that the device does not fall to the floor due to vibration.
Manufacturing of the bed
Another important design detail is the frame, that is, the base plate. To make it, you can use a thick steel sheet of 6-8 mm.
The stator is attached to the frame with M6 screws, which will simultaneously hold the pipe. It can also be removable.
To do this, you will need to install a pipe in the opening of the base, which will correspond to the diameter of the part. And it will stay in the mechanism only due to friction.
To make a pipe, take a piece of thin-walled pipe with an outer diameter of 28 mm. A product with a round or square cross-section is suitable, and depending on this factor, a hole of the appropriate shape and diameter must be made in the frame.
If you have completed the manufacture of all the above parts, making a loading box will not be difficult. It can be made from iron roofing sheet by bending it to a given shape and soldering the seams. Regular sheet iron can also be used, but roofing sheet metal is much stronger and more durable. When the box is ready, install it on the stator and secure it with two M6 bots.
Before you start creating a manual grain mill, keep in mind that if the rotor rotates in one direction, only the first half of the stator working chamber will be used. When the rotor rotates in the other direction, the second part of the chamber will turn on.
There are different numbers of protrusions on both sides, and their sizes are also different. For this reason, the grinding in the first and second cases will be different. This allows you to get coarse or fine flour depending on your needs.
Joomla 1.5 Templates
MANUAL COMBINE MINIBATTLast summer, at the centennial anniversary of the Ulyanovsk Research Institute of Agriculture, all those present paid attention to one of the gifts to the institute - a portable breeding combine. Of course, this is a breeder’s dream - to mechanize the cleaning of small nurseries and get away from using a sickle. Therefore, when the head of the selection department of the UNISH, Vladimir Grigorievich Zakharov, was planning a trip to the Urals to visit our company, it was impossible to resist the temptation to look at the work of this technical novelty on the Kazakh fields. Thanks to our colleague, a breeder, who responded to our request to show the employees a portable harvester and conduct a test drive, which we will tell you about: Firstly, this is not exactly a breeding harvester, but a sampler produced by the French company. And it is intended, on the recommendation of the manufacturer, for selecting test samples to determine grain moisture content in field conditions. A very convenient thing for agronomists of farms with a large sown area, when it is necessary to quickly transfer combines from one plot to another. This is especially important in rainy years like this one in the Kostanay region. What is MINIBATT?
It is portable and when folded fits into a small metal box. In addition, there are also removable batteries, a charger and grain containers. The structure of the unit is quite simple - a top cover with a manual one for grabbing the ears, a rotating threshing drum, a pin concave and a container into which the threshed grain falls.
The concave is removable, made of durable plastic and can be adjusted to suit different crops.
The combine can be assembled for work in the field in a matter of minutes.
The battery is connected, the grain container is secured, the rotation speed of the drum is adjusted, and the aspiration mode is set.
That's all. The combine is ready for work. Now, in a good mood, we begin to thresh the highly shatter-resistant wheat variety Lyubava 5. The weather is sunny, the air temperature is high, the grain is ripe and dry.
By lifting and lowering the upper cover of the thresher using the handle, we clamp the ears of wheat and comb the ears.
Next, the ears are threshed, and the thresher drum acts as a kind of fan, blowing the chaff through a special channel. Then the already cleaned grain falls into a transparent plastic container. And with these cycles you can pluck the entire selection plot.
The manual thresher is not heavy (just over 3 kg) and, in my opinion, is quite convenient to use. Charging one battery lasts for an hour of continuous operation. With further use, the rotation speed of the threshing drum decreases.
At the top of the lid there is a closing hole through which individual ears can be threshed. Moreover, the manufacturer provides for the conversion of this sampler into a stationary beam thresher, suitable even for threshing small sheaves. This requires special legs and a box for receiving sheaves.
If the grain is not threshed clean enough, then using a second container you can thresh it again and bring the grain to an acceptable quality.
Test drive results: The first and, probably, main conclusion of this test is that the combine works and quite well. The grain does not mix, does not crush and, as shown by skipping three times, is practically not injured. The unit is lightweight, convenient, compact. The disadvantages include large losses of grain, inconvenience with combing ears located on different tiers, and, of course, low productivity. The plots of the breeding nursery are harvested much faster with a sickle.
In our opinion, it is better to use it for its intended purpose - to take samples from the fields. When used in breeding plots, such plucking of plots is most likely ineffective. But I think it may well be suitable as a stationary spikelet thresher. Although our spikelet thresher, made by craftsmen, is much more reliable and productive.