Copper pipes are used much less frequently than metal-plastic or polypropylene pipes. But thanks to a set of excellent technical characteristics - thermal conductivity, anti-corrosion and biological resistance - they are found in water supply, heating, and air conditioning systems.
Long copper products are expensive, but you can save on installation. For example, soldering copper pipes with a gas torch is available to anyone who wants to independently improve the system or make repairs. We will talk about how solder joints are made and give the rules for their implementation.
Areas of use
Most often, copper pipes are used for gas transportation and as water pipes.
The production of gas equipment, brake and hydraulic systems, car air conditioners and heat exchangers cannot be imagined without copper pipe rolling. The fact that copper pipes can be reliably joined without welding makes them an attractive option for creating transport routes for viscous flammable media. However, we are not just talking about household systems. For example, fuel lines for cars are often made from copper.
Copper is very convenient for arranging water pipes, as it is not afraid of corrosion with constant contact with moisture. Such systems are characterized by a significant service life, without the need for repair measures.
It should also be noted that copper pipes are resistant to increased pressure (up to 230 atm) compared to products made of plastic or steel. Their ability to tolerate freezing well is especially valued. The products tolerate chlorine well and have antiseptic properties.
Features of connecting gas pipes
For a long time, the gas pipeline consisted exclusively of metal pipes of different diameters. The material was valued for its ability to create a seamless pipeline capable of maintaining absolute tightness under high pressure.
Connections of rusted metal pipes are a source of increased danger, since it is at the joints that the steel alloy is destroyed especially quickly
The significant drawback of the metal alloy forced us to look for other options - under the influence of moisture, after several years of operation, it began to rust, threatening the integrity of the pipeline.
Then pipes from other materials began to appear:
- Copper , the advantage of which is considered resistance to corrosion, the disadvantage is the ability to maintain integrity at low pressure not exceeding 5 kPa.
- Low carbon steel , not susceptible to rust. Its disadvantage is difficulty in processing and high cost. Therefore, for the construction of gas pipelines, PVC pipes with a steel outer braid are used.
- Polyethylene . Elastic and lightweight, this material does not conduct electricity, is cheaper than other analogs and can withstand strong transformations without losing integrity.
You can read more about the different types of gas pipes and the features of their choice in this material.
The elements connecting the main line and the branch leading to the consumer began to be made of rubber. For such connections, heat-resistant rubber is selected that is not prone to drying out due to excessive insolation.
When installing rubber connections, finished factory products are used. Flexible eyeliners made in artisanal conditions do not comply with safety regulations
The choice of material is determined by the pressure in the gas pipeline, the required throughput and is calculated by specialists.
The same goes for connections. Only a professional can determine the appropriate type of fastening and correctly correlate it with the pipe material and technical operating conditions.
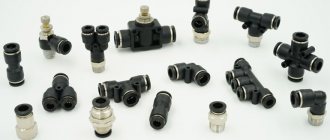
Connection methods
To connect copper pipes to each other, several methods can be used, depending on the location of the work and the requirements for the pipeline (it can be monolithic or collapsible).
Connection installation options:
- welding;
- soldering;
- fitting.
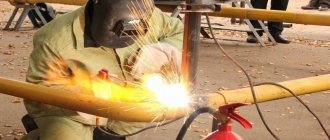
Welding of copper pipes is carried out using graphite, tungsten, copper or carbon electrodes. To organize appropriate conditions, the presence of nitrogen, argon or helium will be required. The work is carried out using a DC welding machine or a special torch. This method has one serious drawback, which is the significant difference in the characteristics of the welding joint and the pipe material. This applies to both the chemical composition and molecular structure, as well as the ability to conduct electricity and heat. This work should only be entrusted to a qualified specialist, since any mistake can lead to seam divergence.
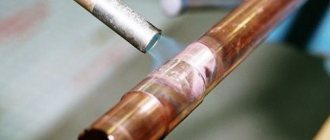
Instead of welding, which is quite difficult to implement, under normal conditions, soldering of copper pipes is practiced. For this, a gas burner or blowtorch is used. There is low-temperature and high-temperature soldering, which differ in the type of solder and implementation mode.
Press couplings and crimp fittings are also used to create a permanent connection of copper pipes. The solder here is replaced by an adapter ring. In the first case, special pliers are used for crimping; in the second, union nuts are used (they are clamped with a wrench). When tightening the nuts, it is necessary to ensure that the ends of the copper tubes meet each other. By grinding the metal, a tight and durable connection is achieved. If you put the coupling on correctly, the connection will not leak for a long time.
Features of the copper soldering process
The essence of soldering is to tightly connect two elements of a copper pipeline by heating and melting the binding material - solder.
After cooling, the tin alloy forms a reliable, non-dismountable structure, which will later be used to transport coolant, cold water, and refrigerant.
The process of soldering copper tubes when installing water heating equipment. Heating is carried out with a manual gas torch; tin wire is used as solder.
In everyday life, low-temperature or, in other words, soft soldering is usually used, in which the flame temperature from a gas burner does not exceed 450 ° C. Low-melting solder is used for it, and the maximum pipe diameter is no more than 110 mm.
Soft capillary soldering is suitable for equipment in water supply and heating systems, but is not used for gas transportation.
More about capillary soldering
Most often, in domestic conditions, copper pipelines are organized using capillary soldering. The essence of this method is the so-called capillary effect, which provides for the possibility of raising liquid (liquid solder) using adhesion. The main condition is that the wetted walls are separated by a short distance.
The organization of a connecting point for copper pipes in domestic conditions is carried out using special fittings for soldering or bell-shaped thickenings. The socket method is considered more reliable, since in this case we are talking about creating only one joint. Based on this, if possible, it is recommended to use socket connections instead of fittings.
The procedure for preparing sockets
Pipe cutting to size is carried out using a rolling pipe cutter. It is important to achieve strict perpendicularity of the end cuts relative to the central axis.
Next, chamfer both ends. To do this, you will need a special device - a chamfer remover. Further cleaning of the internal and external surfaces of the connected pipes is carried out with a copper brush.
Having inserted one of the pipe sections into a vice, it is flared in order to achieve free immersion of the second section into it. For this purpose, a special pipe expander of the appropriate diameter is used.
The result of flaring is the arrangement of a socket at one end of the copper pipe. Testing the level of its readiness during the procedure is carried out by periodically immersing the other, smooth end.
Soldering machine application
In addition to the already mentioned pipe cutter, chamfer and pipe expander, some other tools will be required to solder copper pipes.
First of all, we are talking about a soldering iron. Thanks to this device, a high-temperature zone is created in the joined area for heating the pipes and solder. As a rule, the function of a soldering iron is performed by a special gas burner.
For procedures where soft solder is used, a compact hand-held device powered by propane is quite suitable. As a rule, such devices are equipped with disposable gas cylinders attached to the handle. Despite their small dimensions, burners of this type are capable of providing heating up to +1100 degrees: this is quite enough for working with soft solder. When purchasing, it is recommended to choose models with piezo ignition, which significantly simplifies soldering.
Manual gas burner holders are equipped with an adjustment valve that allows you to adjust the flame length. The same valve allows you to stop the gas supply at the end of work. The purpose of the check valve is to shut off the fuel supply if the flame goes out.
Other required materials
Solder is sold in rods or wire with a lower melting point compared to copper.
This makes it possible to connect copper pipes using the melting method. For soldering you will need a steel bristle brush. With its help, pipes and fittings are cleaned for subsequent connection. The brush can be replaced with fine-grained sandpaper.
You cannot do without soldering flux and a brush (to apply the flux). You will also need a fireproof gasket, a hammer, a vice, and a tape measure.
Step-by-step instructions for soldering with a gas torch
Cutting and cleaning are critical. It is recommended to cut the pipe evenly and at a right angle. To simulate the strength of the connection, it is worth considering that the end of the pipe is inserted up to the stop (arm) of the fitting.
The procedure for determining the location of the fitting on a copper pipe, marking for visual inspection and cutting the copper pipe using a special device - a pipe cutter
It is highly recommended that you use a pipe cutter rather than a hacksaw to cut the pipe insert for the fitting. After the cutting procedure, the end of the pipe is cleaned - the burrs left by the pipe cutter are removed.
Not only the pipe, but also the fitting needs to be cleaned. Cleaning is done in order to remove the oxide film from the surface of the copper. The oxide film prevents high-quality soldering of copper parts and prevents the uniform flow of solder.
Therefore, it is necessary to polish the outer surface of the copper pipe with sandpaper and clean the inside of the fitting with a wire brush. Cleaning is carried out until both surfaces acquire a clean golden appearance.
Processes for cleaning the surface of copper parts intended for soldering with lead-free solder. The surface of the tube is cleaned with sandpaper, and the inner area of the fitting is cleaned with a special wire brush.
Next, flux is applied to the areas of the stripped metal. Flux coating is carried out evenly over the entire stripping area. The flux additionally removes the smallest traces of the oxide film and shallowly etches the copper layer, which is necessary to increase adhesion to the solder.
When working, you need to ensure that no contamination gets into the flux tube. After each operation with flux, the lid of the tube should be tightly closed. The flux brush should be stored in a plastic bag.
Applying a special paste - flux - to the soldering parts, thanks to which the solder spreads evenly and covers the entire soldering area. A soft brush is used for flux treatment.
Powerful and safe gas burner
Modern lead-free solders require higher temperatures than propane gas torches can produce. Professional craftsmen often use powerful acetylene units.
But acetylene torches are expensive and are characterized by a tool with a high explosion hazard. Therefore, for inexperienced users, MAPP gas seems to be the best alternative.
MAPP gas (a combination of acetylene and propane) burns at a sufficient temperature to be able to solder 19 mm tubing. The popular MAPP gas is sold filled in disposable cylinders similar to those used for propane.
Examples of kits that include a cylinder with MAPP gas and a gas burner. Kits are also sold, complete with solder paste - flux and a roll of lead-free solder.
The MAPP gas cylinder conveniently attaches to a high quality self-igniting torch (such as the SureFire T655 model). The cylinder fastening mechanism ensures safe and convenient operation.
By pressing a button, the gas burner self-ignites. It is also easy to regulate and extinguish the flame. All operations are performed without the need to use your hands again to control the spark igniter or gas supply regulator.
Technology for heating the soldering area of copper parts
The blue flame area should be directed towards the fitting. Specifically, the flame is directed, as a rule, to the middle part of the fitting.
To ensure even heating, the flame should be used in an arcing motion around the circumference of the fitting. The hottest part of the flame (the inner blue cone) should touch the copper.
This shows the optimal location of the gas burner nozzle, which ensures high-quality soldering. The blue flame area is in contact with the surface of the copper fitting
The color and melt of the flux will indicate the soldering time. It is necessary to continue heating until the flux begins to melt and the copper acquires a shiny, iridescent appearance.
At this stage, touch the tip of the solder rod to the junction of the copper parts. When heated sufficiently, the solder will automatically flow around the entire circumference of the fitting. You need to wait until it is completely filled, but not overflowed, and then complete the process.
Soldering is performed with a gas torch from the bottom to the top. First, the lower end of the fitting is soldered, then the upper, because the upper part retains the temperature longer due to the transfer of some of the heat from the lower part.
The soldering procedure involves filling the gap between the wall of the copper tube and the wall of the copper fitting with lead-free solder. When heated sufficiently, the solder spontaneously spreads over the entire soldering area.
Make sure there is enough solder at the soldering point before moving the gas torch to the next joint. If the fitting has cooled, a tip of the flame over the copper is enough to raise the temperature without overheating.
Fluxes and solders
Good switching quality can be achieved with both soft and hard solders for copper pipes.
When using low-temperature materials, the strength of the connecting seams is somewhat reduced, but the temperature regime used does not violate the integrity of the copper. Typically, these solders are 95% tin. Substances containing a certain proportion of silver are especially in demand.
High-temperature soldering is carried out using solid copper-phosphorus solder (the proportion of phosphorus is approximately 6%), sold in the form of rods.
Flux refers to a special composition in the form of a liquid or paste, due to which the molten material flows into the joint. This is achieved by improving the adhesion of the solder to the pipe and creating protection for the connecting seam from the penetration of air bubbles into it. In this case, the use of any flux for copper is permitted. They are usually made from zinc chloride or borax.
Methods for checking the tightness of connections
The tightness of the gas pipeline is checked in sections. In a situation with apartment buildings, a segment is selected from the point of fuel entry into the building to the taps of household equipment.
Plugs are placed at the ends of the section. The pressure in the pipes exceeds the standard values by 25%. A drop in pressure is a reason to check connections.
It is forbidden to check gas leaks using open fire: matches, candles. Lighters and piezo lighters are not suitable for this purpose. Fuel accumulated near the connection may explode
The integrity of joints, branches and equipment connection points is checked in two ways:
- Using a gas leak indicator.
- By applying a soap solution or emulsion.
In the first case, a digital, sound or color signal from the device will notify you of the danger. In the second, you need to monitor the appearance of bubbles. Their presence indicates a violation of the integrity of the connection.
Features of working with soft solder
Using the low-temperature method, they install water pipes and heating systems, as well as solder pipes for air conditioners and refrigerators, the ambient temperature of which does not exceed +130 degrees. In this way, you can connect pipes with a cross-section of no more than 10 cm. As work progresses, copper products are rolled, cleaned, treated with flux and inserted into each other. The connecting section must be heated to +200-250 degrees, followed by applying solder to the joining edges.
When using a burner, it is important not to overdo it, as its temperature sometimes rises to +1000 degrees. Therefore, it is recommended to heat the bonded surfaces in series of 15-20 seconds, constantly moving the flame. The guideline for the heating level is usually the color of the flux (it should darken). Next, soft solder is introduced into the working area: upon contact with the copper base, tin melts and flows along the flux into the seam. It is necessary to ensure that the space from the socket to the pipe is completely filled with heated material.
Materials for sealing joints
Threaded and flange connections require additional sealing.
The choice of material for the gasket is carried out taking into account the fact that it should:
- withstand the loads specified by the design, including pressure drops;
- level out defects of the sealing surface;
- fill the space between connected elements.
That is, the gasket must be elastic, durable and dense. The most famous material that meets these requirements is linen. Flax strands are actively used to seal joints of gas and water pipes.
More modern materials - pastes, threads, sealants, FUM tape are used a little less often: due to the higher cost and some conservatism of experienced specialists.
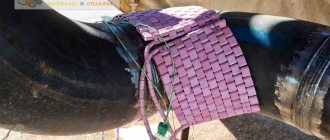
Pros and cons of linen tape
Linen tape is tightly wound around the thread, creating a dense layer. The advantages of this method are low cost, high level of adhesion, strength of the fixed joint.
Previously, flax fibers were used with red lead impregnated with drying oil. Nowadays, special sealing pastes are increasingly being used.
Disadvantages - destruction of flax over time, difficulty in dismantling, high requirements for the experience of a specialist.
If the connection of gas pipes on a laid thread is made with too much force, the gasket may break. Such a joint will not be airtight. Therefore, it is better if the manipulation is entrusted to an experienced master.
Pastes based on oils and resins
Oil and resin compositions do not harden. The substance applied to the joint remains viscous for a long time and effectively resists the penetration of gas into the external environment.
If the gap is small, experienced specialists will choose another method, since non-hardening paste will be effective only on long threads
A big plus is the easy application, which even a novice mechanic can handle. Cons: lack of fixed fixation, low resistance to pressure.
As the pressure in the gas pipeline increases, the paste is gradually squeezed out of the connection.
Drying paste-sealants
The basis of these compositions are solvents. After application, the substance dries and provides a strong hold. Can be used alone or in combination with linen winding for gas connections.
Knowing that the threaded connection is sealed with drying sealant, it is worth checking it periodically and tightening it with a wrench. This applies to all types of pipes
Experts attribute the strength of the resulting joints to the advantages of drying sealing pastes. In addition, the composition is easy to apply: during processing it acts as a lubricant, and begins to dry out while already in the threaded gap. Disadvantages include a tendency to shrink.
Anaerobic adhesives
Viscous, non-shrinking adhesive that polymerizes without shrinkage is the best sealant for threaded and flanged gas connections. Filling the space at the joints, it solidifies only there, remaining liquid and viscous on the outside.
Excess glue can be easily removed from the surface, and the dose that gets inside will remain in the right place and quickly polymerize.
For ease of installation, manufacturers offer adhesives with different drying times. It varies from 3 minutes to several hours. This should be taken into account when choosing a composition
The only drawback of anaerobic glue is the inability to use it at low temperatures. With a strong minus, the polymerization time sharply increases. And in some situations it may not occur at all.
Nylon sealing thread
The principle of using nylon thread is similar to the method of using flax fiber: the material is wound onto the external thread of one element, and then pressed against the internal thread of another.
Benefits include:
- low cost;
- wide temperature range, the upper limit of which is fixed at 130 degrees;
- possibility of use in conditions of high humidity;
- reliability of the processed connection.
Among the disadvantages is the need to roughen the thread - it is extremely difficult to hold the material on smooth metal. In addition, nylon thread is not suitable for sealing pipe joints with a diameter of more than 80 mm.
PTFE tape
FUM tape is a relatively new type of sealant, but quite popular. Its main advantages are elasticity, chemical resistance and heat resistance.
The tape is easy to wind, has a long service life, and is suitable for metal and polyethylene pipes.
It is important to apply FUM tape correctly: on a previously degreased surface, observing the direction of the thread. If the test shows a gas leak through the treated connection, then to correct it it is necessary to completely remove the old winding
However, there are also disadvantages. This is a low level of sealing of connections of large diameters and sensitivity to irregularities - roughness, nicks, and metal shavings can easily disrupt the integrity of the tape.
Working with hard solder
It is recommended to solder copper communications with hard solder in cases where they are planned to be used for operation at temperatures exceeding +110 degrees. In this case, the gas-flame method is suitable for creating temperatures above +700 degrees. In this case, it is necessary to anneal the copper to soften it.
Thanks to the use of copper-phosphorus solder, flux can be omitted: the main thing is to achieve uniform heating of the switched edges. As for the stages of work, they are the same as when working with soft solder.
Conclusions and useful video on the topic
The video shows three methods of sealing standard threaded connections:
Having gained an understanding of the materials from which gas pipeline pipes are made, types of connections and sealing methods, it becomes clear that it is better to entrust all work to professionals. An experienced master will be able to choose the optimal joining method, a suitable sealant, and correctly check the integrity of the connection.
If you have experience in sealing joints, you are aware of new products in the sealing compounds market, write. Our site is visited by both beginners and those who have something to share. Exchange experiences, knowledge, ask questions. The form below allows you to accompany your comment with photographs, diagrams, and sketches.
What to pay attention to
When soldering copper pipes with your own hands, you should remember the typical mistakes made by novice craftsmen:
- weak heating of the pipe or solder. The result of this will be a lack of softening of the solder wire, causing it to stick to the flux only in fragments. The very first switching on of the pipeline may cause the seam to spread;
- insufficient flux application. You need to spread the paste very carefully, without leaving any gaps. Otherwise, the solder will either not stick at all, or will fall off after hardening;
- pipe overheating. This leads to flux burnout.
When soldering at home, you must carefully follow safety rules, since we are talking about the use of open flames and chemicals. You need to work in glasses, gloves and an apron. It is advisable that the workplace be equipped with a good exhaust hood.
How to solder pipes
Before starting work, you need to prepare communications for impact. Welding of pipelines is carried out on small sections of sewer systems, so you need to cut the pipe to a certain size. The cut area is cleaned, after which a chamfer is made there. This operation will help facilitate the connection of heating and cooling branches with fittings.
Photo - step by step instructions
To install annealed materials, you will need to use a so-called pipe expander. This tool is required for installation on non-standard diameter fittings. There are devices of different diameters, almost up to 110 mm.
Step-by-step instructions on how to solder copper pipes with tin:
According to SNiP, the nominal diameter should always be less than the fitting; High-temperature treatment of connections begins only after they have been stripped. Fittings and pipes should be cleaned with a brush and, if necessary, sanded with sandpaper. Depending on the storage of communications, it is also recommended to treat their joints with alcohol to degrease; Next, a thin layer of flux paste is applied to the place where the copper pipes will be sealed and the fittings that will be installed to connect the communication parts will be installed;
The burner is now turned on to the desired temperature. The solder must be applied exactly along the edge of the joints, and the place where the fitting joins is heated with a torch. For welding water pipes, it is most convenient to work with tin, since it is absorbed into the metal and you can save time on heating the connections;
Soldering pipes takes no more than 20 seconds, since the maximum burner temperature is over 1000 degrees. Be careful, in some conditions low-temperature welding is required, so it is advisable to know what type of pipes you have; Afterwards the sewerage is assembled
It is very important not to immediately turn on the water in the lines, otherwise the connection will not have time to cool down and will become covered with cracks - this will negatively affect the tightness of the connection. The average cooling time for copper is from 30 minutes to two hours.
For welding copper pipes with a small difference in diameter, the capillary soldering technology is used. It allows you to connect individual communications with a soldering iron with a difference between them of up to 0.5 mm. In this case, the solder fills the space between the pipes. This allows the system to be installed without a seam. The technique uses hard solders, which have an improved protective function.
Much of the success of soldering depends on the type of solder used. Most often, copper pipes are welded with silver, brass and tin, which have high fluidity rates. Less often work is done with aluminum.
You can immediately buy not only a device for soldering copper pipes, but also a set of expanders and fittings that will be needed when installing sewer systems without a professional plumber. Before starting work, we recommend that you undergo technical training, or at least watch a video.
Safety precautions
When performing soldering work, you should strictly adhere to safety precautions. When carrying out work, high temperatures and chemical compositions are used, which, when split, release dangerous vapors.
To carry out the work you need:
- To protect your hands from burns, you must wear protective gloves;
- When checking a soldered joint, make sure it has cooled down. Copper pipe heats up to high temperatures and cools down slowly.
- Soldering copper pipes should only be done in ventilated areas.
- In high-temperature brazing, copper parts are etched with solutions of acids and alkalis. For safety, wear acid-resistant clothing and rubber gloves.
How to solder the heat exchanger of a gas water heater if the fistula is in a place inaccessible for soldering
If the location of the water leak occurs on the wall of the heat exchanger adjacent to the base of the gas water heater, then repairing the heat exchanger by soldering on site is impossible, and it must be removed from the gas water heater. The designers of NEVA LUX-5013 did their best. To remove the heat exchanger for repairs, you need to disassemble almost the entire gas water heater and, most unpleasantly, disconnect the gas pipe. I didn’t want to mess with gas pipes, as it’s dangerous.
The removal of the heat exchanger for repair was hampered by an umbrella for removing gas combustion products, secured with four aluminum rivets to the base of the gas water heater. I had to drill out these rivets with an electric drill, remove the umbrella, and only then did it become possible to remove the heat exchanger. During assembly, instead of rivets, the umbrella was secured to the base with two M4 screws. If the wall does not interfere, you can secure the umbrella with self-tapping screws.
Next, the repair of the gas water heater was carried out using the technology described above. Over the past two years, I have had to repair the heat exchanger, soldering the fistulas, five times. The last time, water began to leak from the side adjacent to the wall of the heat exchanger, and I decided to buy a new one, which I did. I'm going to repair the old heat exchanger of the geyser, I'll tin and solder the tube along its entire length. Photo of the heat exchanger from the side attached to the base.
When purchasing a heat exchanger for a geyser, I was surprised to find that they gave me not a new one, but an already repaired one. The heat exchanger tube had the same soldering that I did when repairing my old heat exchanger. As a result, out of four available in the store, only one heat exchanger was not soldered. It turns out that the plant ships repaired heat exchangers for spare parts that failed during the warranty period. They seal fistulas in them and sell them again. The heat exchanger has a warranty period of only 1 month. It turns out that in a few months the gas water heater will have to be repaired again!
If you have to buy a heat exchanger for a geyser, carefully inspect it. If soldering is detected, it is better to refuse the purchase. If you replace a heat exchanger in a gas water heater under warranty, make sure that you are not getting a refurbished heat exchanger that was in use, but a new one.
Repair of a replaced geyser heat exchanger
For almost three years, the NEVA LUX-5013 geyser worked properly after replacing the heat exchanger, but the happiness did not last forever, and suddenly water began to drip from it. I had to do the repairs again.
Removing the casing confirmed my fears: a green spot appeared on the outside of the heat exchanger tube, but it was dry, and the fistula, from which water was oozing, was on the side inaccessible for inspection and soldering. I had to remove the heat exchanger for repairs.
A problem arose while searching for the location of the fistula on the back of the removed heat exchanger. The fistula was located at the top of the heat exchanger tube and water oozed from it and flowed along all the tubes below. As a result, all the turns of the tube below the fistula on top turned green and were wet. It was impossible to determine whether this was a single fistula or whether there were several.
After the green deposit had dried, it was removed from the surface of the heat exchanger using fine sandpaper. An external inspection of the heat exchanger tube did not reveal any blackened spots. To find leaks, we had to pressure test the heat exchanger under water pressure.
To supply water to the heat exchanger, the above-mentioned flexible hose from the shower head was used. One end of it was connected through a gasket to the water supply pipe for supplying water to the gas water heater (in the photo on the left), the second was screwed to one end of the heat exchanger tube (in the photo in the center). The second end of the heat exchanger tube was plugged using a water tap.
As soon as the water supply tap to the gas water heater was opened, drops of water immediately appeared in the suspected locations of fistulas. The rest of the tube surface remained dry.
Before soldering the fistulas, it is necessary to disconnect the flexible hose from the water supply network, open the plug valve and drain all the water from the heat exchanger, blowing it out. If this is not done, then the water will not allow the soldering area to be heated to the required temperature, and the fistula will not be able to be soldered.
To solder the fistula, which was located on the bend of the heat exchanger tube, I used two soldering irons. One, with a power of 40 W, was placed under the bend of the tube for additional heating, and the second, one hundred watt, performed soldering.
I recently purchased a hair dryer for my household and soldered the fistula in a straight section, additionally heating the soldering area with it. It turned out that soldering with a hairdryer was much more convenient, since the copper heated up faster and better. The soldering turned out to be more accurate. It’s a pity I didn’t try to solder the fistula without a soldering iron, using only a hair dryer. The air temperature from the hair dryer is about 600˚C, which should be enough to heat the heat exchanger tube to the melting temperature of the solder. I'll definitely check it during the next repair.
After repair, the place of the heat exchanger tube where the fistula is located is covered with a millimeter layer of solder, and the path to water is reliably blocked. Repeated pressure testing of the heat exchanger showed that the tube was leak-tight. Now you can assemble the gas water heater. Water will no longer drip.
I bring to your attention a short video on how to solder a gas water heater radiator.
Total views: 31375
It is worth noting that with the help of the presented technology it is possible to successfully repair not only the heat exchangers of geysers, but also copper heat exchangers and radiators of any other types of water heating and cooling devices, including copper radiators installed in cars.
How to solder the heat exchanger of a gas water heater if the fistula is located in a place accessible for soldering
Before starting soldering, it is necessary to drain the water from the heat exchanger, otherwise the water will remove heat and it will be impossible to warm up the soldering area to the required temperature. To do this, you need to open the hot water tap in the sink or sink and unscrew the union nut from the geyser pipe supplying cold water. Since the column is located at a level higher than the tap, most of the water will drain, but not all. I use a blower to remove residue. This can be done with a compressor, a vacuum cleaner or your mouth. When blowing with your mouth, you can use a flexible hose from a shower head. One of the union nuts of the flexible hose is screwed through the gasket onto the thread of the water supply tube of the heat exchanger, and through the second end of the flexible hose the heat exchanger tube is blown through the mouth. The remaining water is drained through the tap, and you can begin repairing the heat exchanger.
The soldering itself is not difficult. If you do not have experience with a soldering iron, you can familiarize yourself with the soldering technology on the website page “How to solder with a soldering iron.” Using fine sandpaper, clean the location of the fistula from oxides. As a rule, in this place the copper oxidizes and a greenish stain forms (clearly visible in the photo above). After cleaning, wipe the area with a cloth soaked in solvent to remove grease and dust. Tin with any solder, for example POS-61, (melting point not lower than 180°C) with a soldering iron with a power of at least 100 W.
Rosin can be used as a flux; the kind that is used to rub violin bows is also suitable. If you don’t have rosin, you can successfully use aspirin tablets (sold in pharmacies in the form of tablets called “acetylsalicylic acid”). It’s a wonderful flux, I use it all the time in cases where it’s impossible to clean. For example, when tinning multi-core wires. You paint the tablet and sprinkle the tinning area with small crumbs, or rub the tablet over the heated surface. If, during tinning, the solder does not spread, but lies in a loose layer, it means that the soldering area is not heated sufficiently. In this case, you can additionally heat it with another 40 W soldering iron, hair dryer or iron, placing it next to the soldering area.
When the solder has evenly covered the required surface with a thin layer, you need to build it up to a thickness of 1-2 mm. The fistula on the heat exchanger has been eliminated and will never appear again.
Now carefully inspect the geyser heat exchanger tube along its entire length. If you find a green spot, it means that in this place there is most likely a microhole that allows water to pass through. You need to clean the tube with fine sandpaper until it shines and see if there is a small black dot. If there is one, then it should definitely be tinned and soldered. Otherwise, in a couple of months you will have to do repairs again.