In this photo review we want to tell and show you how to build your own wall for storing tools and lumber. We bring to your attention the experience of a famous Canadian carpenter-blogger with the nickname Samurai Carpenter. We hope that this review of the process of making this wall will inspire you to create your own tool storage system!
For many years, a Canadian carpenter had a desire to build a tool storage wall that would not only allow him to store his tools and keep them in perfect order, but would also attract the attention of anyone who entered the Workshop. And finally, he got down to business! For the conversion he used Meranti plywood and the trim pieces are mostly spruce with a mix of some western maple, cherry, cedar and walnut thrown in there to play with contrasts and highlight the beauty of the wood used:
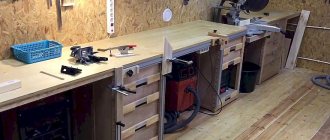
Before the alteration, there was a generally typical carpenter’s workshop with a “not yet” attractive wall and a lack of places to store tools:
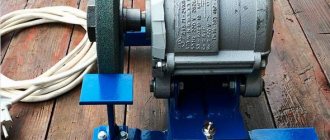
Everything is as usual: such an easy but constant creative “order”. There was a place for axes and a hunting rifle. But for now, the only place for Veritas planes is the workbench.
So, let's look at the process in detail. The work was carried out in three stages:
- Wall covering
- Manufacturing of boxes, shelves and canopies
- Decorating a wall for lumber storage
DIY tool panel in the garage
Place for the future panel:
This problem can be solved using perforated panels (made of tin or HDF) or economy panels (MDF with grooves along the entire length). On thematic forums you can often find topics in which people brag about their workshops equipped with such panels. It looks really impressive.
But this option is not suitable for everyone. Despite the fact that the panels themselves are not cheap, you also need to buy additional hangers and hooks, the total cost of which will be many times higher than the cost of the panel itself. In addition, the ease of use of hooks that do not have a rigid fixation raises questions. And it’s not clear how to attach some kind of homemade plywood hanger to such a panel?
Let me give you an example. Do you see in the photo a red gas wrench with a narrow hole in the handle? If you accidentally push it up a little while removing it, the hook may jump off the panel. Well, or the hook will need to be fixed. A trifle, of course, but you will have to divert time (even if only for a split second), attention and a second hand, which will most likely be busy. Of course, you can try to remove the gas key carefully so that it doesn’t catch anything, but doesn’t this hook require too much attention? The same thing will most likely happen when you try to remove pliers with red and blue handles. Because the rubber handles will catch on the bracket like a Morse taper. Although, of course, I could be wrong and my doubts are in vain. One more detail - hangers for just a pair of pliers and a pair of hammers will cost almost 500 rubles. As they say, so count it.
I am for simple and reliable solutions. Therefore, it was decided to use a sheet of ordinary 15 mm plywood as a panel. As hangers and hooks, you can use ordinary self-tapping screws of various lengths at a cost of two kopecks per kilogram, which will not go anywhere without your persistent desire. The same self-tapping screws can be used to fix any homemade suspension. In this case, the length of the part of the screw protruding from the panel can be precisely adjusted locally by screwing the screw into the plywood even right through. But for this there must be a gap between the plywood and the wall.
The gap can be made using plastic washers for perforated panels. But it is safer to install the panel on a specially welded frame. This will level out the unevenness of the wall, add rigidity to the entire structure and allow you to set a gap of any size. Of course, this method is also not free and not so glamorous, but it is much more practical.
I think few people are interested in the welding process. The result is important. The frame is welded from my favorite fiftieth corner. All mounting holes are 8 mm. We align the frame on a sheet of plywood and mark the fastening points.
The holes in the plywood are a couple of millimeters wider than on the frame to level out minor inaccuracies.
I painted the frame with automotive spray paint. Color – Snow Queen (metallic). The instructions say that the paint must be applied at an ambient temperature of at least +15. However, there is no heating in the workshop and we had to paint at -1. This did not affect the quality of the coating. Most likely, the only difference is the drying time.
The frame is attached to the wall with eight 8x80 dowels. The fact is that the inter-garage wall on which the panel is planned to be installed is only half a brick thick. As planned, a large number of attachment points should evenly distribute the load. In addition, some of the dowels got caught between the bricks, so their reliability is lower.
Now, looking at the finished result, I understand that it was possible to get by with half the dowels. But here it’s better to be safe than sorry.
The plywood sheet is attached to the frame with thirteen 8x45 anchors.
Anchors are great for this task. To tighten a regular nut and bolt, you need access to both the nut and the bolt. But when the frame is already fixed to the wall, such access is not possible (especially when attaching plywood to the middle crossbar of the frame). But the anchor requires access from only one front side.
Tool stand in the garage
A stand made of any material will be a convenient way to mount equipment on the wall in a garage box. The most important thing to understand is that it will not be possible to place heavy spare parts and tools on such a panel. But it is ideal for storing small items that you want to always have on hand. Moreover, any owner of a garage box can make a stand for keys in the garage with his own hands from scrap materials.
Now all stand designs are divided into the following types:
- Horizontal stands,
- Vertical panels,
- Sloping structures.
Standard vertical stands are considered the most convenient for garage owners. With their help, you can ensure that the tool is installed on the wall in your personal garage directly above the workbench and workplace.
Proper storage of fishing rods
For any fisherman, fishing rods are worth their weight in gold; they treat them no less carefully than they treat a car. When the fishing line gets tangled, it becomes a real problem. You can organize their proper wall or ceiling storage using available materials. Get some ideas:
for wall storage you will need a PVC pipe and polyethylene foam. Drill holes in the plastic at the required distance, make slits on the stick and secure them on top of each other;
The distance between the sticks is selected based on the length of the fishing rods
the second option is to secure the fishing rods to the ceiling. There are a lot of ideas here: plastic pipes, fastening brackets, fixing boards with slots. Each owner himself will choose a more acceptable idea.
Dashboard in garage
In order to build a panel for a tool, you do not need to have professional skills. This problem is easily solved by purchasing perforated panels (the material can be tin or HDF) or economy panels (an MDF frame with a groove around the entire perimeter of the product).
Since we are talking about making our own options for mounting tools in the garage, we will look at the option of making a panel from MDF sheet or plywood. Here, first of all, you need to measure the space above the workbench and decide on the size of the product itself. Then you lay out a piece of plywood on the floor and lay out on it everything that needs to be laid on the selected panel. The last step is to drill holes in the selected mounting locations and secure the equipment with screws. As a result, professional panels with tools in the garage are made quickly and simply - all that remains is to place them on the wall in the room.
Wheel storage
No garage is complete without wheels; every car owner has at least 4 of them waiting for their season. And if there are more of them, it is more convenient for them to think about wall storage or install a special shelf. Wheels without discs cannot be hung; for them, the optimal solution would be a vertical arrangement on racks. The situation is completely different for tires with rims; they can be mounted to the ceiling and placed vertically.
Memo on storage options for wheels with and without rims
The optimal solution is to prepare special racks at a height convenient for the car owner, so that he can independently place the tires in storage and remove them. If space allows, the easiest way is to install a shelf on the floor, so the garage owner can simply roll each wheel onto it.
Wall mounting of wheelsStoring wheels on a special shelf
Small shelf for vertical storage of wheels
Do-it-yourself tool shield in the garage
A garage wall is another easy way to keep all the equipment you need indoors. If you want to place only a few sets of keys or attachments on the shield, you will need to cut 2 sheets of plywood that will become the frame of the structure. It is best to place all the tools at a distance of 3-4 centimeters between each other, so that all carpentry equipment can be easily reached.
Having decided on the final size of the frame, you need to make auxiliary options for holders. Their width should be no more than 5-7 centimeters. The next step is to mark the holders according to the standard dimensions of the tool handles. All that remains is to cut out the corresponding cells and secure the holders horizontally to the frame.
This is where the most convenient and simple options for arranging tools in the garage end. Watch the video below on this topic.
Step 16: Small Item Holders
For the rest of the tools I made simple holders, simply adjusting them to the profile. For example, for drills I cut out the mount in the shape of a plastic box, for pencils and watches - in the shape of a box, etc.
Important! Some instruments are additionally reinforced with small nails.
Tool stand in the garage
A stand made of any material will be a convenient way to mount equipment on the wall in a garage box. The most important thing to understand is that it will not be possible to place heavy spare parts and tools on such a panel. But it is ideal for storing small items that you want to always have on hand. Moreover, any owner of a garage box can make a stand for keys in the garage with his own hands from scrap materials.
Now all stand designs are divided into the following types:
- Horizontal stands,
- Vertical panels,
- Sloping structures.
Standard vertical stands are considered the most convenient for garage owners. With their help, you can ensure that the tool is installed on the wall in your personal garage directly above the workbench and workplace.
Dashboard in garage
In order to build a panel for a tool, you do not need to have professional skills. This problem is easily solved by purchasing perforated panels (the material can be tin or HDF) or economy panels (an MDF frame with a groove around the entire perimeter of the product).
Since we are talking about making our own options for mounting tools in the garage, we will look at the option of making a panel from MDF sheet or plywood. Here, first of all, you need to measure the space above the workbench and decide on the size of the product itself. Then you lay out a piece of plywood on the floor and lay out on it everything that needs to be laid on the selected panel. The last step is to drill holes in the selected mounting locations and secure the equipment with screws. As a result, professional panels with tools in the garage are made quickly and simply - all that remains is to place them on the wall in the room.
It is important to know! Often, hooks are installed on tool board panels in the garage without rigid fixation. This raises many questions for garage owners, because it is difficult to secure any things to them. You can only use hooks on the wall for junk in the garage.
Step 15: Stencil and Protractor Holder
I have a large and a small protractor. Each of them has the same holes, which allowed us to create a simple holder.
Do-it-yourself tool organizer for the workshop and dacha: a few tips with photos
Home craftsmen and owners of personal plots need a large set of tools for economic activities. It is convenient when all the necessary items are laid out in the correct order and are always available. Retailers offer numerous suitable devices to accommodate the necessary inventory. But homemade organizers can better meet the needs of craftsmen. In addition, you can use scrap materials to create durable and cheap models.
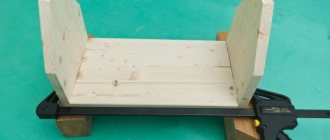
Making a simple but easy-to-use portable box from plywood or scrap boards is a great opportunity to show off your skills as a home carpenter.
For a large number of items, the drawer is made more complex - with pull-out sections.
A set of the most necessary tools for car enthusiasts can be placed in a homemade case with pockets, sewn from an old leather jacket. The compact item is easy to attach to your belt or put in the trunk of your car.
When working regularly in a workshop or garage, a hanging shelf for the necessary tools will be useful.
Very budget options: a wooden plank, stretched twine or a device made from scraps of plastic pipes will be excellent stands for a home craftsman’s set.
If you make a convenient holder with holes of different diameters, then each screwdriver will only occupy a suitable place for it.
An experienced carpenter will be able to design and create a functional structure with doors and numerous compartments.
The round tabletop device is very convenient, but is only suitable for a large workbench. And movable panels under the countertop, made of plywood or plasterboard, will not take up much space and will be full-fledged storage.
Homemade cabinets on wheels, equipped with pull-out shelves for tools, can serve as a mobile work desk.
Nails, screws, nuts, bolts will not be lost and will always be at hand if the hardware is placed in glass jars with lids screwed to the original rotary structure.
An interesting idea for storing fasteners is plywood drawers with a transparent front wall. To make handles, you can use corks from wine bottles. And multi-level shelves with cells are very effective, but their manufacture will require high qualifications.
The structure, made from scrap metal parts, can be installed on a desktop or attached to a wall. Additional shelves or hooks can be easily mounted into the holes of the perforated panel when new equipment appears.
A device made from wooden blocks and durable mesh is not only simple to make, but also very cheap.
Gardening tools - tools for summer residents. To place shovels, rakes, forks and brooms, they come up with original stands and organizers. You can build a structure with your own hands from boards in a barn or in any free space on the site.
To make a convenient cart for moving large garden tools around the site, you need to put the product on wheels.
Tools can be hung on the door of the outbuilding. This technique is accessible even to a beginner.
Homemade containers for small items from old household containers can be supplemented with convenient pockets made of durable fabric.
Tin cans are also useful for carrying small items. The product can be effectively decorated.
Hooks for small garden tools made from the remains of old rakes are durable and perfect for a rustic-style area.
An elegant apron with pockets will help the summer resident take care of her plants. If the belt is made elastic, both adults and children can use the product.
The productivity of a craftsman or summer residents depends on the successful organization of manual labor. Well-equipped tools will not only speed up the process, but also make the task more enjoyable and fruitful.
Original ideas
Many craftsmen strive to achieve maximum orderliness when organizing their workspace. To do this, it is convenient to mark the “seats” for each tool in advance so that you know exactly where it needs to be placed after use. A convenient way to mark vertical holders is to apply the silhouettes of each of the large tools to the mounting location.
When using vertical holders, it is convenient to store discs for circular saws and grinders in homemade envelopes made from halves of disposable plastic plates of suitable diameter folded in several layers.
Straight saw blades (for example, hacksaw blades) can be conveniently stored in pieces of plastic hose.
To store electrical tape and adhesive tape, you can make wooden boxes with a homemade distributor, which in the simplest case can be a sharpened metal strip.
Since Soviet times, home craftsmen have stored small fasteners in matchboxes, and larger fittings in plastic and glass jars. Despite the development of the market for tool storage systems, this method remains relevant today. In this case, it is preferable to use containers made of transparent plastic and glass - this will save you from the need to label each container. Another quick-to-make, convenient and transportable option for storing fasteners is cut-off plastic canisters. Its advantage over other containers is its ergonomic handle.
A practical and easy-to-make screwdriver holder can be made from an ordinary wooden board by drilling several holes of the required diameter in it.
To store long tools that are used relatively rarely (for example, fishing rods and stepladders), it is convenient to create ceiling brackets or shelves. Another practical option for using the space under the ceiling is pull-out roller drawers, which are fixed on guides attached to the ceiling.
You can learn how to make a tool holder with your own hands by watching the video below.