If you're like me, you have a lot of seasonal items for various holidays taking up space in your home, and these items only come out of their boxes for a short time each year. You can, like me, use the attic space above the garage to store these items, and remove them only when necessary.
Of course, like me, you hate the idea of constantly having to drag that weight up and down the stairs through a tiny hole in the garage ceiling.
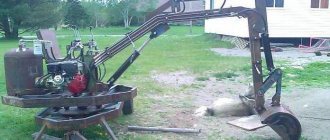
This is where the difference between you and me comes in - I haven't used a ladder to move boxes since I built a DIY garage lift. I've been using this system since 2006 and am currently building one for a neighbor, so the photos will be partly my garage and partly my neighbor's garage.
When all the materials are at hand, you will need to spend one weekend and the project will be ready. With minimal financial outlay, you will appreciate the benefits that the implementation of such a mini garage lift will bring and the feeling that you no longer risk falling down the stairs with a heavy box in your hands. Having written this, I want to note that the project involves mechanical lifting and its inherent hazards. Always use safety precautions when working with suspended loads.
What kind of homemade winch can be?
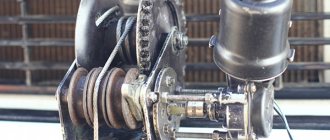
Homemade devices of this kind can be manually, electrically or hydraulically driven. The general principle of the device is as follows: the cable is wound on a drum, which is rotated through a gearbox by a motor or by hand. Let's look at each type in more detail:
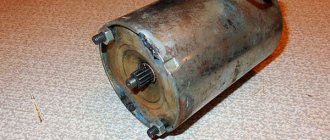
- Electric winches. Most often, they use car starters converted to operate in motor mode, generators from tractors or trucks, or select electric motors from various equipment that match their characteristics. Regardless of its origin, the electric drive must have high torque, high power and consume as little current as possible so as not to significantly drain the car's battery.
Varieties
There are several classifications of winches. The main purpose of the devices is to lift and move loads, so they are used in many areas. Motorists are faced with the need to lift heavy loads quite often. Lifting large components and assemblies in the garage or towing requires reliable securing of loads. Depending on the installation method, winches are divided into 3 types:
- Stationary . Installed on walls, ceilings, beams and other structures. Most often used in large car repair shops.
- Portable . Can be mounted on any suitable surface.
- Mobile . Installed on platforms on wheels. For a small garage, this type of construction is the most preferable.
A manual winch for a car is the most common among car owners. A manual drive is convenient for lifting loads in a garage, but its design must be carefully thought out.
In the absence of these devices, operation of the winch is unsafe.
Machine-driven units require one or two drums. Such mechanisms are used mainly in elevators, cranes, and drilling rigs. When used in a garage, a drum-driven winch can make carrying and lifting objects much easier.
How to make a rotary drilling rig
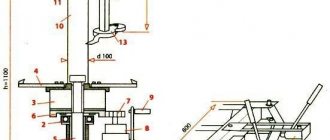
The hydraulic drilling rig must have a frame that allows you to move up/down the motor to which the drill is connected through a swivel. Water is also supplied through the swivel into the column.
Principles for constructing a drill
When making a drilling rig with your own hands, the following procedure is recommended:
- First there must be a swivel and rods. If you are not a qualified turner or do not have one in mind, then it is better to buy these parts. Their manufacture requires high precision, which can be achieved with high qualifications. Moreover, the threads on the swivel and rods must be the same, or an adapter will be required. The carving on the rods is better - trapezoidal, since then few turners can make a conical one.
- Buy a gear motor. If the power supply is from 220 V, then its characteristics are as follows: power 2.2 kW, revolutions - 60-70 per minute (the best: 3MP 31.5 or 3MP 40 or 3MP 50). More powerful ones can be installed only if there is a 380 V power supply, and more powerful ones are rarely needed.
- Buy a winch, it can be manual or electric. The carrying capacity is preferably at least 1 ton (if possible, more is better).
- When you have all these components on hand, you can weld the frame and make a drill. After all, all this equipment is attached to it, and the types of attachment can be different, it is impossible to guess.
Homemade drilling rig
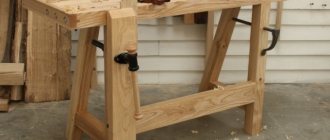
The frame of the mini-drilling rig consists of three parts:
- horizontal platform;
- vertical frame;
- a movable frame (carriage) on which the motor is mounted.
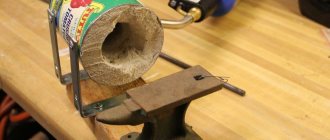
The base is made from a thick-walled pipe - wall thickness 4 mm, minimum 3.5 mm. It’s better to use a profiled one with a cross-section of 40*40 mm, 50*50 mm or so, but a round one will do. When making a small drilling rig frame, precision is not important. It is important to observe geometry: vertical and horizontal, equal angles of inclination, if necessary. And the sizes are “adjusted” according to the fact. First, the lower frame is welded and measured. A vertical frame is made to fit the existing dimensions, and a carriage is made according to its dimensions.
You can make a simple fort drill yourself - they are made from ordinary steel (drawing in the photo below). If you take high-alloy steel, it is difficult to weld it to the rods. For complex and rocky soils, it is better to buy a drill from a specialized company - they have a complex shape, there are many different types.
Drill drawing for 159 mm
To make work easier, connect two remote controls with reverse control. One is placed on the motor, the second on the winch. That's all, actually.
In the design of a rotary or auger drilling rig, the main thing is the swivel, but it is unrealistic to make one without experience. For those who want to make it themselves, we will post a photo and its drawing.
Swivel device for rubble installation
Swivel drawing for small drilling rig
Read how to conduct water from a well to a house here.
§ Mistakes when drilling for water yourself
It is recommended to start drilling for water from shallow depths in order to gain at least a little experience. Experience in vertical drilling is the most important! You can only learn how to drill water wells through practice. Learn to avoid the drill string wedge. Due to inexperience, beginners often “catch a wedge” and lose drill rods. Sometimes the drill jams so much that it is impossible to pull it out even with a crane; the structure simply comes off (usually at the welding points).
Mistakes are not cheap—an expensive tool is lost. Therefore, in hydrodrilling you cannot force things and immediately make deep wells. Approach this matter responsibly and carefully. Read literature, books and textbooks about drilling water wells. This work requires a lot of knowledge that cannot be conveyed in a nutshell, so self-education is mandatory.
From a wheel rim
For a car with stamped wheels, you can make your own device that will help the car get out of the mud or snow on its own. The device works like a reel that winds a rope around itself. Its free end is fixed to a tree, a pole, or a metal peg driven into the ground. The main thing is that such support is held as firmly as possible.
The manufacture of the device must be carried out according to the following algorithm:
- First you need to assemble a spool from any wheel rim. It is important that its size is smaller than that of the standard wheel installed on a particular car.
- Make special hooks in the shape of the letter G.
- To make the correct markings, it is better to take out the spare tire and attach the future spool to it.
- You need to make marks on the workpiece opposite the holes of the spare wheel rim.
- L-shaped hooks made of round steel wire must be welded to these marks. They are necessary in order to ensure strong adhesion of the modified spool to the car wheel. Here it is enough to make one hook through one hole of the wheel rim.
To avoid inaccuracies, you can first lightly grab the wire, try it on again, and only then thoroughly scald the product. - At the last stage, it is advisable to paint the product, since it will have to be transported inside the trunk.
Do-it-yourself universal all-terrain vehicle made from a walk-behind tractor
How to make a muffler with your own hands? DIY muffler repair without welding
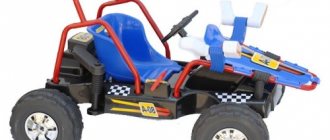
Dear visitors of the site “Homemade Friend”, from the presented material you will learn how to independently assemble a universal all-terrain vehicle from a walk-behind tractor, which without any special modifications can be a tractor, and by installing large low-pressure wheels it turns into an all-terrain vehicle. The author used a “NEVA” walk-behind tractor with a “Lifan” engine as the basis for the manufacture of an all-terrain tractor. The master here realized his long-standing dream of crossing a tractor and a walk-behind tractor and thereby obtaining a universal machine that can be used directly as a tractor for plowing the garden, mowing grass, and cultivating , as well as an all-terrain vehicle for trips to the forest for hunting, picking mushrooms and berries, and fishing.
The all-terrain vehicle has 3 types of wheels - these are wheels from a walk-behind tractor, from a Ural motorcycle and all-terrain wheels YAK-40, aviation tires on R-20 wheels from a Porsche car. There is a trunk in the front part, a removable box in the back for two passengers, as well as awning canopy from bad weather.
To use it as a tractor, the machine plows, cultivates, and mows grass. By the way, for mowing grass, the author made an interesting mower from a friendship chainsaw tire, such a mower takes grass and weeds of various thicknesses. A winch is installed at the rear for lifting the hitch. A drive pulley is installed to increase the speed range and 2 belts, one 1180, and the second 1320, so there is a pressure roller and two clutch pedals.
Materials
- Lifan engine
- Yak-40 aviation tires
- motorcycle wheels "Ural"
- wheels from a walk-behind tractor
- professional pipe square and corner
Tools
- welding inverter
- angle grinder
- drill
- set of wrenches
- measuring tool
- And so on..
Step-by-step instructions for assembling a universal all-terrain vehicle with your own hands.
The first step was to weld a frame from a square professional pipe.
Three types of wheels: from a walk-behind tractor, Ural motorcycle wheels and all-terrain YAK-40 aviation wheels on R-20 Porsche wheels
The hitch is lifted using a winch.
Converted into an all-terrain vehicle.
Mower for tractor from chainsaw "Friendship"
To mow the grass, wheels from a Ural motorcycle are installed on the tractor. The mower is driven by a belt drive, and the shaft transmits torque to the tire with a chain and the grass is evenly mowed.
All-terrain vehicle testing.
Winch manufacturing procedure
In fact, the process of making a winch is quite simple, but it is worth following the order so that you do not have to redo the same work several times.
1. First of all, you need to connect the electric motor to the gearbox. To do this, weld a tube to the engine gear. Drill the other end through and weld two nuts. Next, put the tube on the gearbox gear and screw in the nuts that will serve as a retainer. To prevent anything from wrapping around the shaft, it is worth covering it with something. For example, you can peel off a piece of thin-walled plastic pipe.
Very important! Before fixing, be sure to check that the gearbox is reducing and not increasing the engine speed.
2. Now you need to make the second important part of the car winch with your own hands, namely the drum.
To do this, we take a piece of pipe and weld two metal round plates to its sides, which will limit the rope. The plates must have a through hole through which we pass the shaft with the gear and weld it.
It is important to maintain alignment, otherwise your shaft will wobble and cause unnecessary vibrations.
3. Next, we take two metal square plates, which will be slightly longer in length than the diameter of the drum plates. We make a hole in the center and in each corner.
We weld two bearings on each plate (but not with the inside). Next, we pass the drum shaft through the bearings. To assemble the entire structure, you need 4 bolts, which we thread through a hole in one and the other plate, and screw a nut on the other side. As a result, we do this from 4 corners.
4. The gearbox must be attached to one of the plates so that its gear engages with the shaft gear.
5. Finally, you need to make a frame. To do this, you can make a rectangle from square profiles and weld square plates to it on one side, and also fix the motor and gearbox.
6. And finally, make the remote control. To do this, just one button is enough to close the contact. It must be spring-loaded so that when released, the contact opens.
7. Such a self-made car winch has one important nuance, namely, it cannot be fixed directly to the car. A fabric tow rope will have to be attached to the frame, which will act as an insulator. To get rid of this nuance, it is necessary to isolate the motor brushes from ground.
Step-by-step instructions for making an electric winch from a starter
When all the necessary parts have been collected, you can start inventing. Of course, no one will reinvent the bicycle, but we have to think a little. And so, we have all the necessary parts, drawings, diagrams, some wires, bolts and the desire - we can start making a winch from a starter with our own hands.
STEP 1: starter . Let's disassemble the starter. To make a winch, you do not need a retractor electromagnetic relay. We remove it immediately and move on to disassembling the engine itself. Remove the starter front cover and the starter drive (Bendix). While the starter is disassembled into parts, it can be serviced. Replace or lubricate bearings and replace brushes. We assemble the starter in the reverse order, only without the front cover and bendix.
STEP 2: gearbox . We prepare a reduction gearbox for a homemade winch with our own hands. It's also worth servicing. We clean and lubricate the entire mechanism. In principle, there is no need to do any other manipulations with it. We leave it alone and go to make an adapter coupling in order to make friends between our gearbox and the starter motor.
STEP 3: connect the gearbox and starter . To make a winch from a starter, you need to “make friends” between the gear shaft of the gearbox and the starter shaft. You can connect two gear shafts using an adapter coupling or simply weld one shaft to the second (which is what we did).
STEP 4: Protective cover . In order to close the space between the gearbox and the starter, we need to make a protective casing. To do this, you need to find a pipe of suitable diameter. Let us recall that the diameter of the starter 2101 is 82.5 mm. We take a pipe (in our case it is a hot-rolled pipe, 83 mm in diameter), cut off the required piece of pipe. Let's try it on the starter and gearbox. The starter motor has a smooth edge, and the edge of the reduction gear has characteristic protrusions. We make corresponding grooves in the pipe. After this, we get a single body of a homemade winch from the starter.
Well, we have made a connection between the gearbox and the starter motor, all that remains is to make a drum for winding the steel cable and a drive from the gearbox to the drum. For this task, we need to select a suitable gear wheel and shaft. We go in search of all this stuff, and again to the garage. After all, an electric winch will not make itself!
Homemade ratchet winch
Homemade winch in the garage / Homemade winch in the garage/
Do-it-yourself winch from a KAMAZ ratchet and a carriage for it
Homemade ratchet winch. Power!
homemade winch with brake ratchet
Do-it-yourself winch from a KAMAZ ratchet
Ratchet winch.
Homemade winch for the garage /Selbstgemacht Haspel in die Garage
Manual Winch With Your Hands
winch from a KAMAZ trestle
DIY winch. Winch for car
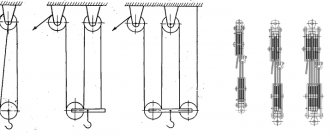
The winch is an ancient invention that appeared before man studied the laws of physics. The device operates on the principle of a lever—the operator applies little force to the handle, and the device moves heavy objects. An irreplaceable thing for car enthusiasts or summer residents, but expensive. Making a handmade homemade winch solves the problem of high price. For little money you can make a design of any complexity.
Homemade winch for farming
All kinds of winches are an indispensable thing for motorists. But a homemade winch for the farm can also be successfully used.
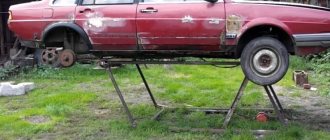
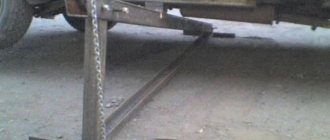
Here, such devices are most often used to move loads along a horizontal surface, for example, heavy logs.
Farmers often use winches by installing them above the attic opening, thus moving loads between different parts of the room.
And some manage to use a homemade winch to plow the land.
To do this, just secure it to the edge of the site, hook the plow to the end of the cable and turn on the winch.
The mechanism pulls the plow, and the person can only give it direction. Using a winch, you can not only plow the ground, but also carry out all cycles of tillage.
We offer a winch for home work, or more precisely for hilling potatoes based on an angle grinder. Almost nothing is needed to make it. We present it as a modification of our winch with an electric motor.
When the engine turned out to be low-power, and I still had a new one, the idea arose to remake the drive. We decided to use an angle grinder. What came out of this is up to you to judge. We will tell you how the modification took place.
Let's start with altering the frame; the engine platform must be adapted to the angle grinder. The canopies and the original appearance of the site remain unchanged. The only thing you need to do is raise it on the frame with the corners to give tension to the belt.
The grinder has threaded holes for attaching handles. It is in them that we insert the bolts to secure the angle grinder to the platform, additionally weld the corner to the platform, as shown in the photo, and secure the electric drive with another bolt.
Then we weld the corners to the frame and raise the platform. We put a pulley on the grinder, put on a belt and carry out a dry test. Next, we carry out full testing on a potato field.
Well casing
Some suburban areas in Moscow and its suburbs are located on loose, loose soil. Rock instability can lead to mine collapse. The work will have to be stopped and the pit will have to be moved to another location.
An alternative option is to casing the walls simultaneously with drilling the well. The technology consists of strengthening the trunk with special casing pipes. The products are available in 2 modifications:
- Coupling. Both sides are equipped with threads. Fixation is carried out with a threaded connection using couplings with internal threads.
- With planted ends. No additional fasteners or special fittings are required for docking. At one of the ends, upsetting is carried out - an increase in the cross-section by the thickness of the wall due to widening by heating. It is equipped with internal thread. On the opposite side, external cutting is performed. The column fragments are joined by screwing.
Some country property owners use PVC pipes to line the trunk. Manufacturers equip plastic products with fasteners.
Types of homemade drilling rigs
To independently drill wells (for water and not only), you need at least a small drilling rig. The depth of wells is rarely less than 20 meters and it is very difficult to do without the use of even the simplest mechanisms. If we talk about drilling techniques and types of rubble rigs, then you can make the following drilling rigs with your own hands:
- Shock-rope installation. The operating principle of this type of equipment is based on gravity. At a certain height, a heavy drill bit is secured with sharpened edges - a glass or a bailer. It is “dropped” several dozen times. Each time the projectile cuts through some part of the soil, and the rock gets stuck inside the hollow projectile (for loose soils they are equipped with valves). The glass is removed from the well and the soil is removed. The process then continues until the well reaches the required depth. For independent implementation, such devices are the simplest. In the most budget option, this is a kind of frame that allows you to fix the block above the well. A long cable with a bailer attached is thrown across the block. You can pull the cable “manually”, or you can install a gear motor with a drum.
One of the shock drilling rigs - Auger drilling rig. Digging into the ground occurs with the help of an auger - a rod with blades welded on by a screw. Using an auger, you can manually drill holes a couple of meters deep - under a pile foundation, for example. To pass through dense layers such as clay or dense sand, considerable effort is required. Therefore, a motor with high torque is required, and they operate on 380 V. And then, auger installations are practically useless on rocky soils. And all the same - it’s just a small stone such as crushed stone or rocks - the auger will not pass them.
Auger drilling rig - Rotary drilling. The principle of rotation is also used, but drilling fluid (water) is supplied inside the drill. This is an effective method - the water carries slurry (crushed rock) to the surface, and the drill is very rarely removed to the surface. It is only constantly increased from above by installing additional rods. There are rotary “dry” drilling units - without solutions, but they require more effort, and the drilling speed is much lower. Therefore, such installations are rarely made and used.
Rotary drilling rig
The choice of the type of drilling rig for making it yourself depends on the geology of the area where they will drill, and the depth of the aquifers also affects. The most universal method is the shock-rope method. Various soils can be penetrated well using rotary equipment using water (this method is also called hydrodrilling). For different types of soil, different chisel shapes are used, and the crushed soil is washed to the surface with water.
The auger drill is the most capricious for soils, but it copes well with viscous soils - clays, loams, but with boulders and rocky soil it gets stuck.
Methods for purifying water from a well or well are described here.
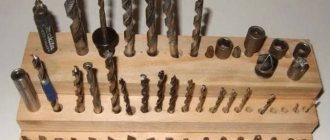
What will you need?
If you are interested in a do-it-yourself winch from a starter, you can get by with cheap and common options. The motor from the VAZ-2101 electric starter is well suited as a power unit. They are quite common and cheap, but they do not have much power, but for a small sedan or SUV, for example, GAZ 69, they are quite enough.
Next is to look at the gearbox. You can also choose from an old Soviet drill. The main thing is that the gear ratio is approximately 1 in 20.
You also need a shaft with gear and bearings, a piece of pipe for the drum and two round metal plates. You will also need sheet metal, various rods, bolts and nuts.
A self-made electric winch is good because you can use a lot of lying around and unnecessary materials.
Among the tools, you definitely need a grinder, a welding machine, and an adjustable wrench.
A winch is often needed on long and difficult trips. If you're an adventurous person, you'll also benefit from learning about building an expedition rack. Read this article. And for a fishing trip you will also need a boat trailer. Read about making it yourself here.
Drilling tool
The method is based on crushing the soil. After destruction, the rock particles are removed from the pit. The work is carried out with a special Sheetz drilling rig. There are several options for working tools:
- To form a pit for a well in soils consisting of wet clay or a sand-clay mixture, the drilling rig is equipped with a driving sleeve. To manufacture it, a fragment of a pipe of the appropriate cross-section is used. The pointed end of the working body easily destroys soil layers. In some versions, the end of the tool is supplemented with sharp teeth. Particles of crushed rock on the walls of the glass are removed from the borehole.
- In loose soils, for the percussion-rope method of drilling wells, a bailer is used as a projectile. The design is represented by a fragment of a pipe, at the end of which a special valve is installed. The safety device holds the destroyed soil inside the working body when extracted to the surface.
- In hard rocky formations, previous tools find it difficult to cope with crushing. Therefore, the drilling rig is equipped with a roller bit. This method of percussion-rope drilling of wells with your own hands is also practiced in dense soils consisting of limestone.
In addition to the working tool, the equipment design includes a winch, attached to a special tripod using a cable. With this lift, the impact projectile is removed from the face.