Digging up a garden is the hardest part of the job if you are lucky enough to have a private plot. Often the result of such occupational therapy is a torn back and strained muscles. But if you have a miracle shovel you made yourself (drawings will be in the article), from now on digging will be quick and easy. Why with your own hands? Yes, for the simple reason that, like a good quality shovel, such a unit will cost a lot of money in the store. And every self-respecting home owner will always have materials for homemade crafts, be it old pitchforks, remnants of twigs or corners. With a little magic, they can be turned into the summer resident’s first assistant - a miracle shovel.
Miracle shovel for digging earth with your own hands
You will find a DIY miracle shovel and its drawings in our article. You've probably already heard about such a device for summer residents as a miracle shovel. If you haven’t heard or don’t quite understand what we’re telling you. This is an invention that is designed to significantly facilitate work in the garden. Of course, work does not become easier with age; after work, your back, arms, and legs begin to ache, and you want to rest, but what if there is a lot of work, but fewer desires or opportunities? In such cases, the miracle shovel comes to the rescue, let's look at the drawings and make it with our own hands at home.
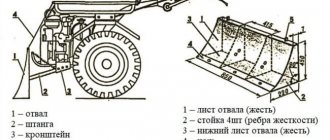
So, what is this device? This is a support frame to which two rippers are attached, a main and a secondary one. The main ripper is a kind of fork tip, and the secondary frame, with pins, these pins should pass between the fork tips. And there is also a support with which it will be easier for you to dig, because you will use the shovel as a lever, and part of the effort will be transferred to this support.
The operating principle of a shovel for the lazy is simple and ingenious. When you start shoveling, you push the support frame into the ground, thereby securing it with your foot. Next, we drive the villa-like points into the ground, and with the help of an auxiliary frame, the rising earth itself is broken into small piles. And thus we move further and further along the site without spending much effort.
What other benefits will you experience when working with such a lazy shovel?
- You don't have to bend over, which significantly relieves stress on your back.
- It is not necessary to use force to lift the soil on the bayonet of the shovel, since it stands on a support.
- There is no need to break large pieces of earth; an additional frame will do this.
- The wide line of the shovel allows you to dig up the area faster.
Miracle shovel photo
Of course, you can buy such a shovel for the lazy in a store; it will cost more than a regular one, and that’s understandable. Therefore, if you know how to work with a welding machine, or have acquaintances or friends who can help you, try making a miracle shovel with your own hands, we will provide you with the drawings.
How to make a miracle shovel with your own hands
- Metal file.
- Drill for metal.
- Welding.
- Steel frame or pipes, corner.
- Fittings.
- Metal stalk.
- The first step is to bend a corner, or pipe, to make a frame for support. You need to bend it with the letter P. The legs should be about 80 centimeters long, and the crossbar should be about 38 centimeters.
- Now you need to make a bar that will stand across. In this bar, every five centimeters you need to drill holes using a drill, and we mount reinforcement bars in them, about 20 centimeters in length, and you need to weld them using a welding machine.
- Now we need to make the main ripper, for this we need a pipe that will be 5 centimeters smaller than the transverse one, and just like in the previous case, we drill holes and insert reinforcement into them.
- Now we need to make ears to attach the hinges that will hold the structure; we can make it from a pipe.
This design will be reliable, but you should not rush into all the work with a miracle shovel, otherwise you can break it, you should not plow too dry soil, take care of the tool and it will repay you with a long service. Next, we bring to your attention the promised drawings of a miracle shovel that you will make with your own hands.
Homemade shovel-ripper
Today, there are a large number of miracle shovels on sale, which represent various designs.
Some types of products can change the depth of digging, others are equipped with additional functions. In addition, along with a manufactured product, on the shelves you can also see devices made by yourself according to special drawings. Among industrial devices, there are several most popular models.
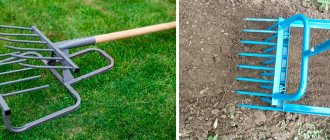
- Classic miracle shovel. Often made by gardeners themselves. This device, consisting of the main forks and a back stop, significantly reduces the load on the body. This increases the speed of work. The disadvantage of this design is that it does not break up earth lumps, so you have to additionally use a rake. Also, the tool can only be used for digging up black soils that are processed regularly;
- Plowman. For better labor productivity, manufacturers are constantly trying to improve the design. Thus, many rippers were created, including the Plowman. A special feature of this device is the length of the bayonet, which can reach 15 cm. Thus, the shovel ensures loosening of any type of soil;
- The mole is available with a pitchfork length of about 25 centimeters. It was created specifically to allow deeper digging. In this case, the plants should be planted immediately after cultivating the soil. It is worth noting that digging soil with such a unit is not easy. Compacted earth or alumina are especially difficult to work with;
- There are universal miracle shovels. With their help, you can dig soil up to 20 centimeters deep, but only if the soil is black soil and freezes only to 10 cm. Under more severe conditions, this shovel is not suitable for cultivating garden crops. But it is suitable for decorative digging.
Watch the video! Digging an area for potatoes with a miracle shovel
When choosing a suitable model, difficulties often arise with the selection of component elements. The way out of this situation is simple: many people have old sleds, pipes from strollers, and dusty fittings in the garage at home. To make a shovel-ripper you will need:
- drill and saw for metal processing;
- welder;
- measuring instruments (angle, tape measure);
- steel pipes or angles;
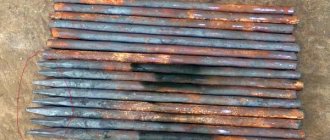
- reinforcement from which the teeth will be made;
- metal stalk.
The parts must be precisely sized and match the person’s height. Therefore, the parts are assembled by first measuring them and cutting off unnecessary parts with a saw.
- The supporting frame is made of metal pipe. It is bent in the shape of the letter “P”. If the top crossbar is 35-40 cm, then the length of the legs is 2 times greater - 80 cm.
- A transverse auxiliary strip with teeth is made. They can be pieces of unnecessary reinforcement 20 cm long, sharpened on one side. If the bar is made of a pipe, several holes are drilled in it at a distance of 50 mm, where the teeth will be inserted and welded. If it is a corner, then the pins are welded directly onto the metal.
- An auxiliary strip with pins is welded to the bottom of the legs at such a distance from the crossbar in the support frame that the main forks move freely.
- A stop is attached to the outside of the support frame crossbar. It will bear the main load when pressure is applied to the handle. The stop is shaped like the letter “T”.
- Select a piece of pipe that is 50 mm smaller than the width of the auxiliary strip. The teeth of the main ripper are welded to it.
- Swivel joints are made from steel ears and a piece of pipe on which the main “forks” will “walk.”
- A handle is inserted into a section of pipe, to the top of which a pipe is welded, which acts as handles. For this purpose, you can use a straightened bicycle handlebar.
To learn how to make a miracle shovel with your own hands, watch the following video.
There is a lot of work in the garden, but the most exhausting work is digging up the soil, cultivating it and removing weeds. They start digging ahead of time, in small sections, since the load is too great. The miracle shovel will help reduce the complexity significantly and at the same time speed up the process at least twice. This relatively inexpensive and uncomplicated device really works, even on difficult soils.
Principle of operation
The work consists of pressing the bucket (blade) of the shovel into the ground and turning over the layer of earth, turning the handles to the right. The earth turns over in a neatly cut layer and lies on the right. The back remains straight, there is no need to bend, a bayonet is stuck into the ground, thanks to which the blade of the shovel enters the soil under the weight of the leg. On light soil you can work with one hand. The spine performs only a rotational movement; without the use of force, with the help of a lever, the work of cutting, removing and turning over a layer of earth is performed.
You can plant potatoes with this “magic digger” as if you were using a plow. You need to dig one furrow (stepping back), put potatoes in it, and when digging the second furrow, even and neat digging occurs. Moreover, you can place fertilizer in the second furrow and bury it while going through the next furrow. With a bucket width of 30 cm, you will get a very even planting of potatoes, with 60 cm between the bushes.
Ideal depth when digging up a site
Quick and easy digging of the site
To cope with this task with minimal effort on your part, the algorithm of actions should be as follows:
Fast cultivation of virgin soil
This is land that has not been cultivated for ten years or more. The turf grows over the years and makes it much more difficult to cultivate such a neglected area. Sowing and caring for plantings without first cultivating the soil will be a fruitless effort. But console yourself with the thought that the soil, which has rested over these years, has accumulated nutrients and will gladly put them into your harvest, after its cultivation, of course.
Among the fastest options for cultivating virgin soil, we can recommend raised beds. We lay cardboard in the desired area of the virgin soil, and pour herbicides into the spaces between the rows. Now we pour fertile soil onto the cardboard and sow seeds or plant seedlings.
The method is fast, but expensive on the budget, because fertile land will have to be purchased, perhaps more than one car. If you still have time, try another option. Cover the required area with cardboard, press it down with a weight and leave it for the whole summer. Under the cardboard, all the green mass will rot and rot, and in the fall the area can be cultivated with any of the shovels or pitchforks described above. Or you can cut out layers of turf and immediately turn them over with the grass facing down. Potatoes can be planted in the gaps between the pastes, and after germination they are mulched generously with organic matter. In the fall, you will harvest the potatoes, and the plot will already be prepared for normal cultivation next year.
Making the right beds
It is not necessary to strain yourself on the site, trying to bring it into “working” condition in one day. Several relevant tips on this topic will help reduce your labor costs:
Digging a heavily overgrown area.
Don't be afraid, you don't have to raise virgin soil. It is enough to spray the area with herbicides, and then, after a few weeks, dig it up. And after another week, apply mineral fertilizers to it and loosen it. Now you can start planting on it.
If you need to dig up a frozen area.
It is better, of course, not to perform such feats, but there are such life circumstances that there is simply no other way. Then we will give you some detailed advice on this topic:
Another advantage of autumn digging is that after it the earth will be well saturated with oxygen, which will also be very useful for the roots of your plants.
If you are lucky and you get an already cultivated area, then you don’t have to dig it up in the fall, but it is advisable to cover it with a layer of mulch; in the spring it will serve as an excellent fertilizer.
Finally.
So, you have become familiar with the options for improved shovels and forks for every taste, now you will not have to break your back in the garden, as before, during the spring preparation of the site for planting.
Source
Principle of operation
Digging begins with installing the handle and fork teeth strictly vertically. Then you need to place your foot on the top of the fork or on the fence and press firmly until the tines are completely embedded in the ground. After this, the handle is pulled back towards itself. Working forks grab and lift a layer of soil, which is pressed through the teeth of a stationary stop.
Simultaneously with digging, loosening also occurs. Next, the digger is moved a little back to the untreated area, and the process is repeated. This gardening tool significantly reduces the strain on your back.
Unlike a shovel, which has a movable Archimedes mechanism, this device is more multifunctional. Several tools are collected in one tool: a shovel, a rake, a pitchfork, a hoe, a harrow. With this universal super-inventory you can:
- prepare the area for planting vegetables;
- loosen, harrow the ground;
- destroy weeds;
- dig up potatoes, carrots, beets.
https://youtube.com/watch?v=6OJBVfcNL50
Review of industrial miracle forks
I dug up my garden with a MIRACLE SHOVEL! I bought a miracle of technology in the spring and easily dug up my garden. This miracle is called a miracle shovel! I wish I had this tool 10 years ago. I hasten to share my feelings: There is practically no load on the back. Legs and arms work. There is no need to constantly bend over or squat. One miracle shovel replaces several tools: a shovel, a rake, a harrow, a hoe and a pitchfork. Excellent for pulling weed roots to the surface. Immediately digs, loosens and harrows. It takes much less time and effort to dig a garden.
How the miracle shovel works: We press the pedal with our foot, the teeth stick into the ground. We lower the lever down with our hands, the earth layer rises, and the soil is broken by opposing teeth. The shovel loosens the ground without turning over the soil and without depleting the fertile soil layer.
This shovel is good for digging a vegetable garden, and for small jobs - digging up apple trees, making holes, we still use a regular shovel.
The miracle shovel is a great tool for gardeners! A necessary gift for retired parents who often have back pain, and this shovel protects the lower back.
What and how to make it from
The designs, as you have seen, are different, but the set of materials will be approximately the same. Their number differs, but the cross-section and characteristics remain unchanged.
You can use a round or profiled pipe, metal rods or “parts” from forks
Materials for production
They usually start with making the frame. It is often made from a profiled pipe, the optimal cross-section is 30*30 mm or so. The wall thickness is important - at least 3 mm. Some models used a corner. The shelf width is also about 30 mm, the metal thickness is at least 3 mm.
The handle can be made from the same profile pipe, or you can use a round one. The thickness of the walls is also important. In principle, having made a latch, you can use a wooden shovel holder. Some purchased models provide for the installation of a wooden holder.
The main attention should be paid to the material that is used for the teeth of the working forks. It must be good structural steel
The forks are made from a rod of at least 8 mm in diameter.
What craftsmen make them from:
- They cut it off from an ordinary fork and weld it onto a miracle shovel.
- Straighten the suspension springs.
- Car springs are sawn into narrow strips.
If you can find a good rod - round, square or hexagonal - it doesn't matter, it will be much easier for you. Not a bad option, by the way, with pitchforks
But you have to buy good ones, and this is not cheap. And one more thing: calculate the dimensions of the miracle shovel so that the working forks have 8 pins. Then you will need to buy two jokes of ordinary pitchforks.
If the design is chosen with two forks - working and thrust, you can place pieces of a suitable length of metal rod on the thrust forks. The loads here are not so high, so the strength should be enough. The diameter of the rod is 10 mm; you can use ribbed reinforcement, which is used to reinforce the foundation.
Most companies that produce miracle shovels have a range of sizes for this product. Our people are different in build and physical fitness. For men, you can make more massive models, and for women and older people, smaller and lighter ones. The average sizes are:
- The width of the working part is from 45 cm to 60 cm. There is no need to do more: it will be difficult to dig and productivity will only decrease, not increase.
- The length of the working fork pins is 220-300 mm.
- The distance between the pins is 70-80 mm.
- The length of the handle is according to your height; it is more convenient if it ends near the shoulder.
The dimensions of the miracle shovel can be selected “to suit you” - it is important that it is convenient to work
All other sizes are selected depending on the design and material used.
Miracle shovel working forks
Detailing of the stop and forks
Full design with front stop
Option with single forks and rear support frame
Other dimensions of the digger and different design of the stop
Lightweight digger with solid bent handle
We make garden forks in a couple of hours and without significant costs!
Do you know what garden forks look like? And for collecting hay or digging up parsley? In fact, there are about 12 types of this tool, from pointed ones to wide shovel-like ones. You will learn later in this article how to choose the right equipment and how to make it yourself without much expense!
Types of pitchforks used in the country
In order to better understand the specifics of the tool being manufactured in the next section, we need to find out what kind of forks are found in nature and for what task our version is suitable. Let's look at the most popular types of garden tools in descending order.
- Classic. These are 4 horns, the diameter of which is about 5-11 mm, depending on the strength of the instrument, and each of them tapers to a point with a thickness of 2-4 mm. Designed for digging up hard soil. They go into the ground with little effort. Perfect for digging up soil in the front garden before winter. They may have 5 teeth - it depends on the model, but there is not much difference.
- Cleaning. Very similar to the previous category, only the number of horns is limited to 4 - it doesn’t happen anymore. Each one has a slightly larger diameter and can sometimes have a flat shape. This is done so that the earth does not crumble when digging, and the harvest grows well. Ideal for digging up potatoes, beets, carrots, horseradish, parsley and other vegetables. They practically replace a bayonet shovel in the garden.
- For making hay and spreading manure. This class has a completely different design. Their horns reach 70 centimeters, and the number of teeth can be from 3 (for dung) to 5 (for throwing hay). They are pointed, much thinner than the instruments described above. Allows you to capture a lot of hay at one time.
- "Ball" Often there is a need to collect small beets, potatoes, cabbage or even cucumbers, but doing this by hand (especially over a large area) is long and difficult. It is at such moments that “ball” pitchforks can help out. Their design is unlike all others: at the end of each horn there is a metal ball with a diameter of 8-12 millimeters. It is done so that the vegetables cannot be damaged during harvesting.
Other types are very rarely used and do not have much value, so we will not consider them. The options described above can satisfy the requirements of every summer resident and help carry out any work on the site.
We make pitchforks for digging up soil and harvesting crops
Now we will make with our own hands 2 main types of tools that will always be useful to you at the dacha: classic and harvesting forks. If necessary, the first option can play the role of a tool for spreading manure, and the second type can conveniently collect hay. Thus, there is no need to keep a whole bunch of equipment at home. Let's get to work.
Step 1
Making horns.
It is better to buy the metal part on the market, since it is quite difficult to do it yourself. However, it is possible. First you need to find a good steel wire with a diameter of 8 mm and a steel rod with a diameter of 15 mm for the base.
Next, cut the wire into 35 centimeters and measure 30 centimeters for the twig
. We sharpen the wire to a cone using sandpaper; the horns should evenly move from 8 mm to 3 mm at the other edge.
Next, we simply weld the thick edge to the twig, fusing a wide layer of metal using a welding inverter.
Step 2
We make the mount.
We take a pipe with a diameter of 45 mm, cut off 10 centimeters from it, and weld it to a steel rod. You can make reinforcement on the front side by welding a steel rod.
Step 3
Finishing of the handle.
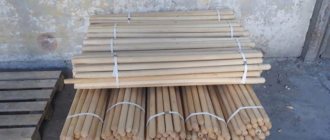
It will be easier to buy the blank itself at a hardware store or at the market. It is better to give preference to birch or oak, since pine has weak strength properties.
It should also be taken into account that digging forks must have a significant margin of safety so that they can dig up hard soil in the fall. We sand the birch cuttings first with coarse-grained sandpaper, then with fine-grained sandpaper.
Next, you need to cover the workpiece with stain, wait until it dries and apply a layer of varnish. Very little of it will be used, since the stain has already thoroughly saturated the wood.
Step 4
Securing the cutting in the seat.
We insert the handle into the seat, turn the tool upside down and hit the holder several times on the concrete surface. After this, take an electric drill, drill a 5 mm hole in the mount and hammer in a nail so that the holder does not slip off.
Now the work can be considered completed. You can safely take the tool and go test it.
Advice from professionals
In order for the construction to go like clockwork and not have to regret it later, it is better to take the advice of experienced craftsmen who have made more than a dozen forks. Let's take a closer look at what they recommend to us.
- Don't try to make more antlers
because you won't be able to dig after frost, which will sometimes be necessary, especially when fertilizing the soil before winter. - Do not use pine - this is a very weak material for this case. It is better to take a holder that is heavy but strong.
- It is recommended to immediately make the seat for the holder a little wider, to accommodate the large diameter of the holder, and then adjust it. It can be easily compacted if the cutting becomes too wobbly. But, as practice shows, the holder is never thick. The bigger, the better.
- There is never too much impregnation. Forks for the garden must be completely protected from corrosion, so you can apply impregnation 2-3 times to maximally protect the tool from biological corrosion and moisture.
If you follow these recommendations and make the tool as described above, the hay fork will turn out quite well and will serve you for decades. It is better to store in a dry place, since even with good protection, corrosion will attack over time.
Do-it-yourself miracle shovel - a revolution in gardening
Maintaining your own vegetable garden is a varied activity. On the one hand, it’s nice to cut fresh greens in the spring, enjoy berries in the summer, and dig up a few bags of your own potatoes in the fall.
The other side of the coin is caring for the crop as it grows, and the hardest work is digging up the site. Moreover, this must be done twice. In autumn and spring. Otherwise, you will have to forget about the harvest.
The classic version of the tool is a bayonet shovel. It allows you to efficiently process soil of any complexity, but the work takes a lot of effort and time. There are walk-behind tractors, electric cultivators, and, after all, you can call a tractor driver with a plow.
However, all these processes require capital investment, bringing the cost of the crop closer to the store price. Therefore, most gardeners prefer to work with their hands. To ease the hard work of a summer resident, a wonderful tool was invented - a miracle shovel.
A super digging shovel is a symbiosis of a pitchfork and a sled. The sharp teeth quite easily penetrate the ground; with the help of a lever in the form of a long handle, a large butt of earth is raised and loosened against the second part of the forks, which are located on the surface.
Of course, you can buy the device in a store, or you can make a miracle shovel with your own hands from scrap materials.
Soil ripper from a hoe
This type of equipment is very easy to make. You need to take an ordinary hoe and weld a curved steel plate to the central part of the blade. Drill two holes at its free end. Then a piece of pipe with a diameter of two and a half centimeters is selected. On one side, two square cheeks are welded to it, on each of which five coaxial holes are drilled. The cheeks are located symmetrically in relation to each other.
The distance between them should correspond to the thickness of the curved plate, which is inserted between the cheeks and secured. A wooden handle is inserted into the pipe section on the opposite side. This is how you can make garden tools for loosening the soil with your own hands. The photo clearly demonstrates how you can change the angle of inclination relative to the ground.
Alternative drawings or “what can be replaced”
Above we described a drawing of a ripper, but there are also very practical models of shovels that can significantly simplify work in the garden. Such a tool will be especially relevant during harvesting, where you need to turn the soil over, and not loosen it.
If you need just such a miracle shovel, its drawings and dimensions will differ significantly. Firstly, the working area will be a metal plane, rather than pointed segments for loosening. The counters are removed. All that remains is the mechanism itself for reducing the effort to turn over the earth clod. That is, its advantage will only be in the absence of back strain - the earth is lifted by pulling the handle of the shovel.
Another very popular miracle shovel design is a tool with a triangular support. Its essence is to significantly reduce the effort when digging out a clod of earth. Its subsequent transportation is carried out using the spinal muscles, which will not satisfy the requirements of many builders. This design is perfect for working in very hard soil, where it is necessary to apply very high pressure precisely in the process of undermining the coma.
How to make your own miracle pitchfork to make digging easier
Miracle forks are a tool used for gardening. It is a non-inversion, aerating tool, which means it opens the soil but does not turn it over. The wide fork allows air and water into the soil and promotes biological life in the soil, which in the top few inches consists primarily of aerobic organisms. A number of studies have been conducted on the importance of microorganisms that live in soil.
Miracle pitchforks can be purchased, but they can be quite expensive. They come in different sizes and styles. My goal was to make a spin fork from scrap materials and items I already had. This gardening unit weighs about 8 kg.
Step 1: Materials
Metal frame channel
2x4" x 60" Flat Steel Bars (2)
Mounting accessory
The following tools :
Angle grinder (cutting, polishing and grinding wheels) Hacksaw Vise
Step 2:
I cut a 22 inch (56 cm) section using a saw. I wanted the step to be wide enough to fit between the handles. Next I marked where I should place the five prongs. I spaced them 5.5 (14 cm) apart. Finally, I cut five notches wide enough for each of the prongs to fit through. *Five prongs is a good number for my needs. More than five will be better for established garden beds. Fewer tines will be more suitable for preparing new beds.
Step 3: Teeth
Step 4: Fork
It is important to note that the material has a galvanized coating. It should be sanded or brushed with a metal wire (a few inches from the weld area) before welding. Grinding and welding can release zinc dust and fumes, which if inhaled can make you very sick. Not to mention, you'll get a better weld with fresh, bare metal. I added a prong to the slot and welded the prong in place. I repeated until all 5 prongs were welded in place. I then tried to clean up my weld using angle grinders. I added a prong to the slot and welded the prong in place. I repeated until all 5 prongs were welded in place. I then tried to clean up my weld using angle grinders. I added a prong to the slot and welded the prong in place. I repeated until all 5 prongs were welded in place. I then tried to clean up my weld using angle grinders.
Step 5: Collar and Handles
Step 6: Test the miracle pitchfork in the garden
I started by testing in a raised bed that I have used for the past two seasons. The bed had become compacted in the off-season and there was a layer of riprap that prevented me from getting the teeth to their full depth. I'm happy to report that the DIY Miracle Fork exceeded my expectations and was much easier than using my grape hoe to prepare the beds. It was nice to see earthworms as I lifted the soil (worms that would most likely have been killed if I had used a simple shovel). Now that I know the welds are strong, I'm going to paint the rod with a paint that will stick to the metal and prevent corrosion. I will also be shaping the handles to make them easier to work with in all the beds I plan to work on. Thanks for searching. Let me know if you decide to build your own happy planting!
Purpose of a bayonet shovel
If your summer cottage is small in size, and you simply have nowhere to store all your gardening tools, pay attention to a bayonet shovel, which can become a universal assistant in the garden at all times. Like its close sister - the shovel, it is simply necessary in the garden for performing various tasks related to the earth
Such work, as a rule, puts a lot of stress on the back and arms, so when buying a tool you need to pay special attention to the quality of the metal from which it is made and the type of wood of its handle.
Cuttings made from hardwood trees are considered the strongest and most durable. And the bayonet must be made of stainless steel or titanium. The blades of such shovels have two configurations: simple for normal work with soil and serrated at the ends for digging up the lawn.
Using the fixture
It should be noted that this unit is very convenient to use: you don’t have to bend over, which significantly reduces the risk of injuring your back, which is very important for those who suffer from radiculitis. In addition, the degree of physical effort exerted also decreases, while the speed of work increases significantly.
The shovel works as follows: you need to press your foot on a special platform, plunging the tool into the ground. Then, without removing your feet from the platform, you need to take a step back with your free leg, while tilting the shovel in your direction. Thus, a lump of earth falls on the teeth. With light hand movements you need to shake off the soil, thereby loosening it. You can also turn it over, thanks to a sharp upward movement of the hand, while moving the tool back by 10-15 cm.
After treating the area in this way several times, it is worth walking over it with a rake, breaking up lumps of earth.
It is interesting to know that in the old days a shovel was called a spade. This name was born from the nature of the action - to step on the foot, or to step in, which means pressing on a metal bayonet.
It is noteworthy that factory-made models of shovels are often clogged with earth and perform their function worse. In addition, wooden handles inserted into special sockets also tend to break. Unlike these devices, in home-made units the connection of all parts is usually more rigid, which is why jamming and breakage occur extremely rarely.
However, this does not mean that a shovel made at home does not have its drawbacks. The possibility of deformation of sealed or welded seams, as well as breakage of plastic parts (if any), cannot be ruled out. However, the good news is that such flaws can only manifest themselves after many years of active use of the instrument.
Aluminum snow shovel
Metal shovels win in terms of strength, but they are heavy for clearing snow. The only exception is lightweight aluminum. Soft metal is great for a scoop. Let's look at how to make a snow shovel from sheet aluminum:
- It is better to make an aluminum scoop with sides. When applying markings to a sheet, the shelves should be marked on three sides of the workpiece. The handle will pass through the backboard, so its height should be 1–2 cm greater than the thickness of the wooden element.
- Aluminum cuts easily. For cutting, metal scissors, an electric jigsaw are suitable, or in extreme cases, you can use a grinder. On the cut out fragment, the sides are folded on three sides. A hole with a diameter equal to the thickness of the handle is pre-drilled in the rear shelf.
- A nest for the handle is attached to the center of the scoop with rivets. It is made from a piece of sheet aluminum. Place the workpiece on the edge of the handle and try to press its edges down. Next, the aluminum plate is tapped with a hammer until a semicircle is extruded. The result will be a scoop, as shown in the photo.
Now all that remains is to take the cutting, pass it through the hole in the back side of the scoop and insert it into the nest. To prevent the made shovel from flying off while throwing snow, the end of the handle is fixed to the socket with a self-tapping screw.
You may hear the opinion that you can only buy an aluminum scoop, but you won’t be able to make it yourself. This is not so - a do-it-yourself snow shovel with an aluminum tray can be made at home without much difficulty. To do this we do the following:
- We process and shape a sheet of aluminum. We cut out the blank for the tray with a hacksaw or grinder.
- Installation of additional metal strips. For structural rigidity, shanks are attached along the edge of the working blade. This improves the design and prevents damage. To install the strips, use a rivet gun.
- Handle attachment. To install a device on a seat tray, take two aluminum strips and place them on the holder. The ends of the strips are pressed to the bucket with a hammer. Holes are made and fastening is done with rivets. The handle is varnished.
What are the features
It became a real gift to all diggers and plowmen. After all, any gardener knows that the hardest physical labor involves digging up the soil. We all pay for planting potatoes with pain in our backs, arms and legs. An Orthodox monk made his own version of the traditional bayonet shovel; he claims that digging with it is a pleasure, it even helps plant potatoes. In the process of digging a garden, you have to bend down each time, pressing the shovel forcefully into the ground, and then, straining all your muscles, lift not only the heavy shovel, but also the soil on it. Of course, such work hurts your back. The Vyatka Plowman shovel allows you to work without stress. This is its main advantage, which is why it is called a “shovel for the lazy,” although it would be more accurate to say, for the weak, because any pensioner with it can become a digger.
It is not symmetrical, you can work with it only with one leg - the left one, but there is no problem with that, you can make a tool for the right leg. The inventor installed a bicycle handlebar at the top, so you can hold the shovel with both hands at chest level. The most important thing: there is no need to lift the earth; it turns over smoothly as a result of the turning movement of the hands.
With such a shovel you can increase labor productivity several times. It is successfully used for digging up a vegetable garden and planting potatoes, but you can also dig a ditch.
How to make a digging fork for a vegetable garden
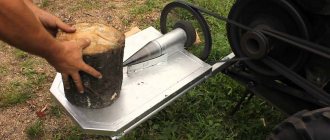
Spring has come - the time for dachas and vegetable gardens. Time to dig up the garden and plant. The shovel, as a classic, but not for all types of rural work, convenient tool is being actively replaced by homemade and factory-made miracle shovels and pitchforks. Today the author of the blog “Homemade Vitmana” will show another homemade product - the miracle of a pitchfork. With such a device, digging will be easier, faster and more fun.
This cool device for digging earth consists of two parts. The first part is the handle, with forks welded at the bottom. For ease of digging, the handle is made at an incline of 30 degrees. A jumper was added by welding in the middle. The width of the forks is 80 cm. 12 fittings are used as pins. It is sharpened and welded in increments of 10 cm. The basis for the forks was a square pipe 25x28. Holes are drilled in it and reinforcement is pushed through. On the reverse side there is a welding joint. You can see the cleaned seams.
The height of the forks is equal to the length of the bayonet of the shovel, approximately 250 mm. The pedal is made on a hinge from a garage hinge, which is cut off on both sides and welded to the handle. Hinge height 100 mm. The pedal is made from a 25×28 square tube. Welded together with a 3/4 pipe and a piece of reinforcement number 12. A gusset was attached for rigidity. A sheet of ten measuring 25×50 was used.
As you can see, the design of the miracle fork is simple, easy to manufacture and materials used for it that are easy to find in a garage or at a metal collection point. On the site you will find a huge number of similar tools to make it easier to dig up soil in garden plots.
Advantages and disadvantages of the tool
There are devices that, although constructed in a similar way, have important differences in design. Below they are described in more detail.
In this type of design there is no front stop. The lattice for breaking clods is made without a front bar. This reduces the weight of the mole ripper shovel slightly. However, since there is no need to lift the shovel off the ground when working, this does not provide a significant advantage.
Digger
The digger consists of the following parts:
- A handle made in the shape of the letter “T” is used here. Therefore, during work, the shovel is held differently than usual. Hands hold the instrument by the horizontal bars. This helps to increase the force of pressure on the soil when working. In addition, such a handle is usually made of metal. It can move up or down. Once a comfortable position has been found, the handle is secured with bolts.
- The forks are attached to the handle at two ends, and not at the central part, as in the classic version.
- The stop attached to the back of the tool is more powerful than in the usual case.
The disadvantage of this design is that there is no provision for crushing the soil.
Digger
Lightcop
This option can be considered the simplest design. For it, it was necessary to invent a rectangular metal frame to which forks were attached, looking down. The emphasis, made rectangular, is attached horizontally. The front grille is missing.
On a note. Despite its simple design, this type of miracle shovel is an effective digging tool.
Archimedes spade
It bears little resemblance to the classic version. The difference, in particular, is that here it is not a pitchfork that is used for digging, but a bayonet shovel. However, the inventor applied a similar principle here: the rule of leverage. This is the invention of Vladimir Kolybelin from the city of Kovrov, Vladimir region.
The Archimedes shovel is designed in this way:
- It has two shafts: long and short.
- The blade of the instrument is attached to a short shaft.
- All parts are connected into one whole by a bracket. With its help, a short shaft with a shovel in the middle is connected to a long handle and can rotate.
Important! Although the arhimedova shovel saves effort compared to conventional tools, it is difficult to use on heavy clay soils
Archimedes spade
They call it a miracle shovel: a miracle pitchfork, a miracle ripper, and a shovel for the lazy
But one thing is important: the design of the unit has many different functions. Therefore, it will take much less time and effort to dig up an area than when using conventional tools. They bury the equipment in the ground, leaning on the comfortable handle with their whole body, and not with just one leg.
And by controlling a special lever, you can easily turn over a heavy layer of soil
They bury the equipment in the ground, leaning on the comfortable handle with the whole body, and not with one leg. And by controlling a special lever, you can easily turn over a heavy layer of soil.
What is different and what can
To be precise, this is not a shovel, but a ripper, since it not only digs, but also breaks clods. The miracle shovel consists of two (sometimes one) slats with pins movably connected. Some models also have a back stop - for easier digging of dense, heavy soil. So in reality it looks more like double pitchforks (see photo below).
Miracle shovel and its components
Yandex.RTB RA-1479455-2
From the picture it is clear that this tool does not have a shovel as such, but the differences from the classic bayonet shovel do not end there. It also has a much higher handle - it should reach your shoulder. It is also convenient if there is a crossbar at the top - you can operate it with both hands.
The miracle shovel performs three operations at once:
- loosens the soil;
- breaks clods;
- “extracts” the roots of weeds without tearing or cutting them (in any case, damaging them much less);
- Digs root vegetables easily - you can dig carrots, potatoes, etc.
But its main advantage is that it greatly facilitates digging the earth, and the main load falls not on the back, as when using a conventional bayonet shovel, but on the legs (driving the working forks into the ground) and on the hands (turning the forks out of the ground). During work, the back is in a vertical position and is almost not loaded.
Another version of the miracle shovel
Yandex.RTB RA-1479455-7
The only downside to this tool is the weight. It is really much larger than the bayonet one. But the super shovel can be rearranged; there is no need to lift it. Or rather, it is raised only a few times: when it is placed on the ground at the beginning of the row. Then, by pulling the handle, it is simply tightened a little.
There is another very attractive point in using a miracle shovel - it digs the garden at least twice as fast. This occurs due to the wider working part - up to 50-60 cm. Provided there is little physical activity, this is very good.
How to work
Although this design is not particularly complex, working with it has its own characteristics. First, you need to start from the far edge of the bed, then move back, gradually dragging the forks back. Well, the general procedure is this:
- Holding the handle, place a miracle shovel and rest it on the front ripper.
- Stick the pitchfork into the ground. Drive them in until the back stop touches the ground. If the ground is heavy or dense, additional force may be needed - press your foot on the crossbar of the front forks.
- Pull the handle towards you. With this movement, the forks will begin to move upward. As they rise, they pass through the forks of the front stop, breaking up the lumps.
- Pull the device back a little, repeat all the steps (plug, squeeze, pull the handle).
It's actually very simple. It’s worth trying a couple of times and then everything repeats automatically.
Forks with a spade tip
This tool is literally indispensable when digging up heavy types of soil, since its design makes it possible not to exert too much effort during work. The spade fork has, in addition to the usual fork teeth, one bayonet located on the edge. This protrusion differs from others in its greater sharpness and width. The bayonet of this device penetrates the soil layer without much effort, and the remaining teeth can easily be placed behind it.
When digging up potatoes, for example, the fruit will remain on the fork and the soil will slide back. In this case, you don’t have to bend over and pick up the tubers manually. They can be easily transferred from the unit to the wheelbarrow in one movement. In addition, vegetables are not damaged, as happens when working with a shovel.
As a rule, in suburban areas they work
pensioners, that is, people who are not young and do not always have good health, for this reason the question of what is the best way to dig up the earth becomes acute.
When using such forks, there is no need to bend and turn repeatedly. The work mainly involves the muscles of the shoulders and arms, while the lower back is practically freed from the load . This is an extremely important point for older people.
. The less they get tired, the more work they can do.
Homemade instrument with steering wheel
For those for whom the speed of digging is important, the invention of one person will help, who belonged to that category of people who live on self-sufficiency and only thanks to cultivating the land and growing cereals, vegetables and fruits. We are talking about monks. One of them is our contemporary, living in one of the modern monasteries, monk Gennady.
His invention became known thanks to one of the programs on central television, where the ascetic inventor demonstrated to a wide audience a homemade shovel-like unit with an interesting design. The upper part of this tool was made up of a regular bicycle handlebar. As a result, monk Gennady received unique equipment for gardening consisting of the following elements:
- stainless steel pipe with a diameter of approximately 2 cm;
- the tip of an ordinary shovel;
- device with a spring for regulation;
- bicycle wheel.
The inventor called this homemade unit a hand plow and even gave it the name “Vyatka Plowman”.
This hand-made plow can make it possible to plow the soil many times faster than with an ordinary shovel. And due to the rotating method of operation, the device does not load the back in the lumbar region. In addition, Father Gennady’s miracle shovel is well applicable to dense layers of earth.
The length of the unit is adjustable, and the bucket, due to its optimized width, is capable of scooping up 2 times more soil compared to an ordinary shovel. Due to the fact that when you turn the steering wheel, the soil is tilted to the side, there is no need to bend over and remove lumps. This is very convenient when planting crops. People who suffer from radiculitis will appreciate this tool.
Design Features
Miracle shovels may vary in design. Such instruments go by different names. You can often find shovels called “Plowman”, “Tornado”, “Digger” and many others. Each of them has its own characteristics, but the design principle of operation is the same in all cases.
Plowman
Soil ripper without front stop
This device is similar to all others. The basis is the supporting and working elements, represented by a pitchfork, but this smart shovel does not have a front stop. This is precisely its design feature. Such designs are lighter and smaller in size
But this is not too important when working, while the absence of a front stop deprives increased stability
Such devices consist of two main elements:
- Working forks with a handle welded to them.
- Support forks, to the comb of which the back stop is attached using welding.
Digger
This variety is represented by wider forks, which are connected to a stop. The whole design is complemented by a powerful, comfortable handle. Features of this design are the presence of a stop and an adjustable handle. The stop in the digging shovel is also movable. After the structure is immersed in the ground, press down on the stop with your foot and turn out the contents of the bed with root crops. Why is the instrument turned out and rearranged?
Digger
On a note. It is easy to work with such a device, so the digging process goes faster. But this miracle device is not capable of crushing soil, so it should not be used for heavy and lumpy areas.
Lightcop
The device is distinguished by a round stop and a handle that is not adjustable. Digging forks are made in a similar way, and the principle of operation is no different. This is a fairly lightweight structure that will help you quickly dig up the ground. You can only understand which device is better by trying both options in practice.
Self-production of a shovel from two segments
It is more difficult to make a miracle shovel with your own hands from two segments. But such a tool is more effective and easier to work with. The structure can be welded according to the Plowman or Mole scheme. This is the owner's personal preference. The photo below shows and numbered all the main parts of the shovel. Guided by this diagram, we will look at how to make a miracle tool at home:
- Let's start with the frame. Its width does not need to be more than 50 cm. Due to the large area of soil covered, the speed of digging will decrease due to rapid fatigue of the worker. The optimal width of the working forks is 35–40 cm. It is better to bend the frame from a square steel pipe.
- When bending the frame, you need to remember that the front stop bars are its continuation. In the diagram they are indicated by the number 1. A cross member is welded to the side elements. The teeth of the second stationary part of the fork, indicated by the number 2, will be attached to it. The result is a main frame on which all the shovel components will be assembled.
- The back stop, indicated by the number 3, is welded to the frame at an angle of approximately 100°. It is made a couple of centimeters wider from the working forks. The support must be strong, since the main load falls on it when lifting a layer of earth with a pitchfork. The shape of the stop depends on personal preference. You can make a T-shaped structure using the Mole principle, as shown in the diagram. This option is considered lightweight. If you like the shape of the Plowman’s stop, then an arc is bent from the pipe, resembling the letter P.
- To make working forks, indicated by the number 4, take a piece of square pipe. A piece of round pipe with a diameter of 50 mm for a wooden handle is welded in the center. The working forks are a movable element, therefore they are attached to the common frame with a bracket marked with the number 5. The connecting unit consists of two parts: one is welded to the frame, and the other to the socket for the handle. For the manufacture of the bracket, sheet steel with a thickness of about 5 mm is used. The two elements are connected with a regular bolt, but not tightly tightened so that the working forks can move.
- To make the pins of the working forks, marked with the number 6, rods are taken from hardened steel. One end of the teeth is sharpened at an angle of 30°, and the other edge is welded to a square pipe with a connecting movable unit. For better loosening of the soil, the pins are bent at an angle of about 150°. The teeth of the second stationary forks are made from reinforcement. There is no need to sharpen the edges. The pins are welded to the cross member of the main frame. There should be 1 more working fork teeth. The distance between the pins depends on the width of the frame, but not less than 100 mm.
- After connecting the two elements, a wooden handle is inserted into the welded section of the round pipe. Its length should be slightly below the chin of a working person. A T-shaped crossbar is attached to the top of the handle. If desired, the handle of the miracle shovel can be made U-shaped. Then two pieces of round pipe are welded to the working fork bar at the edges. Two cuttings are inserted into them, and connected on top with a jumper. In the photo, the U-shaped handle is shown as number 3.
To make it convenient for different people to work with a homemade miracle shovel, the back stop and the handle must be made with length adjustment. Here you need to show your imagination. You can cut inserts from the pipe and drill holes for the cotter pins.
Advice! If, during the first tests of the miracle shovel, bending of the fork teeth is observed, they need to be red-hot over a fire, and then sharply dipped into a metal container with alkaline water.
Watch the video to see how to make a miracle shovel:
Advantages and disadvantages of using the tool
Like any other device, a miracle shovel has a number of positive and negative aspects that are important to know before starting production. Let's define them in more detail
- The level of physical exertion that needs to be applied when cultivating the soil is significantly reduced.
- Due to the wide channel, the process of processing the site is significantly accelerated.
- The shovel is easy to use and anyone can handle it.
- The device is perfect for use on different types of soil.
- A miracle shovel, especially one made with your own hands, is highly reliable and will serve you for many years.
But such a useful invention also has disadvantages:
- It is difficult to repair, so initially you need to make the device high quality.
- You cannot figuratively dig up part of the site.
- The device cannot dig a hole.
- In order for the work to be truly productive, it is better that the worker’s weight is more than 80 kg.
The miracle shovel is a universal invention that will help you cultivate the soil on your site several times faster and with better quality. And making it with your own hands is not at all difficult if you use all the tips and recommendations indicated in this article.
https://plodovie.ru/instrument/ruchnoj/chudo-lopata-svoimi-rukami-9015/
https://stroychik.ru/tools/chudo-lopata-svoimi-rukami
What and how to make it from
If you can’t buy such a device, don’t be upset. It's easy to make it yourself.
Important! As you can see, all devices differ in the number of components and materials required to perform assembly work. All sections and characteristics are the same
Materials for production
Before making a miracle shovel with your own hands, you should prepare the starting material.
Miracle shovel drawing
To create a frame, you must use a profiled pipe with a diameter of 3x3 cm, with a wall thickness of 3 mm or more. For some models, a corner may be needed (shelf width - 3 cm, wall thickness - 3 mm).
The handle can be made from a similar profiled pipe. Some models allow the use of wooden handles, like an auger for a regular shovel.
Particular attention should be paid to the manufacture of forks. Strong structural steel is a must here
The rods for making working fork teeth must have a diameter of at least 8 mm.
Interesting fact. Home craftsmen found a solution very easily, which helps in such a situation. They cut the teeth off a simple fork, saw a car's springs into narrow strips, or straighten strong springs such as suspensions. There are many options to choose from, the main thing is that the original steel is strong.
Dimensions
Modern manufacturers offer their customers tools that can dig, loosen and level, in various sizes. This is done so that a person can choose a miracle shovel for himself, because everyone differs in height and equipment.
Miracle shovel ripper
Most often, structures are made with the following dimensions:
- The width of the working part is 45-60 cm. Structures that are too large are more difficult to use, which can reduce productivity.
- Bayonets for working forks can be 22-30 cm long.
- The length of the handle should be chosen at your discretion. This is done according to growth.
- The optimal distance between the pins is 7-8 cm.
All other characteristics are selected during production. Depending on the selected design, model and material used, parameters may vary.
Blueprints
Before you start making individual elements of a super shovel, you should create a detailed diagram of the tool. Each drawing must contain detailed descriptions indicating dimensions and details. This will take a significant amount of time, but will ultimately help you create a convenient tool. Without a drawing it is very difficult to get what you want; this can only be achieved by an experienced craftsman who has already made more than his first miracle shovel.
As you can see, you can simplify your work on the site with a simple mechanism. If you have certain skills and knowledge of working with metal, then you can make a miracle shovel yourself. A homemade tool is more economically profitable.
vote
Article Rating
How to make it yourself
You can make such a shovel yourself, but to do this you need to be able to work with metal, for example, perform welding work. This section will tell you how to make a miracle shovel with your own hands, about the drawings and dimensions for its manufacture.
The main part of the structure is made of metal. To do this, you can take a profiled pipe or corner. The thickness should be approximately 30 mm. In the latter case, the steel used is important; it should not be thinner than 3 mm.
Important! The teeth must be made of high quality steel. Those made from forks or those made from a car spring are suitable. It is recommended that there be 6 to 8 teeth.
The handle can be made of wood or a metal pipe.
The width of the working part is usually from 60 to 80 cm. If you do more, it will practically not add productivity. The recommended pin length is from 22 to 30 cm.
The length of the handle is made according to height. It will be convenient if it reaches the shoulder.
The picture below shows one of the options for how to make a shovel.
In accordance with this scheme, it is possible to make the tool yourself.
The miracle shovel greatly facilitates the work of digging up a site. You can do it yourself. If possible, it makes sense to purchase a high-quality commercial model.
Rules for using garden equipment
Any tool must be used skillfully so that it lasts as long as possible. The operation of a hand cultivator is based on the principle of leverage. By pressing the foot pedal, a person helps to drive the working teeth into the soil. By lowering the lever with his hands, the summer resident forces the earthen layer to rise. In this case, the soil layer is broken by opposing teeth. Without turning over the entire layer, the device loosens the soil without depleting its fertile layer.
The peculiarity of the tool is that it can only be used on wet soils. It will not loosen dry soil. The best time to use unusual equipment is considered to be the beginning of spring and mid-autumn. But too moist soil is difficult to work with a miracle shovel. During the period of preparing the soil for planting, large areas are dug up with tools.
Caring for the tool is the same as for gardening equipment. It is stored under a canopy, protecting it from rain. For the winter, clean the teeth from soil and wipe all parts of the structure with a dry cloth. You can lubricate the metal parts of the shovel with machine oil to prevent rust.
Summarizing
All these tools are easy to make with your own hands. They make the toughest jobs easier and increase productivity. Flat cutters and miracle shovels should be in the arsenal of every cultivated summer resident. But they are only suitable for land that has already been cultivated - they cannot raise virgin soil. True, most gardeners do not face such a task.
On FORUMHOUSE you can find more smart tools for cultivating land, learn how to make a homemade tractor, watch a video that shows in detail the device of the “Mower” flat cutter, and videos that talk about life hacks that improve the life of a summer resident.
Source