Homemade products from a washing machine engine:
1. How to connect a motor from an old washing machine through a capacitor or without it 2. Homemade emery from a washing machine engine 3. Homemade generator from a washing machine engine 4. Connecting and adjusting the speed of a commutator motor from an automatic washing machine 5. Potter's wheel from a washing machine machines 6. Lathe from an automatic washing machine 7. Wood splitter with an engine from a washing machine 8. Homemade concrete mixer
7 country miracle helpers!
Unusual hand gardening tools (photos, videos, drawings)
1. Fokina flat cutter
The flat cutter is a great achievement of the agricultural mind. This is the first truly universal garden tool. Not just for cultivating the soil, but a tool for comprehensive cohabitation with the cultural plant community and soil.
Fokina flat cutter drawing:
Fokina flat cutter “Swift”
2. Ripper Miracle shovel “Plowman”
Ripper Miracle shovel “Plowman” drawings:
A shovel that can be classified as a ripper-cultivator - “Plowman”. The mechanism of the Plowman ripper is simple and quite effective. Raising the earth is carried out by the operation of a simple lever. The main load falls on the legs, which press the working forks into the ground. The lifting of the soil comes from the force of the hands, which relieves the back and is therefore attractive to the elderly and gardeners suffering from lower back pain. Two opposing forks, passing one through the other, loosen the soil without turning it around, providing a loosening depth of 15-20 cm.
Miracle shovel Prokopenko
Advantages of the design of a shovel or soil ripper or potato digger
1.Deep tillage without soil turnover.
2.High labor productivity.
3. Significant physical effort is not required when processing the formation.
4.Available in production.
A special feature of cultivating the soil with a miracle shovel is that the garden is dug lengthwise rather than across. With both outstretched hands, we take the miracle shovel by the edges of the top bar, step on the platform (footboard) and it easily goes into the ground. With a slight movement (can be combined with light shaking), taking two steps back, we move the shovel from a vertical position to an almost horizontal one. After this, we take a step forward, pull the shovel back 30 cm, give the shovel a vertical position, drive it into the ground and repeat the cycles until the row ends. Then we proceed to processing the next row.
Materials: half-inch labor, round timber (or hexagon) with a diameter of 15 mm.
For ease of transportation, a collapsible design can be made.
Miracle shovel Prokopenko drawings:
3. Miracle turning forks
Miracle forks allow you to dig up the ground without putting any strain on your back due to the unique rotary working method. Miracle Forks do not require bending or squatting. Efforts are applied only to the “steering wheel”. At the same time, digging productivity increases 3-4 times.
Miracle forks are adjustable in height over a wide range, which allows you to ideally adjust the tool to your height.
Miracle forks rotating photos:
4. Miracle shovel of the monk - Father Gennady
Miracle shovel of the monk - Father Gennady photo and drawings:
5. Miracle Cleaver
The Miracle Cleaver is a tool for easily and safely chopping wood. You will be able to chop three times more firewood, spending the same time and the same effort as when working with a regular splitter. At the same time, even women and children will be able to chop wood, because the main work consists only of raising and lowering a weight weighing 3.3 kg.
One Miracle Cleaver replaces four tools: a cleaver, an axe, a hammer and a chisel. If you follow the instructions for use, the tool is absolutely safe.
The miracle cleaver allows you to chop even very thick logs. However, it does not require any special skills and is very easy to use.
Miracle cleaver photo:
6. Miracle potato hiller
The miracle hiller is designed for loosening the soil on potato beds and hilling up the sprouted potatoes.
Thanks to an optimally calculated design, the new invention promotes high-quality soil cultivation (loosening and hilling) and the correct formation of the crest of a potato ridge. The distance between the discs is adjustable, which allows you to loosen the soil near the bushes and hill up the bushes.
The miracle hiller will allow you to hill up potatoes without much effort and in the shortest possible time, avoiding the labor-intensive and tedious work of cultivating the soil with a hand hoe. It takes two people to work as a potato hiller.
Miracle potato hiller photos and drawings:
7. Soil ripper "Tornado"
The “Tornado” soil ripper loosens the soil and easily copes with perennial weeds such as wheatgrass or field bindweed.
Soil ripper "Tornado" photos and drawings:
Source: eurosamodelki.ru
DIY miracle shovel
This homemade device is simply indispensable for summer residents - a miracle shovel! The original design of the shovel allows you to quickly dig up a garden with minimal physical exertion, especially useful for people with back problems.
We present a photo of the step-by-step production of a homemade miracle shovel.
- Rod.
- Corner - 45 mm.
- Pipe.
- A pair of 10mm bolts.
From the rod we cut 15 pieces 30 centimeters long. Next, 8 segments need to be sharpened on one side.
We take a corner 60 cm long, measure out exactly 8 parts on it in order to place 8 rods at the same distance. Next, we take another corner 50 cm long and divide it into 7 parts, respectively, into 7 rods.
We weld rods to the corners, and to a corner 50 cm long you need to weld corners 35 cm long at both ends.
We drill holes along the edges of the side corners and make loops from the corner pieces.
We insert and weld bolts into the hinges, insert the hinges into the holes on the corner, and weld the previously made part on top.
From a 15 pipe, cut two pieces 125 centimeters long and bend them slightly.
We weld the pipe sections along the edges of the upper corner and reinforce them with rods.
We weld a handle to the pipes.
As a result, we got a homemade miracle shovel, made with our own hands, with its help you can quickly and effortlessly dig up a vegetable garden.
How to use a miracle shovel is shown in this video.
Source: sam-stroitel.com
We make garden forks in a couple of hours and without significant costs!
Do you know what garden forks look like? And for collecting hay or digging up parsley? In fact, there are about 12 types of this tool, from pointed ones to wide shovel-like ones. You will learn later in this article how to choose the right equipment and how to make it yourself without much expense!
Types of pitchforks used in the country
In order to better understand the specifics of the tool being manufactured in the next section, we need to find out what kind of forks are found in nature and for what task our version is suitable. Let's look at the most popular types of garden tools in descending order.
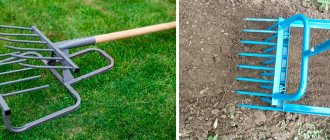
- Classic. These are 4 horns, the diameter of which is about 5-11 mm, depending on the strength of the instrument, and each of them tapers to a point with a thickness of 2-4 mm. Designed for digging up hard soil. They go into the ground with little effort. Perfect for digging up soil in the front garden before winter. They may have 5 teeth - it depends on the model, but there is not much difference.
- Cleaning. Very similar to the previous category, only the number of horns is limited to 4 - it doesn’t happen anymore. Each one has a slightly larger diameter and can sometimes have a flat shape. This is done so that the earth does not crumble when digging, and the harvest grows well. Ideal for digging up potatoes, beets, carrots, horseradish, parsley and other vegetables. They practically replace a bayonet shovel in the garden.
- For making hay and spreading manure. This class has a completely different design. Their horns reach 70 centimeters, and the number of teeth can be from 3 (for dung) to 5 (for throwing hay). They are pointed, much thinner than the instruments described above. Allows you to capture a lot of hay at one time.
- "Ball" Often there is a need to collect small beets, potatoes, cabbage or even cucumbers, but doing this by hand (especially over a large area) is long and difficult. It is at such moments that “ball” pitchforks can help out. Their design is unlike all others: at the end of each horn there is a metal ball with a diameter of 8-12 millimeters. It is done so that the vegetables cannot be damaged during harvesting.
Other types are very rarely used and do not have much value, so we will not consider them. The options described above can satisfy the requirements of every summer resident and help carry out any work on the site.
We make pitchforks for digging up soil and harvesting crops
Now we will make with our own hands 2 main types of tools that will always be useful to you at the dacha: classic and harvesting forks. If necessary, the first option can play the role of a tool for spreading manure, and the second type can conveniently collect hay. Thus, there is no need to keep a whole bunch of equipment at home. Let's get to work.
Step 1
Making horns.
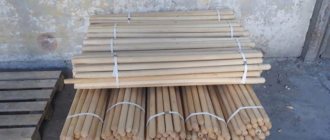
It is better to buy the metal part on the market, since it is quite difficult to do it yourself. However, it is possible. First you need to find a good steel wire with a diameter of 8 mm and a steel rod with a diameter of 15 mm for the base.
Next, cut the wire into 35 centimeters and measure 30 centimeters for the twig
. We sharpen the wire to a cone using sandpaper; the horns should evenly move from 8 mm to 3 mm at the other edge.
Next, we simply weld the thick edge to the twig, fusing a wide layer of metal using a welding inverter.
Step 2
We make the mount.
We take a pipe with a diameter of 45 mm, cut off 10 centimeters from it, and weld it to a steel rod. You can make reinforcement on the front side by welding a steel rod.
Step 3
Finishing of the handle.
It will be easier to buy the blank itself at a hardware store or at the market. It is better to give preference to birch or oak, since pine has weak strength properties.
It should also be taken into account that digging forks must have a significant margin of safety so that they can dig up hard soil in the fall. We sand the birch cuttings first with coarse-grained sandpaper, then with fine-grained sandpaper.
Next, you need to cover the workpiece with stain, wait until it dries and apply a layer of varnish. Very little of it will be used, since the stain has already thoroughly saturated the wood.
Step 4
Securing the cutting in the seat.
We insert the handle into the seat, turn the tool upside down and hit the holder several times on the concrete surface. After this, take an electric drill, drill a 5 mm hole in the mount and hammer in a nail so that the holder does not slip off.
Now the work can be considered completed. You can safely take the tool and go test it.
Advice from professionals
In order for the construction to go like clockwork and not have to regret it later, it is better to take the advice of experienced craftsmen who have made more than a dozen forks. Let's take a closer look at what they recommend to us.
- Don't try to make more antlers
because you won't be able to dig after frost, which will sometimes be necessary, especially when fertilizing the soil before winter. - Do not use pine - this is a very weak material for this case. It is better to take a holder that is heavy but strong.
- It is recommended to immediately make the seat for the holder a little wider, to accommodate the large diameter of the holder, and then adjust it. It can be easily compacted if the cutting becomes too wobbly. But, as practice shows, the holder is never thick. The bigger, the better.
- There is never too much impregnation. Forks for the garden must be completely protected from corrosion, so you can apply impregnation 2-3 times to maximally protect the tool from biological corrosion and moisture.
If you follow these recommendations and make the tool as described above, the hay fork will turn out quite well and will serve you for decades. It is better to store in a dry place, since even with good protection, corrosion will attack over time.
DIY miracle shovel
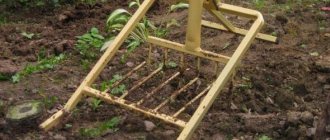
One of the most popular innovative digging tools is the miracle shovel, which consists of twin forks: some are stationary, the other are movable. Mobile forks lift the soil and push it through the teeth of stationary forks. The soil is loosened to a depth of 20-25 cm.
We offer you drawings of the device: it is simple. A participant of our portal, who had previously seen welding machines only in stores, successfully welded such a miracle shovel for herself.
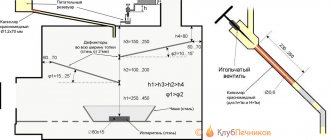
Recommended dimensions of the miracle shovel:
- frame width: 35 cm,
- frame length – 78 cm,
- length of working forks - 23 cm.
According to the experience of operating the unit by the participants of our portal, for its effective operation the ripper must be tilted approximately 25 degrees towards the ground.
A member of our portal with the nickname Mount “slowly sawed with a grinder” on winter weekends and tested this device at the dacha on the May holidays.
I'm shocked: what in previous years I spent several days on, I did in a matter of hours. And the quality of digging is much better: you don’t even need to harrow with a rake. Damp soil sticks to an ordinary shovel with terrible force, but this tool could cope with wet soil, although it worked better where it was drier.
Mount notes that the fork shovel works well on undug soil (although this tool is not intended for virgin soil), and pulls out roots. If you pour peat onto the dug up soil, the unit mixes it with the soil no worse than a mixer.
Digging up beds with this device is very simple: go in one direction, turn, go in the other direction. 10 minutes - and the bed is ready!
And - most importantly - there is no fatigue, as there was from a shovel. At first there were very skeptical remarks from the female contingent about the worthlessness of the device, but after the first 15 minutes of use there was silence.
Our user specifically made this unit lightweight so that it could cope with the most difficult soils, including virgin soil.
Over three years of successful operation, the following advantages were identified in comparison with motor cultivators:
- the miracle shovel does not cut the roots of weeds and thereby does not contribute to their spread throughout the garden, but completely pulls them out;
- You can use it to hill up potatoes: walk along the rows while simultaneously removing weeds, loosen the soil, and then hill up;
- The tool is convenient for digging up long beds;
- there is no need to break up lumps and loosen the dug up soil with a rake;
- The device loosens the soil without turning over the fertile layer.
A similar device called “two shovels” was made by a user with the nickname Dva11.
I looked at the options for shovels on the Internet and in stores and made my own. Due to the large lever, less effort is required and there is no need to bend over too much.
This is an easier option than the previous one, but it also requires effort. Saddle frame made of 15x15x1.5 profile and 4 mm electrodes; The forks themselves are made from a 20-piece pipe and seven teeth from a horse rake (the distance between them is approximately 6-7 cm).
The length of the teeth is 28 centimeters, but due to the fact that the axis is raised by three centimeters, 24 centimeters go into the ground.
A similar tool was put together by a FORUMHOUSE member with the nickname TOSA1970.
It helps a lot when digging, and your back doesn’t get tired like with a regular shovel.
Principle of operation
Digging begins with installing the handle and fork teeth strictly vertically. Then you need to place your foot on the top of the fork or on the fence and press firmly until the tines are completely embedded in the ground. After this, the handle is pulled back towards itself. Working forks grab and lift a layer of soil, which is pressed through the teeth of a stationary stop.
Simultaneously with digging, loosening also occurs. Next, the digger is moved a little back to the untreated area, and the process is repeated. This gardening tool significantly reduces the strain on your back.
Unlike a shovel, which has a movable Archimedes mechanism, this device is more multifunctional. Several tools are collected in one tool: a shovel, a rake, a pitchfork, a hoe, a harrow. With this universal super-inventory you can:
- prepare the area for planting vegetables;
- loosen, harrow the ground;
- destroy weeds;
- dig up potatoes, carrots, beets.
https://youtube.com/watch?v=6OJBVfcNL50
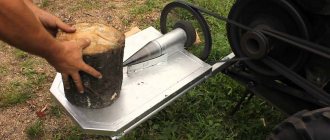
DIY potato digger
Nobody likes picking potatoes out of holes - this is the most difficult and tedious thing in the whole process of digging potatoes. Mount has made another hand-held gardening tool, a hand-held potato digger, which itself removes root tubers from the holes and also cleans them from the soil!
The advantage of this unit is that you don’t need to shake the ground with a shovel. He stuck his pitchfork under a bush, stomped on the lever with his foot - clean potatoes flew out of the ground.
This tool is convenient for digging all root crops. It is much easier to work with it than with a shovel - you don’t get tired at all!
A potato digger is also used for digging up a vegetable garden. But she needs to dig her garden not along, but across the plot.
How to make a flat cutter from a braid
Vladimir Fokin invented his flat cutter after he was unable to use a shovel. This garden tool is capable of performing many operations: loosening, weeding, hilling, mowing, forming beds, etc.
Its main purpose is to remove weeds and at the same time loosen the soil at a depth of 2-5 cm, but without turning the top layer of soil. Supporters of organic farming know that this method of loosening does not destroy beneficial microorganisms living in the soil, and therefore increases its fertility. The Fokina flat cutter is a bracket that is curved in several places at certain angles, its three cutting surfaces are sharply sharpened. The bracket is secured to the handle. It is important to learn how to work correctly with a flat cutter, then this tool will have no price.
Here's how you can check yourself: if your back is straight when working, your body is tilted quite a bit, your thumbs on the handle look up, then everything is correct. If you hold the tool correctly, the physical load when working with it is reduced several times.
Fokin is my father-in-law. Letters of gratitude, especially from elderly people or people with poor health, stood in bags in his home.
A FORUMHOUSE member with the nickname Antol13, based on Fokin’s flat cutter, made his own tool - a super flat cutter Kosar. This super-effective tool is made from a Sable braid that was lying around the house unnecessarily.
Here's how to make a flat cutter from a braid:
- Use a grinder to cut off the stiffening collar so that during operation the flat cutter does not experience resistance and does not cling to the ground. The recommended length of the flat-cutter blade is 17 cm. But it is better to first make the blade longer; after testing, you can always shorten it.
- The recommended attack angle of the flat cutter blade is 35 degrees. If necessary, you can increase it by bending it in a vice with a gas wrench.
- After testing, adjust the length of the flat cutter and the angles of the working surfaces.
- Make grooves on the handle on both sides for better fixation.
- For better fastening and to prevent loosening, make a stainless steel clamp at the top of the tenon.
Using the fixture
It should be noted that this unit is very convenient to use: you don’t have to bend over, which significantly reduces the risk of injuring your back, which is very important for those who suffer from radiculitis. In addition, the degree of physical effort exerted also decreases, while the speed of work increases significantly.
The shovel works as follows: you need to press your foot on a special platform, plunging the tool into the ground. Then, without removing your feet from the platform, you need to take a step back with your free leg, while tilting the shovel in your direction. Thus, a lump of earth falls on the teeth. With light hand movements you need to shake off the soil, thereby loosening it. You can also turn it over, thanks to a sharp upward movement of the hand, while moving the tool back by 10-15 cm.
After treating the area in this way several times, it is worth walking over it with a rake, breaking up lumps of earth.
It is interesting to know that in the old days a shovel was called a spade. This name was born from the nature of the action - to step on the foot, or to step in, which means pressing on a metal bayonet.
It is noteworthy that factory-made models of shovels are often clogged with earth and perform their function worse. In addition, wooden handles inserted into special sockets also tend to break. Unlike these devices, in home-made units the connection of all parts is usually more rigid, which is why jamming and breakage occur extremely rarely.
However, this does not mean that a shovel made at home does not have its drawbacks. The possibility of deformation of sealed or welded seams, as well as breakage of plastic parts (if any), cannot be ruled out. However, the good news is that such flaws can only manifest themselves after many years of active use of the instrument.
Summarizing
All these tools are easy to make with your own hands. They make the toughest jobs easier and increase productivity. Flat cutters and miracle shovels should be in the arsenal of every cultivated summer resident. But they are only suitable for land that has already been cultivated - they cannot raise virgin soil. True, most gardeners do not face such a task.
On FORUMHOUSE you can find more smart tools for cultivating land, learn how to make a homemade tractor, watch a video that shows in detail the device of the “Mower” flat cutter, and videos that talk about life hacks that improve the life of a summer resident.
Source: www.forumhouse.ru
Rules for using garden equipment
Any tool must be used skillfully so that it lasts as long as possible. The operation of a hand cultivator is based on the principle of leverage. By pressing the foot pedal, a person helps to drive the working teeth into the soil. By lowering the lever with his hands, the summer resident forces the earthen layer to rise. In this case, the soil layer is broken by opposing teeth. Without turning over the entire layer, the device loosens the soil without depleting its fertile layer.
The peculiarity of the tool is that it can only be used on wet soils. It will not loosen dry soil. The best time to use unusual equipment is considered to be the beginning of spring and mid-autumn. But too moist soil is difficult to work with a miracle shovel. During the period of preparing the soil for planting, large areas are dug up with tools.
Caring for the tool is the same as for gardening equipment. It is stored under a canopy, protecting it from rain. For the winter, clean the teeth from soil and wipe all parts of the structure with a dry cloth. You can lubricate the metal parts of the shovel with machine oil to prevent rust.
What is different and what can
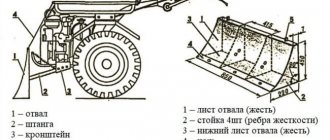
To be precise, this is not a shovel, but a ripper, since it not only digs, but also breaks clods. The miracle shovel consists of two (sometimes one) slats with pins movably connected. Some models also have a back stop - for easier digging of dense, heavy soil. So in reality it looks more like double pitchforks (see photo below).
Miracle shovel and its components
From the picture it is clear that this tool does not have a shovel as such, but the differences from the classic bayonet shovel do not end there. It also has a much higher handle - it should reach your shoulder. It is also convenient if there is a crossbar at the top - you can operate it with both hands.
The miracle shovel performs three operations at once:
- loosens the soil;
- breaks clods;
- “extracts” the roots of weeds without tearing or cutting them (in any case, damaging them much less);
- Digs root vegetables easily - you can dig carrots, potatoes, etc.
But its main advantage is that it greatly facilitates digging the earth, and the main load falls not on the back, as when using a conventional bayonet shovel, but on the legs (driving the working forks into the ground) and on the hands (turning the forks out of the ground). During work, the back is in a vertical position and is almost not loaded.
Another version of the miracle shovel
The only downside to this tool is the weight. It is really much larger than the bayonet one. But the super shovel can be rearranged; there is no need to lift it. Or rather, it is raised only a few times: when it is placed on the ground at the beginning of the row. Then, by pulling the handle, it is simply tightened a little.
There is another very attractive point in using a miracle shovel - it digs the garden at least twice as fast. This occurs due to the wider working part - up to 50-60 cm. Provided there is little physical activity, this is very good.
How to work
Although this design is not particularly complex, working with it has its own characteristics. First, you need to start from the far edge of the bed, then move back, gradually dragging the forks back. Well, the general procedure is this:
- Holding the handle, place a miracle shovel and rest it on the front ripper.
- Stick the pitchfork into the ground. Drive them in until the back stop touches the ground. If the ground is heavy or dense, additional force may be needed - press your foot on the crossbar of the front forks.
- Pull the handle towards you. With this movement, the forks will begin to move upward. As they rise, they pass through the forks of the front stop, breaking up the lumps.
- Pull the device back a little, repeat all the steps (plug, squeeze, pull the handle).
It's actually very simple. It’s worth trying a couple of times and then everything repeats automatically.
Principle of operation
The work consists of pressing the bucket (blade) of the shovel into the ground and turning over the layer of earth, turning the handles to the right. The earth turns over in a neatly cut layer and lies on the right. The back remains straight, there is no need to bend, a bayonet is stuck into the ground, thanks to which the blade of the shovel enters the soil under the weight of the leg. On light soil you can work with one hand. The spine performs only a rotational movement; without the use of force, with the help of a lever, the work of cutting, removing and turning over a layer of earth is performed.
You can plant potatoes with this “magic digger” as if you were using a plow. You need to dig one furrow (stepping back), put potatoes in it, and when digging the second furrow, even and neat digging occurs. Moreover, you can place fertilizer in the second furrow and bury it while going through the next furrow. With a bucket width of 30 cm, you will get a very even planting of potatoes, with 60 cm between the bushes.
Constructions
In addition to the option shown above (called “Tornado”, “Digger” or “Plowman”), there are several more variants of miracle shovel designs under different names.
Assembly drawing of a miracle shovel
Soil ripper without front support
This design also has working and support forks, but does not have a front stop. Because it is less bulky and weighs a little less. But the front stop gives increased stability during operation. And the weight when dragging is not so important.
The handle is attached to the working forks, the back stop is welded to the comb of the second forks. Both of these structures are movably connected to each other (even door hinges can be used).
Ripper miracle shovel for easy tillage
The photo shows one of the implementations, which is made on the basis of a corner and a round pipe. When working, the pins are driven into the ground by pressing on the crossbar, and not on the stop, as in most models.
An option called “Digger” is essentially a wide fork with a stop for easier turning and a high, powerful handle.
Miracle shovel "Digger"
The peculiarity of this design is the stop and the adjustable handle. It is fixed with two bolts and adjusted to the height of the working person.
The emphasis is not stationary, but movable. It is fixed to the frame. When plunging the pins into the ground, press on it with your foot, then, without removing your foot, turn it out by pressing the handle of the fork out of the ground.
Digger in action
The physical load during work is low, the work progresses quickly. But this miracle shovel will not work for hard and lumpy soils: it does not crush the soil. She collapses through the pitchfork under her own weight. But this is only possible on loose soils. On clay or black soil it is better to have a second comb with pins.
Various tool options
There are devices that, although constructed in a similar way, have important differences in design. Below they are described in more detail.
Soil ripper without front support
In this type of design there is no front stop. The lattice for breaking clods is made without a front bar. This reduces the weight of the mole ripper shovel slightly. However, since there is no need to lift the shovel off the ground when working, this does not provide a significant advantage.
Soil ripper without front support
This option differs from the classic one in that it does not have a grille located in front. The handle of the instrument is also made in a different way.
The digger consists of the following parts:
- A handle made in the shape of the letter “T” is used here. Therefore, during work, the shovel is held differently than usual. Hands hold the instrument by the horizontal bars. This helps to increase the force of pressure on the soil when working. In addition, such a handle is usually made of metal. It can move up or down. Once a comfortable position has been found, the handle is secured with bolts.
- The forks are attached to the handle at two ends, and not at the central part, as in the classic version.
- The stop attached to the back of the tool is more powerful than in the usual case.
The disadvantage of this design is that there is no provision for crushing the soil.
This option can be considered the simplest design. For it, it was necessary to invent a rectangular metal frame to which forks were attached, looking down. The emphasis, made rectangular, is attached horizontally. The front grille is missing.
On a note. Despite its simple design, this type of miracle shovel is an effective digging tool.
Archimedes spade
It bears little resemblance to the classic version. The difference, in particular, is that here it is not a pitchfork that is used for digging, but a bayonet shovel. However, the inventor applied a similar principle here: the rule of leverage. This is the invention of Vladimir Kolybelin from the city of Kovrov, Vladimir region.
The Archimedes shovel is designed in this way:
- It has two shafts: long and short.
- The blade of the instrument is attached to a short shaft.
- All parts are connected into one whole by a bracket. With its help, a short shaft with a shovel in the middle is connected to a long handle and can rotate.
When working, the tool is stuck into the ground and the long handle is slightly moved forward. Then they step on the short part, and, taking into account the law of leverage and the length of the arm, the shovel will lift the earth.
Important! Although the arhimedova shovel saves effort compared to conventional tools, it is difficult to use on heavy clay soils.