Tools for digging up a vegetable garden
But just the other day, in the drizzling rain, I decided to transplant old raspberry bushes to a new place for rejuvenation.
For these purposes, I took that same shovel and dug holes for new bushes. But we had to tinker with digging out the old ones. But that was not the problem at all. After some time of intense work, the shovel cracked. At first I thought that the stalk had cracked, as usual, but when I cleared the shovel of clods of earth, a crack was exposed that ran along almost the entire central part.
I had to say goodbye to Chinese “rail steel”.
After such a failure at the dacha, I decided to again go through new alternative inventions. I’ve already written about some of them, but this time I decided to insert, for clarification, videos with reviews of the capabilities of these hand tools, so to speak, in action. As they say, it is better to see once than never to read.
Garden ripper "Mole"
This is perhaps the most famous invention of recent years. We have already written about the mole shovel on the website. So you can read in more detail about the device and digging technology there. In the meantime, I advise you to watch the video of “The Mole” in action, at least three times the gain in time and quality.
But they have already written to me that this invention is not suitable for all types of soil, and besides, not everyone can bear the weight of the device. This design has many variations, which were invented by inventors from different regions of Russia.
But not all of them, unfortunately, are suitable for digging up rich loam or turf.
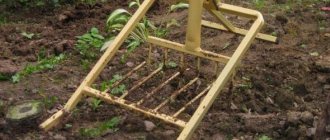
Forks with support
Another device from the same series as “Mole”, “Digger” and “Plowman”. At their core, these are also expanded and strengthened forks, but in this case they also have a support. Convenient for older people. Loosening occurs. Also suitable for digging up potatoes.
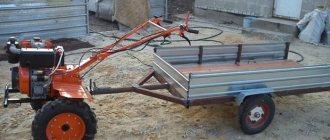
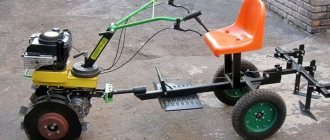
Shovel with steering wheel
That’s what I called, with your permission, this outlandish implementation of an invention for digging up soil. More precisely, a dump. The handle is complemented by a bicycle handlebar, and the soil part itself is offset from the center.
explains everything in detail. The soil, as we see from the video, is dry, sandy and can be easily picked up even with a hoe. But will this structure withstand rich, moist black soil? We write your ideas, advice, recommendations.
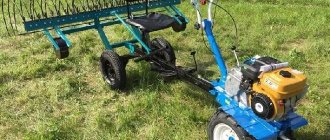
Another flat cutter with a wheel
The wide blade of the flat cutter is based on a frame with a bicycle wheel. Suitable for surface treatment of the soil layer, cutting weeds and loosening the soil. However, you won’t be able to dig up beds with such a wheel.
Another flat cutter, but not Fokina
In the late 80's, my parents had one of these flat cutters that they used to weed potatoes. Various home inventors continue to create the same design. Again, I would like to note that the flat cutter is mainly suitable for weeding and loosening the soil, and not for digging under the bed.
Shovel-flat cutter “Genius”
The unusual combination of two seemingly incompatible devices in one instrument made it possible to create a very useful tool. However, it seems to me that you can’t expect performance from it.
Tornado
No, this is not a deadly wind, but an unusual design that can also be used to plow a garden. But it is still not suitable for full digging. Although the authors of this video
At the end of the article, I would like to inform you that the choice of new equipment, even manual, must be approached wisely, carefully studying and testing with your own hands the strength of the tools that you are going to purchase. It is also worth noting that the quality of the materials from which modern hand tools for work in the country are made leaves much to be desired. Aren't you ashamed, gentlemen manufacturers?
PS This year I’m doing the following experiment. I buy a “Digger”, a steel bayonet shovel (a shovel made of metal of unknown origin could not stand it, read about this at the very beginning of the article) and a large Fokina flat cutter. I will use these devices to their full potential throughout the season, and at the end I will report the results.
There is a lot of work in the garden, but the most exhausting work is digging up the soil, cultivating it and removing weeds. They start digging ahead of time, in small sections, since the load is too great.
The miracle shovel will help reduce the complexity significantly and at the same time speed up the process at least twice. This relatively inexpensive and uncomplicated device really works, even on difficult soils.
Instructions - how to make an Archimedes shovel
For an Archimedean shovel, you can use almost any bayonet shovel, but the author recommends taking a lightweight shovel with holes. Dirt sticks to it less, and because of the holes it is lighter than a regular shovel. In addition, it loosens the soil better. However, it also requires improvement. You need to make several holes in it (explanations in the video).
Next you need to trim the foot lever on both sides. A bevel 180 mm long is made at one end. At the tip the thickness of the bar is about 10 mm. An inset is made on the back side of the cut and a small cutting of the cutting is glued into it with Titan glue. The result is a heel. Note: the heel in the design of the shovel is needed to adjust the tilting angle of the earth, it prevents the earth from falling on the feet, gives the vector of the explosion (soil dump) forward, and helps create an explosion crater. From the opposite end of the bar the length is about 80 mm. The thickness of the end of the segment is half the diameter of the cutting. The foot lever is ready.
The foot lever is driven into the bayonet shovel to a depth of 150 mm. Attached with screws and bolt. The bolt is designed to prevent the arm from breaking. We make a through hole in the wood along the previously marked holes in the bayonet.
We assemble a large handle with a handle and bracket - the only original part. It is made of 1.5 mm thick steel. Has several holes with a diameter of 6.2 mm. The stretch between the upper holes is 190 mm, between the lower ones – 100 mm. There are two mounting holes along the axis of symmetry. The bottom hole is 15 mm from the bottom edge, the second hole is 85 mm from the bottom edge. Ream height – 150 mm. Stretch to hole – 135 mm. In the central part the height is 110 mm. Total width – 220 mm. In the lower narrow part – 150 mm. By bending the blank made according to the template, a finished bracket is obtained. It is assembled on a shovel using two bolted connections. The author seriously suggests an alternative option for making a papier-mâché bracket. To increase strength, at least two layers of cotton fabric should be placed between layers of paper. The total thickness of the layers is required to be at least 5 mm. The result is a very rigid and durable structure. In order to strengthen the walls of the holes for the rotation axis, washers are glued between the paper. A papier-mâché bracket has one advantage: while being quite strong, it weighs 250 grams less than an iron one.
How to make a bracket
See how the author makes the bracket. But, if you want to make one shovel for yourself, then you can do it, as he says, simpler. Bend the workpiece directly on the handle. That is, in place you need to make two mounting holes strictly on the axis of the handle with the same dimensions as on the steel reamer of the bracket. Secure the reamer on the handle with M6 bolts and nuts through wide washers and impact bend it on a large bench vice using a heavy hammer. The reamer will bend around the handle - the bracket is ready.
When the Archimedean shovel is ready, you need to check: when lowering the finished shovel down with the bayonet, the levers should not diverge.
Preparing for assembly
The handle and the canvas are not yet a shovel. After purchasing these elements, you have to take its assembly seriously. It involves several steps.
- First of all, you need to dry the cuttings well. Usually, holders are delivered to stores from the manufacturer damp, and in the spring season it happens that they do not always have time to dry well in the store. Therefore, it is better to place the cutting outside under a canopy for several weeks. This time is enough for it to dry well.
The next stage is sharpening the handle. It is necessary to remove a layer of wood at a certain angle. For rough processing, you can use a sharp ax, but do not overdo it. Next, the wood is processed with a grinder using a special wood sanding attachment. The final adjustment is made with coarse sandpaper. The holder must fit very tightly into the landing tube of the shovel blade.
Before proceeding to the final stage - attaching a shovel to the handle, it needs to be painted.
Very often gardeners neglect this, but in vain. An unpainted cutting will get wet in the rain, absorb moisture and become twice as heavy. In addition, such a cutting will last much less. For painting, use a simple stain. It is inexpensive and can be found in any hardware store. It should be applied to the wood with a paint brush in two layers. After this, let it sit for 12 hours and varnish. Leave to dry for 12 hours.
Flaws
Gardeners did not find any significant “shortcomings” in the miracle structures for digging soil, but no one can argue with the objective facts:
- The “working” grip of ripper shovels can reach 40 cm, which means that in an area where seedlings are planted close to each other, it is a useless tool;
- a loosening or digging device (the invention of Gennady’s father) will not be able to dig a deep hole;
- advanced models are difficult to repair if they break down, since they are made of a large number of parts.
The fewer elements, rotating mechanisms, and bolted connections a device has, the easier it is to maintain and repair. Therefore, it is better to start making homemade shovels with a careful selection of a drawing, which involves the use of a small number of simple elements. For pointed rods on panels, handles, and handles, you need to select durable, corrosion-resistant materials. The ideal option in this case is stainless steel. A metal pipe is suitable for the handle; you can also use it to make a bar and a stop.
Shovel care
In order for a shovel to serve for a long time and productively, it must be treated with care. After work, the remaining stuck soil must be cleaned off, and the tool itself must be put away in a well-ventilated place. Bayonet shovels are stored with the handle facing up. The exception is models that are equipped with a sealed glass. In this case, to remove moisture from it so that it does not damage the wood of the handle and the glass itself, the shovel is placed with the tip up.
A dull tool must be treated with an emery wheel or a sharpening stone. If knots or chips appear on the handle, they are cleaned with sandpaper. With careful use and storage, even the cheapest bayonet shovel will last a long time.
The main design elements of a miracle shovel
In addition to the option shown above (called “Tornado”, “Digger” or “Plowman”), there are several more variants of miracle shovel designs under different names.
This design also has working and support forks, but does not have a front stop. Because it is less bulky and weighs a little less. But the front stop gives increased stability during operation. And the weight when dragging is not so important.
The handle is attached to the working forks, the back stop is welded to the comb of the second forks. Both of these structures are movably connected to each other (even door hinges can be used).
Ripper miracle shovel for easy tillage
The photo shows one of the implementations, which is made on the basis of a corner and a round pipe. When working, the pins are driven into the ground by pressing on the crossbar, and not on the stop, as in most models.
An option called “Digger” is essentially a wide fork with a stop for easier turning and a high, powerful handle.
The peculiarity of this design is the stop and the adjustable handle. It is fixed with two bolts and adjusted to the height of the working person.
The emphasis is not stationary, but movable. It is fixed to the frame. When plunging the pins into the ground, press on it with your foot, then, without removing your foot, turn it out by pressing the handle of the fork out of the ground.
Digger in action
How to make a miracle digger, see the following video.
This miracle shovel design is slightly different from the previous one. The stops in it are rounded, the handle is arched, but the basic structure is the same. There is some drawback - there is no way to adjust the handle, but otherwise everything is the same - a movable stop and working forks.
Two options called "Lightcop". The simplest ripper for the vegetable garden, garden and cottage
It’s hard to say whether this variation is better or worse. It would be possible to evaluate only by comparing the performance of both copies on the same site.
The miracle shovel not only performs its direct function - digging the earth, it also loosens and breaks clods of earth. The design consists of two strips with pins. They are movably connected to each other. Sometimes the device may consist of one such strip.
Some manufacturers produce models that have a back stop. This shovel is designed to make work easier when digging dense, heavy soil. So the miracle shovel is more like a double pitchfork.
The main advantages of the miracle shovel include the fact that it can perform several functions:
- Loosens the soil;
- Breaks up large clods of earth;
- Pulls out the roots of any weeds without leaving them in the ground;
- Easily digs potatoes, beets and other root vegetables.
The operating principle of this device is not complicated. If we describe it in general terms, it will look like this: ordinary forks mounted on the back stop loosen the ground using the force that a person transfers manually to the tool, pressing on the handle.
At this time, the second fork teeth, located opposite and entering the lock, break up large lumps of soil during the loosening process. As a result, the earth is well dug up and loosened.
The ripper is equipped with a front stop, which provides good stability to the entire mechanism. Looking at the work of a miracle shovel, it can be compared to scissors that cut and crush piles of earth. At the same time, there is no need to cultivate the land with a garden rake.
The miracle shovel is an indispensable assistant for gardeners and gardeners. It is especially good to use it when digging large areas, since with the help of this tool the work process can be accelerated several times.
Watch the video! Miracle shovel, which one to choose
What are the features
It became a real gift to all diggers and plowmen. After all, any gardener knows that the hardest physical labor involves digging up the soil. We all pay for planting potatoes with pain in our backs, arms and legs. An Orthodox monk made his own version of the traditional bayonet shovel; he claims that digging with it is a pleasure, it even helps plant potatoes.
In the process of digging a garden, you have to bend down each time, pressing the shovel forcefully into the ground, and then, straining all your muscles, lift not only the heavy shovel, but also the soil on it. Of course, such work hurts your back. The Vyatka Plowman shovel allows you to work without stress. This is its main advantage, which is why it is called a “shovel for the lazy,” although it would be more accurate to say, for the weak, because any pensioner with it can become a digger.
It is not symmetrical, you can work with it only with one leg - the left one, but there is no problem with that, you can make a tool for the right leg. The inventor installed a bicycle handlebar at the top, so you can hold the shovel with both hands at chest level. The most important thing: there is no need to lift the earth; it turns over smoothly as a result of the turning movement of the hands.
With such a shovel you can increase labor productivity several times. It is successfully used for digging up a vegetable garden and planting potatoes, but you can also dig a ditch.
Optimal size for a bayonet shovel
Although, many workers believe that the size of the working part and the handle of the shovel are not of fundamental importance. However, this is not the case. The force required to perform the work depends on the correct selection of the size of the bayonet shovel.
Too large a working part (blade) of a shovel will turn out a large lump of soil, which has a lot of weight. After working with such a shovel for several minutes, a person of average build is guaranteed to get tired. On the contrary, a blade that is too small will require more operations to dig up the same area. Particular attention should be paid to the cuttings. It should be the optimal length. In a vertical position, the handle mounted on the bayonet of the shovel should not reach 10 cm to the worker’s shoulder. Although, this is a fairly average figure, and there are people who work quite well with short handles.
Various tool options
There are devices that, although constructed in a similar way, have important differences in design. Below they are described in more detail.
Soil ripper without front support
In this type of design there is no front stop. The lattice for breaking clods is made without a front bar. This reduces the weight of the mole ripper shovel slightly. However, since there is no need to lift the shovel off the ground when working, this does not provide a significant advantage.
Soil ripper without front support
Digger
This option differs from the classic one in that it does not have a grille located in front. The handle of the instrument is also made in a different way.
The digger consists of the following parts:
- A handle made in the shape of the letter “T” is used here. Therefore, during work, the shovel is held differently than usual. Hands hold the instrument by the horizontal bars. This helps to increase the force of pressure on the soil when working. In addition, such a handle is usually made of metal. It can move up or down. Once a comfortable position has been found, the handle is secured with bolts.
- The forks are attached to the handle at two ends, and not at the central part, as in the classic version.
- The stop attached to the back of the tool is more powerful than in the usual case.
The disadvantage of this design is that there is no provision for crushing the soil.
Digger
Lightcop
This option can be considered the simplest design. For it, it was necessary to invent a rectangular metal frame to which forks were attached, looking down. The emphasis, made rectangular, is attached horizontally. The front grille is missing.
On a note. Despite its simple design, this type of miracle shovel is an effective digging tool.
Archimedes spade
It bears little resemblance to the classic version. The difference, in particular, is that here it is not a pitchfork that is used for digging, but a bayonet shovel. However, the inventor applied a similar principle here: the rule of leverage. This is the invention of Vladimir Kolybelin from the city of Kovrov, Vladimir region.
The Archimedes shovel is designed in this way:
- It has two shafts: long and short.
- The blade of the instrument is attached to a short shaft.
- All parts are connected into one whole by a bracket. With its help, a short shaft with a shovel in the middle is connected to a long handle and can rotate.
When working, the tool is stuck into the ground and the long handle is slightly moved forward. Then they step on the short part, and, taking into account the law of leverage and the length of the arm, the shovel will lift the earth.
Important! Although the arhimedova shovel saves effort compared to conventional tools, it is difficult to use on heavy clay soils
Archimedes spade
Canvases
Manufacturers offer more than 20 options for shovels made from various metal alloys. Let's look at the most common ones.
- The bulk of shovels used by gardeners and builders are made of rail steel . The blade of such a shovel is very durable; under heavy loads it “springs” well, taking its original shape. It is easy to sharpen and quite resistant to corrosion.
- Titanium fabric does not have such flexibility. Despite its high strength, it is quite fragile. It may break under heavy load or strong impact. The ideal option for use is digging beds. The light weight of the shovel will give you pleasure in this not very pleasant and tedious work. Please note that a shovel made from such an alloy is not cheap.
- Recently, many summer residents have had “stainless steel” in their assortment of garden tools. stainless steel shovel is lightweight, lumps of earth hardly stick to it, and it is completely non-corrosive. But there are also disadvantages: the canvas is not as strong as titanium or made of rail steel. It will be convenient for digging beds on soft and airy soil. When working with hard soil it will bend.
Important! A shovel made of rail steel is a universal option for a gardener. But if you need to dig up beds on light and loose soil, then a stainless steel shovel is best suited for this job.
Advantages and disadvantages
An electric shovel designed for snow removal has its pros and cons. They must be taken into account when choosing a product between a manual and self-propelled snow blower.
Advantages of the device:
- Comparative lightness and small size. The design is simplified as much as possible, due to the absence of a tank and a number of other additional elements. Even with a weight of 6-7 kg, the weight is almost not felt. The compactness of the electric shovel allows it to be used for clearing snow even in small spaces without any storage difficulties.
- Reliability and long service life. Modern snow removal mechanisms are equipped with overheating protection, which extends the service life of the motor. Electric snow blower motors have double-insulated windings, which provide additional protection from water and reduce the risk of breakdown. The electric shovel's motor is unpretentious and can operate for a long time without the need for expensive maintenance.
- Low noise level. The electric motor of the snow clearer makes almost no noise, which does not require the installation of an additional noise-insulating housing. This factor further facilitates the design.
- Environmental friendliness. Electric shovel motors are environmentally friendly. During their operation, no carbon dioxide, carbon monoxide or other harmful elements are released.
- Ease of use. Electric snow blowers do not require adding oil or purchasing gasoline. In addition, the start-up process is simplified here. All that is required is to charge the battery in time or insert the plug into the outlet.
- Low price. Unlike self-propelled snow blowers, electric shovels have a lower price, but do the job just as efficiently.
Disadvantages of electric shovels:
Lack of power. Often, manual snow blowers are equipped with engines up to 2 kW, which is enough for domestic purposes, but not enough for professional work. In the latter case, a gasoline or diesel snow blower is more suitable. Poor mobility. Electric shovels powered by the mains are “tied” to 220 V outlets, which forces you to be near power sources or use extension cords. This is not a problem for cleaning areas near an office or country house, but difficulties may arise in remote areas. The problem is solved if you give preference to a battery-powered shovel. Difficulty throwing out frozen snow. Structurally, electric shovels are designed for removing fresh and still loose snow. If it melts and then becomes covered with an ice crust, difficulties arise and the engine may overheat. Relatively short snow throw range
When purchasing, it is important to look at the distance the snow mass is thrown. Here it is necessary to proceed from the characteristics of the territory and proximity to other people's sites.
POPULAR WITH READERS: Flashing LED lamp: causes and solutions
Electric shovels are not self-propelled, so operating them requires some effort. But this does not cause difficulties even for people with minimal physical training. The issue of control is further simplified if the device has wheels.
Principle of operation
The work consists of pressing the bucket (blade) of the shovel into the ground and turning over the layer of earth, turning the handles to the right. The earth turns over in a neatly cut layer and lies on the right. The back remains straight, there is no need to bend, a bayonet is stuck into the ground, thanks to which the blade of the shovel enters the soil under the weight of the leg. On light soil you can work with one hand. The spine performs only a rotational movement; without the use of force, with the help of a lever, the work of cutting, removing and turning over a layer of earth is performed.
You can plant potatoes with this “magic digger” as if you were using a plow. You need to dig one furrow (stepping back), put potatoes in it, and when digging the second furrow, even and neat digging occurs. Moreover, you can place fertilizer in the second furrow and bury it while going through the next furrow. With a bucket width of 30 cm, you will get a very even planting of potatoes, with 60 cm between the bushes.
Advantages
The undeniable advantage of the “Vyatka Plowman” is its high labor productivity and the absence of stress on the spine when digging a vegetable garden. With its help, a digger can dig a trench, and a summer resident can easily and quickly dig up a garden. This miracle digger can handle digging up virgin soil. It is especially good to use it in light sandy soil, then you don’t even have to loosen it.
It’s interesting that this miracle shovel can be made with one’s own hands. The drawings are posted on the Internet; they were made by a resident of the Dnepropetrovsk region to help everyone. It can be made practically from scrap metal. You will need the following simple materials:
- stainless steel pipe;
- stainless steel shovel blade (preferably cold rolled);
- pin;
- bicycle wheel.
With the help of these drawings, a shovel for the lazy with your own hands can be made taking into account the height of a person. The horizontal handle should be located at chest level so that you do not have to raise or lower your arms. Although today you can buy a ready-made digger for any leg of your choice. It is in demand, which means that production can be entrusted to professionals, and you don’t have to understand the drawings!
The advantages of new designs are that working with them does not require a lot of time and physical effort.
In addition, they are convenient because:
- labor productivity increases by 3-4 times;
- no need to bend down to the ground;
- you don’t have to strain your back muscles when the shovel moves upward along with a lump of earth (when the earth is damp, this is even harder to do);
- Due to the rotational movement of the digging or loosening main element, only the hands are strained, pressing on the handles that are attached to the handle.
When purchasing, you need to pay attention to the weight of a person the miracle shovel is designed for. For example, classic options can be used by people no lighter than 80 kg, since the devices are quite bulky and difficult to move across a surface
But the “Plowman” design is suitable for gardeners weighing 60 kg or more. Gennady’s father’s shovel is much lighter than complex configurations, so a person who can comfortably hold it in his hands will have no difficulty in performing garden work, regardless of his weight category.
Cuttings: choosing the best option
The most common cuttings for shovels are birch and pine. You don’t even have to look for them, since they are available in any hardware store. Despite their similar appearance, the difference between these cuttings is significant.
- pine holder has two significant advantages: low price and light weight. Disadvantages: fragility and brittleness. Despite the fact that three quarters of our cuttings are made from pine, think about whether it’s worth saving on this. As a last resort, buy two at once - keep one in stock.
- Birch cuttings are much stronger than pine ones and will last longer. However, a significant disadvantage of such a cutting is that it is much heavier. It is worth noting that the heavy weight of a shovel is not always its disadvantage. If you're chopping roots, digging a hole under a fence post, or working in very rocky ground, a heavy shovel will double your effort. But when digging beds, a light one is preferable - with a heavy one you will get tired faster.
- Oak and ash are also used for making cuttings. Cuttings from these types of wood are not so common, but they are superior in quality to pine and birch. The best option is ash. The handle from it is light and very durable. Oak cuttings also have good strength, but they are heavy, so they are suitable for shovels that are designed for “impact” work. Oak and ash cuttings are 3–4 times more expensive than pine cuttings.
Recently, pipes made of modern and high-strength metal alloys have also been used as cuttings. It can be anodized aluminum or titanium. The advantage of such cuttings is that they do not rust, are light in weight and have a large margin of safety. But they are not cheap either.
Important! The best option for an ordinary gardener is a universal shovel with a birch handle. Its cost is quite reasonable, and the shovel will have a significant margin of safety.
Instructions for making a miracle shovel with drawings
Before you start making your own miracle shovel, you need to pay attention to the main design features of such a tool. In most models, the forks are movably mounted on a forward, horizontal frame, complemented by a stop at the rear (in some cases, the frame is replaced with a slightly curved slide)
Between the teeth there are counter-directed rods, which are more reminiscent of a rake.
The tool may have two handles, but in most cases it is a regular handle, like a shovel or the same fork. However, not in all cases a wooden handle is used, since such a lever can easily break (the teeth often catch on roots). Instead of a handle, a metal pipe (for example, aluminum) can be installed. If a wooden handle breaks in the socket of a garden tool, at its very base, then removing the fragment will be quite difficult, and the only way out is to try to drill it out.
There are also more simplified models, the design of which includes only a frame, which is also a support (placed behind the working part). The teeth are fixed directly to the front rod, at the ends of which there are fasteners for the other two handles. This version of the miracle shovel is most often made at home.
Did you know? In the old days, a standard wooden shovel (or, as it was also called, a “blade”) had a width of 6-14 inches and a length of 8-16 inches, and this with a total length with a handle of 1½-1¾ arshins. In Rus', all shovels and blades were hewn primarily from aspen, sometimes from linden or birch, and even less often from oak or maple.
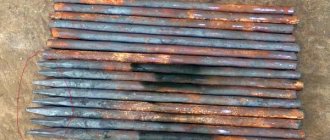
When making a miracle shovel yourself, first of all, you need to create bayonets, for which the pre-prepared reinforcement is cut into pieces of the required length. The ends of these sections are sharpened on one side at an angle of 30°, although if the soil on your site is soft, then the bevel angle can be reduced to 15° (however, this will often lead to dulling of the cutting part).
Having the required bayonets in hand, you can proceed to creating a supporting bar, for which part of a square pipe is cut off. It is also worth preparing a round hollow pipe, which in the future will play the role of a handle. All elements are welded according to the drawings presented below.
How to make a super shovel with your own hands
Manufacturers of gardening tools have long adopted such tools and produce them on an industrial scale. Nevertheless, you can find such a shovel everywhere, and if you find it in a store, its cost will be very high.
At the same time, you can assemble such a tool with your own hands, using available tools. And even if some materials need to be purchased, the cost of the shovel will still be below the market price.
To make such a digger with your own hands you will need the following materials:
- a metal pipe with a diameter of 20-25 mm will be used to make a supporting frame;
- a two-meter piece of steel pipe with a diameter of 4 cm;
- steel sheet measuring 20x20 cm and thickness 2 mm;
- fittings or round rods with a cross-section of 1 cm - 2 meters, they will be needed to make a rake.
To assemble and fasten all parts of the shovel you will need tools - a welding machine, an angle grinder with a metal disc and a drill with drills. The manufacturing process takes place in the following sequence.
- Making a supporting frame. To make such a frame with your own hands, use a round steel pipe with a cross-section of 2 cm. You can take a square pipe with a cross-section of 2x2 cm. The pipe can be bent in the form of an arc or connected individual sections of the pipe in the shape of the letter A. The size of the frame should be 46x80 cm.
- Installation of rods. Another tube is welded across the frame. Holes with a diameter of 8 mm are drilled across the diameter at a distance of 5 cm and an angle of 20 degrees. You can increase the distance between the rods to 10 cm if the soil in the garden is light and fertile. Rods 20 cm long each are inserted into the holes and welded using a welding machine. The rods must first be sharpened at an angle of 30 degrees to facilitate penetration into the soil. Also, to make digging with a shovel easier, the teeth made from reinforcement need to be slightly bent. Opposite the welded teeth, it is necessary to install another row of them. To do this, a piece of iron pipe is welded to the frame, and another row of reinforcement rods is welded to it.
- Installing a foot support. A footrest in the shape of the letter “T” is welded to the top of the frame at an angle of 120 degrees. Metal ears must be used to secure the support and rake together.
- Then a piece of pipe with a diameter of 6 cm or more is welded to the structure to install the handle into it. After fastening all the parts using a welding machine, the tool can be used.
Any gardener can make such a digger, the main thing is to have the necessary materials. With the help of such a hand-made shovel, processing the garden will be much faster and better.
In addition, thanks to the forks that form the basis of the structure, weeds in the soil will not be cut off, but will be pulled out of it using the teeth. This allows you to remove weeds by the roots, while reducing the possibility of their germination.
Assembly
Stuffing a cutting is a simple matter, but it is worth taking into account the following subtleties:
- it is very important that the handle completely fills the chamfer (recess) of the blade, which will give the shovel an additional margin of strength, otherwise the shovel will bend even with a small force;
- Before inserting the cutting into the planting place, it is advisable to moisten its treated end with hot resin, which will protect the tree located in the planting tube from moisture and rotting, and the planting will be stronger;
- insert the holder into the planting tube of the blade and, turning the shovel upside down, tap the end of the handle on a hard surface;
- if you are convinced that the wood has completely occupied the planting chamfer, you can fasten the blade to the handle - for this there are two holes in the planting tube; Here it is safer to use screws rather than nails.
If you want a lightweight shovel with a durable and super-light handle, then pay attention to an aluminum pipe coated with a factory anode. The diameter of the pipe should be 3.5–4 centimeters, while the thickness of its wall should be at least 3–4 millimeters.
At the base, they will cut the pipe to the length you request. Typically, the length of a shovel handle for a person of average height is one and a half meters. The planting tube of the shovel for such a cutting should be several millimeters larger and preferably cone-shaped.
If the metal stalk still dangles a little in the planting tube, then in this case you need to use a seal.
- This can be a piece of roofing material soaked in hot bitumen, or a regular bandage soaked in epoxy resin. After inserting the cutting into the planting tube of the shovel blade, it must be secured well. Unlike fastening a wooden handle, screws are not enough here. Reliable fastening can be provided by bolts with a diameter of 5–6 millimeters. In two places of the landing tube, two holes of suitable diameter are drilled with an electric drill at a distance of 10–12 centimeters from each other. The planting tube of the shovel is drilled through along with the aluminum handle installed in it. After this, insert the bolts with washers into the holes and tighten the nuts.
- Shovels and plastic cuttings are attached to the canvas in a similar way. To give the ideal shape for the cone-shaped landing tubes, it is recommended to heat the plastic with a hairdryer or gas burner. Shovels with aluminum or plastic holders are very light and durable. However, they must be handled very carefully - such holders are afraid of impacts. A slight deformation in the center of the handle will cause it to bend (plastic - break) and it will no longer be possible to restore it.
The final touch to assembling a shovel yourself is the handle on the top of the handle. Its main function is to prevent the shovel from rotating in your hands.
This is a completely optional part of the shovel, but it greatly simplifies the work process, especially if you have to deal with clay or hard soil. These pens are available in a variety of materials and shapes. You will find a suitable option at any hardware store. The handle is attached to the handle with ordinary screws.
How to make it yourself
You can make such a shovel yourself, but to do this you need to be able to work with metal, for example, perform welding work. This section will tell you how to make a miracle shovel with your own hands, about the drawings and dimensions for its manufacture.
Materials
The main part of the structure is made of metal. To do this, you can take a profiled pipe or corner. The thickness should be approximately 30 mm. In the latter case, the steel used is important; it should not be thinner than 3 mm.
Important! The teeth must be made of high quality steel. Those made from forks or those made from a car spring are suitable.
It is recommended that there be 6 to 8 teeth.
The handle can be made of wood or a metal pipe.
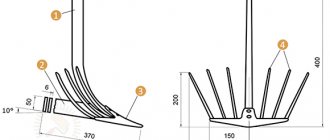
Dimensions
The width of the working part is usually from 60 to 80 cm. If you do more, it will practically not add productivity. The recommended pin length is from 22 to 30 cm.
The length of the handle is made according to height. It will be convenient if it reaches the shoulder.
Blueprints
The picture below shows one of the options for how to make a shovel.
In accordance with this scheme, it is possible to make the tool yourself.
The miracle shovel greatly facilitates the work of digging up a site. You can do it yourself. If possible, it makes sense to purchase a high-quality commercial model.
Not everyone knows how to make a miracle shovel with their own hands, but almost all summer residents and gardeners, owners of personal plots know how difficult it is to dig up a vegetable garden. This procedure will be greatly simplified if you know how to make a miracle shovel with your own hands. It is worth noting that such a device is far from the only one in the arsenal of summer residents, there are others, but it is this device that can significantly reduce the time of digging up a site and save energy when working “in the field.”
A miracle shovel is necessary for digging up a site in spring and autumn, before planting plants during gardening and dacha work.
The latter is especially important, since anyone who has encountered such work knows how difficult it is to complete it. After all, intensive digging of a vegetable garden is not only difficult and tiring, but also detrimental to health
A homemade tool performs the functions of a regular shovel much better and, according to the owners of this device, it can quickly and efficiently dig up the required area of land.
Types and purposes of automobile shovels
Of course, you can carry an ordinary garden shovel in the trunk, but it’s still better to buy one that will meet all the necessary requirements.
Design Features
A typical shovel for a car is approximately 80 cm long (when unfolded). At the same time, the length of the handle is 60 cm, so that it is comfortable to hold. Sometimes, for convenience, it is equipped with a handle.
Car shovel
Shovels for the machine can be of various designs: folding, telescopic, collapsible. To clear snow drifts, shovels have a kind of indentation on the bayonet, and for digging soil and clay there must be a pointed end.
Production materials
Most often, shovels with a steel blade are used. But they also exist with installed titanium analogues. They are lighter than others. But the easiest material for making such shovels is plastic. Today's technologies make it possible to create them so strong that they can be used for any areas of the ground near cars. Metal cuttings, as a rule, are thinner than wooden ones.
Which shovel is best for digging soil in the garden?
Regular shovel
If the digger is traveling in a large vehicle, a long Fiskars shovel is suitable. There are no limitations in terms of dimensions, but in terms of ergonomics it’s just right. Both the inclination of the bayonet to the handle and the bend of the handle - everything works for convenience.
He can also be advised to use a Fiskars telescopic shovel - for shallow purposes, it doesn’t need to be completely unfolded. And if you need to remove the top layer from a large area, we push it forward and onto the mines.
Folding paddles
The thing is useful as an addition to the main shovel. Or like a last chance shovel. But digging for her all day is an activity worthy of Sisyphus. A lot of effort with little result. Perhaps you can take such a shovel in addition to a scuba or even without it when digging for coins on the beach.
Read also: Tesoro Tejon: detailed analysis of the metal detector, customer reviews, video from the dig and finds