Home / Welding technique
Back
Reading time: 5 min
0
1291
The band saw is a multi-cutting cutting tool. It looks like a closed flexible steel ring with notched teeth on one of its faces.
The tape is mounted on two friction wheels rotated by an electric motor, which allows you to make not only straight cuts, but also curved ones.
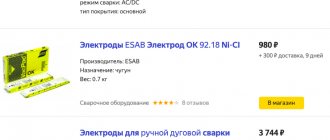
The cutting strip for metal and non-metallic parts is regulated by P54924-2010. Frequent use of this cutting tool does not exclude its rupture along the body or weld seam.
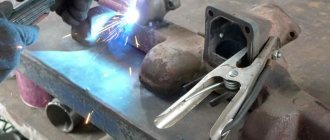
To connect the ends of the saw, you will need the services of a welder, but having some experience in metalwork and an apparatus for welding band saws, you can join them at home.
- General information
- Equipment
- Welding technology Cutting
- Stripping
- Securing the fabric into clamps
General information
When joining the ends of the saw, it is necessary to take into account its load when processing parts, subjecting the tape to constant stretching and bending.
A band saw strip made from alloy or carbon steel can withstand the force of the material being processed, which sometimes cannot be said about a welded joint.
After a period of working hours, the seam bursts. Therefore, the latter must be made of a material of the same composition as the ring with teeth itself.
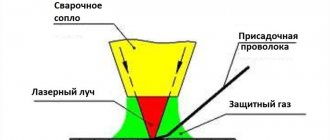
The creation of a high-quality connection will be helped by the use of a special device for welding band saws, using resistance arc welding.
The latter is caused by uniform heating of the joints of the two parts being connected. After the described thermal operation, the ends are tightly joined, forming a one-piece ring.
Selecting a device
To carry out the described work, a small machine is suitable, which will include: two clamps (movable and fixed), electrodes and a transformer. The current from the latter must be supplied to the junction of the parts of the canvas, so it is important to connect the electrodes to the clamps.
Using a movable clamp, a condition is created to adjust the resulting gap between the two parts of the band saw. The end result of working on such a machine is a welded bead with sufficient reliability and strength. This is important due to the repeated loads that the saw experiences during operation.
Equipment
For welding the ends of band saws, there are special resistance welding machines, which have varying degrees of automation.
Inexpensive devices are characterized by manual adjustment of the type of welding and seam formation. The high cost of the device guarantees automatic welding without human intervention.
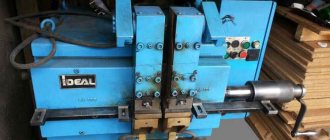
The simplest apparatus designed for welding joints of band saws, regardless of the nature of their use, is shown in the photograph. Its design is quite simple:
- device casing - 1;
- welding transformer for power regulation - 2;
- clamping mechanism - 3-4;
- start button or key - 5.
A craftsman who constantly works with saws can assemble the device himself from industrial elements.
Welding and soldering of band saws
The difficulty of joining the ends of band saws is determined by the difference in the parameters of different saws (in size and material) and the difficult conditions in which the tool operates, experiencing repeated cyclic tensile and bending loads. Ideally, the joint should be as strong as the whole canvas, but this is not easy to achieve.
Brazed Band Saw
There are two main ways to connect band saws: contact butt welding on special welding machines and soldering.
Welding band saws using special welding machines
The essence of flash butt welding of band saws is that an electric current is passed through the ends of the saw that are butt-joined and compressed with a certain force, leading to heating, melting and welding of the end edges of the blade.
Current is supplied through electrodes connected to the terminals. A large number of models of machines for resistance welding of band saws are produced. The most advanced of them provide an automated welding and annealing cycle, eliminating the possibility of operator error when maintaining the timing of the electrical pulse during welding and annealing. In the simplest devices, welding and annealing times are controlled by the operator.
The simplest machine for welding band saws is shown in the photo below. It consists of a housing (1), a welding transformer (2), a clamping mechanism with electrodes and clamping levers (3), and a start button (4). The clamping mechanism, in turn, consists of fixed (5) and movable (6) clamps. The latter has the free movement necessary for upsetting - the movement of the ends of the saw towards each other with the formation of a welding bead. Under the action of a spring that creates upset pressure, the ends of the saw are pressed against each other with a certain force.
Band saw welding machine
Band saw welding machine
The welding process of band saws includes the following operations:
- cutting saw;
- stripping the ends to be connected;
- installing the web in the welding machine, selecting the current mode, setting the required force and upsetting stroke;
- fabric welding;
- annealing the saw;
- cleaning the seam.
cutting
. It is best to cut the canvas using guillotine shears, but you can cut it with a cutting wheel or chop it with a chisel. If the blade has already been welded before, when re-welding, you need to cut off about 5 mm from each end.
In any case, the following conditions must be met when cutting:
- the connection point should be located between the tops of the teeth;
- when cutting, an allowance should be left for draft (approximately 1.5 mm for each end of the tape);
- The cutting line should be straight and perpendicular to the back of the saw.
The latter is necessary so that the welded saw blade does not have a bend at the junction (along the back line).
There is a fairly simple way to accurately cut welded strips. It consists of positioning the saw as shown in the picture below (middle image) and cutting or sanding both ends of the blade at the same time (assembled). With such processing of the ends, even if the cutting line is not perpendicular to the back of the saw, its ends will still join as expected, and the evenness of the blade after welding will be ensured.
Simultaneous processing of band saw ends
Stripping
. The ends of the saw are cleaned of dirt and degreased with acetone or alcohol. The edges to be joined are cleaned with abrasive. They should be smooth, without burrs.
Installing the canvas into the machine
. The prepared saw is installed in the clamping mechanism (one end in a fixed clamp, the other in a movable one) so that its edges meet in the middle of the free space between the clamps. In this case, their complete coincidence must be ensured.
The corresponding control knobs set the force and stroke of the upsetting, and the welding mode. All these parameters depend on the size of the saws being welded. The larger the cross-section of the saw, the greater the welding current and higher upsetting force required.
The instructions for welding machines contain tables containing all the necessary settings depending on the size of the saw being welded. Often, welding modes are set without specifying a specific value of welding current and voltage. To weld a certain saw, you simply need to set the control handle to a certain position (I, II or III, for example).
Welding
. The welding process is activated by pressing a button or turning the handle. In this case, current is supplied to the clamps, and from them to the ends of the saw, resulting in the melting of the metal in the joint area. Under the action of the spring, the movable clamp begins to shift towards the stationary clamp by the amount of the upsetting stroke, as a result of which a weld bead is formed in the joint area, connecting the ends of the saw.
Welding band saws
In addition to the current value, the most important parameter is the time of application of the current pulse. Welding machines with an automatic welding mode turn off the current supply after a certain time has passed (usually 1-2 seconds). When working on machines that do not have an automatic mode, the welding time must be controlled by the operator.
The whole difficulty of welding band saws lies in the difference in the sizes of their blades and the materials from which they are made. Therefore, often after the first welding, which ended unsatisfactorily, the welder is forced to experimentally select suitable modes. This is best done on unnecessary scraps of fabric. After the optimal mode has been selected, it is advisable to write down its parameters so that the correct mode can be applied to all saws with the same parameters.
It is very important to keep the surfaces of the electrodes in contact with the saw clean. The presence of foreign substances between the blade and the electrodes increases the circuit resistance and disrupts the welding mode.
Annealing
. Annealing is necessary so that the metal, which has acquired increased hardness and brittleness as a result of welding, returns its original (or close to it) structure, i.e. again became plastic and viscous. Annealing is carried out in the same clamps as welding, but in the absence of upsetting force and in a different current mode.
Heating to the annealing temperature (about 600°C) and slow cooling is sometimes accomplished by pressing, holding and releasing the button that supplies the annealing current to the electrodes, while the annealing current button is periodically pressed to slow down the cooling. If the device is not equipped with a pyrometer, the temperature is controlled by the color of the metal - when it reaches the annealing temperature, it should be cherry-red. Do not reheat until it turns orange or yellow, indicating a higher temperature. Gradual cooling during annealing can last about 3-5 minutes. Some blades require two annealing cycles. Sometimes welding and annealing are combined into one process, increasing the cooling time of the weld after welding by periodically turning on the heating current.
Stripping the canvas
. When cleaning, the bead in the weld area must be removed from the blade and the correct geometry must be given to the interdental cavity at the joint. You can clean it with almost any abrasive tool. The main thing is that the treated surface is smooth and flush with neighboring areas. When stripping, the circle should be directed along the seam, and not across it.
Cleaning the band saw after welding
Cleaning the band saw after welding
Quality control of welding and annealing
. When welding band saws, the following defects may occur.
- The welded edges of the web are offset relative to each other (the surfaces of the ends of the blade are not in the same plane). This happens when the upsetting stroke is too large or the current is insufficient.
- The release of the melt onto the surface of the canvas. Occurs when the current is too high.
- Lack of penetration. Occurs due to low pressure and short stroke or too little current.
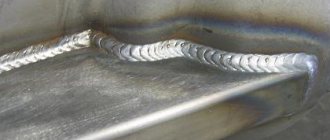
In high-quality welded saws, the weld seam should protrude above the surface of the blade by at least 1.5 mm.
The quality of annealing can be checked as follows - bend the fabric in a circle with a bending radius of 20-25 cm and look at its behavior. If the bending arc is close in shape to a circle and the seam does not crack, it means that welding and annealing were carried out well. If the bent blade takes on a V-shape, it means that the metal in the welding zone is too soft due to excessive annealing. The appearance of cracks in the welding zone indicates insufficient annealing (too rapid cooling).
Band saw soldering
High-temperature soldering of band saw blades is also an acceptable joining method, providing, if done well, sufficient strength to the blade.
And for home use, soldering is the most affordable way to join a torn band saw. Fabric preparation
. Before soldering, the edges of the fabric to be joined must be cleaned of dirt.
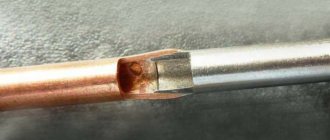
The ends of the saw are connected end-to-end along beveled edges obtained by sharpening on an abrasive wheel. The shape of the bevel is shown in the figure below; its value (c) varies depending on the width of the blade and ranges from 8 to 12 mm, but often the bevel size is made significantly smaller. It is very important that the beveled surfaces are flat and that they fit snugly together. It is also necessary to ensure that the pitch of the teeth in the joint area is characteristic of a given saw.
Band saw soldering
Solders
. The best solders for soldering band saws are considered to be silver ones (PSr-45, and even better - PSr-65). You should not use silver solders with a lower silver content, for example PSR-25 is not suitable.
Fluxes
. It is best to purchase some special paste-like flux designed for high-temperature soldering of alloy steels. The paste form of flux is most convenient for this work.
If a special flux is not available, you can prepare a paste-like composition yourself. Take 10 parts of borax and mix them with one part of ammonium chloride. Water is added to the resulting mixture until the paste becomes thick.
In principle, you can use borax alone as a flux, but it is inconvenient to apply it to the joint.
Borax
Equipment and accessories
. Heating during soldering can be carried out in different ways, but the most common is heating with various gas burners. The flame of a gas burner should be either slightly oxygen deficient (if possible) or neutral.
Soldering temperature depends on the brand of solder. If PSR-45 solder is used, which has a melting range of 660-725°C, then a heating temperature of about 800°C will be sufficient. The joint should not be overheated to avoid unwanted structural changes in the metal.
It is necessary to have a device in which you can clamp the ends of the saw in the desired position, accurately aligning the blades along the bevel and the back of the blade. A drawing of one of the possible options for such a device is shown in the figure below.
Device for soldering band saws: 1 - recess providing access to the burner flame.
But simpler DIY options are possible.
Homemade device for soldering band saws
Homemade device for soldering band saws
Homemade device for soldering band saws
Soldering process
. Soldering band saws is no different in nature from high-temperature soldering of other products (for more information on soldering, see the articles Metal Soldering and Hard Soldering). It is performed in this sequence.
Band saw soldering
The beveled edges are coated with flux and the ends of the saw are clamped in the jig so that the edges fit tightly together and the backs of the ends of the blade are pressed against the ridge in the jig. When applying flux, care must be taken to ensure that it does not cover any surfaces of the saw other than the bevels themselves. This will prevent solder from flowing onto those planes where it is not needed, and from where it will have to be removed after soldering.
Soldering band saws (a piece of solder is pre-placed on the joint)
The connection is heated using a torch to the desired temperature and solder is supplied to the joint. The melted solder is spontaneously, thanks to capillary forces, drawn into the joint between the sheets, as evidenced by the appearance of its strip along the entire perimeter of the joint. Very little solder is required, so there is no need to melt excess solder.
The solder should melt not from the flame of the burner, but from the heat of the heated connection.
Band saw soldering: heating the joint
Band saw soldering: solder filling the joint
You need to allow the joint to cool for a few minutes before removing the saw from the fixture. If everything is done correctly, then there should be virtually no solder sagging on the canvas. If they are, they need to be removed by careful cleaning.
Band saw soldering: stripping the joint
Band saw soldering: finished joint
When using the content of this site, you need to put active links to this site, visible to users and search robots.
Literature
Welding technology
Welding a band saw blade has several stages.
The material provides a detailed description of each of them.
cutting
The saw blade is sold in coils, which means purchasing a blade of a certain length. To cut metal with teeth, a guillotine and a cutting table are used, which give an even cut.
The tape is cut along the upper edge of the teeth, with an allowance of 2 mm on the cut side. This will allow you to maintain your pitch and draft.
Preliminary stage
To prepare the canvas, you should follow the algorithm:
- The ends to be welded are trimmed. The planes must be parallel. For this, a guillotine and a chisel are used.
- If the saw breaks at the welding points, it is necessary to trim the joint by 5 mm. Cutting is done strictly between the teeth. The end is treated with a solvent. This helps remove contaminants.
- The saw is sent to a sharpening machine, where the blade is given a rough surface. There, irregularities remaining after trimming and burrs are eliminated.
- The fabric is sent to the welding machine.
With proper preparation, the quality of the result will be much higher.
Welding mode
The selection of the magnitude and polarity of the current, electrode diameter, soldering speed and arc voltage on the simplest apparatus is done manually. The process depends on the size of the canvas and its cross-section.
An increased value of the latter implies an increase in current strength. Band cutting tools are made from various metals and their alloys, which are difficult to weld.
Saw manufacturers do not provide information about the type of material for public use, which makes it difficult to select a welding mode. It, the masters, is established experimentally.
To facilitate the work of welding a band saw, the user manual supplied with the welding machine will help, which indicates all types of modes.
You will also have to manually regulate the speed of current pulses on a budget device; lack of control can lead to overheating of the metal.
It is recommended to apply current for no more than 2 seconds. Expensive welding devices adjust the time automatically.
Preparatory activities
Before starting assembly activities, based on the drawing, you should prepare the necessary materials and tools. This will allow you, first of all, to determine whether you have everything you need for the job (you will need to buy what’s missing), and also not to be distracted by little things during the process.
Required materials and tools
To make a band saw, you will need the following materials and parts:
- boards or sheets of plywood (or chipboard) from which the frame, table, and pulleys will be made;
- sheet steel (for saw);
- channel used to create a support frame, or metal corners, or wooden blocks and slats;
- bearings;
- steel rod - for making pulley axles;
- electric motor;
- self-tapping screws, bolts with nuts and washers;
- polyurethane glue;
- rubber from a bicycle inner tube;
- textolite;
- bushings;
- V-belt;
- varnish or paint.
The recommended thickness of the boards is 20 mm. It is better to give preference to lumber made from durable and hard wood.
To work you will need the following tools:
- screwdriver (with drills);
- hammer;
- wrenches (the size of bolts);
- screwdrivers;
- pliers;
- Sander;
- Bulgarian;
- grinder;
- jigsaw
Power tools can be easily replaced with their hand-held counterparts. But in this case, assembly will require more time and labor. When using metal corners or channels instead of wooden blocks, you will also need a welding machine and electrodes. The use of bolted connections creates additional problems with the tight fit of parts.
Recommendations for choosing tape fabric
Making a cutting blade with your own hands is quite difficult. For these purposes, tool steel grades U8 or U10 are needed. The saw must be flexible. Its thickness for relatively soft wood is from 0.2 to 0.4 mm, and for hard wood - from 0.4 to 0.8 mm. The blade length of the assembled version of the machine will be about 1.7 m. You will need to cut the teeth yourself, set them correctly and sharpen them. To solder the tape into a continuous ring (end-to-end), you will need to use a gas torch and solder. The connecting seam must be sanded afterwards.
It is much easier and more convenient to purchase a ready-made cutting blade of good quality in a store, so as not to waste time on its manufacture . The width of the products ranges from 18 to 88 mm. In this case, you need to focus on the material that is to be sawed. Manufacturers offer the following types of saws according to this criterion:
- bimetallic, intended for performing work on metal (stainless steel and relatively strong alloys);
- diamond, with which you can saw marble, quartz, granite and other hard materials;
- carbide, allowing the processing of high-strength alloys;
- made from strips of tool steel used for sawing wood.
The last variety is quite often equipped with machines assembled in domestic conditions. This is due to its affordability and practicality. But if you have to work with hard materials, then it is better to purchase a more durable, wear-resistant and expensive saw to reduce the likelihood of the tape breaking to a minimum.
If you plan to make a figured cut using a band saw, then you need to select the width of the blade taking into account the radius of curvature. Some relationships between these quantities are shown in the following photograph.
Advice! For even longitudinal sawing of lumber, wide cutting blades should be used. They allow you to make a more even cut.
When choosing a saw for wood, you also need to take into account the pitch of its teeth (the distance between their centers). The hardness of the wood that can be sawed depends on this. The following are the most common tooth profiles, their markings and areas of application.
You also need to pay attention to the quality of sharpening of the teeth. The cutting edge must be sharp and smooth. You should also ask your sales consultant about the possibility of re-sharpening it and how many times this can be done. For your own safety, it is recommended to give preference to higher quality canvases.
Important! For installation on the machine, it is better to choose universal saws suitable for processing wood of different hardnesses. This will make it possible to change such blades much less frequently when replacing the material being processed.
Welding
The process of soldering the joints of the fabric is carried out on a welding machine, which, depending on the modification, is started using a key or a special handle.
After turning on the unit, welding current is supplied to the ends of the tape through the clamps to melt the metal in the area of the intended seam.
The end of heating will mean that the travel clamp should be moved slightly to form the weld bead.
To obtain a strong connection, the surface of the conductive rod must be cleaned. There is no point in cleaning along its entire length; the main thing is that the surface in contact with the tape does not have traces of dirt or other unwanted deposits.
Failure to comply with this condition will disrupt the circuit resistance, which will negatively affect the quality of the connected part.
Re-stripping
The process of tempering the metal creates visible sagging on it. They can be removed by repeated stripping. The latter is not so necessary for improving technical characteristics as for aesthetic purposes.
The band saw is cleaned with a grinder or any abrasive tool until the seam is visually erased.
It is also recommended to correct the recesses between the teeth, giving them the correct geometric shape.
Soldering control
It would not be superfluous to inspect the seam of a welded band saw if it was made by a novice craftsman. Control is carried out visually. The articulated area should be carefully inspected to identify possible defects.
The latter may be:
- displacement of the ends;
- splashes of molten material onto the belt;
- lack of weld penetration, which impairs technological qualities.
Displacement of the ends occurs due to low current strength, splash - due to excessively increased current. Lack of penetration occurs at low pressure or insufficient current.