What is needed for work
A soldering gun, also called a hot-air soldering station, is a multi-component tool with a large number of functions for repairing modern devices. It allows you to solder SMD components, capacitors, LEDs and other parts. The same applies to BGA-type chips, which make installation more dense. Today, almost every electronic component in modern devices is made in this way.
To solder SMD components, you need the following materials and devices:
- actually, the hair dryer itself;
- attachments for it;
- flux with solder paste;
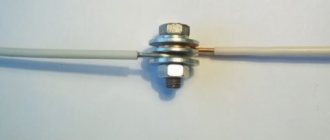
- copper braid;
- some kind of device for prying up parts (tweezers, for example);
- medium-soft brush;
- lens;
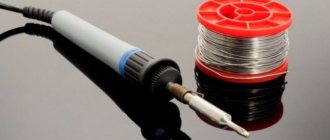
- a soldering iron with a thinner tip compared to a standard one;
- stencil for “rolling”.
To work competently with a soldering gun means to be careful, have angelic patience, and be extremely careful.
Tools and materials
To solder printed circuit boards we will need:
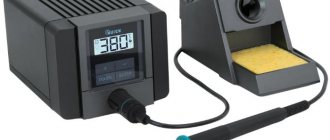
- actually, a soldering station with a hair dryer and a set of attachments;
- flux (for example, Interflux IF8001) is a very important component; it ensures good contact between the elements during assembly and the further functionality of the board;
- solder paste;
- stencil for applying solder paste to the microcircuit;
- low-melting solders (for example, Wood's alloy, Rose's alloy), they will help when soldering the component from the board;
- a means for removing excess solder, this can be a suction syringe or a copper braid (“pigtail” of thin wire);
- tweezers or flat screwdriver;
- industrial alcohol for cleaning the connection.
This set is selected individually for each master. In addition, you will need high-quality lighting and a lens to inspect the solder seam.
And also - extreme care and a lot of patience.
Sequence of actions using the example of an SMD component
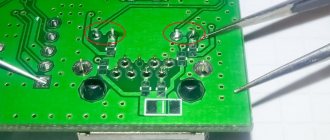
Let’s say that on the working printing surface of the electronic unit being repaired there is a burnt-out SMD box that needs to be dismantled. To remove it and install a new one, you need to select a compact nozzle for the hair dryer and prepare flux.
The temperature regime on the soldering hair dryer is set within 345-350 degrees using a regulator. Then they apply flux to the part to be replaced, and begin to slowly “warm up”.
The air pressure during the process should not be too strong, otherwise there is a risk of blowing away nearby elements. The culprit of the breakdown continues to be heated until the solder begins to melt, which will be immediately noticeable.
It may take about three minutes to warm up, and this is normal, there is no need to rush. If the solder persists for a long time, you need to add 5 degrees.
After the solder has liquefied, carefully dismantle the SMD part. During the process, it is important not to knock down the neighboring components, since they have probably lost stability due to the melting of the solder holding them in place.
Upon completion of the operation, the copper braid must be used to clean the “spots” (contact pads), then provide small bumps in the same places with solder paste or solder.
A serviceable smd is placed in the old place with a minimum amount of flux. Heat the part with a soldering hair dryer until the solder shines brightly, spreading over each of the contacts.
Features of working with BGA chips
When soldering BGA type microcircuits, the same temperature range is selected from 345 to 350 degrees, ensuring moderate air pressure to prevent blowing off the “neighbors”. During operation, the soldering gun should be held at an angle of 90 degrees with respect to the board. To avoid failure of the chip, you should not heat it only in the center; it is better to go around the mounting element around the perimeter.
After 1-3 minutes have elapsed, you can try to slightly lift the chip above the board using tweezers. If the chip does not budge, the solder is still hard. To avoid damage to the conductive paths of the board, you need to use the regulator on the hair dryer to “throw on top” 5 degrees of temperature and continue heating.
Why dry chips?
Chips are microcircuits housed in BGA packages. The name, apparently, came from an abbreviation that meant “Numerical Integrated Processor”.
Based on experience, professionals have a strong opinion that during storage, transportation, and shipment, chips absorb moisture and during soldering, it increases in volume and destroys the part.
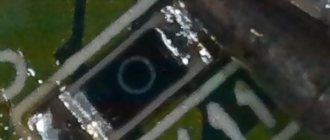
The effect of moisture on the chip can be seen if the latter is heated. Blisters and bubbles will form on its surface long before the temperature rises to a value sufficient to melt the solder. One can only imagine what is happening inside the part.
To avoid the undesirable consequences of moisture in the chip body, when installing boards, the chips are dried before soldering. This procedure helps remove moisture from the case.
Heating from below
This technique is not only useful when working with a soldering gun, but also increases the convenience of soldering.
The board is secured with a clamp, the temperature is set to 200 degrees and warmed up for five minutes, after which they begin to work as usual.
Using thermal tape, you can shield nearby elements.
After removing the chip, the contacts are cleaned with the above braid. Do the same with the board.
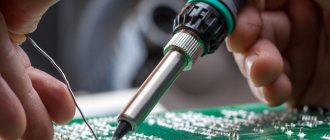
All procedures must be carried out carefully to prevent damage to the circuit. If you don't have copper braid on hand, you can remove the solder using a soldering iron with a thin tip.
What is compound and how to remove it from the board
The compound is a resin that increases the strength of the board and reduces the operating temperature of the microcircuits. Also saves the board when exposed to moisture
If you need to resolder the chip, the compound will have to be removed. It is applied in different ways. Manufacturers can coat the edges of contacts with SMD parts. Or they can fill it completely.
How to remove resin from a board
Can be removed mechanically. To do this, heat the board with a hairdryer to 150 °C and use a toothpick or metal tweezers to remove pieces of the compound from the board. It's not always possible to do this.
You can also try chemical solvents. Typically sold at mobile phone parts stores.
And in order to desolder a microcircuit that has a compound under the contacts, you need cutting tweezers. The soldering procedure is similar to the usual one, but this time you need to cut off the compound.
Reballing procedure
To carry out reballing, the chip is placed in a stencil and secured with specialized electrical tape. Apply solder paste on the back side with a finger or spatula, then set the hair dryer to a temperature of about 300 degrees and begin to warm it up. After the characteristic shine from the molten solder paste appears, allow the solder to cool completely.
To free the stencil from the chip, remove the electrical tape and heat the stencil to approximately 150 degrees; at the end of the procedure, the part should be free. It happens that it is impossible to immediately remove a part from a Chinese stencil, so it may be necessary to carefully hook it.
During reverse soldering of the microcircuits, the risks are assessed and the chip is laid out the required number of times to ensure an exact match of the heels and balls. Then they set the temperature on a soldering hair dryer to 330 to 350 degrees and heat until the melted solder allows the chip to fall into place on its own.
A soldering station is an indispensable tool for an electronics engineer. Usually the station comes with both a soldering iron and a hair dryer. If you learn how to use them, then almost any soldering will seem exciting and not very difficult.
A special feature of the stations is temperature control. You need to immediately remember an important rule - avoid temperatures above 400 °C or more. Many beginner (and even experienced) radio amateurs neglect this. These are critical values for microcircuits and boards.
Solder melts at approximately 180 to 230°C (lead-containing solders) or 180 to 250°C (lead-free). This is far from 400 °C. Why then set the temperature high?
Technology
The process of performing the work consists of 3 main parts: desoldering the old element, cleaning the board from excess solder and installing the new part. Let's consider these stages separately.
Dismantling the old component is carried out in a certain sequence.
- Before removing the edge of the microcircuit housing, mark the board with marks that determine its position. For example, use a needle to carefully leave scratches. It is enough to note the 2 perpendicular sides.
- Set the heating temperature on the soldering station. It should be 345–350 degrees. It is advisable to choose the lowest air flow speed.
- Apply flux to the solder joint.
- Warm up the connection between the part and the board. You need to heat for 3-5 minutes until the solder melts (this will be immediately visible). If it does not melt, increase the temperature by 5 degrees.
- It is necessary to heat not only in the center of the component, but also along the perimeter of the microcircuit. Use a hair dryer along the entire length of the solder seam.
- When the solder has melted, remove the old part. To do this, pry it with tweezers and lift it up. You can use a flathead screwdriver instead of tweezers, but there is a risk of damaging the board. If the part “does not work”, it means the solder has not melted. Continue heating.
Important! You need to lift the old part straight up, preventing it from moving to the sides. Otherwise, the melted solder will short-circuit adjacent contacts and will not be easy to remove.
Or even worse, a track will come off the board, which will be even more difficult to restore.
Next, we move on to preparing the contact pads of the board.
- Melt the solder at the contact point.
- If you have a syringe, use it to remove excess metal.
- If you don't have a syringe, use copper braid. To do this, fluff it minimally so that the pores are visible. Next, coat it liberally with flux, apply it to the joint and heat it with a hairdryer or soldering iron. The braid will absorb excess metal. After this, it remains to cut off the unnecessary part.
The board should be completely free of solder.
Next we move on to preparing the part. The main task is to apply solder to the contacts in the form of balls of the same size (this is called reballing). To do this, use a stencil.
A stencil is a metal plate with many holes into which a part is inserted using legs.
To use it, do the following.
- secure the radio component to the stencil with special electrical tape;
- Apply solder paste on the back side with a spatula;
- set the heating temperature to 300 degrees;
- heat the part together with the stencil, and when the characteristic shine appears, turn off the heating;
- Allow the component to cool completely;
- remove the electrical tape;
- turn on the heat to 150 degrees, warm up the part and carefully release it from the stencil.
Educational program for beginners
To desolder a part from a board, you need to make sure that the contacts are heated until the solder melts (approximately 230 °C). The main mistake beginners make is to immediately heat the place where they are soldering to 300 - 350 °C.
For example, you need to desolder a microcircuit from a board using a Lukey 702 soldering station.
Many radio amateurs and electronics engineers set heating parameters above 300 °C.
At the first moment, the part is exposed to about 200 °C. The contacts and the surrounding area of soldering work are at room temperature.
The heating of the part reaches 300 °C, but the contacts have not yet reached 200 °C.
The microcircuit experiences a critical temperature of 350 °C. Meanwhile, the surrounding soldering area is heated unevenly, even if the hair dryer is evenly moved across the soldering area. A noticeable temperature difference appears at the contacts of the part.
400 °C and the microcircuit begins to fry.
A little more, and it will unsolder due to the fact that the contacts have practically heated up until the solder melts. But this happens because the board has warmed up. And in this case, it happened unevenly. High temperatures lead to thermal breakdown of the microcircuit and it fails. The board bends, turns black, and bubbles appear due to boiled PCB and its components.
This soldering method is very dangerous and ineffective.
Application benefits
Solder pastes are used not only in everyday life, but also in industry. Such widespread distribution of this material is explained by its following advantages:
If there is no opportunity or desire to make the mixture yourself, you can purchase a ready-made version. But you need to remember that high-quality solder paste costs about 10 US dollars per 50 g. Cheaper options are of poor quality and may not only not provide sufficient fixation reliability, but also lead to additional problems during subsequent use of the electronic product. To avoid problems, it is better to buy such materials in certified stores or directly from manufacturers.
Source
How to desolder a microcircuit
How do you solder parts without damage?
It is necessary to analyze the soldering area and equipment:
- Estimate the thickness of the board. The thicker the board, the more difficult and longer it takes to warm it up. The board consists of layers of tracks, masks, pads and many metal parts that are very heat-intensive.
- What's nearby? To avoid damaging surrounding components, they must be protected from temperature. The following will cope with this task: thermal tape, aluminum tape, radiators and coins.
- What is the ambient temperature ? If the air is cold, the board will have to be heated a little longer. Of particular importance is what is located under the board. No need to solder on a metal plate or on an empty bench. A wooden board or a set of napkins works best. And at the same time, the board must be in the same plane, without distortions.
- Equipment. Many soldering stations are sold without calibration. The difference between the temperature shown on the indicator and the actual temperature can reach either 10 °C or 50 °C.
Important Specifications
Solder mass must be selected taking into account its physical and chemical properties. These characteristics are directly dependent on the ingredients of the composition. These properties are:
In addition, no-clean pastes do not provoke the formation of corrosion, while water-washable pastes can lead to such problems at the soldering site, since they contain a number of organic substances.
How to solder with a hairdryer correctly
It is necessary to cover all small components that are vulnerable to overheating with protection.
In this case, aluminum tape is used. It protects components well from temperature and holds the board components tightly. However, it adds heat capacity to the soldering area. Thermal tape also protects well, but sticks to the board less well.
The board is placed on a material that has the least heat capacity and slowly releases temperature to the environment. You can use, for example, a wooden plank. And at the same time, the soldering area should not be inclined.
It is best to apply flux to the contacts. It distributes heat well compared to heated air, but you should not add too much of it. It may boil, hiss, or interfere with soldering.
The first step is to warm up the soldering area. The hair dryer is set to about 100 °C and maximum air flow.
It is necessary to warm up both the part itself and the surrounding soldering area with contacts in a circular motion.
Next, after about a minute, you should gradually increase the heating.
The difference with the contacts will be small. Thus, within a few minutes, increase to 300 °C.
Steps of about 20 - 30 °C for every tens of seconds.
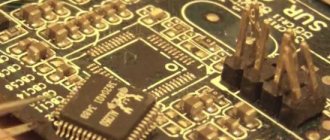
What is SMD and basic principles
The use of flux for soldering SMD components has its own characteristics, which make it possible to improve the connection of the surface of microcircuits and boards. General recommendation for using flux for soldering SMD is effective for chip resistors, as well as SOIC, LQFP, QFN and others. The application of the thinnest layer of material allows for production soldering without compromising quality. By the way, literally from English the meaning of SMD soldering paste is translated as “using components for surface soldering” (Surface Mounted Devices). As can be seen from the working name of the paste, it allows for sufficient assembly density of the connection compared to conventional technologies.
SMD component soldering process
Most craftsmen mistakenly believe that using SMD components is impractical at home. Most craftsmen believe that only TN technology can be needed at home, although the main problem is choosing the correct diameter of the soldering iron tip. Inexperienced craftsmen really do not know the intricacies of using SMD soldering with solder paste, since the result of the work is “staining” of SMD contacts on the printed circuit board with tin. To avoid typical mistakes, some parameters should be taken into account: capillary effect, which must have a fine structure, as well as surface tension and proper wetting of the surface being treated. Ignoring the tasks at hand will not be able to fully answer the difficult question of which flux is best for soldering SMDs at home or on an industrial scale.
High-quality contact with the legs of the microcircuit of the board with SMD components occurs for one simple reason, the effect begins to be exerted by the general tension force, which forms separate independent drops of tin formation on the surface of the board.”
As can be seen from the general description, the wizard’s actions are minimized and the flux for soldering SMD components only heats the legs of the microparts used. Remember, when working with very small components and parts, seizing (unexpected connection) of technological elements to the tip of a working hot soldering iron may occur, which negatively affects the further operation of the microcircuit.
How to understand that a part is already soldered
A glare appears on the contacts. Using tweezers, gently push the chip. If it moves easily and smoothly from side to side, then it can already be removed; if not, we heat it further.
This technique must be individually adjusted for each soldering and soldering station. For example, sometimes you will have to heat the board longer, and sometimes about 240 °C will be enough. The soldering method depends on the case.
Alloy Rose
To reduce the risk of overheating, Rose alloy can be used. It will help reduce heat to 120 °C. In this way, you can remove the part from dangerous and sensitive areas. Just add a couple of solder granules and a little flux.
After tinning the contacts, the part is easily desoldered. You need to carefully desolder the contacts; they can easily be damaged due to sudden movement.
The resulting solder must be removed from the board. It is very fragile and not suitable for use.
Combined method
Another very effective technique. If during soldering the part is poorly soldered or does not desolder, this is a consequence of low-quality solder, flux, or insufficient heating of the board.
To do this, while working with a soldering iron, you need to help from above with a soldering hair dryer. The hair dryer should be set to 200°C. This way, heating will occur faster, and the temperature at the contacts will stabilize, and the surrounding air will absorb less heat.
general information
A welding gun for working with polymers (also known as a hot air gun) is a simple device consisting of a housing, inside of which there is a small electric heater and a fan. The air flow is sucked in from the atmosphere using a fan and, passing through the heater, is heated to a predetermined temperature. Doesn't remind you of anything? Yes, an ordinary household hair dryer, which we usually use to dry our hair.
But there are still differences, and the most important of them is the heating temperature of the air. Soldering hair dryers are different in that they are capable of heating air to a temperature of several hundred degrees. If household hair dryers were capable of something similar, people would be left without hair