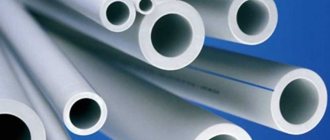
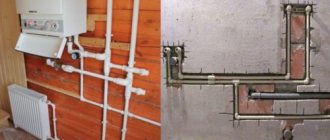
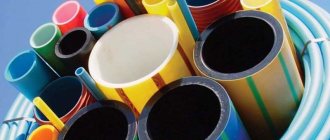
Pipes made from artificial polymers such as PVC have become extremely popular due to their low price and ease of installation. For this reason, over time they began to replace classic metal pipes, this is especially noticeable when designing or repairing plumbing systems in apartments and houses. Old rusty pipes are simply replaced with new plastic ones, and this is done in a couple of hours.
But the merit of the quick installation of such pipes does not lie in the skill of the welder. After all, a special soldering iron is used for welding PVC pipes. A soldering iron for PVC pipes can be purchased in a store, and there are quite budget models that won’t break your pocket. But what if you are not ready to purchase a new device and want to save money, or just like to make electrical appliances with your own hands? In this case, you can make a soldering iron yourself, and we will explain in detail how to do this in this article.
general information
A machine for welding PVC products (or pipes made of any other artificial polymers) is an electrical device operating from a standard 220V network, designed for soldering pipes of various diameters.
Before we begin assembling this device, it would be nice to know what it consists of. The key elements of any soldering iron for pipes are a body with a comfortable handle, a thermostat, which sets the required heating temperature for the heating element, and the heating element itself, hidden in a metal casing that heats up.
Additionally, the kit can be supplied with nozzles for soldering pipes of different diameters. We have dedicated a separate article to the topic of attachments; read it to be aware of all the features. Here we will say one thing: it is preferable to use Teflon-coated nozzles. This way they are guaranteed not to stick to the pipes during heating.
Surely you may have heard that such soldering irons are often called “irons”. And this is not without reason. The fact is that the heating element is indeed visually very similar to the soleplate of an iron and their operating principle has much in common. In both the iron and the soldering iron, the surface is evenly heated, only in the case of a soldering iron, the heat from the heating element is transferred to the nozzles, and the pipe is then pressed against them to melt its edge.
In this case, the heating temperature is set using a thermostat installed in the soldering iron body. Adjusting the temperature is extremely important, because if it is too high, the pipe will simply melt in the nozzle, and if it is too low, it will simply not be able to warm up evenly. This means that the connection will be of poor quality and will quickly leak if we are talking about installing a water supply system, for example.
Variety of models
Product 'Ermak'
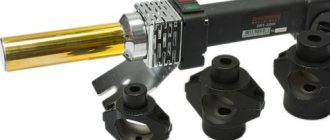
There are two types of soldering machines on sale. The first type is equipped with a flat tip. In the second type of device, the soldering element is made in the shape of a cylinder. Each variety has its own characteristics. According to many experts, models with a cylinder-shaped sting are more convenient. Since the soldering element is compact in size, the device can be used even in small spaces.
Each type of device is equipped with its own type of replaceable attachments. For models with a flat tip, the nozzle is installed using a special bolt. The plate has several holes for connecting two or three nozzles.
For models with a cylindrical tip, the heating elements look like clamps. They crimp the cylinder and are secured with several bolts. The replaceable nozzles of the second type of device (unlike the first) do not scroll relative to their axis. This greatly simplifies the soldering process. Because there is no need to tighten the bolts.
You also need to pay attention to the configuration of the nozzles. Most often, a set contains at least three attachments. Some models are equipped with six replaceable heating elements to work with structures of different sections.
Today, the most popular manufacturers of soldering irons for polypropylene structures are the following brands:
- Ermak;
- Storm;
- Quick;
- Wavin ekoplastik;
- Kraftool;
- Lava;
- Neo.
To choose a tool you need to know which one is better. To do this, just read consumer reviews. Note that it is better to spend a little more money and purchase a quality tool from a well-known brand than to purchase a cheap Chinese device.
Also pay attention to the power of the equipment. As a rule, for devices this figure can be from 800 to 1500 W. Such devices are used for soldering structures with cross-sectional sizes of 15, 20, 32 and 50 millimeters. If we are talking about joining products with a diameter of up to 63 millimeters, it is better to use equipment with a power of 1700 watts or more. There are also models designed for soldering products with a cross-section of 75, 90 or 110 millimeters.
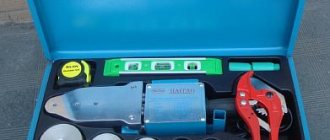
Typically, the equipment package includes a standard set of additional elements.
As a rule, the list contains:
- replaceable nozzles;
- bolts;
- shipping container;
- stand;
- thermal gloves;
- roulette;
- level;
- instructions.
Try to choose a tool that is as complete as possible with everything you need. This will allow you to save money and time. Equipment from well-known manufacturers in most cases comes with all the necessary additional elements. Often soldering irons can be equipped with scissors for cutting pipes.
Peculiarities
Unfortunately, budget soldering irons are not always equipped with thermostats, and this is a big minus. After all, it is difficult for beginners to determine when the temperature is insufficient or excessive. In addition, not all home craftsmen will use the purchased soldering iron often. And spending a couple of thousand rubles on a device that will gather dust on a shelf for years is not the most rational decision.
Read also: Rating of the best soldering irons for polypropylene pipes
There is also another drawback of budget soldering irons - their unsatisfactory workmanship and sometimes poor-quality finished seam. So why buy a low-quality item and then use it a couple of times and throw it into the far corner? It is better to make a soldering iron with your own hands from improvised materials and a couple of resistors.
Of course, a homemade tool won't be as good as a $200 soldering iron, but it will definitely help you with one-time minor repairs. In addition, you yourself will know what it is made of and will be able to choose better materials. Instead of cheap plastic (which can be found in all Chinese soldering irons), take aluminum. Then your device will be head and shoulders above budget store-bought soldering irons. It is enough to apply minimal knowledge of electrical engineering.
Soldering pipes in difficult areas
When assembling a water supply or heating system with a complex configuration, problems may arise with access to the soldering area. How to solder polypropylene pipes in hard-to-reach places?
Watch the video
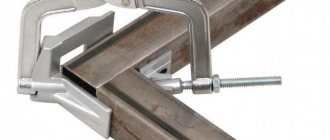
During the preparation process, it is necessary to roughly break the entire network into separate nodes that can be connected on a workbench, after which the finished branches are welded into the system at two or three points. The following areas can be considered difficult to install:
Read also: Caesar salad with chicken and bacon
- pipelines placed under the ceiling;
- in places where it is impossible to place a soldering iron.
The best way to avoid difficulties in this case is to prevent them from occurring. To do this, you need to think about the assembly order, making complex assemblies on a workbench, and not on your hands. If this is not possible, it is better to use electrical fittings.
In general, the occurrence of difficulties of this kind is a consequence of design errors. Manufacturability of installation is the main condition for the designer.
Soldering iron assembly
soldering iron for plastic pipes
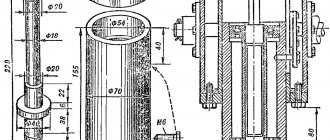
Let's start assembling. To weld polypropylene pipes we need an old iron. We need to remove the “sole” from it, it will act as a heating element. In the photo it is shown as number 1. We drill a hole in the heating element and use bolts to attach the heating elements on both sides. Next, you need to make a thermostat (number 3 in the photo) and pack it in a heat-insulating casing, it is indicated by number 2.
To assemble the thermostat, use the diagram below. For R1 you will need a variable resistor of 500 kOhm, for R2 - a resistor of 4.7 kOhm 0.5, for R3 - you can take a resistor of 1 mOhm, 0.25 w. For VS1, DB-3 type dinistors are perfect; for VS2, take TC 25-4 triacs. An electric heater with a power of 1000V is suitable for T3H. And for C1 we recommend taking a 0.1 uF capacitor, 400 v. Use a neon lamp type HL 1 as an indicator light.
Prepare the aluminum housing. In our case, the size is 13x6x9 centimeters. Place the thermostat on the board in it; the board should be made of foil PCB. Place the temperature control knob outside the aluminum housing. It is desirable that it has divisions. Additionally, you can equip the device with a light bulb for convenient indication. It will signal that the device is turned on and heating up.
Fix all this on a PCB plate (number 4). Then attach it to the heating element and place it on an aluminum stand (number 5). Be sure to place a fluoroplastic insulator between the plate and the casing (number 6 in the photo).
Insert the protruding part of the PCB plate into the groove (its location is indicated by number 8 in the photo). It can be removed at any time for more convenient storage. You can also build a handle out of wood and attach it to the plate. All! The iron for PVC pipes is ready.
This device can be used in the same way as a factory-made soldering iron. Using such a device, we soldered pipes with a diameter of 20 millimeters and heated them for only 3-5 seconds. The heating element generates so much heat that it is enough for quick and high-quality soldering.
With heating regulator
To control the heating temperature of a homemade soldering iron for polypropylene pipes, install a thermocouple. To assemble a device equipped with a heating regulator for the working sole, additional parts and spare parts will be required, namely:
- thermostat, thermocouple and two tips;
- dial indicator with a special scale (with “zero” and two sectors);
- insulated conductors with a length of at least one meter each;
- asbestos wool.
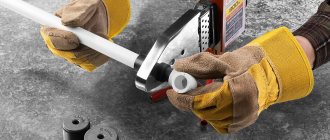
Bonding technology
Repair consists of several mandatory steps that cannot be skipped or swapped.
- Removing the bumper. If the plastic cover is cracked in several places, before removing it, you need to secure it with tape from the outside (so that the part does not fall apart).
- Preparatory work includes choosing an adhesive composition, selecting tools, cleaning the bumper, and preparing the surface. All work is carried out in a warm, well-ventilated area.
- Gluing process.
- Grinding.
- Painting.
Glued bumper
If it is necessary to repair a small crack, chip or deep scratch, after preparing the bumper, glue is applied from the outside, filling the gap with the composition, and lightly pressing the plastic. If the crack is significant and crosses the edge of the lining, use epoxy glue and fiberglass.
Preparation
Preparing the bumper before gluing it with epoxy glue and fiberglass in steps (if there is a significant crack):
- Wash the bumper and dry it.
- Sand the damaged area with coarse sandpaper, this will increase adhesion, and degrease with white spirit.
- Correct the fracture site.
Coat all cracks on the outside with hot glue (use a gun) or plasticine. This will prevent the epoxy from leaking out during drying and seal the future seam. Seal the outside with tape over hot glue. This will additionally maintain the shape of the bumper during the repair process.
Materials and tools
If there is a large gap, the bumper on the car must be sealed with two-part epoxy glue, which is diluted before the main work. The assorted two-component compounds “Khimkontakt-Epoxy” and the one-component “Nowax STEEL EPOXY ADHESIVE (steel 30 g)” earned good reviews from drivers.
What you will need for work:
- epoxy - 300 g;
- fiberglass - 2 m;
- brush;
- automotive primer, degreaser, auto enamel;
- sandpaper, scissors.
All work is carried out at a temperature of 18-20 degrees. The epoxy glue hardens for up to 36 hours; during this time, the bumper cannot be turned over and the adhesion strength must be checked. If the adhesion of materials is disrupted, in winter the inside of the glued patch may crack.
Repair process
Measure the required amount of fiberglass to cover the entire fracture area and cut it off. Craftsmen recommend using fiberglass rather than fiberglass to glue the bumper to the car. The material will increase the density of the seam and its strength.
Dilute epoxy glue if using a two-component composition. Take 10-12 parts of resin, 1 part of hardener, mix thoroughly. Leave for 5 minutes in a warm place (20-23 degrees).
Repair process step by step:
- Coat the inside of the body kit generously with glue.
- Apply fiberglass fabric, press it to the bumper, soak it with glue, make sure that no air remains.
- Apply glue and glue the fabric in 2-3 layers.
- Apply the last layer of glue.
- Place the bumper in a warm place for 24 hours, preferably in such a way as to reduce the stress on the crack, but not on its side, since the resin will drain as it hardens.
Bumper painting after repair
The final stage is putty and painting. After the glue has dried on the outside of the bumper, the bumper is sanded and primer is applied, and after drying it is painted.
Thermal fuse
And one of the interesting things there is a thermal fuse! This could be the reason for the underheating. It is located under the protective grille, bolted to the heater.
Its function is Additional protection. Although all control - heating, monitoring, turning off and turning on - is taken over by the electronics, the manufacturers have installed additional protection. In case, for example, the thyristor breaks down and the heating element stops being controlled by the controller.
How it works and why it broke
In the event of a breakdown of the electronics, when a certain temperature is reached, the bimetallic contacts of the fuse will open and turn off the heating element, preventing it from overheating. The principle of operation is like an iron, if anyone is familiar with it, they understand what I mean.
A more detailed check showed that this was so, my instinct did not let me down. The reason for this malfunction is as follows. A fairly decent current flows through the closed contacts of this fuse. Under current load, over time, the contacts begin to heat up, then slowly burn - stronger and stronger, and eventually their ability to conduct current becomes worse.
As a result, the amount of energy sufficient for normal heating is not transferred to the heating element. Part of it is lost on these burnt contacts, which makes them heat up even more.
Do you remember what happens when the thermal fuse heats up? As it heats up, its contacts tend to open. All this only further worsens the contact in this circuit or breaks it altogether.
Thermal fuse
How to fix it?
Which exit? Trying to restore a thermal fuse is a thankless and useless task. Even if this works, it will not last long and soon you will have to disassemble the soldering iron again for repeated repairs.
Replace with a new one? This is ideal! But where can I get one like that? Therefore, the method remains reliable, but radical. Remove him from the chain!
The task is the following. You need to disconnect the fuse terminal (black wire in the photo) from the heating element contact.
Disconnect the terminal
You can, of course, bite off the fuse and connect the blue black wire to the existing terminal, but this is not the best option, since the connection will begin to heat up over time and also needs to be insulated.
But ordinary electrical tape is not suitable for this, because there is strong, natural heating from the heating element, it will melt.
It’s best to crimp a new terminal onto the blue wire; it costs pennies at an electrical goods store. I had the terminals insulated, but I decided to remove it because I’m not sure that it will withstand the temperature. It is better to use the heat-resistant casings that were on the wires.
New terminal
We prepare the wire and crimp the terminal on it; if there are no special pliers for this, this can be done with pliers, the crimping must be reliable, the wire should not dangle in the terminal.
Preparing the wire and terminal for crimping The wire is ready for connection. The wires are connected and ready to be assembled.
Well, the electrical part is ready, all that remains is to put everything together and check it.
Choosing a machine for welding propylene and PVC - what criteria are important when purchasing a tool
To choose a good device for welding plastic pipes, you do not need to consider the most expensive models from European manufacturers. You can buy an inexpensive soldering iron from a domestic manufacturer, which will be no worse in functionality than foreign-made devices. In order for a tool to cope with the assigned tasks, it is necessary to decide on its purpose at the selection stage. When choosing the cheapest Chinese tool, it is important to understand that it is characterized by low reliability, and most importantly, it cannot be used for a long time. A particular danger for household tools is overheating over a long period of time, as a result of which the components begin to fail.
Alternative to welding
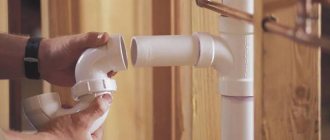
In some cases, for example, in hard-to-reach places in the bathroom or other rooms, it is not possible to carry out welding work. The soldering process can be replaced by gluing the pipe to the fitting using an organic solvent. It has a very strong softening effect, but is also highly volatile.
After lubricating the end of the pipe and the internal cavity of the coupling, the plastic softens for a short period of time, and the connection can be made. Reverse polymerization begins after a few seconds.
However, this method is more suitable for PVC pipes that are less prone to thermoplasticity.
If for some reason this option is not suitable, for pipes NOT UNDER PRESSURE it is permissible to use a supercharged lighter instead of a soldering iron. This connection method is shown in the video tutorial below. It is important to understand: uniform soldering cannot be achieved precisely because of the alternating heating of parts, therefore the technology cannot be used for critical connections.
Materials
The main element is the boiler, but in addition to it you will need several additional parts:
- Aluminum plate and small wire.
- Indication lamp (can be taken from the iron).
- Thermostat.
- Strong thermal tape and thermal paste.
- Textolite and electric plug.
- Ceramic insulation.
- Welding nozzle (25 millimeters).
- A few bolts and nuts to secure it.
- Insulating tape.
A small paradox. To work, you will need a soldering iron, but only to connect the wires, otherwise the design simply will not work. It’s better to ask once and make your own than to constantly be without a tool.
Important! Making a tool correctly requires some effort, and therefore inexperienced designers may make several mistakes. When collecting materials, set aside spare parts so you don't have to run to the store again.