In the old days, people used firewood, which they cut by hand, to heat their homes. The main tool for this was a special ax - a cleaver. Today, a large number of mechanical, electrical and hydraulic human assistants have appeared, with the help of which you can easily cope with the preparation of firewood for the winter. The devices have different types, but the principle of their operation is the same - they immediately split the log into several parts. But not every private home owner can afford to buy such a device. However, for home use, the simplest models of cleavers can be made with your own hands.
Purpose of wood splitters
If you are the proud owner of your own country house, then you probably know well how hard it is to chop wood while swinging a heavy, heavy axe. However, progress does not stand still, so these days the work of collecting firewood can be significantly simplified. For this purpose, special machines called “wood splitters” are used.
Of course, not everyone has a need for such technology. If you split firewood once a month, then a regular splitting splitter is quite enough for you, but there are categories of homeowners who cannot do without a mechanical device. First of all, these are people who permanently live in houses with stove heating, fireplaces or solid fuel boilers. Such equipment is necessary in wood-burning boiler houses, and, of course, we should not forget about lovers of Russian baths - after all, before they take a good steam, they will certainly need to stock up on firewood to kindle the fireplace
Tradition or technology?
Our ancestors, and not only ours, preferred to chop wood with an axe. Saws appeared in use relatively recently, and were less widespread than axes. This is due both to large losses of material - up to 5% of the wood goes into sawdust, which is not suitable for kindling - and to the fact that logs split into fibers burn and are stored better.
Traditional ax for chopping wood
The traditional ax for chopping wood is called a cleaver, from the word “to chop”, “stake”. This is a massive product, usually weighing 2…3 kg, with a weak blade and a long handle. This design is due to the fact that all the force must go into the blow, without being reflected in the hands and shoulders of the hewer.
However, such work requires sufficient physical strength and endurance, but to a greater extent – skills. Experienced woodcutters claim that on any log there are special points, a blow to which can split even the hardest tree without much force.
A more modern option is the so-called wood splitters
This is a mechanical device with a manual, hydraulic or electric drive that allows you to split round timber into individual logs.
Since the manufacture of an ordinary cleaver, that is, a massive ax, at home is available only to practicing blacksmiths with sufficient experience and appropriate equipment, let’s talk about a device for mechanized splitting of logs, which is also colloquially called a cleaver, and not just a wood splitter.
Hydraulic cleaver
The operating principle of a hydraulic wood splitter is based on the use of the energy of a compressed fluid - an agent through which pressure is transmitted to the working piston. From the piston, pressure goes to the tool that splits the logs. This, in turn, puts pressure on the logs.
When making such a firewood splitter with your own hands, pay great attention to the frame, which is made of a thick-walled steel channel. A piston with a cutting element moves along the frame. With such a mechanism, a log can be split into several parts in one move. It is important that there are also additional guides.
The maximum length of a log that a hydraulic splitter can split is 63 cm, and the maximum pressure that the device can develop is 9 tons. Such characteristics make it possible to split a log of 40 cm in diameter in two seconds.
How to choose a homemade wood splitter: general provisions
The choice of scheme and type of drive depends on the conditions and volumes in which the wood splitter will be used.
For an inexperienced woodcutter who processes a small amount of wood for personal needs, a manual wood splitter is suitable. Its design is usually very simple and does not require any power supply.
For small farms and private houses heated by wood boilers and stoves, as well as for cooking on fire, electric screw or compact hydraulic models are convenient. The choice of energy type - electricity or gasoline - depends on its availability.
Powerful models with hydraulic drive and high productivity are suitable for the logging industry and enterprises that supply firewood for sale. Here, amateur activities are not appropriate; for stable work, the purchase of professional equipment is necessary.
The more convenient it is to carry logs
Carrying logs in your hands is uncomfortable. Especially if they are wet, dirty or covered in ice and snow. The “third” and “fourth” steel hand comes to the rescue - a pincer (grab) grip.
152247User FORUMHOUSE
I was wondering if anyone has used a manual log gripper? Is it worth paying 3,000 rubles for a branded one? I want to order some for myself so I can load the logs. Is it convenient to use?
Russlanych FORUMHOUSE user
I've been using a pincer gripper for 5 years. I have never regretted buying it. I took them for 1500 rubles. My friends told me that he threw away the money, but now I don’t go to the forest for firewood without it.
When purchasing grab pliers, keep in mind that there are models with different grip widths. For example, under logs with a diameter of 20 and 30 cm. With pliers with a large grip, you can grab both large and small logs.
By the way, there is a cheaper option - single-jointed log pliers. Is it worth taking them?
wind1windSuper-Moderator FORUMHOUSE
With a single-joint grip, to prevent the log from slipping out, you will have to squeeze the handles, i.e. make additional physical efforts. On soft wood the force is less, on hard or frozen wood more. In double-jointed grips, compression occurs automatically due to the weight of the lifted log.
Well, for all home-made people, a user with the nickname 152247 offers to make a hand made version of branded pliers with a grip width for a log with a diameter of 30 cm.
In the background is a piece of paper with a 5x5 mm square.
Types of wood splitters
The basic principle of operation of the device is the impact on wood by screwing or striking a massive cleaver. In this case, according to the type of cleaver, the following are distinguished:
- Conical. Here, the wood is split under the action of a conical element screwed into the deck. Due to its external similarity, this detail is also called a “carrot”.
- With a wedge-blade that cuts into wood like a regular ax.
By type of drive there are:
- Manual mechanisms, where the force is applied by a person, and it increases due to the correct application of the load and rigidly securing the workpiece.
- Electric, where the force is set by an electric motor. Most often, cone models are implemented in this embodiment, since it is very easy to organize the rotation of the main part directly, without transmission mechanisms. The engine can run on mains power or liquid fuel (gasoline).
- Hydraulic, more precisely, hydraulic with electric drive. Here, the primary force is provided by the electrician, and the necessary pressure on the workpiece is transmitted through the hydraulic system.
You can also divide the devices according to the method of stacking firewood: horizontally and vertically. In most household models, a fragment of the trunk is laid horizontally on a special frame/stand, with lower-mounted supports being more suitable for massive logs of large diameter, and higher ones for relatively thin round timber. Vertical models are more common in the professional segment; they are more powerful and productive.
There are also professional devices with the possibility of both horizontal and vertical stacking of firewood
Wood splitter with screw drive
The main unit of this device is the screw-nut transmission . The principle of operation is based on the transformation of the rotational movement of the screw into the translational movement of the nut. Even small devices of this type allow you to split firewood into several pieces with minimal physical effort.
There are different types of screw cleaver:
- Household. Most often used in private homes. If the frame has an axle with a pair of wheels, it can be mobile.
- Industrial. Entire complexes used at the sawmill and requiring professional handling.
Depending on the type of drive, these devices are either electric or gasoline.
The electric model can be powered from a single- or three-phase network. Supplying a site with three-phase current is an expensive undertaking, so most are inclined to choose a single-phase model.
Thread types of screw wood splitters:
- With metric thread. They have less reliability because these threads wear out faster. There is a risk of the log falling off.
- With persistent thread. Sufficient shape and sharpness ensures good cutting into wood. This thread is more durable than the previous analogue.
A device with a drive is more expensive. The price also depends on the type of motor. On average, an internal combustion engine cleaver costs 15% more than an electric one.
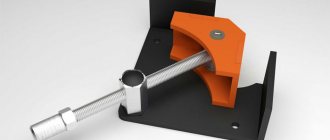
Manual wood splitter
This wood splitter is the easiest to make. The principle of its operation is based on the energy of hitting the cleaver with a heavy object. The effect is almost the same as if you put an ax on a log and hit the ax head with a sledgehammer. But this crowbar is more convenient to use and the work speed is higher.
Wood splitter
Its advantage is that it is safe to use, easy to manufacture, and takes up little space. Does not require delivery of each log to him. It will be convenient to move from one log to another. While working with it, your back remains straight, which is important when chopping large volumes of firewood. You don't have to bend over each log to split it.
But it requires the use of human physical strength and makes a loud metallic sound during operation. To protect against sound, you will have to wear headphones.
The crowbar consists of only two parts. The first part is directly a splitter with a guide pipe, and the second part is a shock. The impact part can be external, that is, wrap around the guide pipe, or internal - go inside the guide pipe. For this cleaver to be effective, one rule must be followed when making it. The part of the cleaver with the guide and blade should be as light as possible, and the striking part as heavy as possible, but within reasonable limits, since the striking part will have to be lifted manually. The greater the difference in mass between these two parts, the higher the efficiency of the cleaver.
Drawing of a wood splitter
When making a crowbar cleaver, the main thing is to observe the rule of a large difference in the masses of the parts of the cleaver and maintain a sufficient stroke length of the striking part to create a strong blow. This length should be approximately 50-60cm.
To make the first part of the cleaver as light as possible, you need to use a thin-walled pipe as a guide and make the blade of the cleaver narrow.
If vibration is transmitted to the hands during an impact, it can be significantly reduced by making the handles wooden. If the handles are made of metal, then they need to be welded onto the heaviest and most massive impact part, this will also help reduce vibration.
To ensure smooth movement of the striking part and reduce the sound of metal parts rubbing against each other, a polypropylene pipe should be used between these parts.
To avoid rapid riveting of the metal at the point of impact of the two parts of the crowbar, the contact patch between them should not be too small.
For ease of working with a crowbar, logs should be placed inside an old car wheel. This will prevent chipped pieces from flying away from the logs, and they will always be in the same position.
DIY manual spring cleaver
Let's consider one of the most popular and least problematic models - a spring log splitter.
The diagram shows only part of the device, without the lever.
By placing a weight above the cleaver and attaching a handle to it, you can split massive logs with noticeably less effort than with manual chopping. In this case, the handle (lever) does not have to be located on the side of the cleaver - a more effective design is based on the principle of a well crane, and the longer the lever, the less force must be applied.
This is what the device might look like when assembled. This is a mobile model that can be transported by tilting it backwards - on wheels.
This is a stationary model, on A-shaped supports. The handle is in front, near the cleaver.
Such a wood splitter can be assembled from any sufficiently durable materials - for example, a profiled pipe - by welding. The main part of the design is a spring, for example, from a car suspension. The size of the load is selected experimentally, depending on the stiffness of the spring. This element must have such a mass that the spring absorbs the cleaver after the log collapses, and at the same time provide sufficient force on the tree.
Step-by-step instructions for creating a homemade mechanical wood splitter:
- determine the size of the device. The bed should be at such a height that you only have to bend over when placing a new log;
- we make the bed. In this embodiment, a profile pipe is used for the rack and horizontal supports, a channel for braces (spacers);
- we fix the platform for the spring, strengthening it with spacers - this part will be subject to significant mechanical stress, so the welds must be made continuous and as reliable as possible. The diameter of the pipe should be 3...5% less than the internal diameter of the spring;
- fix a beam above the spring platform on which the cleaver will rest. The distance between this beam and the spring platform is equal to the height of the spring itself. The beam is attached to the rack with a hinge;
- then the cleaver is attached to a long lever. We remind you that the larger the lever, the less force you will have to apply to split firewood;
- We weld the handle and weighting material. In this case, a piece of rail was used. After finishing the work, it is advisable to paint the structure so that it does not rust.
Please note that the “legs” of the device, that is, the horizontal supports, are located at an angle. This design provides increased stability. The length of these supports should be at least half the length of the beam with the cleaver.
Another fairly simple hand-held device is the so-called crowbar, sometimes called a Bailey wood splitter.
This is an inertial type model, that is, a cleaver raised up along a guide and released falls down under the influence of gravity. Both the stand and the guide cleaver are made of two pipes of such a diameter that the larger one slides freely over the smaller one. The device requires regular lubrication.
In a simplified form, this is an ordinary cleaver (axe), the metal part of which, removed from the handle, is attached to two guides. Raised by hand on a round stand, it is then released and goes down, splitting the log. This model does not provide any shock absorption, so it is not advisable to make a hard stand under the log, which could damage the blade.
Step-by-step instructions for making a mechanical wood splitter with your own hands
Let us analyze in detail the assembly of the spring mechanism with a description of each stage.
Materials, tools
To work you will need:
- tape measure, level, pencil;
- grinder with cutting discs;
- welding machine, electrodes, mask;
- rail (30-40 cm is enough);
- profile pipe measuring 3*6 cm or 4*6 cm;
- channels;
- metal corner;
- shock absorber from a passenger car;
- bushing from a car suspension (not necessarily new);
- steel pipes (diameter from 4 to 7 cm);
- I-beam (12‒16).
During cutting and welding, it is recommended to wear safety glasses or a mask and gloves.
Blueprints
Careful planning will help avoid manufacturing errors.
Therefore, it is worthwhile to sketch out the future design on paper first. To speed up the creation of a sketch, it is allowed to use computer engineering design programs or take a ready-made diagram of a wood splitter as a basis.
Connection of elements, assembly
The wood splitter is assembled like this:
- The support is made from a channel. The stand is made of an I-beam, since even under prolonged loads such metal is difficult to bend. To prevent the device from falling during operation, pipe supports are welded. The jibs are attached to the base.
- Supports for the spring are cut from the channel using a grinder. A square-shaped hole is made for secure attachment to the rack.
- The height of the structure depends not only on the length of the spring, but also on ease of use. It is better to lift the load when it is located at waist height.
- Jib bars are cut from metal corners. Increase the stability of the support. This way the product will not move during operation.
- A retainer is created from a small piece of pipe, which is selected taking into account the diameter of the spring.
- A hole is cut at the top of the rack, a sleeve is inserted and welded. The perpendicularity of the fasteners is checked. The axis of the bushing must be parallel to the ground.
- The shaft is inserted into the sleeve. A piece of channel in the form of a rocker arm is welded to the shaft, and a retainer (from a pipe) for the spring is attached to the bottom.
- A hole is made in the rocker arm in accordance with the dimensions of the rack. This is necessary for the free movement of the rocker arm.
- Now the profile pipe is welded to the rocker arm. A chisel is fixed to one of the ends. The raw material of the chisel is carbon steel grade U9 or U10. To sharpen a chisel, use a grinder with a special wheel.
- Above the chisel, a rail element is attached by welding, which will serve as a load.
- For ease of operation, the handle is welded. To avoid vibrations, it is better to put rubber pads on top.
- The product is ready. All that's left is to do a test run. The tree should split into several pieces.
It is better to place logs for splitting on top of a thick piece of log. When the spring cleaver splits the log, the blade will press into the wood, and therefore will become less dull.
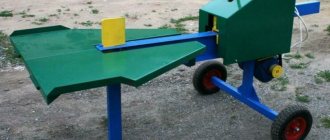
How to make a wood splitter with an electric motor
To make a wood splitter yourself, you need to prepare all the materials and find the drawings. After this, you can proceed to the manufacture of the main structural parts and assembly of the unit.
To make a functioning wood splitter, you need to prepare the following materials:
Elements that make up a wood splitter
- cone. If you have the appropriate skills, you can make it yourself or purchase a finished part;
- shaft;
- pulleys;
- stars;
- drive belt. You can use a chain from a car or motorcycle;
- bearings equipped with housings;
- metal corner or pipes;
- steel sheet 4 mm thick to form the working surface;
- metal scraps;
- Electrical engine;
- wiring;
- RCD;
- bolts and nuts;
- magnetic switch.
After preparing all the necessary materials and tools, you can proceed to assembling the wood splitter with your own hands:
- Using a grinder, angles and pipes are cut into pieces of the required length to make the frame.
- A table cover and a shelf are cut out of a metal sheet.
- Using a welding machine, the elements of the wood splitter frame are connected.
- To make the unit mobile, it is recommended to attach wheels to it.
- A tabletop and shelf are installed on the finished frame.
- Install the electric motor support frame and the power unit itself.
- The cone shaft is assembled: the bearings are mounted in housings, the shaft and pulleys are installed.
- After assembling the unit, it is secured to the frame using bolts and nuts. It should rotate freely.
- Install the belts. To make the equipment work efficiently, be sure to check the straightness of their movement.
- The screw cone is installed on the shaft using a key connection.
- Mount the divider.
- Install an RCD, a magnetic starter, and electrical wiring.
- If you managed to do everything correctly, the wood splitter will start working.
How to make a hydraulic wood splitter
If you need to make a hydraulic wood splitter with your own hands, you must, in addition to the main list of materials, prepare an oil tank and pump, metal beams, high-pressure hoses, and a hydraulic cylinder. The manufacturing technology of the unit is as follows:
Drawing for assembling a hydraulic wood splitter with your own hands
- A frame is formed from rolled materials.
- A hydraulic cylinder is installed above the beam at a height of 5 cm.
- A pusher made of sheet material is mounted at the end of the rod.
- It is necessary to make a housing for the knife to ensure its movement along the bed.
- Several holes are made in the body and the knife is secured using bolts and nuts.
- All elements of the hydraulic system are connected into one circuit - pump, tank, hydraulic cylinder, control unit.
Assembling a frame for a hydraulic machine
The motor for this design is most often taken to be a gasoline-type engine removed from a passenger car or motorcycle. It is worth adding that the assembly of such a model will cost much more than all previous options. In addition, the process itself is much more complicated. However, the result will be the most comfortable device for chopping wood.
The assembly of the frame takes place in several stages with a strict sequence of actions.
- At the first stage, you need to take a 50 mm pipe and weld a 30 x 30 mm corner to it - the hub. The end result should be two stable triangles.
- Angles 60 x 60 mm are used for the front axle. It is also necessary to weld another pair of corners to them, but with dimensions of 30 x 30 mm. They will act as spacers.
- Wheels are attached to the axles.
- A base is welded to the rear, on which the engine will be located in the future.
- The next stage is the manufacture of a durable frame from channels using welding.
- It is necessary to assemble a movable structure from an 80 mm channel.
- From the same material it is necessary to weld a structure that will push the wood blank onto the knife. Usually it is also made in the form of a triangle.
- To prevent wood from falling during operation, it is necessary to secure stops on the sides.
After this, you can proceed to the stage of making a knife.
It is important to understand here that a good cutting element is the basis of not only comfortable, but also safe work. As this element, you can use a piece from a Kamaz spring.
Here we can also add that making a cleaver is the simplest activity. All you need is equipment that will allow you to sharpen the workpiece at an angle of 60-70 degrees. After this, the knife is welded to the frame.
The work does not end there; you will also need to make an oil tank and a motor. An empty propane cylinder can be used as a tank. You need to do the following:
- The balloon is filled with water.
- Next, you need to cut off the valve of the cylinder without pouring water out of it.
- After this, you need to create a sump. To do this, a quarter of the volume of the cylinder is separated and a steel partition with a minimum height of 10 cm is installed.
- The next step is to install a filter mesh, which is also equipped with a magnet. It must be located at a distance of 5 cm from the bottom of the tank. This filter will retain chips, thereby extending the life of the engine.
- Next, you need to weld the pipe through which the oil will flow into the pump. The fence should not be at the very bottom, as in this case it will catch debris.
- Using a level, you need to install the tank just above the pump.
Development of a layout diagram for a wood splitter
A homemade hydraulic wood splitter is made according to a specific pattern. It necessarily contains the following basic elements: 1 – a knife with a sharp blade; 2 – pusher; 3 – hydraulic cylinder rod; 4 – tank; 5 – pump; 6 – distributor; 7 – hydraulic cylinder; 8 – bed.
From tank 4, working fluid (oil) comes from pump 5. Hydraulic distributor 6 directs flows to different cavities of hydraulic cylinder 7. When fluid is supplied from outside, cylinder rod 3 moves pusher 2 towards blade 1.
If at this time there is a fragment on the frame 8 that needs to be split, then it will move towards the blade of the knife 1 and split.
To independently start manufacturing an installation for mechanical splitting of firewood, you need to assemble the main elements on the frame.
The frame itself must be made from a rolled profile (I-beams or channels). Since the force will develop quite significant, profile elements of numbers from 14 to 20 are selected (the number is the height dimension, expressed in centimeters).
The bed is installed horizontally on the chassis. This decision is justified by the fact that in the future the wood splitter can be moved short distances in yards. During periods of precipitation, the installation can be rolled under the roof.
For convenient placement of logs, a bed is mounted on the frame. It is made from a sheet of metal. The profile is set so that the workpiece can be centered independently.
The chopped logs extend beyond the knife. Stands are installed at the exit. It is convenient to take firewood from them and transfer them to woodpiles.
An automated wood splitter is justified when organizing the removal of chopped firewood to a storage location.
It is much easier to assemble a structure in which every movement of the pusher is controlled by the operator.
The production cycle is carried out in the following order:
- A batch of blanks is delivered to the wood splitter.
- Each log of a certain size is placed on a bed.
- The distributor switches to supply oil to the external cavity of the hydraulic cylinder.
- The pusher moves under pressure to press on the workpiece. It splits when it hits the knife.
- The split logs are moved to racks outside the knife.
- The operator switches the hydraulic valve to move the pusher back.
- While the actuator returns to its original position, the operator carries the firewood outside the installation.
- Next, the log splitting cycle is repeated until the delivered batch of logs is completely processed
Types and principle of operation of a hydraulic wood splitter
It’s worth noting right away that the process of obtaining firewood can be mechanized in another way - for example, by using a screw cleaver with an electric or even manual drive. However, the hydraulic drive makes it possible to pre-press the log, which makes working with the wood splitter safer and guarantees better splitting. The pumping unit is usually powered from an electric motor with a power of 3...6 kW, or from a gasoline engine.
The drive of a hydraulic wood splitter can have two designs - horizontal and vertical. Both are applicable, everything is determined by the availability of free space on the site of utility rooms, and - in the case of making a hydraulic splitter with your own hands - by the availability of the existing pumping unit that is supposed to be used.
Note that the vertical unit is equipped with a frame with wheels, which allows it to be moved around the site. The presented design can be improved by using a tool with an X-like blade instead of a conventional flat knife, which would make it possible to divide the cormorant not into two, but into four fragments.
The vertical type hydraulic splitter can be easily controlled by one person, although the height of the initial log is limited by the dimensions of the frame. It is believed that the longitudinal stability of the drive with this arrangement is reduced, therefore, in terms of power, vertical-type hydraulic wood splitter models are inferior to their horizontal “colleagues”. To drive the device, you can use the hydraulic system of any wheeled tractor, and the circuit diagram will differ little from the one shown in the figure.
Subtleties of choice
The first step is to decide, of course, the type of device. But there are other important nuances that influence the choice:
- Knife material. The knife must be made of hardened steel to last a long time.
- Emphasis. The most convenient are splitting axes with a height-adjustable stop. With this setting, splitting is carried out with minimal stress, which means productivity increases.
- Safety. A quality cleaver should have a 2-lever locking system. The risk of injury to an employee during work is minimized. The woodcutter holds the levers with his hands. When one of them is released, the device stops working.
- Convenience. If equipment is purchased, you need to pay attention to its ease of use and ability to move.
The simplest cleaver that you can make with your own hands is a device made from a slightly sharpened steel wedge and a wooden handle. However, if you need to prepare a large amount of firewood, it is recommended to purchase a device with a drive.
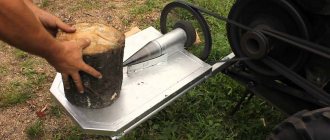
Cone screw splitter
The most common type of wood splitter. The basic principle is copied from the effect of deformation of wood obtained when screwing wood screws into it to fix another object. When hardware enters the wood and begins to split its fibers, a crack forms in the part, leading to splitting.
Basic design of a cone log splitter
The machine consists of two main parts:
- The base part is represented by a strong frame . It is made from a profile pipe and has the shape of a bedside table. Consists of four racks connected to each other by jumpers. The top is covered with a steel sheet to the size of the perimeter and a thickness of 10 mm. Two bearing mounts are installed on it. A similar plate is attached at the middle level. Holes are drilled in it to mount the electric motor. A table for feeding material is welded to the frame. It is made from two racks, using a profile pipe, connected by a jumper. The top is made of steel sheet. The dimensions correspond to the perimeter of the table. Metal thickness 10 mm. A knife is welded to the surface of the table to separate the log. It prevents a fragment from unexpectedly falling under the screw cone with its subsequent tightening and deformation of the shaft. It is welded strictly under the cone at a distance of 20 mm from the largest diameter of the cone included in the kit for this machine.
- The mechanical part is represented by a shaft , two bearings, a pulley that reduces the rotation speed, a cone with a screw thread, an electric motor, a small pulley for the engine and a rubberized belt.
How does it work?
The steel shaft is placed in bearings and installed in mounts on the frame. A pulley with a diameter of 400 mm is attached to its end. An electric motor with a small pulley with a diameter of 140 mm is installed on the middle platform. A belt drive is installed between them.
The difference in pulley diameters makes it possible to reduce the rotation speed from the engine to the shaft with a cone by three times, but allows you to increase the power of the machine by 3 times.
The screw cone is made of steel grade 45 or 42X. It is turned on a lathe. The tapered thread is angled to engage the material.
The length of the cone is 250 mm, the diameter of the base for the shaft ranges from 40 mm to 100 mm.
A hole for the shaft is drilled in the base. The cone is secured to the shaft using screws or internal threads.
Types of drives for cone splitter
The drive for producing the work of a mechanical cleaver can be:
- Electric motors powered from a mains voltage of 220 V and 380 V. The choice depends on the required power of the machine.
- Internal combustion engines running on gasoline or diesel fuel.
- From a special device on a mechanical lawn mower or mini tractor. This is a temporary drive.
Important! Particular attention must be paid to the safety of work on these machines. They have a large number of exposed rotating parts with high power. Electric current is used to operate. It is important to follow all safety regulations. Mandatory use of protective clothing and personal protective equipment, mittens, tarpaulin boots, glasses.
The main advantages of a screw log splitter:
- Ease of manufacture.
- High performance.
- Low price of components.
- Reliability of the design.
The main disadvantages of a screw log splitter:
- Not suitable for trees with matted fibers.
- It's difficult to make a cone yourself.
We will need the following materials and tools:
- Gearbox.
- Motor.
- Screw cone.
It is better to use a screw cone. It makes it easier to split wood. You can make a cone yourself, but you need to have professional lathe skills and a special machine. The carving varies. The best thread parameters have been determined: pitch 7 millimeters, depth 3 millimeters.
It is advisable to first draw up a drawing of the product. Indicate the location of parts and wiring. You also need to take the wedge making seriously. It can be made from steel. It is better if the screw is made by a professional. The quality of the device will depend on it. The frame size is selected for the specific person who will work with the wood splitter. Optimal dimensions: height 90 centimeters, width about 70 centimeters, length of the product is a meter.
The engine is installed at the bottom of the frame, this is necessary to protect the motor from sawdust. When making a cleaver, you need to decide on the method of tensioning the belt drive. We will need additional videos. The belt drive is covered with a special casing. It is made from a piece of metal plate.
If the screw cleaver is mounted directly on the motor axis, then the maximum permissible shaft rotation speed should not exceed 500 rpm. Power is desirable from 3 kW. Finding such an engine is not easy, so it is better to use transmission mechanisms. The simplest option is drive belts on pulleys. A gearbox, for example, from a motorcycle, will provide greater productivity.
Assembling a screw cleaver
You need to cut the pipe into several small pieces using a grinder. We cut out a table and a lower shelf from a metal sheet. We weld the frame units together. We attach the legs to the table. If you want to make the wood splitter mobile, you can attach wheels to it. We make a base for the engine and weld it to the frame. We install a pulley on the motor shaft. We assemble the cone shaft structure. We install belts on it. The rotation of the shaft must be uniform. We attach a screw cone to the motor shaft.
The product is ready. Checking the wood splitter in operation. We paint the device with anti-corrosion paint
Important: you can install splitting chocks ONLY VERTICALLY! Otherwise, wood may get caught under the cone and jam it or bend the shaft.
Electrical device
With an electric cleaver or a device equipped with an electric drive, things are even easier. The main working part rotates all the time after the electric motor starts, and the worker can only add logs. The working part in this case is a cone with a screw thread. When rotated, the spiral element freely enters the wood, and the fibers of the material are literally torn.
An electric cleaver also has a working shaft and a chopping tip. A belt drive pulley is installed in the grooves at the ends of the shaft. The shaft is attached to the frame using two fasteners with bearings, but there is also a scheme for direct mounting of the cone on the shaft.
If there is a high probability of voltage surges or interruptions in the supply of electricity, the splitter can be equipped with an internal combustion engine (ICE) with a chain drive. When working with such a device, logs are fed exclusively vertically onto the rotating cone.
Example of a foot splitter
Now let’s look at an example when you don’t want to pay for electricity and for gasoline or other fuel, but you want some simple hydraulic splitter. How to make everything work using human power? It's actually simple.
Materials and tools for assembly:
- hydraulic jack;
- profile pipe 40x50;
- corners;
- steel plates 6-8 mm thick;
- rubber band;
- a piece of metal at least 30 mm thick (to create a wedge that will split the wood);
- M12 bolts;
- welding, grinder, measuring tool, drill, etc.
Manufacturing process
Step 1. Making the frame.
The base is a profile pipe with a diameter of 40x50 mm. But she can’t cope alone and may bend. There is option 2. Either we take a thicker pipe, or we strengthen the existing one. Everything is clear with the first option, but how to do the second can be seen in the photo. A simple farm is being made.
To make a slider you need to use a corner. We cut into the required lengths and weld. The main task is to make it slide freely along the guide, but make sure that there are no strong backlashes. To strengthen the place where the hydraulic jack rod will subsequently rest, the bevel of the plate is welded.
Step 2. Making the base for the jack.
A hydraulic jack with a lifting power of 10 tons is required. But you can choose a lower power, for example, 6 tons also copes quite well. But it is necessary to prepare a good support. To do this, take strips of metal 6–8 mm thick and weld them under the heel of the jack.
Step 3. Handle.
As planned, the jack is powered by the foot, so the handle has to be modernized. To do this, we simply weld the parts to obtain the necessary bend that is comfortable for the leg. You can also weld a special pedal to prevent your foot from slipping. To return the handle to its original position, you can use a spring. But the author took a more complicated route and welded the roller and tied a tourniquet to the handle.
Step 4. Knife.
The cutting part is made of steel of at least 3 mm. We sharpen it in the form of a wedge. For fastening to the guide we use M12 screws. Screws require periodic inspection.
At this point, the foot press for chopping wood is ready. Its main advantage is that it does not require many resources; all suitable material can be found in the garage.
Types of splitting devices
There are mechanical cleavers, devices with electric drive and hydraulic drive, with a screw drive. The first type, with a manual drive, is not difficult to do yourself, since its operating diagram is simple. The components of a homemade cleaver are a metal wedge and a spring mechanism.
Adjustment of the device is ensured by adjusting the spring. By changing its position , that is, decreasing or increasing the distance to the working wedge, it becomes possible to process logs of different lengths. A manually driven cleaver is used with a solid base. A log is placed on the device, the worker lifts the tool up, and with a little effort lowers the wedge onto the log, splitting it. Due to the action of the spring, the mechanism returns to its original position.
The main auxiliary forces in the operation of a mechanical device:
- gravity;
- elasticity of the steel wedge.
The big advantage of the device compared to a conventional ax is that it reduces the load on the worker during work. So, in an equal period of time, a cleaver can split more firewood.
Chainsaw wood splitter
The easiest way to use a bladeless saw as a wood splitter is to install a special attachment. They are sold for certain models and pair with the device without problems.
To work with such an attachment, you do not need a table or any device for holding logs. You can simply hold them with your foot. The process of working with the nozzle is shown in the video.
If this option does not suit you, you can make a homemade machine.
To do this, a chainsaw in the usual configuration is installed on a prepared wooden frame.
Secure the entire device and canvas.
A rigid frame made of PVC pipes and metal allows you to hold the product in place, despite strong vibration during operation.
However, you should understand that this is more of a device for sawing timber, boards, logs to length than for splitting them into logs, which is clearly visible in the final part of the video.
How to make a hydrosplitting knife
As described above, to make a knife for a wood splitter with your own hands, you need to take at least 3 mm of metal. An I-beam would also work. Some craftsmen even make it from metal with a thickness of 12 to 20 mm. The main thing is to sharpen it well.
We cut the beam with a grinder to the required size.
Next, everything is welded. In order to maintain angles of 60 degrees, you can cut a guide from wood. You can see how it looks in the photo.
The central knife is sharpened on both sides. The remaining blades are only on one edge. But they can also be sharpened on both sides.
This is what a wood splitter knife looks like, cutting into 8 pieces at once:
Its advantage is that if you lower it as far as possible, the lower blades are hidden and it begins to chop into 6 parts.
How to dry firewood of different types of wood
Owners of wood-burning stoves and boilers know that the heat generator must be heated with dry, not freshly cut, wood. But wood comes in different species, I wonder if this somehow affects the characteristics of its drying and storage in firewood sheds?
152247
This season, it took only two weeks from the logs to being laid out to dry. I worked alone. Does anyone dry firewood for 2-3 years? How to dry oak, maple and hardwood?
alex 2FORUMHOUSE user
I do not recommend drying birch and aspen for 3 years. The quality of firewood is falling.
Palych1975FORUMHOUSE user
My observations: if you don’t immediately chop birch or alder firewood, but leave it in logs, then within a year they will rot and become rotten. And if you immediately chop it into logs, they dry perfectly, burn hot and are stored for a long time even in an open woodpile, provided that the woodpile is folded with the bark facing up.
OlegN
This is if you store firewood openly. If under the roof of the woodshed, the birch will only become stronger. And try not to chop the oak right away. In a year it will be much more difficult.
Polar0id
Birch will become stronger depending on when it was harvested. If a tree is cut down in the spring or summer during the period of sap flow, it will become moldy and rot. Moreover, if you immediately put the birch in the woodshed, even if it is chopped. So let it dry out in the pile first. There are no such problems with food harvested in the fall; everything freezes over the winter.
More tips and observations from 152247:
- Birch has a vapor-proof bark. If it is not immediately split to dry, then, in the open air, it will begin to rot from the inside. Such firewood has a reduced calorie content.
- The user has developed the following firewood procurement scheme: December-January - sawing logs, February-March - chopping firewood and storing it in the woodpile, July - transporting fuel to the woodshed.
The more pieces the log is cut into, the faster the firewood will dry.
ign73FORUMHOUSE Member
I heard that you can’t store firewood in logs for a long time. You have to split them, otherwise they will rot. This is true?
Tom_iuraFORUMHOUSE Member
Store the firewood in a dry place and everything will be fine. In Germany, chopped firewood is dried for two years indoors, where there is no difference in air humidity. I once conducted an experiment - I checked how long it would take for a solid fuel boiler to reach full power. I threw acacia wood after ten years of drying. The boiler quickly fired up, and when I took the wood after 6 months of drying, it took longer and more fuel was consumed.
alex967
I heated the stove with chopped birch, which had lain in the woodshed for 7 years. It burns well, the heat produces a lot.
And this is firewood box 152247.
The user checked the moisture content of the firewood with a moisture meter. Results:
- Birch firewood was sawed and split after the New Year and put in a separate woodpile under the open sky. The barn was removed in June. Humidity from 12 to 16%.
- Birch firewood dried outside for 1.5 years, covered from rain and snow on top. Humidity from 11 to 12.5%.
- Pine firewood from dead dead wood has a moisture content of 10% for two months in a woodpile.
- Oak firewood dried up to 16% in 2.
152247
Firewood with a moisture content of less than 20% is already fuel.
Security measures
If you plan to make a wood chopping machine yourself, you need to remember such a circumstance as the high rotation speed of the working element. A speed of 500 rpm or more greatly increases the risk of possible injuries during operation, since the log will be difficult to hold in your hands.
To reduce the risk of injury, a steel stationary part is sometimes installed under the splitting screw to prevent the log from bouncing. Also, some craftsmen, instead of an electric motor, install a unit removed from a walk-behind tractor and powered by gasoline with a capacity of 6 horsepower. But for such devices, it is preferable to use an electric motor with a rotation speed of 250 rpm.
When collecting elements to assemble them into a single device, the greatest difficulty can be the search for a cone screw. It is not so easy to purchase it if you are determined to assemble the device with your own hands from available materials.
Safety precautions when chopping wood
You should adhere to the following recommendations:
- You only need to work in closed shoes so that a bounced piece of log does not injure your foot.
- Logs must be fed vertically to the cone mechanism.
- Chopping firewood should be carried out away from houses, people, animals, and recreation areas, so as not to harm the estate or others.
- The ringer's position should be stable, with feet shoulder-width apart.
- Gloves are not used when working with a screw splitter. The rotating screw can catch the glove and pull the hand along with it. The same applies to hanging parts of clothing.
- In a homemade screw unit, it is important to provide an emergency stop. To do this, it is equipped with a pedal or emergency button. Moreover, simply disconnecting it from the network is not enough, because the shaft will continue to spin for some time. A special electromagnetic brake is required in the closed state.
When choosing a product for splitting firewood for the dacha, preference should be given to mechanical types or hydraulic ones that run on gasoline. They will be inexpensive, and the performance will be high. The alternative is to make one of these types yourself.