One of the advantages of pulse metal detectors is the ease of manufacturing search coils for them . At the same time, with a simple coil, pulse metal detectors have a good detection depth. This article will describe the simplest and most affordable ways to make search coils for pulse metal detectors with your own hands.
Coils made using the manufacturing methods described below are suitable for almost all popular pulse metal detector circuits (Koschei, Clone, Tracker, Pirate, etc.).
Coil for pulse metal detector made of twisted pair
From twisted pair wire, you can get an excellent sensor for pulse metal detectors. Such a coil will have a search depth of more than 1.5 meters and have good sensitivity to small objects (Coins, rings, etc.). To make it, you will need a twisted pair wire (this kind of wire is used for Internet connection and is available for sale in any market and computer store). The wire consists of 4 twisted pairs of wire without a screen!
The sequence of manufacturing a coil for a pulse metal detector, made from twisted pair wire:
- We cut off 2.7 meters of wire.
- We find the middle of our piece (135 cm) and mark it. Then we measure 41 cm from it and also put marks.
- We connect the wire along the marks into a ring, as shown in the figure below, and secure it with tape or tape.
- Now we begin to twist the ends around the ring. We do this on both sides at the same time, and make sure that the turns fit tightly, without gaps. As a result, you get a ring of 3 turns. This is what you should get:
- Secure the resulting ring with tape. And we bend the ends of our coil inward.
- Then we strip the insulation of the wires and solder our wires in the following sequence:
- We insulate the soldering points using thermal tubes or electrical tape.
- To output the coil, we take a 2*0.5 or 2*0.75 mm wire in rubber insulation, 1.2 meters long, and solder it to the remaining ends of the coil and also insulate it.
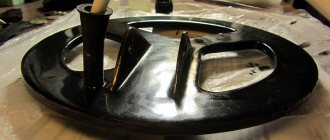
- Then you need to select a suitable housing for the reel, you can buy it ready-made, or select a plastic plate of a suitable diameter, etc.
- We put the coil into the housing and fix it there with hot glue, we also fix our solders and wires to the terminals. You should get something like this:
- Then the body is sealed, or if you used a plastic plate or tray, it is better to fill it with epoxy resin, this will give your structure additional rigidity. Before sealing the case or filling it with epoxy resin, it is better to conduct intermediate performance tests! Since after gluing, there is nothing to fix!
- To attach the coil to the metal detector rod, you can use this bracket (it’s very inexpensive), or make a similar one yourself.
- We solder the connector to the second end of the wire, and our coil is ready for use.
When testing such a coil from Koschey 5I metal detectors, the following data were obtained:
- Iron gates – 190 cm
- Helmet – 85 cm
- Coin 5 kos USSR – 30 cm.
Search programs
The Koschey X45 metal detector has two modes - static and dynamic. The depth specialists 5I and 5IM do not have any separate programs. Everything is regulated by the settings that we described above.
Koschey metal detectors are designed for the thinking archaeologist. By manipulating the fine settings, he will create the necessary programs for himself. By the way, Koschey digital metal detectors remember settings when turned off, unlike some famous ones.
Large coil for a DIY pulse metal detector.
Here we will describe a method for manufacturing a 50*70 cm depth coil for pulse metal detectors . This coil is good for searching for large metal targets at great depths, but it is not suitable for searching for small metal.
So, the process of making a coil for pulse metal detectors:
- We make a pattern. To do this, in any graphics program, draw our pattern and print it in 1:1 size.
- Using a pattern, we draw the outline of our coil on a sheet of plywood or chipboard.
- We drive nails around the perimeter, or screw in screws (the screws must be wrapped with electrical tape so that they do not scratch the wire), in increments of 5 - 10 cm.
- Then we wind a winding around them (for the Clone metal detector 18 -19 turns) of winding enamel wire 0.7-0.8mm, you can also use stranded insulated wire, but then the weight of the coil will be a little more.
- Between the studs, we tighten the winding with cable ties or tape. And coat the free areas with epoxy resin.
- After the epoxy resin has hardened, remove the nails and remove the coil. We remove our zip ties. We solder leads from a stranded wire 1.5 meters long to the ends of the coil. And we wrap the coil with fiberglass and epoxy resin.
- To make a cross, you can use a polypropylene pipe with a diameter of 20 mm. Such pipes are sold under the name “Heat-welded pipes”.
- You can work with polypropylene using an industrial hair dryer. It must be heated very carefully, because... at 280 degrees the material decomposes. So, we take two pieces of pipe, heat the middle of one of them, dig a hole through it, expand it so that the second pipe fits into it, heat the middle of this very second pipe (continuing to keep the middle of the first one hot) and insert one into the other. Despite the complex description, it doesn’t require any special dexterity—I did it the first time. Two heated pieces of polypropylene are glued together “to death”; you don’t have to worry about their strength.
- We heat the ends of the cross and cut them with scissors (heated polypropylene cuts well) in order to obtain “notches” for winding. Then we insert the crosspiece inside the winding and, alternately heating the ends of the crosspiece with the recesses, “seal” the winding in the latter. When putting the winding on the crosspiece, you can pass the cable through one of the crosspiece pipes.
- We make a plate from a section of the same pipe (by hot flattening), bend it into the letter “P” and weld it (again hot) to the middle of the cross. We drill holes for everyone’s favorite bolts from the toilet lid.
- In order to give additional strength and tightness, we seal the remaining cracks with all kinds of sealants, wrap doubtful places with fiberglass and epoxy, and finally, wrap everything with electrical tape.
Read also: Machine for sharpening drills
Owner reviews
The owners praise the device. Armchair expert snobs get burned by this. Therefore, in RuNet there are endless holivars around Koshchei. Only a very passionate person can understand these streams of mutual reproaches and insults: the search for truth will be like searching for a small gold earring in a trash can like a city park with a Garrett Ace 250.
You can listen to comrade Ivan Zhilyaev, who shares his opinion about homemade metal detectors Clone PI AVR W, Chance, Koschey PI.
The choice is yours, friends! And the editorial team, working remotely due to the coronavirus pandemic, wishes you good health and good luck in the field.
↓↓↓ Discuss this article in the comments. Scroll down ↓↓↓
Read also: Don’t know how to choose headphones for a metal detector? Are they even needed to be a cop? Go to the detailed article!
Making a coil for a pulse metal detector with your own hands:
Good night colleague. Please, give me a detailed photo of what wires to connect to…..otherwise I’m a little confused.
If you are talking about a twisted pair coil, then here is a photo:
In general, it’s more convenient to look at the table above in the article - where O (orange) is the orange wire, OB (white with an orange stripe), etc.
Hello. There is such a question. I want to make an outback for a pirate measuring 60 by 60, what kind of wire should I use and how many turns? Thank you.
Hello, please tell me! Is it possible to find gold, silver, copper using a twisted pair coil?
Hello. Yes you can. But keep in mind that all pulse metal detectors do not see chains very well. And with coins, rings and other solid products there are no problems!
Hello! I want to make a depth coil for the Astra-250 metal detector... So that the detection depth in the ground is at least 2.5 meters... Please tell me what the diameter of the coil itself should be? The diameter of the wire? And how many turns should I do? Thank you!
Hello! I need to make a depth coil for the Astra-250 metal detector... So that the depth of metal detection in the ground is at least 2.5 meters... Please tell me... What should the diameter of the coil be? What is the wire diameter? And what is the number of turns? Thank you!
Good afternoon. Tell me, can this huge coil be used on a Garett Ace, will the number of turns remain the same?
Good afternoon. No, such coils can work with pulse metal detectors (Clone, Tracker, Koschei, Pulsstar, etc.) and with Koschei 25k it has a separate pulse mode. ICQ 250 can't do this. So she won’t go to Garrett ACE!
Good morning. Can you tell me if these coils are suitable for TERMINATOR metal detectors? Thank you.
No, such a coil will not work for the Terminator!
Hello. Can I connect this large coil Garrett ACE 250. Thank you
Hello. If I'm not mistaken, then Terminator is a Fragma company. they are impulsive. I myself am the owner of a Fragma Ram 5 metal detector, so despite the fact that they say that their metal detectors only work with their coils, I think that it should work with this coil too.
You are mistaken, Terminator is not their project, they can either simply repeat this metal detector or release something of their own under its name!
But let’s say a sensor for small objects. Let’s convert the Koschey 5i into a submariner. Like a sniper gun. Diameter 10-12 cm. What parameters are there to find the chain, even at the expense of depth, and adjust it in the device? Thanks in advance for your efforts.
Everyone has problems with the chains of impulse generators, regardless of the coil size. I haven’t tried coils as small as 10-12 cm. And the best result for searching for small targets was shown by the Printed Sensor coil. It is most sensitive to small coins and jewelry, maybe if you make a small basket of 10-15 cm, the result will be even better, but I have not seen winding data for such a coil.
Thank you for the winding diagram, only I have one question left, please tell me Koshchei has four wires on the connector, 2 for input, 2 for output, but what about your circuit, do you have two wires? how to connect?
Read also: Weight of 1m2 aluminum sheet
Koshchei has 5i, 2 wires per coil and two for determining the type of sensor. This basket can be connected either without connecting the contacts at all to determine the type of sensor (Contacts 2-3 in a standard 5-pin connector) or by soldering a 30 kOhm resistor there and it will work fine anyway!
Hello. Tell me, is it possible to make or order a coil (frame 1mx1m) for the Tesoro Tejon (17.3 kHz pulse generator) for depth, otherwise you need to find copper washers at a depth of over 3 meters, there are a lot of them there. And the declared depth of Tejon is up to 2 meters. Or you will have to buy a depth probe or a magnetometer. THX
The frame for your metal detector will not work. And the magnetometer will not help you, it sees ferromagnetic metals (i.e. ferrous) but it will not see copper. You need a depth detector, for example Koschey 5I, with a frame like this https://detectori.com.ua/shop/127/desc/metalloiskatel-glubinnyj-koshhej-5ig-s-glubinnoj-ramkoj-1-2-1-2- metra
Good day iskatel! Can you reset your mailbox address? I became interested in Kshchei-5IM, but it turns out that it was discontinued. Can a basket for Koshchei be made not from enamel wire, but from stranded copper of the same cross-section in PVC insulation? Thank you in advance. Petrovich
I wrote to you by email!
You can make a coil for MD Senator.
I have a circuit based on 3k561le5, very simple, 3 kanders, 3 resistances, one variable and 1 trans.kt315b.coil with a diameter of 30cm. I got it by chance (one person threw it away after “repair”), I picked it up and gave it food - a corpse. I soldered everything, the installation was on a piece of non-foil. After thinking a little, I solved the problem using this material. I drew it, soldered it, gave it 9V. - it works. Very stable. But the sensitivity is rather weak, a piece of iron with 1 kg can see 30 cm, a bucket - 60 cm, and for small things like a bolt with a finger, a washer Dia. 2-3 cm does not make a sound, aluminum, copper - it howls until it whistles. Need forces me to dig the ground, my only income in our wilderness. In my youth I did a little design, but in sound engineering, but I haven’t come across anything. I am grateful to those who found the time and paid attention to my “novel”, but the point is different... There is a lot of iron, but my mi can’t see deeper than 30cm, help me increase my senses. Low bow in advance! Ivan, 54 years old.
That is, the wire itself should NOT be shielded? And how does this reel perform on the Traker PI 2?
He behaves normally! Have you seen pulse metal detectors with shielded wires?
I don't understand. Why is my notification not being sent?
The first message from the user must be moderated... Then all messages will be added normally..
I appeal to everyone who understands design, in particular MDs and coils for them. I especially want to communicate with the SEEKER. There are many questions and some considerations. Maybe I’ll take something from you, and maybe you’ll find something useful too. If YES, then please PM me the coordinates: soap, or even better Skype.
Good day, what kind of coil would you recommend for MD? fortune?
Good day, please tell me what kind of wire, how many turns and what should be the diameter and depth of the coil for a phantom metal detector, to search for large objects, so that it does not trigger nails, bolts, and so on. Thanks in advance for your answer.
What can you say about these characteristics of the Pirate coil?
Diameter - 30 cm... 3 turns of twisted pair with serial wiring.. Resistance - 5.5 Ohm
Perhaps someone had experience with a twisted pair coil?
Guys, I wound a coil for koschey5 and according to the instructions 1.2 * 1.2 meters, there are no indicators who can please tell me how to fix it
Did your metal detector see it as deep? did you install a jumper or switch to determine the sensor type?
Is the first reel suitable for a pirate?
I would like to ask if it is possible to make a metal detector for coins or something more out of a 3-in-1 fit detector? Thanks in advance!
I have a military IMP device from 1971, the coil is faulty, does anyone know how to make a homemade coil for this device?
Good day, please tell me how many turns of wire and what should be the diameter and depth of the coil for a pirate metal detector to search for large objects at great depths? Thanks in advance for your answer.
Good day, please tell me what wire, how many turns and what should be the diameter of the depth coil for the Geoscanner M45 metal detector to detect an object at a depth of up to 8 meters. Thanks in advance for your answer.
When making a metal detector, you can make sure that the main element of this design is the coil. Typically, this part consists of copper wire. With the help of special pulses emanating from the coil, metal objects can be identified in soil of varying densities.
The metal detector coil is a fairly simple element, so winding it yourself will not be difficult. As a basis for work, you can take the “Malysh FM2” metal detector. The coil of this device must be wound quite accurately. Experienced people will be able to do this kind of work themselves. For a beginner, it is better to use specialized software. To do this, you need to download the Coil32 program file located at the end of the article.
Read also: Classification of tungsten electrodes by color
The inductance of a metal detector coil is measured in microhenry units. According to the detector circuit, this value should be 2290 mkH. There are also instructions for selecting the thickness of the wire depending on the diameter of the element.
If only a wire with a certain cross-section is available, but a larger (or smaller) coil size is needed, then a special program comes to the rescue. When you launch Coil32, a window should appear as shown in the following figure:
In the window of the running program, you need to press the “PLUGINS” button, in the menu that opens, select the “Multi loop” option. This subsection should display the coils required for operation. If everything is done sequentially, a window should appear on the computer screen:
This window details what wire diameter is suitable for a particular frame. Here you can also find the values of the Inductance parameter.
Before starting work, you need to set the necessary parameters in the cells:
- inductance – 2290 mkH;
- wire thickness – 0.4 mm;
- reel frame – 111 mm.
After entering these parameters in the program window, you will need to click the corresponding button for calculations. The necessary information will appear on the right and will look like the following figure:
Independently calculating the parameters for winding a metal detector coil using the appropriate software will seem quite easy. The program itself will determine the optimal wire cross-section for each diameter and inductance values. The Coil32 program is available for download in an archive file.
The turn has come to the most painstaking part of the “Chance” metal detector – the search coil. Although, according to numerous reviews on the Internet, “Chance” can work with the coils of any pulse metal detectors, but for proper processing of discrimination and selection, you need to make the coil as close as possible to the parameters of the author’s coil. The result should be a coil with a low parasitic capacitance, with the following parameters: L = 400 uH, R = 1.7 Ohm.
In the author’s version, the coil frame was made of plexiglass, 4 mm thick; I will use 5 mm getinax.
This is what the finished search coil looks like. It consists of 2 parts, 24 and 18 turns each.
To wind the coil, you need to outline the frame and make cuts in it. The easiest way would be to print and cut out this template, attach it to the future frame and make notes for the cuts. I marked the sizes of the parts of the coil in blue and red, and the cuts in green.
The end result should be a frame like this.
Here is my frame (I was a little overzealous with the cuts, I had to fix it with matches).
To wind the coil I used enameled wire with a diameter of 0.8 mm.
First, we begin to wind part of the coil with 24 turns.
To understand the principle of winding, look at the picture, this is what one turn looks like. Brown with red arrows indicates the part of the coil that is visible to us, the dotted line indicates the part of the coil that is on the back side of the frame.
This is how the coil will wind if you look at the coil from the end of the frame. Here the frame with cuts is indicated in brown, and the turn of wire in black. The coils are wound like a snake.
This is what the first turn on my frame looks like.
Next, we continue to wind the 2nd turn in the same way.
And this is from the end of the frame, the first turn is indicated in black, the second in red.
And so on until 24 turns are wound.
In the end it should look like this. Since the coils are wound like a “snake”, on one side of the frame we can only see half of the coils (12 pcs.), the second half will be on the reverse side. Having wound the first part of the coil, we move on to the second, containing 18 turns. We continue to wind according to the same principle, only on other cuts (I put matches on it, because I overdid it with the cuts). As a result, there should be 9 turns on each side of the frame.
This is how I brought out the 2nd end of the coil.
This is what the search coil will ultimately look like.
I don’t yet have the opportunity to measure the inductance, but the resistance is the same as that of the author’s coil - 1.7 Ohms.
That's all, the next part is about making a rod for a metal detector.
Comparison with other models
If it were not for the unusual, slightly confusing menu, the Koschey X45 could well compete with devices at a higher price. In general, for the money, it seems to be a quite worthy alternative to the more expensive Rutus - Alter 71 and Argo. In terms of price, Koschey is much cheaper, but in terms of settings it is very similar to these two devices. Differences: Koshchei does not have a Dual combined mode, everything is very unclear with the frequency. But he earns 120% of his money.
Read also: Minelab CTX 3030, nicknamed “Zozo”, did Minelab manage to create the perfect metal detector?
Simple metal detector Malysh FM at home - diagram, installation
Malysh FM is one of the simplest metal detectors available today. The circuit is perfect for creating a pinpointer.
Malysh FM works on the principle of a frequency meter (previously it was used in the Koschei FM MI). The circuit of the metal detector is simple; the search coil is also easy to make with your own hands at home. It is for this reason that Malysh FM has found popularity among radio amateurs, despite minor shortcomings, which we will discuss below.
The new idea that arose among the creators of Koshchei FM also had its pitfalls. The operation of the metal detector was unstable due to constant drift, and the search depth was relatively small. However, in Malysh FM they tried to eliminate these problems programmatically and something came of it.
Diagram of the Malysh FM metal detector
All details are simple and accessible. The main thing is to use thermostable capacitors, they can be taken from a burnt multimeter or Soviet K71. But ceramic capacitors are not suitable.
The Malysh FM metal detector board is very simple and looks like this:
To power the metal detector, Krona batteries or another power source from 9 to 12 V are suitable. The metal detector board itself consumes only 10 mA, and only a powerful speaker can cause an increase in power consumption. For this reason, it is better to use piezo speakers or headphones.
The board and firmware for the Malysh FM metal detector can be downloaded below.
Making a coil for the MALYSH FM metal detector
The coil for the Malysh FM metal detector is as important as high-quality capacitors. Together with capacitors, it forms an oscillatory circuit with a frequency of 19 kHz.
The Malysh FM metal detector circuit can be used as a pinpointer or a beach metal detector.
Data for winding the coil: a wire with a cross section of 0.1–0.18 mm (95 turns) is used on a rim with a diameter of 70 mm.
The photo below is an example of commercially produced Malysh FM pinpointers:
For beachgoers: PET 155 0.1–0.18 (55 turns) wire is used for a rim with a diameter of 180 mm.
Next, the turns are removed from the rim and tightly wound together with thread, then aluminum foil is wound onto the coil to shield the coil, and a screen break is made at the point where the ends of the coil come out (Gap without foil). Then tinned copper wire is wound into a spiral onto the foil, and we connect it with a cable to the minus on the metal detector board. To connect the coil to the metal detector board, a microphone wire (2 wires in a common screen) is well suited; we solder the wires to the ends of the coil, and “screen to screen”.
Video of how the Malysh FM metal detector works:
Strange modifications
Finds made by a metal detector sometimes turn out to be so valuable that many owners of the devices begin to feel dizzy - they have a desire to buy a more powerful and expensive device for finding treasures. There is no need to rush to change the manufacturer; the developers have something to surprise the buyer. Based on the Koschey-20M device, there is an improved “Professional” version with a Goliath coil.
By maintaining the appearance of the metal detector, including the control panel and ease of use, the manufacturer managed to create a more powerful and sensitive device. Firstly, the device is capable of separating precious metals from ferrous ones at great depths, even if they are in close proximity to each other. The second advantage is the ability to operate the coil in the air, being above the surface of the earth at a distance of 5-10 centimeters.
Decent service
The domestic product is also interesting because in specialized markets of the Russian Federation the owner will always be able to purchase the accessories and spare parts he needs for his existing device. And you don’t need to think that the choice is limited to microcircuits and coils. On the counters you can see: housings for electronic units, brackets, handles, sensors and even modified circuits of all devices.
As practice shows, the electronic circuit of a metal detector and the search coil are the most popular elements of the device. After all, they are the ones who determine the effectiveness of the device. However, before purchasing spare parts, many experts recommend that the user first try changing the firmware of the metal detector, since often this is the action that allows you to configure the detector more effectively.
All inclusive
Naturally, a Russian manufacturer must have at least one modification that can satisfy the wishes of even the most demanding customers.
The Koschey-25K metal detector is a kind of leader among all the manufacturer’s detectors. It’s better to start with technical characteristics that can really surprise future owners:
- The maximum object detection depth is 3 meters. Apparently, it is unlikely that a coin will be found under such a layer of earth, but the device will detect a tank from the Second World War or other large metal structure.
- Adjustable operating frequency ranges are 4-12 kHz and 400 Hz.
- Support for popular sensors: single-frequency, multi-frequency, pulse.
- Several search modes (selective, pulse, non-selective).
Convenience and simplicity
Cheap metal detectors have one unpleasant feature - the absence of a liquid crystal display. Naturally, the owner may have many questions regarding the setup of the device; the software part is especially interesting, which, according to the manufacturer, can be easily changed.
As practice shows, the problem can be solved in two ways: using a programmer and connecting the unit to a personal computer. If everything is simple and clear with programming the microcircuit, then there are clearly questions about the second method. In the operating instructions, the manufacturer not only described in detail the method of connecting the metal detector to the X4 port, but also indicated the model of the adapter that the user will need to solve the task. In fact, you can connect to a computer not only a pulse metal detector, but also any other device that has the appropriate X4 interface.
Assembly into one piece
Ear mounting
I cut the grooves using a jigsaw. Naturally, I overdid it a little in one place:
To make the ears fit well, I made a small bevel on the edges of the cuts:
Now we had to decide which option is better? Ears can be placed in different ways.
Industrially produced reels are often made according to the right-hand version, but I prefer the left-handed one. In general, I often make leftist decisions.
In theory, the right method is better balanced, because The rod mount is closer to the center of gravity. But it is far from a fact that after lightening the coil, its center of gravity will not shift in one direction or another.
The left mounting method looks more visually pleasing (IMHO), and in this case the total length of the metal detector when folded will be a couple of centimeters shorter. For someone who plans to carry the device in a backpack, this may be important.
In general, I made my choice and started gluing. He generously smeared it with bauxite, securely fixed it in the desired position and left it to harden:
After hardening, I sanded off everything sticking out from the back side with sandpaper:
Cable entry
Then, using a round file, I prepared grooves for the conductors, inserted the connecting cable through the hole and glued it tightly:
To prevent strong kinks, the cable at the entry point needed to be somehow reinforced. For these purposes, I used this little rubber thing that I got from God knows where:
Of course, if I had a normal sealed lead-in, it would be much better, but. and that will do.
All that remained was to glue the third pancake (the bottom).
Finishing the frame
To glue the third pancake it took several milliliters of bauxite and a couple of hours for everything to set. Here's the result:
Thus, I received a rigid and durable frame, fully prepared for winding the wire.
Winding sealing
An enameled copper wire with a diameter of 0.71 mm was used as a winding wire. After winding 27 turns, the sensor became heavier by another 65 grams:
Now the winding had to be caulked somehow. As putty I used a mixture of epoxy resin and finely chopped fiberglass (I learned about this super recipe from this article).
In short, I cut some fiberglass:
and mixed it thoroughly with bauxite with the addition of ballpoint pen paste. The result was a viscous substance similar to wet hair. With this composition you can cover any cracks without problems:
Pieces of fiberglass give the putty the necessary viscosity, and after hardening, provide increased strength to the adhesive joint.
So that the mixture is properly compacted, and the resin saturates the turns of the wire, I wrap it all with electrical tape tightly:
The electrical tape must be green or, at worst, blue.
After everything froze thoroughly, I wondered how strong the structure turned out to be. It turned out that the reel could easily support my weight (about 80 kg).