It’s easy to make a durable and reliable rack from pipes for a garage or other household purposes.
You can make a garage rack from various available materials; pipes are especially suitable for this. To assemble a storage system from them, it is not necessary to have a welding machine.
Next, we want to share with you several technologies that will allow even a beginner to make a rack from pipes with their own hands.
Advantages and disadvantages of shelving made from corrugated pipe
The advantage of a wooden shelving is the relative speed of its construction. But fragility and lack of reliability are significant disadvantages, especially if the rack is located in a room with high humidity. This applies to unheated or irregularly heated premises. There, metal, for example a profile pipe, is more suitable as a base.
The metal profile is quite durable, and there are many different options on sale. The rack based on it is also easy and quick to assemble. But tin is susceptible to corrosion in damp rooms; its strength is comparable to wood.
A frame welded from metal corners has good performance. But the cost of the material and the complexity of the work are almost no different from a rack made of profile pipe. But the latter is much better in appearance.
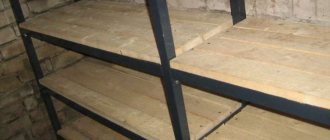
Racks made of metal profiles have incomparably better characteristics. Even the appearance shows that this material is best suited for this type of structure.
Advantages of a rack made of profile pipes:
- High structural strength, ability to store heavy parts.
- Durability in poorly heated or damp areas.
- The design looks more attractive, the racks are thinner, and almost do not interfere with the view and rearrangement of objects.
- Frame mobility. The rack is easy to rearrange and is less bulky.
The profile pipe design also has disadvantages:
- Relatively difficult to manufacture: you must be able to use a welding machine or learn how to fasten parts with bolts.
- The cost of profile material is much higher.
Descriptions of racks made from various materials show that preference should be given to those made from profile pipes. The design is reliable and durable, and building it according to the given drawings and diagrams is not so difficult. I wish everyone to demonstrate their abilities in technical creativity.
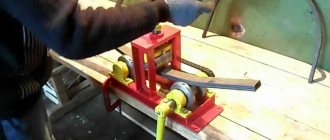
Simple and universal equipment of the Joker system
Hello dear friends!
Today we will look at the very convenient Joker fittings.
This is a system of pipes from which you can make almost “anything”!
It includes special couplings, thanks to which pipes can be connected at any angle and in any quantity.
In addition, it also includes a simply huge number of connecting connections that make this system universal.
This also includes elements such as special holders into which glass, chipboard, and, in general, all kinds of plates can be fixed.
Therefore, even completely independent structures can be made from it, for example: shop windows, stalls, all kinds of structures, etc.
In the production of cabinet furniture, this equipment is widely used in the manufacture of sliding wardrobes.
With its help, inside the wardrobe you can install all kinds of pipes for storing clothes (the so-called hangers).
What is the value of this fittings, and what is the secret of its popularity?
And its value lies in reliability, simplicity and versatility.
The main thing that needs to be taken into account when calculating structures is the size of the pipe spans and the load that they must withstand. As for the rest, even a schoolchild can assemble any structure from this system.
All elements of this fittings are adjusted with hexagons (only pipe flanges are attached to chipboard parts, to the floor, etc. - with self-tapping screws).
It includes pipes (with a diameter of 25 and 50 millimeters), the thickness of which can be 1.0-1.1-1.2 millimeters.
These pipes are quite light, but at the same time quite durable (a meter pipe can withstand a (distributed) load of up to 60 kilograms). All elements are made of steel and aluminum, and covered with a layer of chrome.
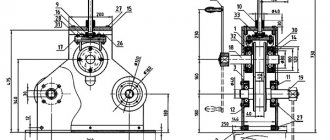
The pictures show some elements (for clarity). In fact, it contains about a hundred similar elements.
There are specialists who specialize in the manufacture of commercial equipment.
For them, the main tool is this particular fitting.
Their labor costs are an order of magnitude less than those of similar specialists in the production of cabinet furniture, and their income is an order of magnitude greater.
And all these “benefits” are provided by the simple, reliable, stylish, and popular Joker system.
That's all. See you.
Which profile pipes are suitable and how many of them will be needed
It all depends on the size and shape of the rack. It is better to use rectangular profile pipes. First, I choose a diagram and drawing of the future shelving so that it fits the room in height and size. Next, you need to decide whether all structural elements will be the same or not. It is better to weld the racks and crossbars from pipes of the same section, but the longitudinal strips are thinner.
Having chosen the desired scheme, I write down all the dimensions of the planks and height posts, their number. Then I calculate the total length of all pipes of each standard size. This will help you buy profile rolled products so that as little scraps as possible remain.
When making the first rack, you will need 21.6 m of 20x40 mm profile pipe. When using rolled products 1.8 m long, 12 pipes will be needed. With a pipe length of 2.7 m, 8 pipes will be needed.
For the second option, depending on the size of the walls, you will need to measure and calculate all pipe lengths. For racks you can use larger profile pipes. Knowing the dimensions of the wall and choosing the distance between the shelves, these dimensions are entered into the template, and then the number of pipes used is calculated depending on the options available for sale.
If the store has pipes of 6, 8, 12 m, then for ease of transportation they can be cut to the required length, so make calculations in advance using the proposed template.
Office desk with plastic frame
Buying even the cheapest office desk can be a big hassle for some people, so we'll show you how to make a desk out of plastic pipes. This project differs from the previous one in its complexity, so you will have to think through some parts yourself, but we will try to explain everything to you as clearly as possible.
First of all, you need to decide on the size of the table. In our case, we take a ready-made tabletop (915×2030 mm), under which we will assemble the frame. When choosing a tabletop for your own table, pay attention to its weight and follow the rule: the lower the weight, the better for your table. The best solution for a countertop would be a hollow door leaf. You can also assemble the tabletop yourself using flat boards, fasteners, a saw and a drill.
First of all, prepare 12 meters of plastic pipe and cut it into the following parts:
- 5 parts of 7.5 cm;
- 10 pieces of 30 cm;
- 4 parts of 50 cm;
- And 4 pieces of 75 cm.
Among the other parts for the frame you will need the following:
- 4 T-fittings;
- 4 four-way fittings;
- 2 cross fittings;
- 10 plugs for pipes and fittings.
Having prepared all the necessary parts, you can begin to assemble a table from polypropylene pipes. It is better to perform the first assembly without using glue, and after assembly, glue all the connections one by one. Begin assembly by constructing the sides of the frame on which the tabletop will rest.
Next, assemble the back part, which will connect the two already assembled. To give the table additional stability, we recommend adding a third leg to the back wall. When assembling the table, carefully monitor the parallelism of all elements in order to ultimately obtain an even structure.
At the final stage, it is necessary to connect all the parts into a single structure, obtaining a table frame. Check it for strength, correct any unevenness, and then glue all connections.
Having made the frame, you can begin installing the tabletop. This can be done in many different ways, but we will consider the most reliable and aesthetically correct of them.
How to make a rack from corrugated pipe with your own hands
I use 2 types of fastening when creating such structures. The pipes can be welded together or secured with corners.
Required tools and materials
Depending on the type of fastening, I will describe 2 types of assembly: welding and corner mounting.
- For assembly by welding
The tools you need are a welding machine, a hammer, an angle grinder, a tape measure, a 0.8–2 m ruler (with a level possible), an iron marker or chalk. Consumables include electrodes and metal cutting discs. You can use tin, plywood or other sheet material as flooring.
If the flooring is metal, I “grab” it by welding to the crossbars and racks. If it is made of a different material, then bolts are needed to secure it. In this case, you will need a drill.
IMPORTANT: When working with welding and other electrical equipment, especially in damp areas, you must use a tool that is known to be in good working order. Any damage leading to disruption of the insulation of live parts of the tool requires mandatory and immediate repair. Homemade extension cords and plugs without proper insulation are strictly prohibited.
I would like to pay special attention to the illumination of the object. During welding work, it is better to purchase or borrow several portable lamps from friends. It is advisable to position them so that the light from them falls on the object being processed from both sides. The absence of shadows will ensure vision safety.
Work with a chameleon-type welding helmet must be carried out according to the instructions. I recommend using only a shield with a light filter only for professional welders or those who have experience working with such a tool.
- For assembly on corners
You can do without a welding machine. You will need a grinder, a drill-driver, mounting angles and plates, bolts and nuts, keys, screwdrivers and pliers.
You can make the corners yourself or purchase ready-made ones. When making corners myself, I use sheet metal of the same thickness or maximum 2 times thicker than the walls of the profile pipe.
I use bolts for nuts with a size of 10 mm; for more critical connections I use stronger fasteners. They proceed from expediency: thin ones may not be strong enough, and for thick bolts you will have to drill large holes.
Using a rivet gun is easier and easier to attach tin or plywood to the crossbars. If it is not there, I secure the flooring with bolts.
Drawings and diagrams
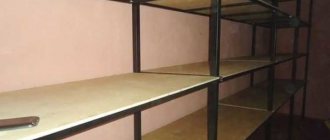
In this article I will talk about two types of shelving. One with specific distances, at a height of 1.8 m. The second as a template for use according to the existing wall dimensions. Here it is angular, so it can be used to make 2 walls or parts of them.
- First option
His drawing is in the photo.
Distance between shelves 410 mm. This is enough for the most used items. The height of the rack is 1.8 m, with a height to the ceiling of about 2.2 m, there is approximately the same amount of space between the shelves. If the room is larger or slightly smaller, this is not significant.
- Second option
There are many varieties of such a rack; its template is shown in the photo.
To assemble, you need to measure the dimensions of the wall and transfer them to the template. It can be printed in several copies and the required dimensions can be specified.
This corner rack can have 3-4 rows of shelves; the latter are not necessary if the ceiling is low. But if the room is large and you need to store a lot, then the top row of flooring is installed. It is better to choose the distances between the posts as multiples of the size of the available rental.
When planning, I make sure to take into account the width of the different sides of the profile pipe: the front one will be narrow, and the crossbars themselves will lie on the wide one.
Build process
You can watch the video on how to assemble the profile structure.
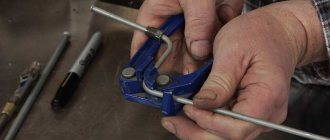
First, I cut the profile pipes of the required sizes for the side structures of the rack and weld them or fasten them with corners.
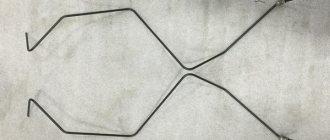
I start the installation with the side “ladders”. I lay two pipes 1.8 m long in parallel at a distance of 400 mm from each other. On both, I mark the middle with a tape measure. I cut a 400 mm long strip cut with a grinder or taken from already cut ones by welding, like a crossbar of the letter “H”. The top edge of the plank should be below the middle mark by the thickness of the flooring, i.e. the surface of the shelves will be flush with the middle mark. In the diagram this distance is 900 mm.
I assemble it with bolts using the same principle. Correctly calculated dimensions will allow you to avoid mistakes during assembly. When manufacturing identical parts, it is necessary to compare them with each other for safety reasons.
Next, I secure the remaining crossbars; everywhere the distances between the extreme lines of the planks will be 410 mm. When fastening with corners, they are placed below and above, in the inner corners, so that the emphasis and support are on them. The plank will have one bolt in the crossbars - 2. The connection is shown in the figure.
After both side walls are assembled, I place them at a distance of 1400 mm and secure the top bar. If the structure is unstable, then I temporarily fasten the “ladders” with longitudinal strips of greater length, maintaining the distance between the structures as in the diagram. The further sequence is not particularly important.
I accurately set the distances and fasten the remaining parts of the structure. After assembling the frame, I strengthen and fix the shelves.
A few words about design options
Before making the furniture in question, you should decide on its tasks and design.
Most often, shelving from the following types of pipes is installed in the garage:
- Wall-mounted - are a stand-alone structure that is not attached to the wall. Thanks to this, the product can be transported. Another advantage is that the structure does not put a load on the walls, which is important when they are not very strong, for example, framed or covered with plasterboard;
Wall-mounted furniture can be moved from place to place
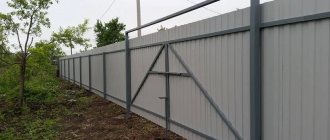
- Stationary - unlike wall-mounted ones, they have racks only on the front side, so the load-bearing function of the rear racks is performed by the wall to which the shelves are attached. That is why such models are called stationary;
Stationary rack attached to the wall
- Cantilever - unlike stationary ones, these products have rear supporting posts, as a result of which the shelves are attached in a cantilever manner, i.e. only from the back side, while the front side simply hangs in the air. The frame of such a product can be attached to the wall or be portable.
Note! Console models take up a little space, but have a small load capacity, so they are not suitable for storing heavy items.
The photo shows a diagram of a cantilever structure made of profiled pipes
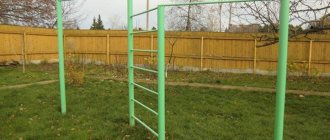
- Hanging - unlike all the products described above, they are hung on the wall, so the entire load falls on the walls, not the floor. In essence, these are ordinary shelves, but larger in size and connected to each other by construction sites. They can be either console or regular, i.e. with front pillars.
Hanging rack does not rest on the floor
The most versatile are wall-mounted and stationary structures, as they allow you to store everything from tools and all kinds of small items to wheels and various heavy objects. If the garage is small, it makes sense to use suspended structures installed under the ceiling, as a result of which the lower part of the garage will be unloaded.
Where to put?
In the loft style, the shelving unit is actually the fundamental element of all furniture - it’s simply difficult to imagine an apartment without it. The owners of the living space supposedly do not have the money for all these types of cabinets and bedside tables, so they replace everything they can with simple and inexpensive shelving, many of which look like homemade ones.
The living room is a place where shelving in an apartment a la loft simply cannot but exist. In apartment design, there are still practically no styles that would challenge the fact that the living room is an exhibition room, where guests are not just invited to relax, but also where various family heirlooms are shown off to them.
Considering that the classic loft shelving unit is universal, you can place souvenirs, decorations, flowers, and books on its shelves. The TV can also be placed on one of the shelves of the rack, because allegedly there was not enough money for a full-fledged bedside table. The same photographs in frames can complement the picture.
Another place where you can’t do without a shelving unit is, of course, the kitchen. In any apartment, this room is intended not only for cooking, but also for storing various kitchen utensils - primarily dishes for eating and culinary experiments, as well as cutlery and so on. For obvious reasons, a full-fledged closet with doors would cost the family more, so for an unpretentious loft, a colorful shelving unit would be a very interesting solution.
The rack is also appropriate in the hallway, where it can be made in the form of an open wardrobe. Imagine such a piece of furniture with compartments for coats and several shelves or drawers below, but without doors that would block the view. You shouldn’t think that this will significantly affect the safety of your clothes, because in many apartments, instead of wardrobes in the hallway, ordinary open hangers are still used - and that’s all.
Glowing!!! wooden kitchen shelf
The author of the idea is designer Mat Brown
To make such a magical glowing shelf for the kitchen with your own hands, you will need relief boards (with knots, notches, cracks of unusual shape) and mixtures of polyester resins and fluorescent, luminescent pigments, you can buy them on Ali ru.aliexpress.com/w/wholesale-pigment -resin.html
Pour the mixture into the cracks and seal the cracks with tape. When pouring, use a level so that the shelf is strictly horizontal when pouring. Also, when pouring, make sure that the mixture does not spill over the edges of the cracks.
The next stage is sanding. When everything is dry, you can remove the tapes and carefully sand the surface.
After finishing sanding, coat the shelf with varnish-fixer in 8-9 layers
The shelf will shine in the dark!
If you distribute shelves with such luminous elements throughout the room, you will get a beautiful planetarium.
Shelf made of plywood (MDF) for the kitchen. Scheme drawing
To make anything, even a regular kitchen shelf, you need a plan. A diagram or drawing is already half the battle. Usually difficulties arise with proportions; you can’t always rely on your own eye, so it’s better to use a ready-made, tested scheme.
For example, do you like this cute country style shelf? Interesting solution, right? Cornice with a decorative pattern in the shape of an apple, back wall assembled from clapboard. If you want the same for your kitchen, use this scheme.
Or another option for a beautiful carved shelf in the same style
This collection contains diagrams and drawings of various shelves and cabinets for the kitchen, as well as methods for attaching the shelf to the wall, assembling the bracket and installing the shelf in the bracket. It will also be easier for you to understand the proportions if you have a ready-made diagram
You can see all the variety of kitchen shelves in this gallery.
from beer bars do it yourself to the kitchen
Choose beer bottles with long necks.
The boards for the shelves are sanded and covered with dark varnish.
Surprisingly, these kitchen shelves made from glass bottles are distinguished by their durability, as they can withstand the weight of an adult.
By placing one such shelf on another you will get a kitchen rack made of glass bottles.
Save
Floor shelf for books
Making a bookshelf with your own hands from plastic elements is an original and definitely cost-effective solution. Starting with the shelf, you can create an interior ensemble that matches your personal style. The work will not require large expenditures of money and time. Even a beginner can handle it.
The dark matte paint and wood details give the piece an elegant and industrial look.
Materials and tools
- Roulette;
- PVC cutter;
- 1-inch (2.5 cm) PVC pipe with a total length of 30 feet (about 9 m);
- 1" Poly Pipe, 30ft
- pine board measuring 6x12 feet (1.8x3.66 m);
- a circular saw;
- PVC glue;
- 1-inch three-way plastic connector – 12 pcs.;
- 1-inch 90 degree swivel angles – 4 pcs.;
- 1.25x0.75-inch (3.2x1.9 cm) PVC sleeve - 4 pcs.;
- paint in a vacuum can;
- stain;
- latex gloves;
- 1-inch (2.5 cm) 2-hole galvanized shelf hinges - 12 pcs.;
- drill with drills;
- screwdriver;
- 0.5 inch (1.3 cm) metal screws - 24 pcs.
Before you begin assembling the shelf, use a special cutter to cut the polyvinyl chloride into pieces of the required length:
- 12 pieces 18 inches (45.7 cm);
- 6 pieces 12 inches (30.5 cm) long;
- 2 pieces 17 inches (43.2 cm) long;
- 4 pieces 2 inches long. (5.1 cm).
Now cut the wood using a circular saw into 3 pieces measuring 2 x 12 feet (0.6 x 3.66 m). Sand the edges and surface of the blanks for wooden shelves in advance.
Description of work
- Take an 18-inch piece and attach a three-way connector to it. To strengthen the connection, use PVC glue. Now attach another 18-inch piece to the connector so that the pipe extends upward. Attach another three-way connector to the other end of the 18-inch piece. Before the glue dries completely, lay the resulting piece on a flat surface and make sure that all connectors are facing the same way. Then attach the third element to the three-way connector in the same way. Finish by attaching another three-way connector to the top of the last 18-inch piece. While the glue is wet, place the pieces on a flat surface, making sure all connectors are the same. Assemble three more legs in the same way.
Each time you connect a piece of plastic to a 90-degree elbow or three-way connector, apply PVC glue to the inside of the connector as well as the outside of the pipe, about 1 cm. After joining, be sure to wipe off any excess glue with a damp sponge.
- Secure the two legs you just created together by placing a 12-inch piece of resin horizontally into the first row of three-way connectors on each leg. Do the same on the remaining two levels. The result is one side of the bookshelf. Repeat the same steps with the other two legs - get the other side of the shelf.
- Proceed with assembling the top connectors. Take two 17-inch pieces of PVC and attach 90 degree swivel pieces to each end. Lay the resulting structures on a flat surface before the glue dries - make sure that the curved elements are absolutely symmetrically located.
- Connect the two sides. Attach a 2-inch length of resin to the top of the three-way connectors at the top of the legs. Now attach both sides of the shelf together using the 17″ pieces you cut earlier. Attach grommets to the bottom of the legs to give the shelf extra support. You have received a reliable design with good rigidity.
- At this point, you can paint the shelf frame by spraying the paint evenly. We use matte black, but you can choose any other color that suits your interior better.
To avoid uneven coloring, apply several layers. Each subsequent layer of paint can be applied after the previous one has completely dried.
- Stain the wood shelf blanks following the manufacturer's label directions. If you want the wood to become a darker color, coat the pieces with several layers of the substance. Make sure you give the same shade to each piece of wood.
- Once the stain has completely dried, you need to pre-drill holes in the shelves to attach them to the plastic frame. Attach the shelf to its place on the frame, place metal loops at the bottom, wrap them around the plastic, put marks in the holes to indicate the joints. Proceed with all three shelves. Each board must be fastened with 4 hinges and 8 European screws.
- Drill all holes using a drill.
- Turn the bookshelf upside down to make it easier to install the screws. You may need a helper to hold the wood pieces in place. Attach the shelves with hinges to the plastic bases. This can be done manually using a screwdriver. If you choose to work with an electric drill, you risk splitting the wood.
The plastic and wood shelf is ready.