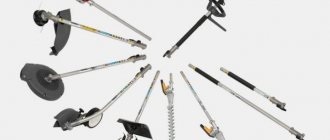
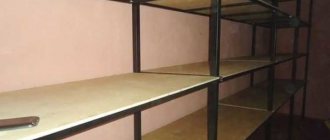
To restore order and free up space occupied by accumulated things, a metal rack is assembled. You can buy a ready-made design or make it yourself. If the weight of the objects is small, an aluminum corner is used as the material. To store preparations for the winter in city apartments, racks made of steel corners are installed on the balcony. To accommodate a large number of heavy objects, make a rack from pipes in a garage, shed, or cellar.
Advantages and disadvantages of metal shelving
The advantages of metal structures include:
- Reliability and durability. The shelves can support significant weight without damage.
- Easy to care for.
- Wear resistance. Even with intensive use, metal pipe racks retain their characteristics and appearance unchanged.
- Full compliance with fire safety requirements.
- Storage of items made of any material.
- The metal frame is resistant to moisture and temperature changes.
Disadvantages include:
- It is more difficult to make a rack from a metal profile than from wood;
- the price of metal structures is higher.
Types of shelving
When choosing a metal storage system option, the complexity of manufacturing and operating conditions are taken into account:
- Modular structures are assembled from perforated profiles of different sizes. They are reliable, and the height of the shelves can be easily changed if necessary. However, the price is steep.
- Aluminum frames are attractive in appearance; their low weight allows you to quickly move the collapsible rack to another place. The disadvantages are the high price and deformation from impacts.
- Shelves of any size and configuration can be made from profile pipes. The shelves can withstand a lot of weight. For manufacturing you will need a welding machine and skills in working with metal.
- In terms of price and labor costs, frames made from metal corners are similar to the previous option, but are inferior in strength and aesthetics.
- The CD profile for fastening drywall is good because welding and expensive tools are not required to assemble the frame. Sold in building materials stores at affordable prices.
Making a product design
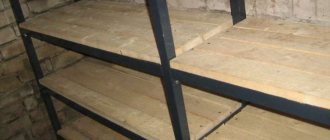
Experienced car enthusiasts recommend using one of the garage walls for shelving. You choose the height and length of the product yourself, but as a rule, shelves are made from the floor to the ceiling. At the bottom, the height of the shelves is greater than the rest, since this is where the largest items are stored. You can make the upper shelves at a minimum height; small items are often stored there.
Please note that a gap of about 30 - 50 centimeters must be left from the bottom shelf to the floor. This will allow you to clean under the shelves properly. In addition, leave a distance from the side walls to the rack posts of about 10-20 centimeters, this will make it easier for you to carry out installation.
Connection by welding or bolting
Metal structures assembled with bolts are easier to make than welded racks, but their rigidity is low, since there are backlashes at the joints. To increase stability, the frame is attached to the wall with plates with holes screwed to the posts. They are nailed down with crutches or dowels. They are attached to a wall made of foam or cinder blocks with anchor bolts. The prefabricated option is chosen if rearrangement is expected in the near future or there is no possibility of welding. Perforated angle frames are assembled without bolts. The horizontal crossbars have hooks that are inserted into the grooves of the posts. However, such a connection also suffers from backlash. Therefore, when installing high racks, the structure is welded.
Requirements for racks
To ensure that the metal rack is safe to use, the installation is guided by the requirements of GOST 16140-77:
- distance between racks 0.9 - 2.9 m;
- rack width 0.45 - 1.35 m;
- the curvature of the posts and crossbars should not be more than 3 mm per 1 m or 0.1% of the length;
- permissible deviation of the racks from the vertical is 1 mm per 1 m without load, and under the influence of weight 4 mm, but not more than 6 mm in length;
- sharp corners and edges must be smoothed;
- if the load does not exceed 60 kg, the shelf does not need an additional bar (stiffening rib), for 90 kg one crossbar is installed in the middle, for 120 kg - two;
- Cracks, lack of penetration, sagging, slag inclusions larger than 1 mm in size, and undercuts deeper than 0.5 mm are not allowed on welded seams.
How to assemble a rack from an aluminum profile with your own hands
Assembling a rack with your own hands from a profile can be done even by a person taking up this task for the first time. It is easier to work with than wood.
The main advantage of the modular design is the ease of assembly from a ready-made kit
Materials and tools
To calculate how much material is needed, first sketch out a sketch indicating the dimensions and number of shelves. Profile dimensions are selected depending on the expected load. To connect the parts, you will need self-tapping screws with press washers, since their fastening is more reliable. It is better to take pointed ones, since drill ones make large holes, so the strength is reduced. Shelves are made from boards 2 - 3 cm thick, 10 mm or more plywood, OSB sheets no thinner than 12 mm.
To work you need to stock up on tools:
- Tape measure, pencil or felt-tip pen, square for checking angles.
- Metal scissors for cutting profiles.
- Screwdriver. If you screw in each screw manually with a screwdriver, it will take several days to assemble the frame.
- A wood hacksaw for cutting shelves. The process will speed up if you have a circular saw or jigsaw.
Build process
When the materials and tools are prepared, begin assembly:
- On the profile, mark the length of the racks, crossbars, and crossbars along the width of the shelves. To prevent the rack from turning out crooked due to errors with the dimensions of the workpieces, you need to re-check the correctness of the markings.
- On the side walls of the profile, cuts are made to the base and bent at this point. The workpiece is cut along the fold line.
- Longitudinal cuts are made on the crossbars to a depth equal to the width of the profile of the vertical supports. Internal bends, if any, are cut off.
- The crossbars are inserted into one another to form a rectangular cross-section. The cut ends are bent 90⁰. You need two of these parts for each shelf. They are installed on both sides of the frame.
- The assembly of the sidewalls, so that there are no distortions, is carried out on a flat surface, possibly on the floor. Cross members are inserted between a pair of vertical supports. After checking the corners, each bend is screwed with 1 - 2 self-tapping screws.
- After both sidewalls are ready, the rack is assembled from the profile. First install the lower crossbars, then the upper ones. If no distortions are found during inspection, the rest are fixed. It is more convenient to screw in the screws by placing the frame on its side. Having secured the parts on one side, it is turned over to the other.
- On profile racks with wide shelves, additional supports are installed from below in the middle of the lower crossbar. After determining the height, bends are made on them and screwed with self-tapping screws.
- After measuring, the shelves are cut. To increase the rigidity of the frame, cutouts are made in the corners so that they extend onto the side crossbars. To fasten wood, it is better to use self-tapping screws with fine threads.
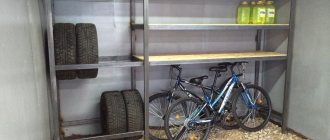
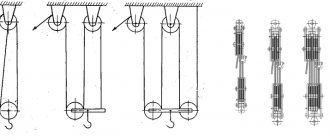
Hanging shelf with studs for garage
Hanging shelf with studs for garage
If you want to save useful space in the room, you can make a hanging shelf with your own hands and attach it to the ceiling.
Materials required for the manufacture of the structure
- Material for flooring the bottom of the shelf. You can use plywood, fiberboard sheets (the thickness of the material should be more than 2 cm).
- Large anchors (4 pcs.).
- Hex nuts - couplings for couplers (4 pcs.).
- Regular nuts (12 pcs.).
- Hairpins (4 pcs.).
- Large diameter flat washers (8 pcs.).
- Grover washers (4 pcs.).
Tools for work
- Drill with a drill bit for wood. The diameter of the drill must match the diameter of the stud.
- A hammer drill for drilling holes in the ceiling for mounting anchors. The drill should be slightly smaller than the diameter of the anchor.
- Wrenches, their markings must match the size of the nuts used.
- Jigsaw.
- Screwdriver.
- Bubble level.
Work order
Hanging shelves
Step 1. To begin, cut out a shelf of the required width and length from a sheet of plywood or fiberboard.
Hanging shelves
Step 2. To enhance the strength of the material, you can attach a metal profile equipped with internal stiffeners to the ends of the slab.
Shelf manufacturing process
Step 3. Holes for the pins are marked along the edges of the shelf. It is worth knowing that it is advisable to drill 5-7 cm from the edges of the slab. If the holes are located too close to the ends, the material may crumble under the weight of the items placed on the shelf.
Step 4. After the holes are drilled, you need to attach the shelf to the ceiling and use a pencil to transfer the location of the holes to the ceiling. This way the structure will be positioned without distortion and you won’t have to worry about the studs becoming deformed.
Holes for anchors are drilled in the ceiling and dust is removed from them. The anchors are driven into the concrete all the way and the nuts are tightened.
Anchor bolt
Driven anchor
Long metal studs connect to anchors placed on the ceiling. The connection is secured using coupling nuts. It is also advisable to secure the connection with an additional regular nut, which is screwed onto the thread of the stud.
Anchor attachment
Anchor fastening.png
Attaching an anchor to the ceiling
Step 5. After the studs are firmly fixed to the ceiling, the period of installing the shelf begins. A nut is screwed onto the stud, then a washer. After this, a shelf is strung on the ends of the studs.
The pin is secured
The shelf is fixed using a Grover washer and a control nut. The washers protect the shelf holes from breaking under loads. The bushing serves as protection against loosening of the fastening nut. You can use two nuts for safety and greater structural strength. The final adjustment of fastening fittings is carried out according to the level.
Hanging a shelf
Hanging a shelf
Fastening the ring nut under the shelf
This hanging shelf will significantly save space in the garage. The only drawback is the mobility of the structure. You can eliminate it using a special metal corner. One edge of the corner is attached to the wall, the second - to the base of the shelf. This way the entire suspended structure is fixed. Also, a metal corner will strengthen the shelf, which will affect its durability.
How to make a metal rack from a profile pipe with your own hands
Depending on the capabilities, the profile pipe frame is assembled with bolts or welded. An alternative option made from metal corners will be cheaper, since their price is lower. To simplify installation, make a combined rack with your own hands. Instead of a pipe for the side posts, use a metal corner.
You can make racks of any size and configuration from profile pipes
Preparatory work
To determine the dimensions of a rack made from a profile pipe, you need to measure the location of its installation. When installed along the entire length of the wall, its sides should not reach the corners by 10 - 15 cm. A metal structure for a garage where there is little space is made up to the ceiling. Due to this, you can reduce the length and width without sacrificing capacity. The height and depth of the shelves depend on the size of the items being placed. Having decided on the parameters, drawings are drawn up indicating the general dimensions, dimensions and cross-section of the parts. Even a simple sketch will help you avoid mistakes when cutting workpieces and installation, as well as accurately calculate the amount of materials.
Choice
First of all, you need to decide on the material for the structure, the final size, which depends more on the room, and the loads that will be placed on the rack. The set that you will receive in the store depends on all this.
The most interesting thing is that some stores may even offer you to assemble this entire structure after delivery, which again is a nice bonus. Personally, I am sure that, if time allows, it is better to assemble the rack that you chose in the store yourself - time passes, and men simply change toys.
Helpful tips and layout ideas
The functionality of a metal rack will improve if you implement the recommendations of knowledgeable people:
- to increase the number of shelves for storing jars with blanks, they are made 30 cm high;
- in order not to be distracted from work by searching for what you need in garages and workshops, workbenches are built into the storage system;
- metal rack on wheels with a stand for tools, convenient to roll out for repairs on the street;
- to increase the usable area of the greenhouse, racks are installed, on the shelves of which boxes with soil are placed;
- space for wheels and bulky items can be left under the bottom shelf, raising it 60 - 70 cm from the floor;
- If you make a drawer with compartments for hardware on one of the shelves, they will always be at hand.
Example of rack layout 1
Example of rack layout 2
A self-made metal rack is not only cheaper than a factory one, but also more convenient to use. It is collected taking into account the characteristics of the room, the number and size of objects. The assembly of a metal structure with the required parameters can be performed even without a welding machine.
Manufacturing technology
For convenience, we divide the manufacturing process into several stages:
- Drawing up a drawing;
- Preparation of materials;
- Frame assembly;
- Finishing.
Next, we will look at the work process step by step from start to finish.
Drawing up a drawing
Before assembling a metal rack, you need to decide on its design and basic parameters. To do this, first of all, consider the dimensions of the structure. To be on the safe side, go to the garage and measure the area where you want to install the furniture.
In addition, decide on the height of the future product. In a garage, especially if it is small, it is advisable to make a storage system right up to the ceiling. Due to this, you can reduce its size, i.e. length and depth, without sacrificing capacity.
When parameters such as length, depth and height are known, decide on the distance between the shelves. To do this, think about what items you are going to store.
For example, the height of the wheel storage compartment should be several centimeters greater than the outer diameter of the wheel, i.e. the distance between the shelves should be approximately 65-70 cm. Make the remaining compartments smaller so that more shelves can fit.
As for the design, we will make the most practical option - a wall frame. It has two rows of racks, so it is not attached to the wall and, if necessary, can be moved from place to place.
All racks are connected to each other by longitudinal and transverse crossbars. These same crossbars are also the basis for the shelves. Accordingly, the distance between the shelves depends on their position.
That, in fact, is the whole structure. Therefore, as we have already said, DIY metal shelving is quite simple to make.
Advice! When you have decided on all the main parameters, be sure to “sketch” a drawing on paper, even by hand, and indicate on it the dimensions of all parts in millimeters. Thanks to him, you will not go wrong when making blanks and assembling the frame.
Materials
The frame of the structure will be made from profiled pipes 20x20 mm. The wall thickness must be at least 2 mm so that the structure has sufficient load-bearing capacity.
As for the shelves, they can be made from any boards, slats, plywood, OSB, reinforcement rods or any other materials that you have at hand.
Note! Instead of a profiled pipe, you can use a corner, the price of which is slightly lower. However, a product made from a pipe looks neater.
It must be said that the assembly of the frame can be done in two ways:
- By welding - in this case, to connect the parts except a welding machine and consumables for it, you will not need anything;
- Bolted method - this assembly option is suitable for those who do not have a welding machine. Its principle is based on the use of special fasteners (brackets) for perforated pipes, which are tightened with bolts.
If you are going to assemble the frame using the second method, count on the drawing how many and what connections the structure has, and purchase the appropriate fasteners.
Among other things, we will need paint and varnish material to immediately paint the frame and shelves. If this is not done, the structure in the garage will quickly become corroded and begin to rot.
Frame assembly
So, we’ve sorted out the preparatory stages, now let’s look at how to make metal racks with your own hands.
The sequential action is as follows:
Advice! Before assembling the metal rack, prepare a workbench or large table on which you can secure the parts with clamps. This will greatly simplify the workflow.
Advice! To avoid making mortgages, you can use a corner to make jumpers.
We can say that we have already made a metal rack with our own hands. All that remains are the small touches - painting and making shelves.