Electrical circuit of a car winch
Connection diagrams for various winches, motors, remote controls, solenoids, contactors, radio units.
Honestly stolen from Forosenko and made more readable
Almost all motors are connected the same way. There are 4 contacts on the motor: Ground, A, F-1 and F-2 In addition, the contacts may have color marks: A - red F1 - Yellow, F2 - Black .
On most winch motors, the terminals are located as follows: A at the rear of the motor, F-1 and F-2 at the front edge of the motor, F-1 towards the rear of the winch and F-2 towards the front.
Winches of class 8-12000 are connected with wires of 25 and 35 square meters. The shorter the wires, the less losses.
When installing a winch, the battery must be at least 65Ah and not older than 1 year. The battery terminals must be new or in good condition.
The ground from the winch motor is connected to the battery terminal and nothing else. Installation of this wire is MANDATORY.
Plus, it’s better to make the winches disconnectable from the battery terminal - it’s safer.
The control module switches the circuit in this way: Winding - “+” is applied to F2; A is switched to F1 Unwinding - “+” is applied to F1; A is switched to F2
New generation solenoids are made in one unit.
A box the size of 2 packs of cigarettes contains two contactors, terminals for the remote control wiring and power outputs for the motor.
The module is relatively sealed.
This module is compatible with all winches Warn, T-Max, Runva, Ramsey, Stokrat, etc.
One such solenoid replaces 2 old relays “Com Up”, “T-Max”, etc. and 4 old Warn solenoids.
When connecting solenoids, be sure not to mix up the “+” and “A” . This will not affect the operation in any way, but in the event of an error, the winch motor will be under constant voltage and in wet conditions this can lead to damage to the stator windings. There was an error in some factory circuits. Correctly, when the contact of wire “A” is under the nut.
Connection diagram for the universal solenoid monoblock:
Connection diagram for the remote control connector, radio unit and solenoid in the old-style T-Max unit.
Diagram of the new T-max control modules:
Connection diagram for a control unit with two old-style solenoids:
Schematic diagram of the operation of the solenoid block:
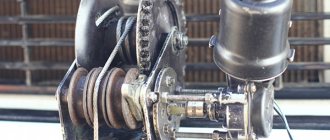
Motor connection diagram without solenoid block
Connection diagram of the Solenoid (contactor) - monoblock of ATV winches (2000, 3000, 3500, 4000) For motors with permanent magnets (two contacts). The diagram is also true for automobile winches of the “5000”, “6000” and “8000” series with permanent magnet motors.
Scheme for ATV from Varn:
Warn Solenoid Wiring Diagram:
Schematic diagram for connecting winches with four WARN solenoids:
Connection diagram for the Varn Remote and monoblock solenoid:
Schematic diagram of the winch motor and block on 4 solenoids:
Connection diagram for permanent magnet winches:
Connection diagram of the remote control and radio unit to the monoblock solenoid:
Connection diagram of the remote control and radio remote control to a block with two solenoids:
Connection diagram for the solenoid and motor of ATV winches with a “type3” monoblock and Connection diagram for winches with a “square” solenoid (“4x4”, “Rysak”, “Bison”, etc.)
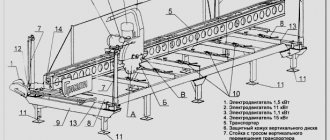
Installation theory and practice
Where to begin? Let's think about the fact that the remote control should have not only a control unit, but also a power supply. This means that you will need a 12 Volt car socket, an on relay and a clutch relay with an operating voltage of both 12 Volts. Please note that there are three groups of contacts for the switching relay. Firstly, it is recommended that a group of normally closed contacts be connected in series to the clutch relay. In turn, the clutch relay has its own group of normally closed contacts. They need to be brought sequentially to a button with a shutdown function (Stop). As for the two groups of normally open contacts in the switching relay, they should be connected in parallel to the button with the switching function (Start). Thus, through these open contacts inside the security alarm unit relay (which unlocks and locks the front door), the required supply voltage operates.
If everything is clear with theory, then let's move on to practice. How to put everything together? The power and control unit is placed in a separate housing directly inside the winch (above the motor and next to the clutch pedal). Then you need to attach the first connection block to the body of this block. In turn, the remote control for the winch is assembled in another box with two buttons (Start and Stop), you need to place the electromagnet activation relay, the car alarm unit and the second connection block. But that is not all.
What's next? – An electromagnet must be securely attached to two corners under the winch. Make sure that these corners will not in any way interfere with the movement of the winch anchor. And in order to firmly secure the magnet armature, you need to increase the clutch pedal by the width of the armature. You need to achieve the maximum possible rigidity of the fastening. Why is it important? – The quality of the winch’s work depends on this. It is important at this stage to prevent any shifts during operation.
How to make a winch for an SUV with your own hands and what you will need for this, read here. See the features of using synthetic and metal cables in winches for cars here.
Next - an equally important stage - is the adjustment of the assembled parts. What does it mean? First you need to find, and then fix, the angle that is optimal for installing the electromagnet. This task will become feasible as soon as you loosen the cross bolts. Having done this, press the clutch pedal so that the magnet and the armature fully touch each other, and then secure this position of the magnet. It is possible that as you work, you will find more interesting solutions to intermediate problems, guided by your specific needs. Go for it!
This post contains all the diagrams on the topic of connecting the Gruner 750H relay
Gruner 750H relay connection diagram
as a positive switch (example winch positive switch):
Gruner 750H relay connection diagram
as a ground switch:
Connection diagram for the automatic control module for two relays Gruner 750H:
Connection diagram for the Isolation Device for the additional battery URA-1000
Connection diagram for two batteries with a positive break using a Gruner 750H power relay:
Connection diagram of the Gruner 750H relay to the gap in the positive bus of a car winch:
Connection diagram for an intelligent controller for two batteries:
Scheme of operation of the contactors of the ComeUp winch control monoblock:
ComeUp monoblock solenoids
to the winch motor and control panel:
Connection diagram for the remote control connector, radio unit and solenoid in the T-Max
old style:
Connection diagram for new T-MAX winch control modules:
Schemes for 4 solenoid connection of WARN winches:
Connection diagram for ATV winches WARN:
Wiring diagram for winch WARN 9.5Ti:
Connection diagram for the ComeUp 9000
:
Connection diagram for permanent magnet winches (“5000”, “6000”, rep8.5e, etc.):
Important little things
Now it's time to check how it works. What’s nice is that, unlike a mechanical winch, which works thanks to human muscle efforts, a winch with a remote control is designed in such a way that the machine actually pulls itself out. You will only need to help her a little by pressing the right buttons in time and competently managing the entire process. But we should not forget that the weather conditions during testing of this homemade device can be very different from the real situation when you actually have to pull your car out of a swamp, snowdrift or somewhere else.
General technical questions
Issues of operation and maintenance of automatic transmissions on Toyotas and not only. Because the boxes of many models overlap
- about automatic transmission and extras. radiator
- 3 hours ago
Author: Stalker.
Tuning, styling, interior, car audio and theft protection
“Non-power” body kit, trim and restoration of the interior, car audio, sound insulation, anti-theft, etc. for all models of Toyota SUVs.
- Experience in installing salon o...
Author: ciropishe
Other related Toyota issues.
Life of Toyota 4x4 - problems and solutions common to all platforms.
- Forklift SOS...
Author: Palasatikk
Technical issues of various series
Those. Landcruiser series 40, 55, 60 questions
Classic axle spring Landcruiser 4x, 55 and 6x series
- “>“>
- 60 left-handed 12 NT under...
- Author: " >
- 9 hours ago
Those. questions Landcruiser “light” 7x (2L, 2L-T(E), 3L, 1KZ-T(E) and 22R(E))
Easy 70s and everything about them
- G52 gearbox help with advice
- 7 hours ago
Author: kap.68
Those. questions Landcruiser “heavy” 7x (1HZ, 1PZ, 3B, 1FZ-FE)
Expeditionary Classics (75-79 Pickup)
- Wiring for tow bar for 7…
Author: kasac
Those. questions Landcruiser 80, 100, 105 series (Lexus LX 450, 470)
Questions about full-size and axle SUVs
- Check for Kruzak
Author: T_CRUZ
Those. Landcruiser 200 (Lexus LX 570), Sequoia, Tacoma, Tundra questions
Modern Toyota developments in the field of large SUVs and pickups
- Help with diesel
Author: Mikhail_Vladivostok
Those. 4Runner and HiLux 1st and 2nd generation questions
SUVs and pickups of the 6x and 130 series
- What kind of connector
Author: 0389dB
Those. questions 4Runner and HiLux 3rd generation, Landсruiser Prado 9x
Cars series 185 and Prado series 9x
- Optics for Prado 95. Replacement…
Author: VADUS
Those. 4Runner and HiLux 4th and 5th generation questions; Landсruiser Prado 12x,150 (Lexus GX); FJ Cruiser
Platform machines 215 and 285
- replacing 2.7 with 4.0
Author: peress
Those. questions Highlander (Lexus RX), RAV4 and other Toyota cars
Discussion of all four-wheel drive Toyotas
- Into the dune front axle from 70
Author: follow me
Disadvantages of wired remote controls
So far we have only talked about positive things. But it’s worth warning about pitfalls. You can’t do without them when it comes to a wired remote control. What do you think: what is the inconvenience here? Imagine that, quite suddenly, without planning, you find yourself in the very middle of a dirty slurry, and at this time your winch will calmly lie in the trunk, and in order to use it, you cannot avoid “plunging” into this mud. For what? – To get the winch and your wired remote control, and then connect it. In this case, you will need to remove the cable from under the hood, etc.
Be prepared for the fact that leaving the remote control under the wipers will also be a bad idea. At any moment, it can fly away in a direction unknown to you, thrown by branches or strong shaking, and become inoperable. Agree that it is better to try to predict such situations in order to prepare for them in advance. Experienced extreme sports enthusiasts who regularly practice driving in mud as a form of entertainment recommend that the winch remote control or handle be located away from the winch drum. Then, if the cable breaks due to excessive load, the car owner will be protected and most likely will not suffer.
Of course, it would be much easier to buy a ready-made winch with a factory remote control, especially if you are not familiar with the equipment. But this solution is not always optimal for your specific car. Besides the fact that this pleasure will cost you quite a lot (for a device that will be used only from time to time), no one will give you guarantees that this will be the most correct decision for your car.
Therefore, if you understand the principles of the structure of such things and you are well versed in mechanisms, then it is not impossible for you to make this thing yourself at home, instead of making an inexpensive purchase. All that is needed for this is a few simple details and, most importantly, your desire, diligence and accuracy.