Almost all modern lithium-ion batteries have excellent energy capacity, as well as high compact dimensions. It is with their help that you can power high-power devices with the greatest efficiency. And it is absolutely not necessary to buy a ready-made charger in a store for this, because there is a more budget-friendly option that radio amateurs will especially like - to assemble a charger for lithium-ion batteries with your own hands.
Charger for lithium-ion batteries
A little about lithium-ion batteries
These include the following aspects:
- high density of output current and accumulated energy, long-term charge retention;
- no effect of capacity reduction due to regular incomplete charging;
- self-discharge no more than 4-8% per month when stored without recharging, aging no more than 15-20% per year;
- no need for a full discharge to train the energy capacity of the drive;
- light weight, variability of shape and dimensions of the device;
- operating temperature range – from -20°С to +50°С (low temperatures prevent recharging);
- long service life (up to 10 years of operation and more than 1000 discharge cycles).
The disadvantages of lithium batteries are:
- dependence of the service life on the duration of use and storage, and not on the number of discharge cycles;
- risk of failure during overcharging (current flow upon completion of charging);
- low resistance to deep discharge;
- high price;
- explosion hazard due to mechanical damage and excess current, if they lead to heating of the electrolyte and breaking the seal of the housing.
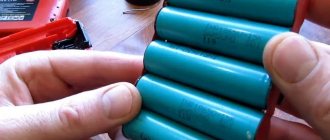
The name of the 18650 battery is due to its shape and dimensions. The battery width is 18 mm and the length is 65 mm. The last number in the marking indicates the cylindrical shape of the battery. The drive circuit is equipped with a controller that prevents overheating during charging.
The battery case can be marked in more detail: for example, INR18650-20R. The first letter distinguishes all lithium-type batteries, the second specifies the type of cathode material (C – cobalt, N – manganese, F – ferrophosphate).
The letter "R" stands for rechargeable. The next 5 digits reflect the dimensions and shape factor of the battery, and the last one is the battery capacity in Ah.
18650 batteries with a protection board can be labeled as 18700 or 18670. The protection board controller helps prevent the battery voltage from exceeding the rated voltage (4.2 V) and falling below 2.5 V.
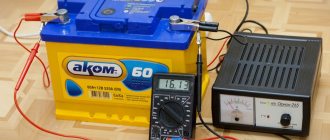
Homemade lithium battery charging - electrical diagram
The basis for this device are two stabilizer microcircuits 317 and 431 (forum topic). In this case, the LM317 integrated stabilizer serves as a current source; we take this part in the TO-220 housing and must install it on the heat sink using thermal paste. The TL431 voltage regulator manufactured by Texas Instruments is also available in SOT-89, TO-92, SOP-8, SOT-23, SOT-25 and other packages.
Recommended input voltage is from nine to twenty volts. The output is adjusted with a 22 kOhm trimmer; it should be around 4.2V.
Light emitting diodes (LED) D1 and D2 of any color you like. I chose the following: LED1 red rectangular 2.5 mm (2.5 milCandelas) and LED2 green diffusion 3 mm (40-80 milCandelas). It is convenient to use SMD LEDs if you do not install the finished board in the case.
The minimum power of resistor R2 (22 Ohm) is 2 Watts, and R5 (11 Ohm) is 1 Watt. All other ones are 0.125-0.25W.
The 22 kiloOhm variable resistor must be of type SP5-2 (imported 3296W). Such variable resistors have very precise resistance adjustment, which can be smoothly adjusted by twisting a worm pair similar to a bronze bolt.
How to charge lithium-ion batteries yourself
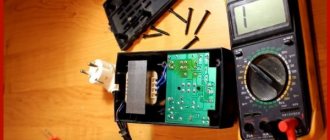
The simplest option is to use a mobile phone charger. The devices produce a voltage suitable for restoring the power of 18650 batteries. The method is used only in emergency cases. Its frequent use leads to a decrease in battery capacity.
Homemade charger for a lithium-ion 18650 battery, made from an old phone charger.
To charge the battery, do the following:
- The charger plug is cut off. The wires are stripped of insulation and divided into positive and negative poles. The positive cable most often has a red braid, and the negative cable has a black braid.
- The cleaned wires are attached to the battery poles with plasticine. The USB cable is connected to a computer connector or a special adapter.
- The power source is charged, periodically monitoring the process. It is recommended to charge the battery for no more than an hour. This time is enough to completely restore capacity.
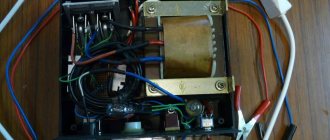
Complex circuits are used to assemble advanced charging. Before starting work, prepare a soldering iron, solder, flux and glue. Separately, purchase the board necessary for the normal functioning of the homemade charger.
https://youtube.com/watch?v=2wMnrZpl3Vo
The assembly is carried out like this:
- The board is installed in a plastic box prepared in advance. The structure is supplied with positive and negative wires. The box is used to hold the battery while charging. You can make a container from an old charger, an unusable household appliance or a toy. The dimensions must match the battery parameters.
- The board is soldered, taking into account the markings. The markings make it easy to place the wires. The board is equipped with multi-colored indicators that reflect the charging progress. The microcircuit is glued to the box in a convenient place. After this, observing the polarity, connect the wires. Before fixing, they are cleared of insulation and treated with rosin. A small amount of liquid solder is applied to the board.
During the manufacture of the device, short circuits must not be allowed. The above diagram allows you to assemble a simple but reliable charger in a few hours. Using a USB cable, it is connected to an electrical outlet or computer. The battery is installed in the resulting socket. After the green indicator turns on, the device is turned off.
Tags: charging, voltage converter
Comments 53
I don't want to offend the author. But, in my opinion, it’s easier to buy this THING (ru.aliexpress.com/store/p...010608.0.0.2ab313bcxa5Ivl) It will charge correctly, balance the banks, and put them into storage mode. And it also charges lead and metal hydrides. You just need to customize it to suit your wishes. I have 4 of these. And I bought screwdrivers for my friends for their use. Works quietly from a computer power supply. And it even slightly raises the voltage for 4S assemblies when powered by 12V.
Also, at first I did everything on Imax, but now I just added balancers to the native boards in my Shurik (it was originally on lithium), which were not there before, and installed Sony VTC6 batteries for Mach 3000
Is there a link to this converter, for some reason I can’t find it?
China rules, everything is ready in a pile and that’s it. this is not like the earlier collection based on publications of the Radio magazine, oh where are you, the good old days...
in order to tighten 2 self-tapping screws at home, you need to go through a quest with charging! Then it’s better to make a networker on wires out of Shurik... such a hat will not work for work (because it’s cheaper to buy a new Shurik)
From such a converter with a display aka Kasyan on YouTube made a very budget LBP
But I liked the Muska without a balancer board at all. Stupidly, each bank is charged separately. There's also something like the com port of the person crashed into the battery
charger for charging. Tuftology. You need to write more clearly or at least check what you write before publishing. Why have you screwed up the collective farm beyond measure? Only a tambourine with a fire is missing. Several blocks, a bunch of wires, some kind of crocodiles... Set the currents, voltage... Well, that's enough to play with for once. What if you charge it every day and during the summer? First of all, you miss and BANG. Stopudovo. Where and how it puffs... HZ. And why are you sure that the 18650 LIIon needs to be charged with a current of 1Amp? I have a lot of questions, not because I want to repeat myself or think, but because you posted it for everyone to see. As a homemade person - +1, but I don’t recommend repeating it to anyone even in a nightmare. Without balancing, your assembly will very quickly go into overdrive. And the Shuriks are simply prescribed high-precision lithium, and not 18650 from laptops.
18650 from beeches are simply free usually. For some, this is more important than Shurik’s maximum torque.
So a freebie is not always useful. They are not high-current in beeches at all. On the contrary. Duh, oh well. It turns well. It doesn't taste that good to me. My Shuras work both in winter and summer and charge in no more than 30 minutes.
charger for charging. Tuftology. You need to write more clearly or at least check what you write before publishing. Why have you screwed up the collective farm beyond measure? Only a tambourine with a fire is missing. Several blocks, a bunch of wires, some kind of crocodiles... Set the currents, voltage... Well, that's enough to play with for once. What if you charge it every day and during the summer? First of all, you miss and BANG. Stopudovo. Where and how it puffs... HZ. And why are you sure that the 18650 LIIon needs to be charged with a current of 1Amp? I have a lot of questions, not because I want to repeat myself or think, but because you posted it for everyone to see. As a homemade person - +1, but I don’t recommend repeating it to anyone even in a nightmare. Without balancing, your assembly will very quickly go into overdrive. And the Shuriks are simply prescribed high-precision lithium, and not 18650 from laptops.
Not "high-current lithium", but high-current
Thank you. Was wrong.
charger for charging. Tuftology. You need to write more clearly or at least check what you write before publishing. Why have you screwed up the collective farm beyond measure? Only a tambourine with a fire is missing. Several blocks, a bunch of wires, some kind of crocodiles... Set the currents, voltage... Well, that's enough to play with for once. What if you charge it every day and during the summer? First of all, you miss and BANG. Stopudovo. Where and how it puffs... HZ. And why are you sure that the 18650 LIIon needs to be charged with a current of 1Amp? I have a lot of questions, not because I want to repeat myself or think, but because you posted it for everyone to see. As a homemade person - +1, but I don’t recommend repeating it to anyone even in a nightmare. Without balancing, your assembly will very quickly go into overdrive. And the Shuriks are simply prescribed high-precision lithium, and not 18650 from laptops.
Which device should you use?
Different models of chargers differ in technical characteristics, set of functions and some other parameters:
Liitokala Lii-500 is a universal charger that automatically selects currents for.
- Simple. Such devices supply a current of 1 A. They have a single socket for installing an 18650 battery.
- Improved. The device is equipped with 2 battery slots. The maximum voltage level is 4.2 V. This charger is more expensive. Additional functions include charge indication. The device automatically limits the procedure time, preventing overcharging.
- Universal. Used to charge power supplies of the 18650 and 26650 types. Models of this type are used to restore the functionality of lithium-ion and nickel-cadmium cells. The best devices are equipped with a safety system that eliminates the need for regular voltage and current measurements.
- Homemade. If a ready-made device cannot be found, the charger can be assembled at home. The components are connected according to the diagrams.
A little about lithium-ion batteries
Features of 18650 battery:
- Long service life. The power supply can withstand up to 600 discharge and charge cycles. Lithium batteries have an extended service life and can retain capacity for a long time.
- Compact sizes. The height of the element is 65 mm, diameter is 18 mm. These numbers formed the basis for the name of the battery. Despite its small size, the battery has ample capabilities.
- Availability of a controller. Most old-style batteries are highly explosive. Chemical reactions take place in the battery case, the speed of which increases many times over when overheated. A mechanical short circuit of several containers containing electrolyte also occurred, leading to a fire. The controller, built into modern power supplies, prevents severe overheating and explosion. It's from overcharging.
- Impossibility of long-term storage. Batteries left unused for a long time quickly lose capacity. Li-ion batteries need to be charged regularly. At the same time, a number of rules are observed to prevent the product from failure. It is necessary to correctly calculate the charge current and limit the voltage. Violation of the rules leads to a decrease in service life.
Features of lithium batteries
Li-ion batteries are very unpretentious to use. If handled with care, they will last about 3-4 years. However, it is worth focusing on the fact that even if batteries are not used, they slowly die. Therefore, stocking up on batteries for the device for future use is not entirely reasonable. 2 years is the normal time from the date of production. If more has passed, then these may be already failed batteries.
Interesting. The most common 18650 can size has an average capacity of 3500 mAh. The normal price for such a battery is 3-4 dollars. Therefore, manufacturers who promise a 10,000 mAh Power bank for $3 are, to put it mildly, deceiving. It would be good if there was at least 3000 mAh.
Which device should you use?
To recharge the 18650 battery, you need to use devices with a rated voltage of 4.2 V. If the lithium-ion drive is planned to be connected to a universal charger, then it must be equipped with a parameter controller and indicators for the end of the process.
The cheapest models have 1-2 slots for batteries, a maximum amperage of up to 1 A and a nominal voltage of 4.2 V. The best charger option for lithium drives is a smart device equipped with a terminal voltage meter, a recovery function after a deep discharge and protection against exceeding the nominal voltage
What is the difference between a charge controller and a protection circuit?
Some users periodically have a question, put in the title of the section - why do we need a charge controller if there is a protection circuit (individual or general in the form of a balancing board). The fact is that these devices solve different problems :
- the protective module protects the element from overcharging, prevents it from going into a deep discharge, and turns off the battery when the permissible temperature is exceeded;
- The charge controller forms the correct mode of energy replenishment - stabilizes the current at a given level, carries out additional charging according to various algorithms.
And confusion may arise due to the fact that there are cases when some of the functions of these devices are duplicated. Thus, overheating protection can be built into both the protection board and the charge controller. And both the built-in board (disabling the battery) and the charger (completing the process of replenishing energy) can protect against overcharging.
How to charge a 18650 battery
Many chargers (chargers) are universal, but when charging lithium-ion batteries you must follow these rules:
0.5-1 A is the optimal charge current for 18650 batteries.
- At the early stage, it is necessary to apply no more than 0.05 V. Finish the procedure by increasing the parameter to 4.2 V. This value is an acceptable safe level for 18650 batteries.
- The charge current should be 0.5-1 A. With a higher value, the charge will be collected faster. However, it is not recommended to immediately supply a current of 1 A. The indicator should increase smoothly.
- Accelerated charging methods should only be used in emergency cases. The procedure time should not exceed 3 hours. Overcharging damages battery components, causing overheating.
- It is recommended to use devices that automatically monitor charging progress. They turn off automatically after the battery reaches the required power. Cheap and homemade devices are not equipped with controllers, so the user will have to independently monitor the progress of the procedure.
Components and accessories for memory assembly
To assemble a homemade charger for 18650 lithium batteries at a minimum cost, just prepare:
- plastic box with approximate dimensions 80x70x30 mm;
- glue gun and rods;
- hot knife;
- soldering iron with solder;
- screws and screwdriver;
- protected module TP4056 (more details about its selection are in the next subsection);
- battery compartment for 1 cylindrical battery with dimensions 18x65 mm;
- printed circuit board;
- 5-volt power supply or alternative - 4 100 nF capacitors and 7805 voltage regulator;
- power supply with characteristics of 12 V, 2 A;
- power connector;
- SPST switch with a pair of outputs.
Useful tips for using 18650 batteries
To preserve battery capacity and extend their service life, you need to follow several tips:
- correctly select the operating mode of the charger, and in the absence of a controller, adjust the parameters automatically;
- avoid deep discharge, connect the battery when the charge drops to 70-80%;
- when calculating the recovery duration, take into account not only the number of ampere hours, but also the difference in voltage when charging in a factory and at home, which affects the watt capacity;
- do not try to increase the battery capacity by discharge-charge cycles;
- do not allow the drive to overheat, do not leave it in direct sunlight;
- operate the battery at a temperature of +10…+25°С; for use at low temperatures, insulate the case;
- Avoid impacts on the body of the battery, exposure to strong friction and vibration; during transportation, place batteries on a thick soft substrate;
- store lithium-ion drives with 50-60% charge and at a temperature of about 0°C.
When purchasing a battery, you need to pay attention to the release date. Batteries manufactured more than 3 years ago are considered expired and low-functional.
General assembly principle for any 18650 charger
First of all, you need to make a board. You can develop it yourself (in programs like Sprint LayOut), or you can find a ready-made one on the Internet. Then there are two ways:
- Make a board using the LUT method or other home technology.
- Order a board in China.
In the second option, the board will obviously be of better quality, but it will cost more, and you will have to wait more than one day.
When assembling a charger for 18650 batteries on specialized microcircuits, you must keep in mind that their cases are often subminiature, and soldering such elements requires special skills.
How to charge a 18650 battery
When charging a 18650 battery, the following rules must be observed:
- Recovery should begin at a voltage of 0.05 V, gradually increasing it to 4.2 V.
- The range of permissible charge current is 25-50% of the capacity (for example, for a 2000 mAh battery it varies from 0.5 to 1 A).
- The optimal figure is 25-30% of the capacity, the maximum amperage is used only for urgent recharging.
- The permissible charging time when the battery is completely discharged is 3 hours.
- To accurately select the recovery duration, you need to measure its voltage with a multimeter or connect it to an intelligent charger.
The optimal mode consists of two stages:
- CC (constant current). It needs to provide a constant amperage, which is within 20-50% of the battery capacity. With accelerated charging, a higher current value can be used, but it is not recommended to use this mode often. The charger must be equipped with a smooth voltage rise function. At the first stage, the charger works as a current stabilizer.
- CV (constant voltage). When the voltage rises to 4.2 V, you can proceed to the second stage of recharging, at which a voltage of 4.15-4.25 V is maintained. By the end of the first stage, the battery is restored by 70-80%. As the charge accumulates to 90-95%, the amperage will gradually decrease. As soon as its value reaches 1-5% of capacity, the battery can be disconnected from the charger.
Some “charger” models are equipped with a battery recovery mode for deep discharge (less than 2.5 V). The battery is charged with low current (no more than 5-10% of capacity) until its voltage reaches 2.8 V. After this, the charger switches to direct current mode.
Charge controller circuits
Charger for LM317.
A simple homemade memory can be assembled using the widespread and inexpensive LM317 microcircuit. In this case, it is connected according to the voltage stabilizer circuit, and the battery is charged by the falling current. This algorithm does not allow full use of the battery's capabilities, and this is the main drawback of the scheme. Another drawback is that voltages below 8 volts cannot be supplied to the circuit. Therefore, it will not be possible to power the memory from the USB port.
During the process, the current is monitored in the form of a voltage drop across resistor R1. As soon as it decreases to a certain level, transistor VT1 closes and the LED goes out, signaling the end of charging. The process does not stop, so you need to monitor the condition yourself. You can upgrade the circuit by turning on a relay instead of the LED, which, when turned off, opens the power circuit with its contacts.
The charger is somewhat more complicated, allowing you to implement a pulse current charging algorithm without any controllers.
Charger circuit with pulse recharging function.
At the first stage, the battery is charged with a stable current, the value of which is determined by the supply voltage and the value of the resistor RD. When the voltage reaches the threshold of 4.15 volts, the comparator is triggered and transistor VT1 is turned off. The voltage across the element will soon drop below the threshold, and the transistor will open again. This procedure will continue cyclically, but as the charge progresses, the pauses will become longer and the pulses shorter. As a result, the battery will be charged to a voltage of 4.15 volts, which is set by resistor R1.
Analysis of the circuit shows that it can be easily simplified without reducing functionality. So, instead of a transformer with a midpoint and a rectifier, you can take any power source with a voltage of 5 volts (there is no need to increase the voltage much, the elements of the power circuit will heat up, bringing the thermal death of the universe closer). The transistor can be replaced with a bipolar one (the domestic KT827 is also suitable).
Simplified memory diagram.
The voltage detector can be replaced with KIA742, KIA719, KIA739. As a result, the diagram will take the following form.
You can also use specialized microcircuits specifically designed to create such chargers. One of them is MCP73831.
Charging algorithm implemented on the MCP73831 (using the example of a battery with a capacity of 180 mAh).
It supports correct two-stage charging mode. The current is set by the value of the resistor connected between pins 5 and 2. The only drawback is the highest current that can be removed from the microcircuit - 500 mA. This is not always enough; high-capacity cells will take a long time to charge.
Typical connection diagram for MCP73831.
You can also assemble the charger using other specialized microcircuits specially designed for a similar purpose. In addition to the classic MAX1555, these can be:
- LP2951;
- LTC4054;
- TP4056;
- LTC1734;
- MCP73812;
- NCP1835;
- other microcircuits.
Each element has its pros and cons. To understand them and make the right choice, you need to read the datasheets.