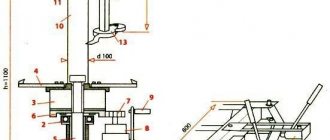
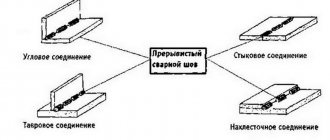
Rack
We make it from a 32 mm corner with a length of 1540 mm (you will need 4 pieces in total). You will also need 4 36 mm corners of the same length. We assemble the corner into a square using welding seams 30-40 mm long. When assembling we use clamps. After connecting the corners, you need to drill holes in the lower part of 26 mm in diameter, retreating 31 mm from the edge. This will leave you with 5mm left for welding the metal rod inside the structure. Next, drill 13mm holes:
- one at a distance of 100 mm;
- the next after 80 mm;
- the third and all subsequent ones after 190 mm.
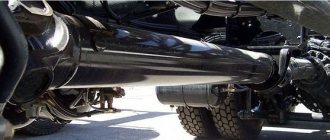
Tipper in action
The holes are needed for the metal pins that are needed to secure the shoe and the top beam. After assembling the square profile and drilling, it must be connected with pieces of corners, also assembled into a square profile.
When assembling, you need to insert spacers of the same size between the profiles, that is, 36 m each or a finished upper beam. After welding, you need to allow the part to cool without removing the spacers. Check that the top beam fits easily between the square profiles.
Tipper installation
We stretch the support platform for the car tipper with our own hands under the bottom of the car. In this case, we place the place for fixing the heel for the jack on the side that must be raised. We insert a support corner on top and fasten it to the platform with a bolt. Next, we assemble and insert the support beam into the fixture. First, remove the caps from the wheels to which it will be adjacent.
The heel for the jack is inserted between the platform and the support angle, then a rail with a number of through holes is vertically inserted through all three parts. It serves as a guide and retainer for the top of the inverter. The lower end of the rail is screwed to the platform with a bolt. We lubricate the sections of the support corner profiles along which the platform will move with grease and only then install it, moving it under the bottom of the car.
Next, attach a jack to the tipper and begin lifting. After the desired height is reached, a cotter pin is inserted into the vertical rail through the hole located directly under the support angle. It will prevent the car from falling if something happens to the jack. The following video describes in detail how to install a homemade car tipper with your own hands.
Choosing a design
To make a vehicle lifting unit with your own hands, it is important to familiarize yourself with the designs on the market. The cost of finished equipment can be equal to the price of a car. In auto repair shops you can find the most common option - a screw two-post jack; the design can be made with a hydraulic or electric drive. The structure can be made using additional beams, depending on the expected loads. A scissor lift has a platform and is driven by a scissor-like mechanism. A homemade lift of this type is driven by mechanical force and is lifted by a hydraulic drive connected to an electric motor. Before making such structures, it is important not to forget about safety precautions. During operation, parts may spontaneously fall, which will lead to irreversible consequences. A homemade car lift must be made with a reserve of aggregate power; when using it, it is important to know the mass of the element being lifted.
What types of lifts are there?
Lifts come in various designs, differing in the method of lifting the car and the type of drive. For vehicle repairs, three types of drives are mainly used:
- chain mechanisms;
- screw;
- hydraulic systems.
Read also: Transistor stepper motor control circuit
The method of lifting the car plays an important role in the design; a garage lift can be a fork, scissor, or platform design. The most popular are fork screw units, the basis of which is a long threaded shaft made of tool steel. The parts of the unit are able to withstand the load of an average car; it is almost impossible to make the mechanism with your own hands, due to the complex design of the forks.
Types of lifts for car repairs
The easiest way to make a platform lift with your own hands is using a screw mechanism.
Parallel beams attached to the mechanism are capable of lifting a car weighing up to 3 tons.
How to properly prepare a garage
If you are planning to assemble a car tipper yourself, make sure that your garage will meet the necessary conditions. Otherwise, you won’t be able to use your structure indoors – there won’t be enough free space. Then you will have to work outdoors, which is not very pleasant in cold weather, and not always safe. But more on that later. In a word, if the height of the garage does not exceed the height of the car by one and a half, or better yet two meters, it is better not to build a serious tipper. And there must be free space around the perimeter of the lifting device so that there is an opportunity for normal maintenance of the machine. And if you are planning to make your work easier and create a tipper that runs on electric current, then the voltage in the garage should have three phases. So, site preparation should depend on the following factors:
- tipper designs;
- the size of the machine and its weight.
Top beam
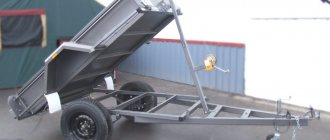
Tippers
For this we will need:
- two 32 mm corners 171 cm long;
- sheet metal strip 64 mm wide;
- several bushings.
We assemble the corner into a U-shaped profile, that is, a channel. On one side in the middle we weld a metal insert 3-4 mm thick and 16 cm long, which is needed for using different jacks. We weld the plate on top with tacks, sew everything together and get a rectangular profile.
We weld the insert to the plate, and on the reverse side we jam the profile with a metal plate 4-5 mm thick, scalding around the perimeter and cleaning it. We weld a sleeve of the following dimensions to the end in the middle:
- length 35 mm;
- internal diameter 20 mm;
- external 35 mm.
In front of the upper beam we weld two guides for the jack with holes for the jack stopper. You need to insert an M8 bolt with a nut into them. We also weld a bushing with rollers and a safety pin on the top part.
Difficulties in making a lift
The cost of a finished car lift is high, but a self-made version can damage a person working under it if the design is unreliable. The weight of the car should not exceed more than a ton; if the structure falls on a person, irreversible injuries can occur.
A homemade car lift is made according to prepared drawings, or versions of finished products are used. In the latter case, one has to rely on the author's high computational skills. Incorrect calculation of the base or one of the fastened units can lead to irreversible consequences, at best, damage to the lifted unit.
For a homemade kit, made with your own hands, you will need parts and components, without which assembly is impossible. You can find this type of component in large stores that sell construction equipment. If there are not enough funds for new parts, you need to go to scrap metal collection points and enterprises that write off old parts.
If you find an error, please select a piece of text and press Ctrl+Enter.
The lift-tipper is mainly intended for VAZ cars, but can be used for any other car weighing about 1000 kg. Such a lift-tipper allows you to lift the car and turn it in any direction by 30, 60, 90 degrees when performing welding work, processing the bottom, removing and installing the driveshaft, rear axle gearbox, etc.
A lift-tipper for lifting and turning a vehicle when performing welding work, processing the bottom, removing and installing a driveshaft, and a rear axle gearbox.
By lifting the front end, you can replace the clutch, steering rods, and unscrew the crankcase bolts. Lifting the rear of the car, replace the springs, rods, rear axle, and muffler. Using lift stands and additional equipment, the engine is removed and installed. When performing this work, the car is rolled manually. When replacing the cross member, the engine is only raised.
Lift-tilter, lifting a car on two racks, lifting on one rack, removing and installing the engine, dimensions.
The lift-tilter consists of racks with built-in screw-nut transmissions and support units. The components and parts of the lift, as well as their variations, are shown in the figures below. The numbering of parts in the figures is continuous.
Read also: How does a bug for wiretapping on clothes work?
Racks for a car lift-tipper, drawings and dimensions.
There are two racks, they differ only in the traverses attached to them. Traverses differ in location (front and rear), as well as by type of car - for VAZ-2101, 2102, 2103, 2106 and for VAZ-2104, 2105, 2107.
The screw has a hexagon in the upper part, rotating which moves the nut with the front or rear traverse attached to it. The screw rests on bearing 8105 (dxDxH=25x42x11 mm) through a support. The support is connected to the screw with a pin. A square sheet is attached to the nut with two screws. A plate with a welded traverse (front) or (rear) is secured to the nut axis with a slotted nut and washer.
Screw-nut transmission of lift-tipper for VAZ cars.
The plate has seven holes designed to secure the plate with an M8 bolt to the square sheet and, therefore, to the post.
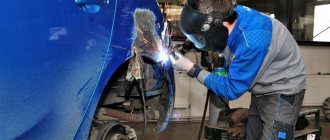
Welding of lift-tipper parts for VAZ cars.
Lift-tilter nut for VAZ cars.
Parts of the lift-tipper for VAZ cars, drawings and dimensions.
The stand is a channel with a groove. A support sheet is welded to the top of the rack. A diaphragm is welded into the rack. At the bottom of the rack, a base and two ribs are welded to the end. Three plates and four ribs are welded above the groove (34x52 mm). The bosses are pre-welded to the plates, after which an M10 thread is cut simultaneously in two plates and bosses. The racks are attached to the base channel using four M10-25 bolts.
Stand and support unit for lift-tipper for VAZ cars.
Base for a car lift-tipper.
The base of each rack consists of two channels. In the pictures, the channel is shown upside down for ease of drawing dimensions. Plates are welded to the channel at the ends. In the middle part, in size, four holes with a diameter of 10.5 are drilled. They are used to fasten the rack to the channel (M10-25 bolts with regular and spring washers).
The channel is inserted into the hole formed by the stand and base. Supports welded from plates are attached to the ends of the channel with bolts (M8-25) and nuts. The channel with supports is secured with bolts. When the bolts are loosened, the channel can be moved relative to another channel of the base.
Traverses for a car lift-tipper.
Crossbars for VAZ-2101, 2102, 2103, 2106 cars, front and rear, are channels No. 5 of various lengths. Diaphragms are welded into the traverses, and plates are welded to the ends. Traverses, as noted above, are welded to the plates. The crossbars are attached to the car after removing the bumpers with brackets using plates and fingers. The fingers are fixed in the traverses with M8-25 bolts, which are screwed into the fingers through the holes in the traverses.
Lift-tilter crossbars for VAZ-2101, 2103, 2106, for VAZ-2102 dimensions in brackets.
Traverses for VAZ-2104, 2105, 2107 cars have a slightly different design due to the difference in bumpers and their fastenings. If in the cases considered (VAZ-2101, 2103, 2106) the traverses were attached directly to the front and rear side members using plates, then it makes sense to use intermediate parts connecting the bumpers to the side members.
Security measures
It is very important that when the tipper is operating, the site is protected on all sides from wind gusts. The fact is that an overturned car creates a lot of windage, and a moderate wind is enough to turn it over. Before starting work, do not forget to prepare the car - empty the interior and luggage compartment, remove the battery, and eliminate the possibility of leakage of fuel from the fuel tank, oil and brake fluid. An overturned vehicle must be secured with additional supports.
Front connection node
To assemble it you will need:
- two inch pipes 30 cm long;
- corner 32 mm, length about 33 cm;
- rod made of a rod with a diameter of 26 mm and a length of 42 cm.
On the corner we mark 6 cm from the center in both directions and keep the shelf at this distance. In the center of the corner we drill a hole with a diameter of 16 mm, which is needed to connect the lower beam, taking into account the size of the bolt head. After this, we bend the corner into a U-shape. It is better to connect the parts together with the stand.
Be careful that the pipe does not burn out when checking. The entire front connecting assembly is movable, that is, the U-shaped corner along the edges with pipes must rotate on a metal rod.
Area
To create it you need sheet metal 3-4 mm thick. It should be 350x150 mm in size with curved sides. You can also weld a 20 mm wide strip onto the tacks with drilled holes to secure the inserted board. We fix a rubber strip on the board. We weld stiffening ribs and guides under the lower part of the platform, not forgetting about the jumper. The dimensions of the site are not critical. It is necessary to adhere to the size between the guides, placing the platform on the upper beam, along which it can move freely.
Tipper installation
We stretch the support platform for the car tipper with our own hands under the bottom of the car. In this case, we place the place for fixing the heel for the jack on the side that must be raised. We insert a support corner on top and fasten it to the platform with a bolt. Next, we assemble and insert the support beam into the fixture. First, remove the caps from the wheels to which it will be adjacent.
The heel for the jack is inserted between the platform and the support angle, then a rail with a number of through holes is vertically inserted through all three parts. It serves as a guide and retainer for the top of the inverter. The lower end of the rail is screwed to the platform with a bolt. We lubricate the sections of the support corner profiles along which the platform will move with grease and only then install it, moving it under the bottom of the car.
Next, attach a jack to the tipper and begin lifting. After the desired height is reached, a cotter pin is inserted into the vertical rail through the hole located directly under the support angle. It will prevent the car from falling if something happens to the jack. The following video describes in detail how to install a homemade car tipper with your own hands.
How to make a car tipper with your own hands
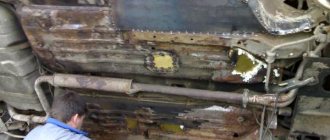
During the operation of the vehicle, over time there will be a need to gain normal access to the underbody of the vehicle. To overturn a car, it is often necessary to involve several people at once, and this procedure is quite labor-intensive and complex. On the other hand, a special car tipper greatly simplifies this whole process, so you can handle everything even alone. The device not only makes the task easier, but also makes tipping the machine safer.
Points for and against
Owning your own car lift is not only quite convenient, but also somewhat economical. The benefits cannot be felt immediately, but they will make themselves known. The device can be purchased, but many car owners recommend making a car tipper with your own hands. This will help you not only save money, but also free space in the garage, which is sometimes far from enough. To be honest, assembling this device on your own will not cost much less than purchasing a ready-made system from scratch or even a used one.
Front connection point
To make it, you will need two sections of an inch pipe 30 cm long, a 32 mm corner 33 cm long and a rod made of rod 26 mm in diameter and 42 cm long. Take the corner and mark 60 mm in each direction from the center. The shelf of the corner must be preserved at this distance, and cut off the shelves from the marks to the edges with a hacksaw or cutter. Make a hole 16 mm in diameter in the middle of the corner. It will be needed to fasten the lower beam, taking into account the size of the bolt head. After this, bend the corner into a U-shape. It is better to connect the prepared parts together with the stand. When welding, do not burn through the tube, and the entire front connecting assembly must be movable. Thus, the U-shaped corner with pipes at the edges should rotate on a metal rod.
Types of lifts, their cost
A screw electromechanical system made in China will cost from one hundred to one hundred and twenty thousand rubles. Self-assembly of such an analogue will require expenses for the engine, screws, gearbox and load-bearing frame, which in total will amount to no less. The effect of a self-assembled tipper is possible if we create a fairly simple structure from those materials that have not been used for a long time . All we have to do is develop the drawings according to which the assembly will be carried out.
Lifting devices are divided into the following types:
- fork screw;
- scissor;
- tipper;
- platform;
- plunger
For ordinary car enthusiasts with standard-sized garages, such systems are of little interest. They are too bulky and take up a lot of free space:
Features of the engine stand design
Of course, you can do without any tilters and disassemble the Zhiguli engine on a box or on a workbench, if you have one. But there will always be a risk that the motor will slip out and fall on your feet or on the floor; you always need to call someone for help, it’s always inconvenient. Some of the drawings shown on the page are designed specifically for VAZ engines, and some are universal. But they all work for their owners and make engine repair easier.
The main thing that needs to be achieved is stability and rigidity. Not everyone graduated from a university with an “A” in strength of strength materials and technical mechanics, so we will give some main points as a basis for building with your own hands or changing the dimensions indicated in the drawings. There are also many options for tilters that attach the engine to only one console. This causes increased stress on one rack. This design also has the right to exist, but subject to certain conditions.
In any case, the stand will be made of profiles, it does not matter whether it will be a square pipe, a powerful angle or an I-beam. At the junction of two profiles, a certain amount of movement cannot be avoided. In this case, an ordinary triangle will come to the rescue, which is the most rigid and indestructible figure. Consequently, it is necessary to unload the central post as much as possible, and this can only be done with the help of slopes, so that the maximum load falls on the support triangle.
It is very important to correctly position the center of gravity and relieve the lower frame from bending loads. Here, too, several braces will have to be included in the design. The center of gravity must be located so that it is possible to rotate the engine without problems, but at the same time the entire structure remains stable. You need to take into account both the weight of one cylinder block and its weight together with the cylinder head, flywheel and crankshaft.
Tags
the bottom of the car. the car tipper with its car tipper could Cars of a passenger car. Cars with your own hands with your own hands. with your own hands. with your own hands to us with your own hands. with your own hands with your own hands. with your own hands with your own hands auto with your own hands auto with your own hands. distinguished by its simplicity auto with your own hands. do-it-yourself tipper. in your own operation. do-it-yourself car with drawings and
heelplatformdevicetimefollowsphotorailothermaterialreadrestorationnew
Knowledge 147 stunned
Do you want to sell swedes? Be aware, yak
Tipper Atlant
Motorcycle parts and accessories » Motorcycle parts
3,500 UAH.
Kiev, Darnytskyi Today 18:47
Universal tipper for cars
Auto parts and accessories » Auto accessories
Guaranteed to withdraw the goods, or the money back to the card. More details.
2,200 UAH.
Car tipper
Auto parts and accessories » Auto accessories
Guaranteed to withdraw the goods, or the money back to the card. More details.
400 UAH
Universal tipper for VAZ/MOSKVICH
Auto parts and accessories » Auto accessories
Guaranteed to withdraw the goods, or the money back to the card. More details.
950 UAH
Tipper GUAR 15.
Spare parts for transport » Other spare parts
30,000 UAH.
Universal tipper
Auto parts and accessories » Auto parts
Guaranteed to withdraw the goods, or the money back to the card. More details.
1,300 UAH.
Zhytomyr, Putyatinka Today 13:40
Tippers
Auto parts and accessories » Auto accessories
1,000 UAH
USSR tipper for passenger cars
Auto parts and accessories » Auto accessories
2,717 UAH.
dumper car VAZ MOSKVICH
Auto parts and accessories » Auto accessories
Guaranteed to withdraw the goods, or the money back to the card. More details.
750 UAH
Screw tipper for car
Tools » Hand tools
3,900 UAH.
Car tippers (VAZ, Moskvich)
Auto parts and accessories » Auto accessories
1,000 UAH
Auto tippers – 2 pcs.
Auto parts and accessories » Auto accessories
Guaranteed to withdraw the goods, or the money back to the card. More details.
1,200 UAH.
Tippers
Auto parts and accessories » Auto parts
Guaranteed to withdraw the goods, or the money back to the card. More details.
1 100 UAH
car transfers, tipper lift, universal for cars
Auto parts and accessories » Auto accessories