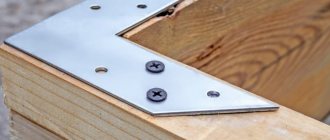
The principle of installing an entrance door depends on the type of door frame and the material of the wall to which it will be mounted. Most often, the base is concrete, brick, or blocks. In accordance with the characteristics of the surface, a suitable anchor is determined that can provide a strong and durable fastening.
The door frames themselves can be of different materials (wood species), weight, dimensions. Entrance doors may have a hollow steel body. In this case, you will need an increased length anchor. In some cases, it will be appropriate to use anchors with a countersunk head. Since the head should not protrude from the body into the opening, it is important to select the correct size of the anchor.
Installation on construction foam
This method involves preliminary fixing the box in the opening using wooden wedges. Using a building level and plumb line, the verticality and horizontality of the structure is determined. Small sections of the opening between the box and the wall are fixed with polyurethane foam. After drying, the perimeter is completely filled. It is important to leave room for the foam to expand so that when it dries and is exposed to temperatures, it does not compress the box. For this method, you should choose professional and high-quality foam with a gun.
The method is only suitable for lightweight MDF products that will not be used frequently. It is not a reliable option.
What anchors are suitable for installing metal entrance doors?
To figure out which anchor bolt is suitable for solving the task, you need to consider the features of the fasteners. We have identified anchors that will help firmly secure the entrance doors:
- the driven type is a universal and simplest fastener that is used in solid foundations. This is a type of hardware with internal threads. Select a suitable bolt for the anchors;
- wedge - has a special design. It is fixed by expanding the spacer part in the hole. To install a wedge anchor you will need a pilot hole. Depending on the type of head, you can choose an anchor that will not spoil the appearance of the door frame;
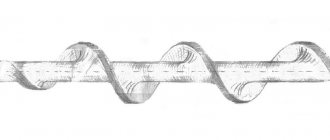
- rod - have an enlarged rod, due to which the anchor is used for porous materials. When passing through voids in the base, rod anchors create a strong connection. It is used not only for loose substrates, but also for multilayer materials. Even if you are uncomfortable driving fasteners at a 90-degree angle, you can change the angle using a long rod.
These are the most popular types of anchors suitable for steel door installations. If we consider non-metallic anchors, chemical fasteners are considered an excellent alternative. The principle of their installation is associated with the action of an expanding capsule with a special substance that firmly fixes the anchor.
Using direct hangers
Suspensions used for plasterboard and suspended ceilings are suitable for installation. The suspension plates are attached to the box, after which the structure is inserted into the opening. Using plumb lines and a level, the location of the door relative to the vertical and horizontal is adjusted. Next, the plates are fixed, the gaps between the wall and the box are foamed with polyurethane foam.
This method is suitable for doors of light weight and in the absence of fine finishing of the walls.
Advantages of anchors over other elements
Anchors for installing metal doors are the most optimal fastening option. Other methods are significantly inferior. For example, when holes are drilled and reinforcement with an identical diameter is hammered into them, the end of which is welded to the mounting ear of the box. The rod fits in quite tightly and creates the feeling of a strong fixation, but when hammering in the hole in the masonry is slightly distributed. When the sash slams due to wind or careless handling, the fastening points become loose, and the weight of the structure presses on the foam and plaster in the cracks. The latter begin to crack and crumble.
Fastening with dowels with plastic caps also leads to loosening. Plastic seals holes well for stationary objects (shelves, hanging household appliances), and vibrations from the rebate quickly crush the soft material and the box begins to wobble. Anchors are superior to all fasteners due to their expansion capacity. The hole can be drilled 1 mm larger than the diameter of the rod. Placing the pin does not break the edges in the masonry. A screw or hammer mechanism releases the internal devices and firmly fixes the box.
Mounting brackets
The modern method is a special design consisting of a bracket, a mounting bolt and self-tapping screws. A universal kit for installing a door frame allows you to secure it without using spacers, and adjustments can be made at any stage. Dowels are installed into the opening and bolts are screwed in, onto which a box with brackets pre-installed on it is hung. This method is suitable if the gap between the box and the wall is at least 1 cm.
Mounting kits have different degrees of expected load, which should be taken into account when purchasing.
Preparatory work for installation
In order for the door frame to be fastened successfully, it is recommended to prepare for such work. To do this, you should collect all the tools that may be useful. This will increase the efficiency of installation and avoid fuss, during which many people make mistakes.
Preparatory work should also include processing the doorway. The old door block is removed from it. Polyurethane foam, cement mortar, sealants, etc. are removed. The width and height of the passage must correspond to the dimensions of the door. Therefore, if necessary, the doorway will need to be reduced or increased to the required values. The sides of the doorway should be smooth and parallel to each other. To do this, level the surfaces. It is recommended to install the door frame when the floor finishing is completed (laminate, linoleum or tiles have been laid).
Required Tools
To install an interior door frame, you will need a certain set of tools. The following will be useful:
- construction knife;
- hammer;
- Bulgarian;
- chisel;
- Phillips screwdriver;
- electric drill;
- electric cross-cutting machine for wood.
Supplies you will need:
- polyurethane foam;
- spacer wedges;
- fasteners;
- platbands.
The set of tools depends on how the box will be installed and fixed.
Door frame fastener
To install the box, you need to decide on the option for mounting it. There are quite a lot of them. The choice must be made taking into account the characteristics of the opening, experience with certain fasteners, and personal preferences.
It is possible to mount the door frame on hangers. The door frame can be installed using screws and anchors. There are special brackets. A box can also be attached to them. Many home craftsmen install door blocks on polyurethane foam. This is due to the simplicity and efficiency of the work. Taking into account the chosen method of installing the box, you need to select and purchase fasteners and other necessary tools.
Fastening with anchors and screws
The classic installation method seems to be the most universal and reliable, since it is applicable to doors of any weight, including heavy metal structures. This type of installation is carried out using two methods: hidden and through.
- Hidden installation. In this case, fastening is used at three hidden points: under the hinges and the lock plate. The box is fixed to the base using anchors or self-tapping screws. However, three attachment points are not enough for the strength of the structure, so spacers and construction foam are additionally used.
- Through installation. Suitable for walls and structures of various materials and weights, including heavy entrance doors. It is usually carried out in accordance with GOST: holes 1 cm deep are drilled at four points on each side of the box. After installation in the opening, marks are made on the walls for subsequent drilling of the wall in order to secure the box using anchors or self-tapping screws. The choice of fasteners depends on the wall material. Next, the structure is inserted into the opening and secured with fasteners.
This option is the most appropriate: it is durable, reliable, and does not require spacers or the use of polyurethane foam. The only downside may be the presence of plugs at the drilling points.
Thus, there are quite a few ways to secure a door frame, which allows you to choose the most suitable one for a particular situation. However, the standard through-anchor method is the most reliable system, suitable for all types of doors, regardless of weight and purpose.
Installing an entrance door with anchor bolts: what is fastener
Using anchor bolts, you can secure the front door yourself. Fasteners are most often made of durable alloy steel, have a tip and thread, a nut, and a bushing. When screwed into the base, the position of the coupling changes. Due to its deformation, the hardware is firmly connected to the base. After installation, it is almost impossible to remove such an anchor.
All anchor bolts are classified according to the following characteristics:
- anchor parameters, including length and diameter;
- bearing load;
- a pulling force that will weaken the connection or pull it completely out of the hole.
All anchors for fastening doors are marked, from which you can get complete information about the values of length, outer diameter and inner diameter. The anchor configuration differs by the presence of additional elements in the form of a ring and a hook.
When installing entrance doors, anchoring metal doors can provide a strong connection. When installing, keep in mind that the hole should be slightly larger in diameter than the fastener itself. This is explained by the configuration of the anchor, which expands when installing entrance doors without damaging the wall.
Why jambs bend: all the reasons
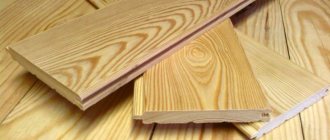
You know that door frames are made of wood. And, as you know, wood perfectly absorbs moisture. Of course, the outside of the jambs is varnished. And this, in theory, should protect the material from water. But the fact is that the varnish perfectly allows moisture to pass through.
The result is the following diagram. By absorbing moisture, the tree increases in size. And when it gives it away, its size decreases. The process is natural - but unpleasant.
Since wood has a non-uniform structure, it both increases and decreases non-uniformly. As a result, the jambs bend.
This is the main, only and main cause of the problem. How to solve it? Yes Easy! The jambs should be properly secured. Then they will remain in their place in any case, even when exposed to external factors.
What you need to prepare for work
There's really nothing complicated about it. True, “complex” in this case is not a synonym for “heavy”. To work with a metal door you will need not only skill, but also one or two muscular assistants.
In addition, you need to clearly understand the features of the process, evaluate your own strengths and prepare a tool.
- plumb line and building level;
- medium-sized crowbar or nail puller (crowbar or crowbar);
- hammer drill or electric drill with a set of drills;
- Bulgarian;
- wooden wedges;
- construction tape;
- polyurethane foam;
- spanners.
The progress of work will consist of several stages:
- dismantle the old frame;
- prepare the doorway;
- install a new frame and hang the door leaf;
- perform finishing work.
Let's look at each stage in more detail.
How to install an interior door with your own hands?
If you know how to use the tool, you can install the doors yourself. It is important to initially take all accurate measurements to avoid distortions. In general terms, the procedure for installing an interior door consists of the following processes:
- If the frame is sold disassembled, it will have to be assembled. This work increases the installation time of the interior door and also complicates the process.
- All elements of the door block are equipped with fittings: handles, locks, latches. A system consisting of rollers and guide rails is installed on the sliding sash. When installing a swing door, the door leaf is secured to the door with hinges.
- After assembling the structure, the installation of doors in the apartment begins with the installation of the frame. In the opening, the frame is fixed with anchors or hangers, and the gaps are filled with foam.
- The sash is hung on the installed canopy, adjustments are made, and trims with extensions are installed.
To perform the correct installation of an interior door with your own hands, even before purchasing the door block, accurately measure the opening. The dimensions of the frame must be smaller than the passage, otherwise it will have to be expanded. It is optimal to maintain gaps when installing an interior door between the door and the wall - from 10 to 40 mm.
Platbands are required, but extensions are needed if the depth of the opening exceeds the size of the frame. Protruding sections of the wall are hidden under decorative strips. Step-by-step instructions will help you better understand the installation process.
Box assembly
The installation of an interior door begins by unpacking the purchased unit and inspecting all components. The door frame can be sold assembled or disassembled into individual elements with mounting grooves.
If you purchased a boat with ready-made fasteners, you just need to assemble it. The frame is sold from elements cut to size. There can be three of them: a false and hinged stand, as well as a lintel top bar. If a threshold is provided, then a fourth element is included.
To assemble the frame, plugs are knocked out from the ends of the racks along with connecting pins. The edges of the vertical and horizontal frame elements are joined so that the mounting holes coincide. The connecting pins are driven in with a hammer, and the holes are closed with plugs.
When knocking out the plugs, the blows are applied through wooden pads to prevent the destruction of the decorative coating.
It is much more difficult to assemble a box sold in the form of blanks made from figured veneered timber. You will need woodworking tools, as well as basic knowledge of carpentry. Assembling the boat consists of the following steps:
- First, measure the sash. The length of the frame elements is calculated so that a gap of 3 mm is formed between the inside of the pan and the canvas along the entire perimeter. If it is intended to install a sealing rubber, the size of the gap is calculated taking into account its thickness.
- The blanks are marked, then sawed with a wood hacksaw with fine teeth at an angle of 45 or 90 degrees. Direct docking is easier. To properly saw off a corner, the workpiece is placed in a miter box. Connect the prepared elements of the box with long self-tapping screws, having previously drilled holes.
- It is easier for an inexperienced person to install doors without a threshold, since only three elements will have to be connected. The shape of the box is made in the form of the letter “P”. The edges of the upper lintel are placed on the ends of the racks. Each joint is secured with two self-tapping screws.
- The sash is placed in the finished frame. Measure the gaps between the door and frame on three sides, keeping to the required 3 mm. The racks below will rest on the floor. The length is calculated so that there is a gap of 8–15 mm between the floor covering and the lower end of the sash.
- To install the threshold of an interior door, the frame is assembled from four elements. The lower jumper is inserted between the posts and then secured with self-tapping screws. The gap between the threshold and the end of the sash is maintained at 3 mm.
After the frame is made, the door leaf is laid. Having retreated 25 cm from above and below, on the hinge stand, as well as the end of the sash, mark the installation locations for the hinges. To prevent the fastening plates from protruding, recesses are selected in the wood using a chisel or milling cutter.
Two ways to install the box
The open method involves fixing the interior door frame with anchors. The frame is inserted into the opening. Displayed vertically and horizontally. All measurements are carried out with a level and a plumb line. Maintaining a gap of 10 to 40 mm, wooden wedges are driven between the frame and the walls. By knocking or loosening the spacers, the frame is perfectly level.
From the inside of the box, through holes with countersunk recesses are drilled in increments of 50–60 cm. Holes are made in the wall using a concrete drill. The anchors are screwed in so that the head is hidden inside the secret recess. After a level check, the gap between the wall and the frame is filled with foam. Secret holes are puttied and then painted over.
The second closed method of mounting the box involves the use of hangers used in the manufacture of a frame for drywall, or a special mounting system. The metal strip is screwed with self-tapping screws to the underside of the frame. The box is inserted into the interior opening, wedged with wooden wedges, the hanging petals are folded onto the wall, secured with self-tapping screws and plastic dowels.
Installation of additional equipment
When installing a door block in a deep interior opening, the frame is not able to cover the entire wall. If the width of the box is not enough, then add-ons are used. Decorative strips are installed on the longitudinal groove of the frame, having previously lubricated the lock with glue. If the door frame does not provide a lock for the extensions, the planks are fixed through secret holes with self-tapping screws. The optimal fastening pitch is 60 cm.
Installation of door leaf
Before installing the door, the door leaf is equipped with fittings. There are different types and colors of canopies available in the market. The place for their fastening is determined before installing the box. For interior doors, it is popular to install butterfly awnings that do not require insertion.
Box assembly
Most often, the timber for the box is supplied in the form of separate parts that you will need to connect yourself. The door frame is assembled on the floor. To properly assemble the frame, you need to prepare the parts.
Measure the width and length of the canvas. For the door to move freely, you need to make allowances of 5-6 mm when marking the frame parts. This will make it possible to leave gaps between the box and the canvas.
To install the top strip of the box, the ends of the vertical elements need to be processed:
- measure the thickness of the top crossbar at the protrusion location;
- set aside this value from the end cut of the side;
- make a cross cut of the part of the sidewall protruding into the vestibule along this line;
- Using a chisel, cut off part of the material from the end to the cut, leveling the surface of the profile.
After such preparation, you need to try on the cross member to the cut of the vertical sidewall. If the thickness measurement was not made accurately, a gap will form between the edges of the parts. It needs to be eliminated.
Determine the hinge side of the box and mark the hinge locations at a distance of 20 cm from the top and bottom edges. If flat hinges are chosen for hanging the door, make a recess in the narthex. The dimensions and depth of the notch depend on the dimensions of the loop card. When marking the recess on the box, you need to make sure that the hinge pins are directed upward. The hinges can be fastened immediately or you can leave this part of the work for later. Place the door leaf in the frame and mark on it the locations of the hinge parts.
Connect the parts of the box into a U-shaped structure. Use self-tapping screws for connection. They must be screwed through the plane of the vertical parts into the end of the top bar. In order to avoid cracking of the box profile, first make holes at the screw installation sites with a 3-4 mm drill.
The uprights of the interior door frame have a length reserve (about 5 cm). After connecting the parts, you need to measure the opening again and cut off the excess length of the bars. If a wooden box is assembled with a threshold, then it is necessary to prepare the lower ends for installing the crossbar at the bottom, as indicated for the upper strip.
Final stages of work
At this point, installing a metal entrance door with your own hands is almost complete. Now you need to seal the joint that appears. Polyurethane foam is a simple, but not the most reliable option. In addition, its use greatly facilitates the work of burglars. Therefore, we strongly recommend using cement mortar to which alabaster should be added.
The work is simple:
- We close the joint from the apartment side with any smooth material at hand (plastic panel, board, etc.). This will prevent the mixture from falling out into the corridor.
- Armed with rubber gloves, we throw the solution into the gap from the entrance side. It must be filled out completely.
- Using a spatula or trowel, level the solution.
- We go into the apartment and remove the barrier.
- We apply putty on this side.
The cement mixture takes a day (sometimes two) to dry. Therefore, at this time, try to reduce the use of the door as much as possible in order to prevent cracking of the mortar. Don't forget to check the operation of the locks and handles - they should work smoothly. In case of the slightest defects, ask for replacement. We recommend immediately lubricating all moving elements (keyholes, hinges, etc.). WD −40 is perfect for this.
Removing the old door
In order to dismantle the old door, you need:
- remove the door leaf from its hinges;
- Use a crowbar to disassemble the old door frame. To do this, it is advisable to first remove all the nails and pull out the side posts.
If you can’t pull out the nails, you can simply saw the side posts approximately in the middle and tear them off using a crowbar.
- remove the lintel and threshold. After removing the door frame, you need to remove protruding nails, remaining mortar, plaster and thermal insulation.