Looking for a leak
If a stain of antifreeze remains under the car after parking, it means there is a leak in the cooling system..
Before removing the cooling radiator or air conditioner, you should make sure that all pipes and the expansion tank housing are in order. The heat exchanger of the interior heating system is also checked.
Before dismantling, you need to drain the liquid from the system . The removed radiator is carefully inspected in good lighting. If the damage cannot be seen, all holes are plugged with tight plugs and the heat exchanger is immersed in water. The emerging chain of bubbles will indicate the location of the leak. If you increase the pressure by connecting one of the pipes to the compressor hose, you can detect a leak faster.
Why do radiators leak?
It is no exaggeration to say that the radiator plays a central role in the cooling system of a car engine. While it is in good working order, most drivers even forget about its existence. But the conditions in which this device operates are far from greenhouse.
The radiator, in addition to being subject to constant temperature fluctuations, especially in winter, also absorbs all the blows of the elements: exposure to chemical reagents from the road surface, insect attacks, bombardment of stones from the wheels of oncoming cars, and finally, pricks from dry branches when driving along forest road.
It's not surprising that one day a leak might occur. This will be noticeable by a decrease in the coolant level in the expansion tank. What could be the reason? This is mainly caused by malfunctions of the engine cooling system:
mechanical damage to the tank or cooling tubes as a result of external influences (road accident, collision with a sharp object, careless handling when servicing the engine unit); cracks in the pipes due to natural wear or as a result of increased pressure in the system (the safety valve of the filler neck has gone sour, the breakthrough of hot gases through a broken head gasket, engine overheating); loosening the clamp clamps on the coolant inlet and outlet pipes; leakage of the gasket between the tank and the expander (on combined structures).
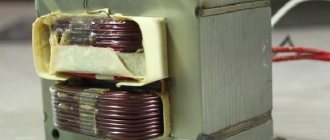
Copper or aluminum?
For high-quality soldering of faulty car radiators, you need to find out what they are made of. Modern devices are made of aluminum, copper or plastic.
The easiest way to distinguish material is by color:
The plastic used for radiators is usually black.
Copper is quite easy to solder in a home workshop or garage . Soldering leaky aluminum car radiators is complicated by a number of its physical and chemical features.
We repair the radiator
Soldering copper radiators will require preparing the following:
At the preparation stage, the product is cleaned of mechanical impurities and thoroughly dried. To speed up drying, you can blow it through one of the nozzles with compressed air under low pressure. The leak area is cleaned with abrasive paper. If there are lamellas nearby, they are carefully trimmed. Flux compound is applied to the soldering area and allowed to dry.
A powerful soldering iron or portable gas burner is used as a heat source . The electric soldering iron can be powered from the mains or from a battery. Solder is placed in the soldering area and heated with a flame so that it melts and flows into the crack or hole. If the molten solder does not wet the metal the first time and does not flow into the gap, you will need to re-clean the surface and apply flux.
What is the difficulty of soldering aluminum?
A layer consisting of oxides with a high melting point quickly appears on the surface of any aluminum part . This temperature is three times higher than that of the metal itself. Until this film is destroyed, there is no point in soldering aluminum parts.
To repair an aluminum radiator you will need:
This is achieved by mechanical surface treatment and the use of specially selected flux compositions.
Materials and tools
To repair an aluminum heat exchanger, you will need:
You will also need a wire brush, hand brush or drill attachment.
Preparing gumboil
To repair a heat exchanger with your own hands, you should take care of a good flux composition. Flux is prepared shortly before soldering a leaky radiator, since over time the composition decomposes and loses its properties. For two shares of crushed rosin you need to take one share of steel filings obtained using a file .
The composition must be poured into a fireproof container, mixed and heated with a burner. Then stir again and cool.
For the most durable seam
There is another recipe for flux, which is commonly called “flux”. With its help, you can achieve special seam strength. To create the flux you will need the following ingredients:
All components should be crushed and mixed thoroughly. The composition should be stored in a tightly closed container, protected from light.
How to seal a car radiator
Now let's talk about how to seal the radiator and what glue is best suited for this. Thus, one of the best options is considered to be the two-component adhesive 3M DP 8805. The basis of its composition is acrylic, which makes it possible to use the composition for working with difficult-to-glue materials:
- the main advantages of such glue are the ability to create a sufficiently strong and reliable seam that will not lose its original shape when exposed to high temperatures;
- The disadvantage is the rather high cost.
Special welding adhesives are also a good option. They are designed for quick and, most importantly, effective elimination of defects on plastic surfaces. Adhesive joints after such compositions withstand not only high but also low temperatures. In addition, they are not afraid of high atmospheric pressure.
To avoid making a mistake in your choice, we recommend purchasing the required adhesive from a certified automotive store.
We straighten aluminum with our own hands
Soldering aluminum radiators requires careful preparation of the repair site.
The faulty unit should be washed and dried completely. The repair area must be cleaned with abrasive paper and degreased with a rag moistened with a solvent.
Now you can apply a layer of flux with a soldering iron and rub it over the part. Next, solder is applied. Do this in several layers, rubbing and stretching each one. The steel filings contained in the flux will react with the oxide layer and destroy it. This will allow the solder to be in direct contact with the surface of the part and will significantly improve the quality of soldering.
After repair, it is necessary to re-check the radiator for leaks
Main fault
Despite the fragility of the structure, the radiator can last for years. Its main enemies are poor coolant and foreign objects that can cause mechanical damage. Antifreeze or antifreeze in themselves are not very active substances that can damage the protective oxide film, and they actually do not react with unstained aluminum. We will show you how to replace the rear hub (wheel bearing) in a Skoda Octavia A5 with your own hands in the field with a minimum set of tools. But if the coolant does not meet the specified chemical standards, it promotes corrosion processes, as a result of which the walls of the honeycomb of the device are gradually destroyed.
Mechanical damage to the radiator in most cases occurs during road traffic accidents, collisions with curbs, tree stumps, etc. In addition, the device may accidentally be damaged during car repairs. How to disassemble the 5th door Nissan X-trail with your own hands. In any case, the result is the same - leakage from a broken cell. The size of the hole determines the possibility of repair. If the heat exchanger is not seriously damaged, and the size of the problem area is several square centimeters, you can try to restore it. There is no other option to repair an aluminum radiator (we’ll figure it out later on how to solder it).
How to solder plastic?
On modern cars, to reduce overall weight and reduce production costs, many parts are made of plastic. Radiators did not escape this fate either. First of all, it is necessary to accurately determine the type of plastic . This is done according to the markings on the part. As a rule, polyamide (PA marking) or polypropylene (PP marking) is used for manufacturing. It is with this marking that you need to purchase welding rods for plastic. They can be replaced with strips cut from an unnecessary plastic part with similar markings.
The following materials and equipment will be required:
You must act in the following order:
During soldering, you need to ensure that the plastic softens, but does not melt or burn. After the repair and before installing it back on the vehicle, you should check the tightness of the repaired area in a container of water.
Source
How to find a crack or faulty radiator
Sometimes the radiator may malfunction due to being dirty. Then it is recommended to clean the device. If the fluid leak continues, then most likely there is a crack in the grille. The seal at the junction of the walls may have broken.
A slight loss of fluid is not immediately noticeable. If the antifreeze level decreases quickly, the engine overheats. This is indicated by a temperature sensor on the dashboard.
The main reasons for the loss of radiator tightness, signs, repair features
Loss of tightness of the radiator of the cooling system may be due to the following reasons:
Considering that the sizes of microcracks are small, a strong leak is not observed in this case.
Wet traces of leakage may disappear after cooling the engine and antifreeze. It is advisable to immediately detect the consequences and place of fluid leakage. The sooner repairs are made in this situation, the less damage will have to be repaired. Can be successfully repaired by cold welding .
The resulting crack is usually large in size. It can occur at the junction of plastic and metal radiator elements. In most cases, such damage is difficult to repair.
Depending on the location and size of the damage, cold welding and soldering methods can be used for repairs.
Restoring a plastic radiator
More and more often today there are cars equipped with coolant tanks
Of course, this is largely practical, since the occurrence of any oxides and destruction by chemical action from the outside is almost completely excluded.
However, the appearance of even a small crack as a result of mechanical stress can lead to active leakage of coolant , a drop in the overall functionality and reliability of the system.
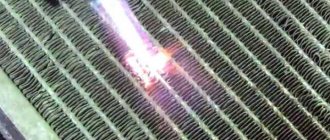
Soldering a radiator at home
Soldering cooling system radiators is a classic repair method. It was used at the beginning of the last century. At that time, radiators were made of copper or its alloys (usually brass). Soldering technology was mature at that time. A copper kettle could be repaired in any city. The soldering process is performed at the melting temperature of the solder used. To perform soldering, the following materials and tools are required:
The pre-repaired surface of the radiator is cleaned of foreign contaminants. Next, if necessary, to provide access to the soldering area, carefully remove the cooling fins. Then a final cleaning is carried out using sandpaper.
The soldering iron (if it is new) is pre-tinned. To do this, active flux is applied to its tip, heated to operating temperature, and then solder is melted onto the soldering iron tip. If there is no active flux, you can use an aspirin tablet. At the same time, it is advisable not to inhale the “thermonuclear” fumes from the tablet.
Next, active flux is applied to the cleaned area. After this, a large drop of solder is applied to the soldering iron tip and the soldering process is carried out. It requires a little experience. It may take time to get good soldering done.
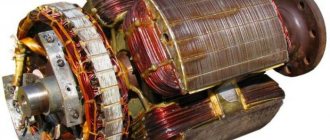
Features of soldering aluminum radiators
Modern cars mainly use aluminum radiators. Aluminum material does not solder well. Almost instantly after stripping, it becomes covered with a layer of oxide, which prevents soldering. On radio markets you can find a special active flux for aluminum. It greatly simplifies the soldering process.
You can use small metal shavings when soldering. It is applied to the repair site mixed with flux. During the application of solder, shavings scratch the surface of the aluminum. Under the layer of flux, the metal does not have time to oxidize, and soldering is successful. Please note that aluminum is a soft material, so you should not apply excessive force to avoid damaging the radiator.
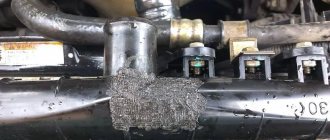
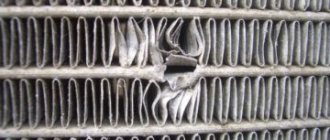
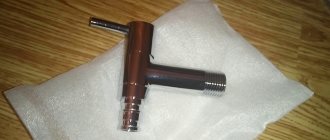
Repair of rubber connections between tubes and tube sheet.
Recently, instead of soldering tubes, rubber seals have been used (photo). These radiators are extremely technologically advanced to assemble, but due to the rapid aging of rubber, such radiators do not last long. This is especially true for the “hot” side of the radiator. It should be noted that if a leak has formed in one place, then other connections will leak in the near future - the rubber has aged. Therefore, local repairs here, as a rule, do not lead to a long-lasting effect. The most correct, but also the most expensive way here is to flare the plastic tanks, remove the rubber seals completely, remove the tube sheet, thoroughly clean all the tubes and tube sheet, drill holes, install the board in place, center and fill all holes with special rubber, installation and rolling plastic tank in place. It should be noted that this procedure is extremely, extremely labor-intensive and responsible, so it is recommended only for rare and expensive radiators. In other cases, it is better to replace the heat exchanger completely.
Welding as a method of radiator repair
At home, it is difficult to use welding to repair radiators. This requires special skills and special welding equipment. Otherwise, the thin metal of the walls will burn through, and instead of being repaired, the radiator may become completely unusable.
Cold welding
Cold welding refers to the joining of materials using a special glue. Usually this is a two-component adhesive based on mastics, epoxy compounds, metal powders to strengthen the structure of the joint, and additives.
The technological process for repairing radiators for almost all types of cold welding is approximately the same. The repair area is first cleaned with solvent and sandpaper. Then the glue components are thoroughly mixed (the mastic is kneaded). After this, the composition is applied to the repair site and left in a warm place.
To increase the reliability of cold welding, extensive repairs are usually performed. To do this, limit the leakage of glue from adjacent areas and from the back surface of the radiator. A kind of “bowl” is created into which glue is poured. This allows you to increase the reliability of the connection. Thermal expansion blocks antifreeze leakage.
A special feature of operating a vehicle after cold welding is the need for periodic monitoring of the repair site for a month. During operation, the radiator is subjected to large mechanical, thermal, and chemical loads. The bonding site may collapse, crack, and undesirable chemical reactions may occur there.
The radiator is primarily responsible for cooling the engine. Its serviceability is an indispensable condition for the performance of the engine.
Did you like the article? Share on social media networks:
Source
Using glue
Holes of small and medium sizes, cracks can be sealed. This option is temporary and is only suitable so as not to drain water from the riser or deprive the room of a heat source. After the heating season, the aluminum radiator must be removed in order to carry out high-quality repairs.
You can seal the hole using:
- Epoxy glue.
- Cement.
- A solution called “cold welding”.
Repairing holes with epoxy glue
To use epoxy resin glue, you need to prepare fiberglass or thick fabric . Since any of these materials must be wrapped around the radiator, the use of such adhesive is limited. After all, not every place can be wrapped easily and tightly. For some versions of aluminum radiators, this method is not suitable at all.
To seal holes or cracks:
- Cut the fabric into long narrow strips.
- Clean the area from which water is flowing. That is, remove all paint that has peeled off and all particles that are easily removed. This is done with a spatula. Next, take a brush with metal bristles and clean the surface. There should be pure metal left. It happens that a crack appears in a place where it is impossible to reach with a brush. An iron cable can help in this situation. It is pushed through the desired part of the radiator and pulled by the ends one by one, cleaning the desired area. This area is then dried.
- Apply glue to the treated area and wrap it with cloth.
- Apply glue to the fabric and wind another turn. This should be done until there are 4-5 turns. No glue is applied to the top layer of fabric.
- Secure the fiberglass using clamps or wire.
- Wait for the glue to dry. It dries from 2 hours to 3 days. If the room temperature is 20-25 °C, then it will dry in 2-3 hours.
To enhance the properties of the glue, you can add aluminum or bronze powder to it. Such powder is obtained by grinding off an unnecessary aluminum or bronze part with a rasp. Before use, the glue and powder must be mixed well.
Cracks are repaired in the same way using cement. However, medical bandages should be used instead of cloth. They need to be soaked in the solution and wound around the radiator.
We use “cold welding”
It is very convenient for sealing cracks and holes. This is a putty that looks like plasticine. There are two types:
The first type is easier to work with, since you need to cut off the desired piece and knead it with your hands. You should wear gloves on your hands, because the putty is chemically active and can harm the skin.
Two-color cold welding must be mixed until a homogeneous solution appears. It becomes sticky while mixing.
The fight against holes using “cold welding” is carried out as follows:
- Clean the damaged area from dirt and paint.
- Knead the cut piece of “cold welding”.
- Apply the solution to the hole and rub it in (this is done with a metal spatula). To prevent the putty from remaining on the spatula, it must be moistened with water.
- If after grouting the cork begins to come out (a bubble forms, which then bursts), it must be rubbed again with a spatula. This may have to be done before the “cold weld” has completely dried. It dries in 5 minutes.
- Secure the plug with a clamp or rubber.
You can also seal the hole with heat-resistant sealant. However, you need to use the right sealant because there are acidic sealants that can corrode aluminum. Practitioners advise using neutral solutions.
Radiator repair: Soldering irons out!
Mid-autumn is the last time to tidy up the cooling system before adding fresh antifreeze. Known, by the way, not only for its frost resistance, but also for its ability to seep even through microscopic cracks. And then, as luck would have it, the radiator leaked...
| Brass radiator soldering technology |
| Mid-autumn is the last time to tidy up the cooling system before adding fresh antifreeze. Known, by the way, not only for its frost resistance, but also for its ability to seep even through microscopic cracks. And then, as luck would have it, the radiator leaked... |
Solder - don't glue
At first glance, in the era of superglues, “cold welding” and other almighty chemistry, it seems awkward to take on such an archaic task as soldering. But when repairing radiators, the use of polymer preparations is not always justified. Do not forget about vibrations, temperature changes, differences in the coefficients of thermal expansion of metal and plastic; and if we add here the price factor and strength indicators... For example, in places where the pipes are attached to the tanks, “cold welding” does not always withstand vibration loads that are transmitted from the engine through rubber hoses. The same can be said about the filler neck. And additives that dissolve in antifreeze, under certain conditions, lead to a decrease in the throughput of the radiator. In a word, a soldered connection is no worse than a glued one. The main thing is that your radiator is not aluminum - this metal is soldered using a special technology.
Peculiarities
Traditionally, it was believed that only specialist coppersmiths could solder a radiator, even a brass one. In fact, there is nothing tricky about this, the main thing is to find a soldering iron of the right size and power and master a couple of simple techniques. In addition, the soldering procedure can be repeated over and over again an unlimited number of times until complete success is achieved.
Soldering such a large unit as a radiator has its own characteristics. First, the leak site is usually contaminated with coolant deposits or oxidation products. Secondly, it is necessary to heat a large mass of metal. And finally, body vibrations must be taken into account, so when repairing the most loaded elements (pipes, places where the radiator is attached to the body), for strength, a larger layer of solder should be applied than is usually recommended.
Process
While the soldering iron is cold, its tip must be freed from scale with a file, as it heats up, lubricate the working edge with flux and carefully cover it with a layer of solder, as if rubbing it in. If this is not done, problems will arise with heating the parts and collecting solder on the tip.
The soldering area must be cleaned until shiny with a scalpel or sandpaper. If you are going to solder a hole in a tank or radiator tube, you should clean a 3-4 mm wide strip along its edges, and free the hole itself from dirt. It happens that only by cutting out the adjacent pipe can you get to the leaking one. Subsequently, it must be completely drowned out - the design of the radiator allows it to be deprived of a certain part of the “honeycomb” (up to 20%). When eliminating a crack at the attachment point of the pipe, you need to clear the gap and its edges. In any case, do not forget to drain the coolant from the radiator and leave the neck open.
The cleaned soldering area must be heated well with a soldering iron, after which the melted rosin will form a thin layer (avoid overheating, it will char at 315°C).
Having collected solder on the soldering iron and transferred it to the heated part, run the tip over the metal several times. If everything is done correctly, the solder will flow from the tip and adhere to the areas covered with flux.
If there are shells left on the tinned surface that are not covered with solder, you need to clean them of flux residues, add fresh rosin there and repeat the tinning in this place.
After tinning, a portion of solder is added to the soldering site, which in molten form is “stretched” over the hole or crack. To avoid making a large seam, you can apply a tin patch to the hole. A large seam can be soldered in parts; the heat capacity of the radiator allows you to re-melt the solder at one edge of the seam without disturbing the already cooled layer at its beginning. You can also, using a lower-power soldering iron, smooth the already solidified solder onto a still warm part to give it a marketable appearance.
Repairing a copper radiator
Clean the engine cooler from adhering dirt and leaves with a vacuum cleaner and water. Remove defective areas from the grilles on the tubes by carefully cutting them off, clean them thoroughly with a metal brush, sandpaper and a small file, and then degrease them with acetone or any alcohol.
Remember that the cleanliness of the leak site must be perfect so that the solder adheres to the metal everywhere - both on aluminum and copper radiators. Otherwise, the quality of the connection will leave much to be desired.
Now you can solder the radiator with your own hands by performing copper plugging. You need to prepare:
- electric soldering iron with a thick tip for 100 - 150 W;
- any burner;
- solder made from a mixture of lead and tin;
- oxide remover (flux);
- rosin, dry or in alcohol.
POS-60 with low melt temperature will patch a copper radiator. For a brass engine cooler, use index 40, only heating the defective area with a gas burner for a longer time.
After performing high-quality tinning, place the solder heated with a soldering iron over this area evenly over the soldering area. It is better to use any flux instead of rosin.
This is what they teach in school
According to plumbing textbooks, soldering is the process of creating a permanent connection of parts using a special alloy (solder). Unlike another popular method - welding, when soldering the metals being joined do not melt, only the solder melts, which wets both parts and fills the gap between them. After cooling and crystallization, the solder, adhering to both surfaces, like glue, securely binds them. Strength depends on the cleanliness of the surfaces and heating (it is important to melt the solder, heat the parts and maintain the required temperature for a certain time). The characteristics of the selected solder and flux, as well as the properties of the materials of the parts being repaired, are important.
Soldering iron is half the success
In most cases, to solder a radiator you need a massive soldering iron with a power of at least 100 W. But a damaged tube can be soldered with a regular 60-watt one. Much depends on how efficiently the soldering iron transfers its temperature to the part. This, in turn, is due to the correct tinning of the tip, the presence of a sufficient amount of solder at the point of contact of the tip with the part, and the angle at which you hold the soldering iron relative to the surface being repaired.
In addition to electric ones, soldering irons heated over an open fire are also used. There is no fundamental difference in their use, except that during the soldering process it is necessary to additionally control the heating and cooling of the working part of the tool.
Safety precautions
| The electric soldering iron must have intact cord insulation and a working plug. During operation, make sure that the cord does not touch the tool or heated parts. |
| Hold the soldering iron by the handle only. You cannot determine its heating by touch - just hold your hand at some distance from the sting. |
| Vapors from heated solder and fluxes are harmful to health. Work should be carried out in a ventilated area or in the fresh air. |
| Please note that the solder takes a long time to cool down on a heated part, so after removing the soldering iron, do not rush to immediately touch the seam with your hands. |
Solders and fluxes
In everyday life, the most commonly used tin-lead solders are POS-40, POS-61, POS-90 (the digital index indicates the percentage of tin content). Their melting point is low: it is 190 – 300° C. Solders of this group are characterized by good wettability and ductility. When repairing cars, copper-zinc solders of the PMC series are also used, which provide a strong and corrosion-resistant connection. But due to the high melting point (825 - 905°C), a gas burner is required for heating, which limits their use.
Fluxes are used to destroy the oxide film on the surface of parts and to protect them from oxidation during the soldering process. For tin-lead solders, an aqueous solution of zinc chloride is usually used - “etched” hydrochloric acid. When repairing brass radiators, it is recommended to use rosin (or its alcohol solution), sold on radio markets. It does not cause corrosion of metals and does not require thorough “decontamination” at the end of the work.
Igor Shirokun Photo by the author
If you find an error, please select a piece of text and press Ctrl+Enter.
Source
Soldering: method 2
This method involves the use of tin-lead-bismuth solder and homemade flux. You need to do the latter from:
- cryolite (the proportion in the solution should be 10%);
- sodium sulfate (share 4%);
- lithium chloride (share 23%);
- potassium chloride (share 56%);
- table salt (share 7%).
Tin-lead-bismuth solder can be purchased in stores (it looks like a rod or wire) or you can make it yourself. The second option is implemented by adding bismuth to molten tin-lead solder. The mass of bismuth in the mass of the finished solution should be 5%. You can calculate the mass of bismuth by dividing the mass of the original solder by 95 and multiplying the resulting figure by 5. To solder fairly large defects in an aluminum radiator, you need:
- Prepare the area where there is a hole. The result of the preparation should be clean, dry, non-greasy aluminum.
- Make flux. This procedure begins by grinding each component in a mortar. Grind until powder is formed. In this case, each element is brought to the state of powder separately. Afterwards, all the “ingredients” are poured into a glass container and mixed until a homogeneous mixture is formed. It is advisable to take a dark, hermetically sealed glass container. This is necessary to protect the mixture from moisture and sunlight when you need to take some breaks. Before soldering, the mixture is poured into a crucible and melted over a gas stove.
- Molten flux is poured onto aluminum and soldering is performed. The features of soldering are no different from the features of the process described above.