In the previous article, we looked at a way to strengthen putty and plaster using a painting mesh . But in addition to the walls, it is also necessary to strengthen the corners, especially where the possibility of touching is quite high. And for these purposes, special painting perforated corners are produced.
In addition, with the help of these corners, it becomes possible to more easily align the angle, and not only the right angle, but also the curved one. Now we will look at what types of painting corners there are and what is the technology for using a painting corner.
Types of corners and features of their use
The most common product options are:
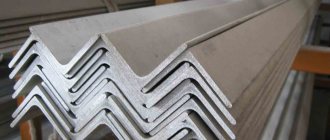
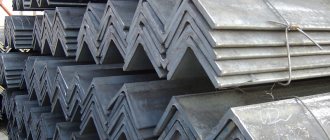
Metal perforated corner
This type is a thin sample made of a profile with perforation and a rigid edge along the edge. There are basically 2 types of similar corners for drywall:
These representatives have many subspecies. The corners are not glued, they are practically “slung” onto the structure and secured with putty or gypsum plaster.
Straight perforated corner is used for processing the inside and outside of corners.
It is a V-shaped profile with many holes - perforations.
Options for metal perforated corner for drywall
Actually, with their help, a high-quality connection with the processed corners occurs, and the top, located at the internal corners - inside, and at the external corners - outside, is a guide for the spatula. Excess air also escapes through the holes. Straight perforated corners are made of plastic, aluminum, and galvanized. The latter is tougher than the others, and the wide one can generally be used as a plaster beacon.
Plastic corner
This sample is more resistant to moisture than the profile, but its resistance to mechanical damage is lower. Among the advantages are the low price and the absence of corrosion of the material. There is also a type of plastic corner, for example, AquaBead, which has special paper with glue applied in the inside. Putty is not required for fixing here; just moisten the adhesive surface with water and simply glue the corner to the desired place.
Arched
When installing a gypsum plasterboard arch in the opening, various finishing materials are used, such as plaster, wallpaper, panels and others. But in order to preserve the transition points between planes, an arched corner, which has great capabilities, is used. Arched corners are divided into the following types:
- Installed under plaster, perforated. They have separate petals on one side of the corner, allowing you to place a sufficient strip on any arched curve. There are plastic and profile ones;
- Decorative, which are glued to the plaster.
This is what an arched corner for drywall looks like
Before attaching the arched corner, you need to match it with the main finish or in contrast, so the design will look more original.
Products with mesh
Such elements are used in places that require strengthening corners and protecting them from damage. Plaster mesh corners are designed for internal and external corners. They can be made of either plastic or metal profile. The choice will be influenced by the shape and material of the finishing surface.
Purpose of paint corners for putty
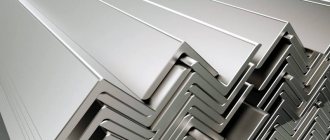
Before applying the finishing coat, perforated aluminum profiles are attached to the corner. They not only help align joints, but also provide surface protection. The length of the metal elements can vary from 2.5 to 3 m, the edges are trimmed to obtain the desired size. After this, the painting corners are attached to the walls (perforations are created for better fixation).
For the manufacture of corner profiles, various materials are used: metal and polymer. The metal group includes perforated products made of steel and aluminum. To protect the product from corrosion, the steel is coated with zinc. The thickness of the strips of metal profiles does not exceed 0.4 mm, they are easy to install, but are only suitable for straight joints (it is impossible to assemble an arch and other shapes using such elements).
Due to their natural plasticity, polymer corners can be used not only for straight but also for rounded joints. In addition, the products are resistant to moisture and are cheaper than other analogues.
Main advantages of the elements:
- high-quality fixation;
- can be used both indoors and outdoors;
- corrosion resistance;
- easy installation;
- light weight;
- durability and safety.
Installation of corners on drywall using corners
When starting to install a corner on drywall, you need to have tools and material on hand.
Required material
- the selected type of corner will need to be purchased with some reserve;
- using a primer, the surface of the drywall is strengthened;
- It is best to buy Vetonit putty, which is of high quality.
Tools
- metal scissors will help you cut out the necessary parts correctly and quickly;
- a brush that will be needed to apply the primer;
- wide and narrow spatulas will be needed for puttying drywall;
- The sanding block will remove all unevenness on the plane, while the angle will be perfectly even.
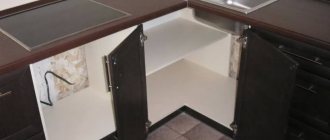
This is what mounted corners on drywall look like.
When starting installation, you need to familiarize yourself with the sequence of leveling the corners with putty so as not to damage this fragile material.
Stages of work
- First, the surface must be thoroughly cleaned and treated with a primer. You need to proceed to the next stage only after it has completely dried.
- Measurements are taken and the required length of the corners is cut. They are applied to the drywall as a sample.
- For further work, you will need non-woven tape, serpyanka mesh for the internal corners, one of the types of perforated corners: plastic, adhesive, rounded, either made of a metal profile or paper-based.
- Before you putty the gypsum plasterboard corners, you should select a putty for the gypsum plasterboard. To form internal and external corners, it is better to buy a dry gypsum mixture. It has a reasonable price, good quality and can securely fasten elements to the structure.
- The putty is prepared following all the steps: poured, poured, stirred, allowed to settle, kneaded again.
- When working with external corners, you need to remember that they are most often subject to mechanical stress; it is better to mount metal samples, in some cases having a rounded shape.
- Check the flatness of the end.
- Putty is applied to the area to be treated with smooth movements. Without allowing the composition to dry, you need to secure the corner with pressure, check the accuracy with a level, and if necessary, you can tap with a rubber mallet.
- Sometimes the corner is attached to the drywall with a stapler or glued with glue, and then covered with putty.
- Another layer of the mixture is applied to the installed element and now alignment occurs with the general plane of the wall.
Installation of painting putty corners in the room on the slope or corners
Perforated corner for putty
Finishing is done as follows:
- First, the perpendicularity of the planes is measured using special tools.
- Adjust the depth of the missing layer. If the vertical and horizontal deviation is insignificant, then level the corners of the walls with a thin screed.
- Prepare aluminum corners (cut to the required length).
- After leveling the wall, prepare a solution and apply it with a spatula to the surface.
- The finishing layer is distributed over the area and carefully rubbed with a corner.
- Apply a paint corner and press (this work is done before the mixture sets; it should flow out through the hole in the aluminum profile).
- Evenly distributes the mass flowing through the perforations, levels the layer, and removes residues.
- After the mixture has dried, sand the corner.
- After preparing the wall, the surface is painted or covered with other decorative materials.
Particular attention is paid to the location of the painting corners when attaching them to slopes. To finish window openings, plastic corners are most often used, because... they are affordable, durable, easy to install, and are fixed over a putty or plaster base. In construction stores, profiles are presented in different sizes, in most cases the angle is at least 90°. The products help hide minor irregularities and other wall defects.
Decorative corners on slopes are often used. The profile must be smooth, symmetrical, without defects. Before installing the painting elements, prepare the surface, measure the required length, and attach the strip.
A painting corner with a mesh is often used for facade finishing work. The material is securely fixed in the plaster and protects the surface from chipping.
Arched
To decorate arched openings, flexible perforated profiles are purchased; they are suitable for working with curved and multi-level structures. The arched perforated corner for putty can be hard or soft. A rigid profile is indispensable when working with three-dimensional structures (where there are many smooth shapes and bends), but the price of such an angle is higher.
For finishing small details in the interior (where there are many beautiful transitions, etc.), arched openings with a small radius, it makes sense to use arched corners made of soft materials. The lack of rigidity of these products is fraught with the further formation of pits and nodules that can destroy smooth transitions. To avoid such difficulties, arched corners are installed using gypsum mixtures. In addition, this installation method allows you to correct visual defects during plastering.
Perforated galvanized paint corner
To strengthen and protect corner structural elements, it is convenient to use a perforated corner, which:
- Provides reliable adhesion under putty and guarantees strong fixation of elements without the use of additional fasteners;
- It has anti-corrosion properties, which allows installation of internal and external surfaces;
- It stands out for its durability thanks to the use of high-quality metal.
Depending on the specifics of the work, the StroyMarket company can offer a metal, plastic or aluminum corner. We offer construction products that have reasonable prices, high quality and guarantee ease of installation.
A painting corner is more often found as an aluminum perforated corner (aluminum corner profile). This is a thin perforated metal profile designed for leveling and reinforcing corner edges. More details here.
Have you decided to renovate your home? Everything is going smoothly. And now the time has come to prepare the corners, slopes, and doorways for further finishing work. Your task is to level these areas and strengthen them with the help of a painting corner (plaster profile).
Characteristics of the corner profile
The purpose of using the material is to strengthen and protect slopes and corners from mechanical damage. It is made of plastic or metal. There are perforations (holes) along the entire length.
The profile can have a reinforcing mesh on both sides. Such building material will adhere securely to the surface after installation.
The corner profile is used to protect corners on plasterboard structures, to strengthen window slopes, doorways, etc. With its help, it is quite easy to give the correct vertical line to the outer corner.
Profile installation
To strengthen and level the corners, purchase the required amount of material. To calculate its consumption, measure the length of each section with a tape measure. Sum everything up and add 10% of the result obtained to the treated value. This measure is necessary, since it is much more difficult to work with small pieces.
- Installation of a metal perforated profile is carried out during the process of leveling the walls. The preliminary step is priming the work area. While the soil dries, the painting corner is shortened to the required size.
- After this procedure, we prepare a solution on which the material will be planted (starting putty, tile adhesive). The mixture is kneaded in a clean container using a mixer. It should look like thick sour cream. A mixer is a special attachment for a drill.
- The time has come to apply the prepared solution over the entire length of the working area and on both adjacent sides. Now you need to attach the profile to the treated area. It is pressed into the solution so that the mixture appears through the perforation. Remove excess solution from the end of the material.
- The verticality of the corner is checked with a building level. Until the mixture sets, adjust the position of the building material. Having achieved the desired result, remove excess putty on adjacent surfaces. Leave everything until completely dry.
- After the plaster has dried, remove any imperfections using a fine-grained emery cloth. The final leveling will take place along with the application of finishing plaster to the main surface (walls, ceilings).
How is a plastic corner installed?
The work of installing a plastic analogue to a plasterboard structure is performed a little differently. It is secured to the work area with a construction stapler. The putty is applied on 2 sides over the profile. The surface is leveled with a spatula, and excess solution is removed. The last stage of work is the elimination of minor defects and the application of a finishing layer of putty.
A detailed description of the installation of a corner profile will help solve the problem with corners and slopes once and for all. They will be under the reliable protection of this material.
- After thorough drying, the slope corner is polished.
- Installing corners inside the structure looks similar, even a little easier. Carefully coat the adjacent sides and the gap between the corners with a spatula, and remove excess mixture. A reinforced tape having the desired shape is glued onto the dry, sanded surface. You can also buy a serpyanka mesh, just apply it to wet putty.
- Using a building level, check the fastening of the corner on the plasterboard, then use the next layer to hide the unevenness.
- After thorough drying, the surface is finished with sandpaper or a sanded block, forming a perfect angle.
- To facilitate the leveling process, so-called beacons are used, attached to the surface with a plaster solution; here you can do without fastening parts.
- Separately, I would like to mention the semicircular plastic corner, used in rooms with the maximum possible impact on the corners. It is made of flexible plastic and has a semicircular angle rather than an acute one. Its price is quite reasonable, and its durability is beyond doubt. It differs in some features at the installation stage, namely cutting the end by 1.5-2 cm with an angle of 45 ͦ . A corner is pressed into the applied initial putty, fixed with a stapler, and the edges are treated with the mixture.
A video of arranging corners will help you see how parts of drywall are reinforced, and will also allow you to select and buy the necessary elements.
Finishing internal and external corners will not seem difficult with the right approach and the necessary training. The main thing is that during installation, smooth walls of plasterboard without a frame must be made, requiring minimal finishing.
Two fundamental differences between perforation angles
In addition to plastic and metal, there are two types of corners: for painting and for wallpaper. The difference is that the wallpaper product implies a protrusion for inserting the wallpaper sheet, fiberglass, etc. During operation, this protrusion takes on all mechanical impacts on the outer corner and does not allow the wallpaper to move away from the base.
A corner for painting, when used with wallpaper, certainly enhances the mechanical strength of the corner, but does not protect the wallpaper from fraying and peeling. As a rule, when gluing wallpaper, such a corner is simply wrapped with a single strip of wallpaper, without making a seam on the outermost corner, which is not very practical. Not practical both in terms of gluing and operation (although some may argue here).
“To be wallpapered” or “to be painted” is rather a popular classification; this important fact is often not indicated in store catalogs. However, a competent consultant will understand the differences well.
Moreover, for high-quality painting, fiberglass is usually used, which does not allow corners to go around - therefore, in such a case, it is also better to use a product for wallpaper.
Let me add: I have only seen plastic products for wallpaper; I have only seen metal ones for painting.
Such products have side dimensions of 20-25 millimeters and a length of 260 centimeters, less often 270 or 300. There is also a profile of 6 meters in length, but it is not easy to find.
How to install a perforated corner with your own hands
In this material we will look at the process of installing a perforated corner. In particular, we will deal with the questions: how to fix the corner, how to level it, how to finish it. For maximum clarity, the article is supplemented with relevant photographs and videos.
First of all, a few words about what it will take to get the job done. So, in addition to the perforated corner, we will need the following materials and tools:
Regarding the perforated corner. In this case, it all depends on the corner you will be finishing. If work is being done to repair an external corner, in a room where there is the greatest likelihood of damage, it is best to use a plastic corner. Such a room, for example, is a corridor.
Of course, the use of a plastic corner is not a mandatory requirement; rather, it is a recommendation. For finishing, you can equally successfully use both metal and plastic corners. Simply, plastic, in comparison with metal, is more advantageous in terms of durability: they do not wrinkle in the event of fairly strong impacts.
Configurations of reinforced corners (external, internal)
Painting corners can be used for both interior and exterior decoration. External corners are most often protected with aluminum profiles to protect the surface from abrasion, impacts and other damage.
Before you begin the work, you need to prepare the appropriate materials and tools:
- perforated aluminum corners;
- putty;
- sheet metal shears;
- spatula for applying the mixture.
Installation consists of 3 stages:
- Preparation of solution and profile
. Using special scissors, adjust the size of the corners. After this, apply the finishing coat (according to the instructions on the package).
- Installation of aluminum corner
. Distribute the solution on the surface, reinforce corners, and correct various irregularities.
- Sanding corners
. After the finishing layer has dried, the surface is sanded with sandpaper or a special mesh.
Finishing of internal corners is carried out in a similar way.
The following tools are prepared for work:
- painting aluminum corners;
- putty;
- scissors for working with metal;
- putty knife.
Preparatory work
Now that we’ve sorted out the tools and type of corners, we can move on to the preparatory process. It comes down to priming the plane to be repaired and preparing a gypsum solution.
First of all, we prepare a solution from starting gypsum putty. By the way, to glue the paint corner, you can use not only the starting putty, but also the finishing putty. You can also use various cement-based adhesives, for example, ceramic tile adhesive.
The solution is prepared as follows: take a certain amount of water into a clean container, add the dry mixture to it and stir everything with a mixer. Important: the solution for installing a perforated corner must be quite thick - much thicker than, for example, for puttingtying walls or gluing foam ceiling tiles (Gluing the ceiling with tiles).
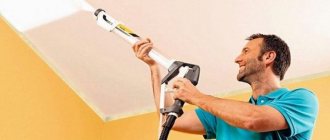
So, the mixture is ready, you can start priming. Everything here is simple and quick: using a paint brush, apply primer to the surface to be treated, spreading it evenly. There is no particular point in priming several times - once is enough.
Corner with mesh to create a reinforcing layer at the corner of the wall.
When installing a reinforcing layer on wet plaster facade systems, not only a specialized mixture is used, but also a reinforcing fiberglass mesh. At the corners of buildings, around window and door openings, corner projections also need to be reinforced within the reinforcing layer. For this purpose, a corner profile with reinforcing fiberglass mesh is used.
In the jargon of façade designers, a corner profile with fiberglass mesh has several names: PVC corner profile, reinforcing corner with fiberglass mesh, façade corner, corner amplifier, etc.
The corner reinforcing profile with fiberglass mesh is based on a PVC core, which imparts rigidity and maintains the straightness of the element's dimensions. On both sides of the PVC core, strips of fiberglass mesh are glued with a special compound, which, like rolled fiberglass mesh, is embedded in an adhesive reinforcing mixture. The most popular PVC corner profile is the 10x15 cm PVC corner profile. It is this mesh size at the edges that allows for correct overlap of the corner and fiberglass mesh on the wall.
Many years of experience of German manufacturers of façade works have shown that the size of the PVC core must be at least 23 mm in the width of the shelves, and the thickness of the PVC must be at least 9 mm. The perforation area of the angle core should be within 25-35%. The corner mesh must have a density of at least 160 grams/m2 with a cell size of 4x4mm, and it must be glued to the core with a high-quality adhesive along the full abutment line. It is these conditions that provide the best performance properties.
The range also includes rolled corner profiles for non-standard corners. And an arched profile for semicircular window openings.
PVC corner profile with fiberglass mesh is used:
- when creating a reinforcing layer during external plastering work with further cladding with plaster mixtures or clinker tiles.
- facade corner 10 x 15 cm is used at the corners of buildings, along the entire length of architectural projections and around the outer corners of window and door openings. (It is recommended to install a drip corner at the top of window and door openings to drain water above the window).
- Arched front corner is used to strengthen the slopes of arches or arched vaults of windows. On one side it has cuts, thanks to which the corner takes the desired bending shape without causing wrinkles to deform.
- The rolled corner allows you to strengthen the corners of the house with a non-standard angle.
| PVC corner profile with reinforcing mesh. In assortment: |
| vendor code | Length m.p. | PC. in pack | Dimensions see |
| 5515 | 2,5 | 100 | 6 x 9 |
| 5520 | 2,5 | 100 | 8 x 12 |
| 5525 | 2,5 | 100 | 10 x 15 |
| 5525 Tex-Prof | 2,5 | 100 | 10 x 15 |