Finally overcame laziness and decided to write about soldering the radiator! While there was silence in the blog, to my surprise, the number of subscribers exceeded a hundred! This makes me very happy, so it’s worth continuing to write!
I stopped writing while soldering the radiator. Unfortunately, during this time almost nothing has changed. Work, then a session, periodic repairs of the second car, etc. They didn’t let me deal with the Volga.
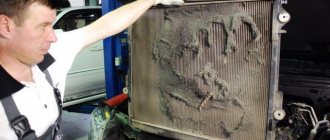
Now to the point: the experimental necromancy of radiators bore fruit - I learned how to solder radiators quite well, plus I realized that not everything that can be soldered is worth soldering. Let me remind you that after flushing the radiator with citric acid, it began to leak quite a lot, and therefore, I decided to try to solder it myself. I think it will be more interesting and useful if it is not just a story, but some kind of soldering manual. Fortunately, I have accumulated a lot of experience, and on the Internet, I haven’t seen much description of how this is done.
Tools and materials:
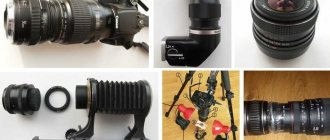
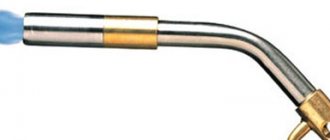
The first and necessary thing is a soldering iron, even two - one - “a la hatchet”, for good heating of large areas, the second - thin, for sealing in hard-to-reach places. A gas blowtorch is also an indispensable thing. Pliers for picking out the “mesh” of the radiator. Well, brushes for the drill for cleaning. At first I tried to use alcohol-rosin flux for soldering; I had it left over from when I soldered a guitar pedal in my adolescence. I really liked it then, but it’s completely unsuitable here. In addition to the fact that it solders poorly, it also leaves layers in the solder through which coolant can leak. So I decided to use soldering acid - it works great. And of course, solder. I used more than 300 grams of it. From the factory, the radiator was sealed with POS 40 brand solder. At first, I also tried soldering with it, but it was very tedious, and the radiator quickly cooled down to a temperature that was not enough for this brand, so I switched to POS 61.
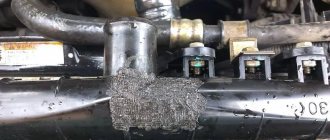
Process: First you need to determine where the leak is. In the worst case, we'll just see a huge hole. The next level, easy leakage, when filling the radiator with water. And finally, when there are no large holes left, the radiator is pressure checked. I did it like this:
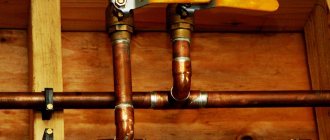
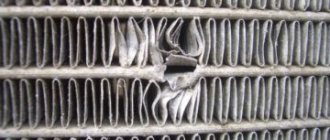
An automobile cooling radiator is designed to lower the temperature of the coolant (antifreeze or antifreeze) circulating inside the engine. Its design usually consists of two tanks and honeycombs located between them, which are a system of thin tubes equipped with thin lamellas. Reducing the refrigerant temperature is achieved through natural or forced air blowing of the cells.
Despite its simple design, the radiator sometimes fails. Its main malfunction is a violation of tightness. In other words, it begins to leak. A coolant leak while the power unit is running threatens the latter with critical breakdowns due to overheating.
Replacing a radiator is not so much a troublesome task as it is an expensive one. And the bill here runs into thousands and even tens of thousands of rubles. In this article we will talk about whether it is possible to solder a cooling radiator with your own hands and what tools you will need for this.
Why does a leak appear?
A leak in the device under consideration can occur only for two reasons: due to mechanical damage and due to corrosion processes occurring inside the tubes. In the first case, it may be the impact of a foreign object on the honeycombs or tanks. This usually happens as a result of traffic accidents, hitting a high curb, hitting a stone, etc. Everything is clear here. A visual inspection will allow you to accurately determine the location of the damage, as well as assess the possibility of repair. Corrosion is a little more complicated. In order not to make a mistake and solder the cooling radiator where needed, you will need to carry out a few simple steps to detect the problem area or even areas. The fact is that corrosion damage can occur in several places at the same time.
Preparatory work
Since the cooling efficiency of the engine or air conditioner mainly depends on the radiator, its technical condition must be carefully monitored.
First of all, you should regularly carry out technical inspections to ensure operability, and in addition, monitor the level of coolant that circulates in it in a closed cycle.
The appearance of a leak is one of the most common causes of failure of this cooling unit, both in a car and in an air conditioner.
It can appear for various reasons. First of all, this can happen due to any mechanical damage.
In addition, all kinds of vibrations coming from a running engine or air conditioner while the car is moving can also cause leaks. In some individual cases, liquid may begin to leak not only in the pipes, but also at their connection to the base.
IMPORTANT TO KNOW: Plasma welding technology
If a radiator leak occurs, soldering, which you can do yourself, will help eliminate the problem. Soldering is carried out in stationary conditions and a garage is ideal for this.
If a leak is detected, it is necessary, first of all, to drain all the coolant from the unit, and then carefully remove it from its regular place in the car.
In the case when antifreeze acts as a coolant, it is recommended to drain it into a special clean container for later reuse.
Next, carefully disconnect all the pipes from the device, being careful not to damage them. After this, unscrew the fastenings of the unit in the normal place and pull it out of the engine compartment.
It is recommended to place the dismantled radiator on a flat, stable surface, which can be a work table in the garage.
How to properly solder a radiator with your own hands is described in detail in the video below.
Video:
Copper or aluminum
In order to properly solder a cooling radiator, it is necessary to determine exactly what material it is made of. Most often, cooling devices are made from copper and aluminum. It is not difficult to determine the type of material. Copper honeycombs have a characteristic reddish-brown color, aluminum ones – gray.
If you have determined that you have a copper radiator, you can consider yourself lucky. This metal is easy to solder at home. If you get an aluminum device, then you will have to tinker with it, because this material is difficult to solder.
Repairing a copper radiator
To solder an engine cooling radiator made of copper, you will need the following tools and tools:
- powerful soldering iron or gas torch;
- solder;
- soldering flux;
- pliers;
- sandpaper.
First, you need to dry the radiator, especially if you checked it by immersing it in water. Next, the damaged area should be thoroughly cleaned with sandpaper. If there are slats on it, they need to be removed locally. After this, the soldering area is treated with flux and dried again.
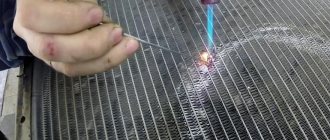
You can solder the cooling radiator using either a gas torch or a soldering iron. In the first case, solder is applied in place and heated with a torch until it melts and fills the crack. When using a soldering iron as a heating tool, make sure that it has sufficient power.
If the solder does not adhere to the surface or lags behind, it is necessary to repeat the stripping and fluxing process. You can check the repaired radiator using the method described above.
Classification of cooling systems
There are several types of engine cooling systems:
- air;
- liquid;
- combined.
The air system uses the flow of outside air to operate. Used in motorized vehicles with low power engines.
In a liquid system, a heated engine is cooled with a special coolant. Most modern car engines are equipped with such a cooling system.
The combined system combines the operation of liquid and air systems. Used to operate high-power power plants. Widely used at energy sector enterprises.
What is the difficulty of soldering aluminum?
Aluminum is a very specific metal. Its peculiarity lies in its high chemical activity, manifested in the formation of a so-called oxide film on the surface. It appears instantly when pure metal comes into contact with air, reacting with oxygen. And it is precisely because of this that it is impossible to solder an aluminum cooling radiator in the usual way. This will require additional substances that contribute to:
- removing oxide film from the surface;
- reducing surface tension;
- protection from adverse factors affecting the soldering process;
- improved solder flow.
Materials and tools for soldering aluminum radiators
In order to solder a cooling radiator, the honeycombs of which are made of aluminum, you will need:
- powerful soldering iron;
- solder (tin-lead or tin-bismuth alloy);
- iron filings;
- rosin;
- fireproof container (crucible).
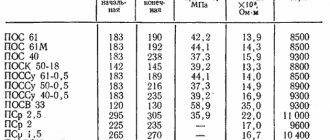
It is desirable that the soldering iron has a power of more than 100 W. Otherwise, it simply will not be able to warm up the aluminum. As for solder, a tin-lead alloy is suitable for sealing small cracks (holes). If the damage is significant, then it is advisable to use solder consisting of 5 parts bismuth and 95 parts tin. Such an alloy can be easily purchased in stores that sell radio components. Usually, it has the form of wire and is marked as POSV-33 or POSV-50.
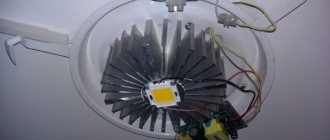
New UAZ radiator
Today you can replace old original radiators with new ones for the 3160, produced by the SHAAZ plant. Their heat output is 62 thousand kcal per hour. The new radiator has a tube arrangement one and a half times more frequent. Regarding the plates, they are shorter and straighter, which significantly improves the heat transfer of the plate and air permeability. Thus, these radiators provide much better cooling.
Regarding modifications during installation, it is necessary to install standard bolts instead of the lower standard bolts, since the threads are located on the radiator itself. It is also recommended to move the lower pump hose slightly downwards. Another distinctive feature of the new UAZ radiator is the absence of lower legs, and the hole for the handle is now located in the lower glove compartment.
And finally, about the kosher radiator on the UAZ Patriot:
Source
Preparing gumboil
Soldering a cooling radiator with your own hands is only possible if you have high-quality flux. You will have to prepare it yourself. And it’s better to do this just before you start soldering. So, pour 2 parts of ordinary rosin and 1 part of iron filings into a fireproof container. Sawdust can be made using a file with fine notches, processing any iron workpiece that comes to hand. Heat the resulting mixture over a fire, stir and let cool. That's basically it. Flux for aluminum is ready.
Flux for the most durable seam
To obtain the most durable protective seam at the site of damage to the radiator, a special flux called flux is used. It can also be obtained at home. To prepare flux, you will need the following substances in the following proportions:
- potassium chloride – 56%;
- lithium chloride – 23%;
- cryolite – 10%;
- coarse table salt – 7%;
- sodium sulfate – 4%.
The ingredients are finely chopped and mixed. This melt must be stored in a hermetically sealed glass container in a dark place.
We repair an aluminum radiator with our own hands
The radiator, as in the previous case, is washed and dried. We thoroughly clean the soldering area with emery cloth and then degrease it. After this, we apply pre-prepared flux to it using a soldering iron. Rub it thoroughly over the surface. Next, we apply solder layer by layer, stretching it over the surface to be repaired. The role of the iron filings is to destroy the oxide film at the very last moment before soldering, thereby allowing the aluminum and solder to bond.
Soldering a radiator at home
Soldering cooling system radiators is a classic repair method. It was used at the beginning of the last century. At that time, radiators were made of copper or its alloys (usually brass). Soldering technology was mature at that time. A copper kettle could be repaired in any city. The soldering process is performed at the melting temperature of the solder used. To perform soldering, the following materials and tools are required:
The pre-repaired surface of the radiator is cleaned of foreign contaminants. Next, if necessary, to provide access to the soldering area, carefully remove the cooling fins. Then a final cleaning is carried out using sandpaper.
The soldering iron (if it is new) is pre-tinned. To do this, active flux is applied to its tip, heated to operating temperature, and then solder is melted onto the soldering iron tip. If there is no active flux, you can use an aspirin tablet. At the same time, it is advisable not to inhale the “thermonuclear” fumes from the tablet.
Next, active flux is applied to the cleaned area. After this, a large drop of solder is applied to the soldering iron tip and the soldering process is carried out. It requires a little experience. It may take time to get good soldering done.
How to solder plastic on a cooling radiator
Most modern car radiators have tanks made of heat-resistant plastic. This material does not react with coolant and does not corrode, but it does not have the elasticity to withstand mechanical damage. That is why some car owners, faced with the problem of a broken tank, are wondering whether it is possible to solder a cooling radiator whose plastic has been damaged. Can! But it is better to entrust this matter to professionals. Heat-resistant plastic is very difficult to solder due to its rigidity. Yes, and choosing the right material for this is quite difficult.
Today you can find hundreds of offers from organizations and individuals who are ready to solder a cooling radiator with high quality. The price for such services ranges from 100 rubles per sq. cm. You will have to pay separately for removal, diagnostics and installation of the device.
If the issue of repairing the tank has become very acute, or you don’t really want to pay, you can try to do it yourself. To do this, the damaged area must be cleaned and formed in such a way that the material that will be applied as a restorer can easily penetrate into the gap. Next, the treated area is degreased.
As for the gluing material, it can be soft plastic or two-component epoxy adhesive. In the first case, the plastic is melted using a soldering iron and applied to the damaged area with a small spatula. The glue is applied in the same way. When performing work on soldering tanks, it is advisable to use a reinforcing mesh with small cells. It is placed between layers of adhesive material. Of course, such soldering cannot guarantee years of trouble-free operation of the radiator, but it is quite suitable as a temporary measure.
When a car radiator starts to leak, not all car owners have the opportunity to immediately replace it with a new one. For some models, a car radiator costs tens of thousands of rubles, for others you have to wait for more than one week for its delivery. Soldering the cooling radiators can help hold out until replacement. The soldering method depends on the material from which the heat exchanger is made.
Radiator repair: Soldering irons out!
Mid-autumn is the last time to tidy up the cooling system before adding fresh antifreeze. Known, by the way, not only for its frost resistance, but also for its ability to seep even through microscopic cracks. And then, as luck would have it, the radiator leaked...
| Brass radiator soldering technology |
| Mid-autumn is the last time to tidy up the cooling system before adding fresh antifreeze. Known, by the way, not only for its frost resistance, but also for its ability to seep even through microscopic cracks. And then, as luck would have it, the radiator leaked... |
Solder - don't glue
At first glance, in the era of superglues, “cold welding” and other almighty chemistry, it seems awkward to take on such an archaic task as soldering. But when repairing radiators, the use of polymer preparations is not always justified. Do not forget about vibrations, temperature changes, differences in the coefficients of thermal expansion of metal and plastic; and if we add here the price factor and strength indicators... For example, in places where the pipes are attached to the tanks, “cold welding” does not always withstand vibration loads that are transmitted from the engine through rubber hoses. The same can be said about the filler neck. And additives that dissolve in antifreeze, under certain conditions, lead to a decrease in the throughput of the radiator. In a word, a soldered connection is no worse than a glued one. The main thing is that your radiator is not aluminum - this metal is soldered using a special technology.
Peculiarities
Traditionally, it was believed that only specialist coppersmiths could solder a radiator, even a brass one. In fact, there is nothing tricky about this, the main thing is to find a soldering iron of the right size and power and master a couple of simple techniques. In addition, the soldering procedure can be repeated over and over again an unlimited number of times until complete success is achieved.
Soldering such a large unit as a radiator has its own characteristics. First, the leak site is usually contaminated with coolant deposits or oxidation products. Secondly, it is necessary to heat a large mass of metal. And finally, body vibrations must be taken into account, so when repairing the most loaded elements (pipes, places where the radiator is attached to the body), for strength, a larger layer of solder should be applied than is usually recommended.
Process
While the soldering iron is cold, its tip must be freed from scale with a file, as it heats up, lubricate the working edge with flux and carefully cover it with a layer of solder, as if rubbing it in. If this is not done, problems will arise with heating the parts and collecting solder on the tip.
The soldering area must be cleaned until shiny with a scalpel or sandpaper. If you are going to solder a hole in a tank or radiator tube, you should clean a 3-4 mm wide strip along its edges, and free the hole itself from dirt. It happens that only by cutting out the adjacent pipe can you get to the leaking one. Subsequently, it must be completely drowned out - the design of the radiator allows it to be deprived of a certain part of the “honeycomb” (up to 20%). When eliminating a crack at the attachment point of the pipe, you need to clear the gap and its edges. In any case, do not forget to drain the coolant from the radiator and leave the neck open.
The cleaned soldering area must be heated well with a soldering iron, after which the melted rosin will form a thin layer (avoid overheating, it will char at 315°C).
Having collected solder on the soldering iron and transferred it to the heated part, run the tip over the metal several times. If everything is done correctly, the solder will flow from the tip and adhere to the areas covered with flux.
If there are shells left on the tinned surface that are not covered with solder, you need to clean them of flux residues, add fresh rosin there and repeat the tinning in this place.
After tinning, a portion of solder is added to the soldering site, which in molten form is “stretched” over the hole or crack. To avoid making a large seam, you can apply a tin patch to the hole. A large seam can be soldered in parts; the heat capacity of the radiator allows you to re-melt the solder at one edge of the seam without disturbing the already cooled layer at its beginning. You can also, using a lower-power soldering iron, smooth the already solidified solder onto a still warm part to give it a marketable appearance.
Why does a leak appear?
The main reasons leading to antifreeze leakage from the cooling system through the heat exchanger are the following:
- mechanical destruction of tubes or collector tanks during an accident;
- thermal destruction of joints due to overheating and operation without liquid;
- corrosion damage.
The first two reasons are somewhat easier to repair because, as a rule, the location of the damage is easy to determine.
In case of corrosion damage, the location of the leak will have to be located. Moreover, it may not be the only one.
Looking for a leak
If a stain of antifreeze remains under the car after parking, it means there is a leak in the cooling system..
Before removing the cooling radiator or air conditioner, you should make sure that all pipes and the expansion tank housing are in order. The heat exchanger of the interior heating system is also checked.
Before dismantling, you need to drain the liquid from the system . The removed radiator is carefully inspected in good lighting. If the damage cannot be seen, all holes are plugged with tight plugs and the heat exchanger is immersed in water. The emerging chain of bubbles will indicate the location of the leak. If you increase the pressure by connecting one of the pipes to the compressor hose, you can detect a leak faster.
The main reasons for the loss of radiator tightness, signs, repair features
Loss of tightness of the radiator of the cooling system may be due to the following reasons:
- Natural wear and tear. The approximate lifespan of a radiator is about 10-12 years. As the device wears out, its internal working surface becomes covered with a layer of scale and deposits formed as a result of chemical and thermodynamic processes. The walls of the radiator plates and tubes become thinner. Since the liquid in the device is under pressure, microcracks are possible, as a result of which the liquid begins to leave the system.
Considering that the sizes of microcracks are small, a strong leak is not observed in this case. Wet traces of leakage may disappear after cooling the engine and antifreeze. It is advisable to immediately detect the consequences and place of fluid leakage. The sooner repairs are made in this situation, the less damage will have to be repaired. Can be successfully repaired by cold welding .
- Filling the cooling system with water. Freezing in the cold season. If there is a slight leak of antifreeze, many drivers add limited amounts of water to the system. During the warm season of vehicle operation, the number of such top-ups can be large. As a result, the concentration and characteristics of antifreeze change. In winter, even at slightly below zero temperatures, it can freeze. In this case, volume expansion occurs. The radiator may “break”.
Copper or aluminum?
For high-quality soldering of faulty car radiators, you need to find out what they are made of. Modern devices are made of aluminum, copper or plastic.
The easiest way to distinguish material is by color:
- copper: red-brown;
- aluminum: grayish shades.
The plastic used for radiators is usually black.
Copper is quite easy to solder in a home workshop or garage . Soldering leaky aluminum car radiators is complicated by a number of its physical and chemical features.
We repair the radiator
Soldering copper radiators will require preparing the following:
- high-power electric soldering iron or gas burner;
- correctly selected solder;
- flux paste;
- abrasive paper;
- pliers;
- degreasing solvent;
- rags.
At the preparation stage, the product is cleaned of mechanical impurities and thoroughly dried. To speed up drying, you can blow it through one of the nozzles with compressed air under low pressure. The leak area is cleaned with abrasive paper. If there are lamellas nearby, they are carefully trimmed. Flux compound is applied to the soldering area and allowed to dry.
Preparing gumboil
To repair a heat exchanger with your own hands, you should take care of a good flux composition. Flux is prepared shortly before soldering a leaky radiator, since over time the composition decomposes and loses its properties. For two shares of crushed rosin you need to take one share of steel filings obtained using a file .
The composition must be poured into a fireproof container, mixed and heated with a burner. Then stir again and cool.
For the most durable seam
There is another recipe for flux, which is commonly called “flux”. With its help, you can achieve special seam strength. To create the flux you will need the following ingredients:
All components should be crushed and mixed thoroughly. The composition should be stored in a tightly closed container, protected from light.
We straighten aluminum with our own hands
Soldering aluminum radiators requires careful preparation of the repair site.
The faulty unit should be washed and dried completely. The repair area must be cleaned with abrasive paper and degreased with a rag moistened with a solvent.
Now you can apply a layer of flux with a soldering iron and rub it over the part. Next, solder is applied. Do this in several layers, rubbing and stretching each one. The steel filings contained in the flux will react with the oxide layer and destroy it. This will allow the solder to be in direct contact with the surface of the part and will significantly improve the quality of soldering.
After repair, it is necessary to re-check the radiator for leaks
Soldering iron is half the success
In most cases, to solder a radiator you need a massive soldering iron with a power of at least 100 W. But a damaged tube can be soldered with a regular 60-watt one. Much depends on how efficiently the soldering iron transfers its temperature to the part. This, in turn, is due to the correct tinning of the tip, the presence of a sufficient amount of solder at the point of contact of the tip with the part, and the angle at which you hold the soldering iron relative to the surface being repaired.
In addition to electric ones, soldering irons heated over an open fire are also used. There is no fundamental difference in their use, except that during the soldering process it is necessary to additionally control the heating and cooling of the working part of the tool.
How to solder plastic?
On modern cars, to reduce overall weight and reduce production costs, many parts are made of plastic. Radiators did not escape this fate either. First of all, it is necessary to accurately determine the type of plastic . This is done according to the markings on the part. As a rule, polyamide (PA marking) or polypropylene (PP marking) is used for manufacturing. It is with this marking that you need to purchase welding rods for plastic. They can be replaced with strips cut from an unnecessary plastic part with similar markings.
The following materials and equipment will be required:
- industrial hair dryer for heating the workpiece;
- electric soldering iron with adjustable tip temperature;
- solder selected in accordance with the radiator material;
- acetone;
- rags.
You must act in the following order:
- degrease the damaged area with a rag soaked in acetone;
- warm up the repair area with a hairdryer;
- set the soldering iron temperature to 250 o C;
- move the soldering iron tip along the seam line several times so that a recess is formed in the shape of the welding rod;
- insert the rod into the recess and, smoothing it with a soldering iron, level it flush with the radiator body.
During soldering, you need to ensure that the plastic softens, but does not melt or burn. After the repair and before installing it back on the vehicle, you should check the tightness of the repaired area in a container of water.
Safety precautions
| The electric soldering iron must have intact cord insulation and a working plug. During operation, make sure that the cord does not touch the tool or heated parts. |
| Hold the soldering iron by the handle only. You cannot determine its heating by touch - just hold your hand at some distance from the sting. |
| Vapors from heated solder and fluxes are harmful to health. Work should be carried out in a ventilated area or in the fresh air. |
| Please note that the solder takes a long time to cool down on a heated part, so after removing the soldering iron, do not rush to immediately touch the seam with your hands. |