A drill is a device designed for creativity and handicrafts related to carving and grinding. This device is necessary for drilling holes, carving plexiglass, wood, metal, grinding various surfaces, and making engravings. Most often, all kinds of accessories for a drill are included with the device: drills, cutting wheels, polishing discs, felt, brushes, cutters. However, it is better to choose attachments for beginners yourself to make using them as comfortable as possible.
A drill is a device designed for creativity and handicrafts.
Drill made from a toothbrush
At first glance, it sounds absurd. But we will talk about an electric brush, which has a completely reliable motor inside. It is enough to get to the steel shaft on which the gearbox with rotating bristles is placed, and the workpiece is in your hands.
The same collet chuck is put on the shaft, and batteries are installed instead of batteries. Or you can adapt a suitable mains power supply.
Drilling walls with such a device will not work, but holes in a printed circuit board will be easy. In principle, you can use any compact electrical appliance that has a conveniently located motor shaft. For example, an old electric razor.
Friday, August 25, 2017
A simple homemade drill from a screwdriver engine
To create a homemade drill, I used a 775 motor, which I ordered from the Chinese here.
Such engines can be found in screwdrivers and, apparently, in compressors for inflating car tires. Not every screwdriver has such an impressive motor. The motor shaft has a diameter of 5 mm. I also needed a cartridge attachment, which you can buy here.
By the way, a very convenient cartridge, clamps up to 4 mm, does not hit at all. You can clamp any attachments for an engraver or drill. It is also advisable to have an engine speed controller like this
The total budget for this device was about 1,100 rubles (without a computer power supply). Any 12 V power supply can be used (depending on the engine voltage), but its power must be comparable to the power of the PC power supply. This engine consumes 1.5-2A at idle. Under load, the current increases. A 250-350W power supply will handle it without any problems. Even if the nozzle jams, there is no emergency shutdown.
The speed controller from this engine heats up very little because the load is not constant. The adjustment is very useful when working with plexiglass and melting plastics. And if necessary, you can grind your heels or polish your nails. The motor has a ball bearing in the front and a bushing in the back. In general, the motor inspires confidence, it is very heavy and solid. There is no such thing as too much power or reliability.
Let's see what we got in the end.
The housing for the engine is made from a section of sewer pipe, capped at the ends with plexiglass. Cutouts in the housing for ventilation. There are no special holes in the front, only a gap between the shaft and the housing (4-5 mm). I was afraid to ventilate the front because the engine would pick up dust and die. Almost everything was assembled using hot-melt glue from a gun (sopladav). There is no strong heating and the strength is sufficient. In order for hot-melt adhesive to hold better, you need to preheat the surfaces to be glued. I use a soldering iron for this. Stayer black glue.
The homemade product is in many ways superior to a ready-made Chinese drill (engraver). I can compare because I have one too. The homemade product heats up less, with comparable power. The disadvantage of homemade products is that the rotation speed is insufficient; 10-15 thousand/minute is not enough for some attachments. But this issue can be solved by purchasing an engine with a higher rotation speed. There is enough choice on Aliexpress. Overall, I am completely satisfied with the device. Of course, this is not a grinder and it has problems cutting metal, even thin ones. It doesn't cut as fast, but it does the job. There is some heating of the engine, but not critical. There is some inconvenience when engraving; it is uncomfortable to hold. When using, you need to remember that the motor shaft, although thick, can be broken or bent. Therefore, do not forget that you have in your hands a tool for delicate work. It works great on plastic, wood and other not very hard materials. Therefore, we can recommend cutting printed circuit boards to radio amateurs when making cases for crafts. You can cut, drill, clean, expand holes of various shapes, and mill. Good luck!
Sometimes you need to sign a gift beautifully, but it’s not clear how to do it. The paint spreads and wears off quickly, so a marker is not an option. Engraving is best suited for this. You don’t even have to spend money on it, since anyone who knows how to solder can make a laser engraver from a printer with their own hands.
Cable + connector
Based on the 12-volt Proxxon Micromot 50/EF drill, I came up with the idea of installing a “spiral” power cable, which is less in the way and is more flexible. I found one like this on the farm - from an old Philips electric razor. I didn’t make it removable, I soldered it directly to the engine, although for greater ergonomics it was possible to move the button a little to the side and attach a “female” type socket to the end.
I chose the connectors based on reliability, but they also fit well into the green color ensemble. I recommend. They are neat and practical, the contact is tight. I bought it in real life, but there are also such products on Ali, they are inexpensive - as an option: aliexpress.com/item/10-Pcs-CCTV-Cameras-2-1mm-x-5-5mm-Male-DC-Power-Plug- Adapter-DC-Power/32598414355.html (1.7 USD for 10 pieces).
Clamping mechanism
The next important component of the device is the chuck used to hold the drill. To make a clamping device, you must purchase a collet chuck in advance
. It is a clamping device capable of firmly holding cylindrical objects. Having secured the drill in the collet chuck and firmly clamped it on the motor axis, you just need to connect the power supply or batteries to the motor.
This simplified version of a mini-drill is already capable of drilling holes.
However, holding the “naked” motor in your hands is uncomfortable, and the mini-drill looks unattractive. To bring what you started to the finish line, you will need a shell and separate control components.
Definition and scope of application of a drill
How to do styling at home
The purpose of a drill can be different; the use of this tool is limited not only to dentistry; without it, the work of a wood or bone carver is practically impossible. For these craftsmen, the best partner is an electric wood drill; they create masterpieces with their own hands, but without such a device, the work would take many times longer. This device is also used in industry in the field of instrument making for all kinds of polishing and grinding. We can’t help but mention jewelers; a homemade engraving drill is a frequent guest on their desktop; a portable assistant significantly expands the range of their services.
In general terms, a drill can be described as a rotary tool; its shaft, called a spindle in technology, rotates with enormous frequency, while the torque is quite small. This makes it possible to perform work on an indecently small scale with high efficiency (grind extremely small parts, make micro-holes, etc.). The kit often comes with a lot of drills, attachments, and knives. The design of professional models is complex due to the presence of many functions, but the simplest analogue of a drill can be made independently if you have a little knowledge of electronics.
For us on this site, of course, the technical varieties of this instrument are interesting. The range of work that it can perform is wider than that of a dentist, because almost all types of drills make it possible to regulate the speed. Also, in addition to the usual attachments for decorative work, you can attach more unusual attributes that will turn the device into a circular saw or milling machine. Well-established manufacturers are mainly foreign, the most famous are Dremel, Proxxon, PowerMax, Omax. There are both stationary and manual types; devices are also divided into battery-powered and those that operate from the mains.
Assembling a mini-drill, collet chuck, DIY Dremel from an old printer and other devices
To carry out drilling work on miniature workpieces, engraving machines, the so-called “dremels,” are usually used. The name comes from the name of the most popular manufacturer. This is a convenient hand tool, but its cost is usually high (especially for high-quality branded products).
The most common area of application is amateur modeling and production of printed circuit boards. As a rule, an industrial design is redundant for such work: some of its capabilities are not in demand. Therefore, home craftsmen often create instruments with their own hands.
What can it be made from?
You can make a mini drill with your own hands by using motors from various improvised means.
- Hair dryer. This option is the most preferable, since the power of the motor from the hair dryer will be quite enough for the mini drill to perform its main functions. The maximum speed of such an engine reaches 1500-1800 rpm.
- Record player. Since the power of the tape recorder motor is very small, the only thing that can come out of such an undertaking is a drill for printed circuit boards. The engine is powered by 6 Volts, which means you will have to find an appropriate charger or battery.
- Fishing rod reel. A mini hand drill can be made from a regular fishing rod reel. The coil mechanism will be used as a motor and, through rotation, will drive the chuck with the drill. The advantage of this method is the ease of manufacture and the absence of the need for power from a battery or mains.
Drill made from a toothbrush
At first glance, it sounds absurd. But we will talk about an electric brush, which has a completely reliable motor inside. It is enough to get to the steel shaft on which the gearbox with rotating bristles is placed, and the workpiece is in your hands.
The same collet chuck is put on the shaft, and batteries are installed instead of batteries. Or you can adapt a suitable mains power supply.
Drilling walls with such a device will not work, but holes in a printed circuit board will be easy. In principle, you can use any compact electrical appliance that has a conveniently located motor shaft. For example, an old electric razor.
Device manufacturing algorithm
The collection takes place in 3 stages. Let's take a closer look at each of them.
Making a mini cartridge
In order to assemble a mini drill chuck, you need to purchase a collet - a special mechanism designed for clamping cylindrical objects. Next, you need to connect the motor to the contacts of the future battery, which will power the device during operation.
If your drill is spinning in the wrong direction, swap the wire contacts.
Finding a drill of the right size is not difficult. Insert the drill into the collet body and clamp tightly. Next, the finished nozzle must be installed on the motor body. The collet should fit tightly onto the motor shaft. Otherwise, you cannot avoid vibration. The chuck for a homemade mini drill is ready.
Attachments for a homemade mini drill can be purchased at any hardware store. Before purchasing, make sure they match the diameter of the collet.
Preparing the body
As a housing for the future device, you can use either an antiperspirant container or a regular hollow tube of a suitable size.
If you use a simple hollow tube as a body, you need to cut off the bottom and insert a rubber or other plug in its place.
If you are making a device from an antiperspirant body, you need to drill a hole in the lid for the drill to exit.
Connecting the elements
The motor must be installed on the reverse side. If your motor is not the right size, choose another tube. The fit must be very tight to avoid vibration as the shaft rotates. After this, it is enough to tighten the bolts on the collet and connect the resulting device to the electrical network.
One of the main disadvantages of assembling a drill with your own hands from a motor is the lower power compared to a standard device and the low strength of the drill.
If your work requires a cutter, you can easily make one yourself from an old lighter. To do this, remove the spinning drum from the lighter and place it on a bolt of a suitable size. Secure this with a nut and insert it into the collet hole. The cutter for surface treatment is ready!
If for some reason the cartridge does not fit the size of the cylindrical shaft of the motor or reel, it is necessary to degrease it thoroughly and then place it on hot glue. This will help to obtain a stable and durable structure.
Such a mini drill with purchased attachments can perform minor repairs on technical equipment, drilling plastic, thin metal, and making crafts.
tehnika.expert
What is the device
A drill is a tool whose operating principle is based on the rotation of a shaft. usually called a spindle. It rotates at a very high frequency, but the torque remains at a small value. Thanks to this, the tool is able to work on a small scale.
As a rule, the speed can be adjusted. Due to this, the range of work performed increases. If we talk about factory versions, they come with a set of additional drills, knives and other attachments.
If you make a drill with your own hands, then a similar set can be purchased separately in city stores or placed an order through an online store.
Collecting materials and tools
The materials we will need are:
- 12V DC motor;
- Collet chuck for drills, working diameter - 3 mm;
- A 32 mm section of PVC sewer pipe;
- Two lithium polymer batteries;
- Switch button;
- A little plexiglass for pipe plugs;
- Several copper wires with solder, sandpaper.
Tools:
soldering iron, hacksaw, screwdriver, milling cutter for drilling outer circles, screwdriver, paint knife, electrical tape and superglue. For marking we will need a tape measure and a pencil.
What you will need
How to make a drill with your own hands? You can use various options for its design. As the main working element of such a device, it is very convenient to use attachments that were supplied with old-style dental drills. Such an attachment, as a rule, is initially mounted on a flexible shaft, from which it must be removed by unscrewing its spring. From the bottom of the dismantled drill attachment, you need to cut off a not too wide ring, which will act as a nut used to fix the entire device on the plate. In addition, by cutting off such a ring, you will free the end of the shaft on which the gear will be mounted.
So, you will need a flexible attachment from a dental machine
On the engraver attachments, made by yourself in the proposed design, you can install various types of replaceable tool holders. Such holders, in particular, can be:
- straight;
- with a lateral arrangement of the tool;
- with a curved working head.
Replacement holder options
More universal are direct type holders, which are used in 90% of cases. In situations where the location of the element being processed does not allow the use of straight holders, they turn to curved type nozzles with a side-mounted tool.
When choosing working attachments from an old drill to equip your homemade engraver, keep in mind that they can only be used in conjunction with a tool whose shank diameter is 2.35 mm. At the same time, tools intended for installation in straight-type holders are distinguished by an elongated shank. The shanks of burs installed in corner holders are shorter and have a special groove (slot).
The old nozzle will have to be cleaned and lubricated, and perhaps the micro-bearings will have to be changed.
Using homemade attachments for an engraver from an old drill has a number of advantages. The main one is that you can purchase such a drill for very little money, since such devices are practically no longer used in modern dentistry. Finding and buying tools to equip such attachments is also not a problem.
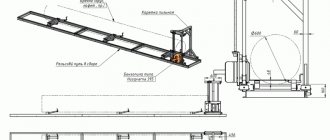
Manufacturing of percussion-rope drilling rig
A tripod with a bailer is a simple design, like everything ingenious. Its dimensions can be estimated “by eye”; particularly precise engineering calculations are not needed here. For example, the height of the tripod on which the bailer will be attached should be about a meter greater than this drill.
If drilling work is carried out in the basement of a house, the size of the structure will be limited by the height of the ceiling.
Impact-rope drilling is performed using a heavy projectile - a bailer. It is thrown down from a height, the soil collapses and fills the cavity inside the bailer, after which the device is removed and cleaned
In an open space, the bailer can be hung higher to increase the impact force. But don't make it too high, it's not effective. The bailer itself should be quite heavy. To effectively loosen the soil, it is better to make notches on its sole or grind off a sharp edge.
The optimal length for drilling is considered to be between 1.8 and 2.2 meters, so that the driller can freely reach the top of the drill to attach or disconnect the cable. However, in manual drilling, the best bailer length is considered to be 1.0 - 1.2 m. This size allows you to reach the bottom of the projectile with your hand if it does not empty when loam sticks, for example.
In cable percussion drilling, a bailer with a length of about 1.2 - 2.0 meters is used. The projectile must be heavy enough to break up the soil and pull it to the surface in large quantities
A bailer is most often made from a piece of metal pipe; the desired metal thickness is 4 - 6 mm.
To make such a drilling device, the following operations should be performed:
- Prepare a piece of pipe of suitable size.
- Make a valve at the bottom of the projectile.
- Weld a protective mesh on top.
- Boil the handle or “ears” to secure the rope.
- Sharpen the bottom of the projectile or weld several “teeth” from pieces of metal or pieces of thick wire.
- Make a tripod from metal pipes.
- Install a block, winch and engine to lift the projectile from the shaft.
- Tie a rope to the bailer and assemble the structure.
The bailer valve deserves special attention. Small diameter projectiles use a ball valve. A metal ball with a diameter slightly larger than half the diameter of the bailer is suitable for its role.
If a suitable ball is not found, it can be made from scrap materials. For example, for these purposes a mixture of lead shot and epoxy resin is often used; the role of the casting mold is played by some kind of children's ball made of plastic or rubber.
The reed valve of a bailer consists of a round piece of metal that closes the gap at the bottom of the glass, as well as a spring that holds it closed.
A washer with a hole whose diameter is smaller than the size of the ball is welded at the bottom so that it does not fly out. For the same purposes, a stopper is placed at the top, at some distance from the protective grille - a piece of metal that limits the upward movement of the ball. A wire grid prevents large pieces of soil from falling out of the bailer.
The valve ball must not fall below the level of the pointed edge or metal teeth, otherwise it will absorb the force of the impact. On the other hand, the “teeth” should not be made too long, otherwise they will not allow part of the soil to get inside the bailer.
A window is cut out in the upper third of the bailer body. It will be needed when a full bailer needs to be cleared of soil that has accumulated inside.
To make a ball valve for a bailer, you need a metal ball with a diameter of about 60 mm. Such an element can be removed from a large bearing
Another valve option is a petal valve. It is made from a piece of metal. The reed valve looks like a round door attached to a spring at the bottom of the bailer. When the projectile moves downwards, the valve opens under soil pressure, and then the spring closes it and holds the soil inside. Sometimes such a valve is sealed with a piece of rubber, but this is not necessary.
If, when drilling with a homemade bailer, it turns out that it captures too little soil, you may just need to slightly correct the design. Sometimes you need to open up the clearance a little at the bottom of the device. If the projectile turns out to be too light, it should be weighted down.
To do this, the upper part of the bailer is sometimes filled with concrete. But you can simply attach an additional load on top on a movable joint.
A tripod for impact-rope drilling can be made from a metal pipe, but for short-term use, durable wood, for example 150-200 mm timber, is also suitable
On viscous soils, a type of bailer without a valve may be effective. Dense soil is packed inside the projectile and held there naturally. Such a device is cleaned through a narrow vertical hole on the side.
If possible and necessary, you should make two different bailers to use them on different soils. The bailer is also used to clean the finished well from sand and dirt. But in this situation there is no need to make such a large projectile; a device about 0.8 -1.0 meters long will do.
CNC device manufacturing
For large volumes of work, a conventional engraver will not cope with the load. If you are going to use it frequently and a lot, you will need a CNC device.
Assembling the interior
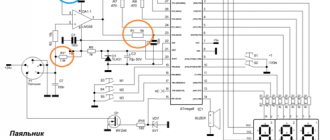
You can even make a laser engraver at home. To do this, you need to remove the stepper motors and guides from the printer. They will drive the laser.
The complete list of required parts is as follows:
Connection diagram for all components:
Explanation of symbols:
Measure the length of the guides and divide them into two groups. The first will contain 4 short ones, the second - 2 long ones. Guides from the same group must be the same length.
Add 10 centimeters to the length of each group of guides and cut the base to the resulting dimensions. Bend U-shaped supports for fastenings from scraps and weld them to the base. Mark and drill holes for the bolts.
Drill a hole in the radiator and glue the laser in there using heat-conducting glue. Solder the wires and transistor to it. Bolt the radiator to the carriage.
Install the guide rail mounts onto the two supports and secure them with bolts. Insert the Y-axis guides into the mounts, put the X-axis carriages on their free ends. Insert the remaining guides with the laser head installed on them. Place the fasteners on the Y-axis guides and screw them to the supports.
Creating a laser engraver
For simple work, such as burning patterns on wood, complex and expensive devices are not needed. A homemade laser engraver powered by a battery will be sufficient.
Before making an engraver , you need to prepare the following parts for its assembly:
- Laser diode from a DVD-RW drive.
- Focusing lens.
- Aluminum U-shaped profile or non-ferrous metal tube with an internal diameter of 15-20 mm.
- Electrolytic capacitor 50 V, 2200 µF.
- Resistor 5 Ohm.
- Film capacitor 100 nF.
- Tact button.
- Switch.
- Thermally conductive adhesive.
- 18650 battery and holder for it.
- Shoe sponge box.
- Scotch tape, including double-sided tape.
- Hot glue gun with consumables.
- Charge controller.
- Jack 2.1 x 5.5 mm.
Remove the write head from the DVD drive.
Carefully remove the focusing lens and disassemble the head housing until you see 2 lasers hidden in heat-distributing casings.
One of them is infrared, for reading information from the disk. The second one, red, is the one who writes. In order to distinguish them, apply a voltage of 3 volts to their terminals.
Pinout:
Be sure to wear dark glasses before testing. Never test the laser by looking at the diode window. You only need to look at the reflection of the beam.
You need to select the laser that lights up. You can throw away the rest if you don’t know where to use it. To protect against static, solder all leads of the diode together and set it aside. Saw off a 15 cm section from the profile. Drill a hole in it for the clock button. Make cutouts in the box for the profile, charging socket and switch.
The schematic diagram of a DIY DVD laser engraver looks like this:
Tin the contact pads on the charge control board and holder:
Using wires to pins B+ and B- of the charge controller, solder the battery compartment. Contacts + and - go to the socket, the remaining 2 go to the laser diode. First, solder the laser power supply circuit by surface mounting and insulate it well with tape.
Make sure that the terminals of the radio components do not short circuit with each other. Solder a laser diode and a button to the power supply circuit. Place the assembled device in the profile and glue the laser with heat-conducting glue. Secure the remaining parts with double-sided tape. Reinstall the tact button.
Insert the profile into the box, bring out the wires and secure it with hot glue. Solder the switch and install it. Do the same procedure with the charging socket. Using a hot glue gun, glue the battery compartment and charge controller into place. Insert the battery into the holder and close the box with the lid.
Before using it, you need to set up the laser. To do this, place a sheet of paper 10 centimeters from it, which will be a target for the laser beam. Place the focusing lens in front of the diode. By moving it further and closer, achieve a burn through the target. Glue the lens to the profile in the place where the greatest effect was achieved.
The assembled engraver is perfect for small jobs and entertainment purposes such as lighting matches and burning balloons.
Remember that the engraver is not a toy and should not be given to children. The laser beam causes irreversible consequences if it comes into contact with the eyes, so keep the device out of the reach of children.
Which cutters, attachments, cutters are suitable for a beginner
Working accessories used to work with an engraver are characterized by their wide variety. To make the right choice when selecting nozzles, you need to consider several factors:
- features of the processed material;
- technological tasks.
Diamond and abrasive burs
Most often, engraving machines are equipped with diamond burs. The main feature of this tool is that the main part of the body is made of tool steel, and its working surface is covered with a layer of diamond powder. Another name for this tool is a cutter. Diamond burs are necessary for processing hard surfaces.
Most often, engraving machines are equipped with diamond burs
Most often they are used when working with the following materials:
- glass;
- steel;
- ceramics;
- stones.
A more budget-friendly option are roller cutters with a working surface made of rubber and abrasive material. They are used for metal work. You need to use abrasive cutters for boring holes and grinding. The capabilities of these tools are optimal only for beginners.
Other attachments
Milling cutters for beginners should be selected in small sizes.
With their help, the engraving will have a neater appearance. Most often, for beginners, sets of cutters are offered, consisting of 4-6 elements of various shapes: cylindrical, end, worm, conical, end. Large kits should only be purchased by experienced craftsmen.
You will also need a drill during the work process.
This tool is necessary for cutting through the design. Most often it is used to make the outline of a picture and the main elements of the background.
For many, a drill is the embodiment of childhood horrors associated with visiting a dental office, and the sound it makes is one of the most unpleasant in the world. Meanwhile, if we consider it as a unique tool used in various fields, including the one that we have already mentioned, then, perhaps, it will not be found equal to it in a number of properties.
The drill got its name from the name of the tool most often used to work with it - a drill. The most common uses for drills in a home workshop are the following:
This is a Chinese Dremel drill with an average cost of 12 - 13 thousand rubles, one of the options for a dental drill machine with approximately the same price and a more expensive (by about a third) direct grinder.
No one can definitely answer what is better and what is worse. It depends on what types of work the tool will be primarily used for. The most universal, according to many, is the Dremel. The abundance of its equipment allows you to perform the widest range of operations for processing most materials: metal, wood, plastic, bone, without additional hassle of re-equipment. The most reliable version is similar to the Makita straight grinder.
Drills differ mainly by:
- power;
- number of revolutions per minute;
- a device for fastening a bur or other working tool;
- the presence or absence of a flexible shaft.
And they select a specific type of drill, mainly to perform a certain type of work. And here, for carving wood or bone, the ideal option is to have an 80 - 150 Watt motor at 8 - 12 thousand rpm.
If the drill acts mainly as a microdrill with the functions of stripping and grinding, then it is quite possible to get by with 3000 rpm. Based on this…
Wood carving drill or engraver: how to choose in the store?
A drill can have several other names: miniature drill, engraver. Most often, such devices are multifunctional, as they are complemented by a huge number of different attachments.
When purchasing a wood carving machine, you need to pay attention to the following characteristics:
- The shaft lock button and the trigger element should be located close to each other. This arrangement will allow the artist to quickly change his occupation without being distracted from his work.
- The average power of the device should be 180 watts.
- Torque should be averaged between 5000-35000 rpm. Many models offer the technician a choice of speed. A device with a function of working with reduced torque will be appropriate for making engravings.
- The weight of the device should not be too large, otherwise it will be difficult to use for a long time. The optimal weight is considered to be 400-600 grams.
- If you want to work in a place far from an outlet, you need to select a model with a battery.
An indication of the battery charge level brings a certain degree of convenience to the device. This function allows you to charge the device on time and not miss work deadlines. Therefore, in order to answer the question: which drill to choose, you need to evaluate the direction of your creativity and its requirements. Based on these indicators, the device that is optimal in its functionality is selected.
Homemade drill with a flexible shaft - Metals, equipment, instructions
Many home craftsmen are interested in the question of whether a drill can be made with their own hands. Solving this problem is not difficult, and the finished home-made device, despite the simplicity of its design, will be distinguished by fairly high efficiency and functionality.
Homemade drill based on a small-sized electric motor
A homemade drill will not cost much and will not cause any problems during manufacture. It will be useful in many situations, including when performing such technological operations as:
- drilling;
- drilling holes;
- processing of grooves and recesses of various configurations;
- engraving;
- polishing;
- cutting of plastic products;
- cutting non-ferrous sheet metal (aluminum, brass, bronze, etc.) up to 1.5 mm thick.
Grinding a metal part with a drill
The drill, made according to the instructions below, is distinguished by its compact dimensions, light weight and ease of use.
Such a device, made by hand at home, is equally successfully used to perform small and quite serious work with products made of various materials - metal, wood, plastic, bone, etc.
Such a drill is very useful in jewelry making, when repairing small items for various purposes, manufacturing and repairing electrical devices, and in many other situations.
Drill - characteristics, application, DIY production
For many, a drill is the embodiment of childhood horrors associated with visiting a dental office, and the sound it makes is one of the most unpleasant in the world. Meanwhile, if we consider it as a unique tool used in various fields, including the one that we have already mentioned, then, perhaps, it will not be found equal to it in a number of properties.
Advantages of homemade and purchased models
Today there are many ready-made factory offers, among which it is quite possible to find a suitable one. People stubbornly continue to make hand drills with their own hands. However, before making a choice in favor of one option or another, you need to carefully weigh the pros and cons.
To make a hand drill you don’t need to spend a lot of money
In favor of purchasing a ready-made drill, they say:
- Speed of transaction. There is absolutely no delay - the purchase can be made immediately. You just need to get to the appropriate store.
- No physical costs. All the buyer needs to do is simply bring the spoon drill home. And if you consider that it weighs very little, then you won’t have to waste much effort.
- Loyal price. The device is quite inexpensive, sometimes even cheaper than a homemade one. It is this factor that is often decisive in favor of making a purchase.
And in order to make a drill, you will have to spend time, money and even acquire new skills.
However, such painstaking work has its own number of positive features:
- Possibility to obtain a drill of non-standard dimensions.
- No need to waste time visiting stores.
- With proper preparation, you can create a drill of the most ornate design, which is difficult to find on the open market.
Which scenario to prefer is a personal choice for each person. If you decide to carry out the work yourself, it is important to evaluate your own strengths and understand whether the task is feasible or not.
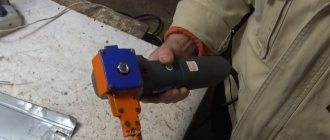
Assembly and performance tests
The entire assembly consisted of unsoldering the button, connecting the cord and installing the connectors. And from the inside, the motor in the housing was slightly fixed with hot-melt adhesive nozzles so that when drilling it would not go inside.
For hanging storage (it has now taken pride of place next to my work desk), I attached a bracket made of 2.5 mm hard copper wire to the Dremel through the ventilation holes, which, if necessary, can be easily detached from the case.
The car turned out to be very compact, but powerful.
Additional photos
I tried to process a piece of thermoplastic polypropylene pipe. The machine performed excellently on this viscous material. Manipulations with metal and wood are no problem at all.
Additional photos
Assembling a homemade device
In order to be able to use an attachment from an old drill to perform minor work on items made of metal, plastic, wood and bone, it is necessary to make a device with which such an attachment will be driven by a small electric motor of the required power. As a drive motor for a homemade drill, you can use a small, but resourceful and powerful motor from an ordinary hair dryer or an old VCR.
To transfer the torque from the electric motor to the shaft of the engraver attachment, you can use plastic gears of various sizes. In particular, gearboxes of children's wind-up toys, as well as kinematic diagrams of household appliances for various purposes, are equipped with such gears. When choosing such gears, it is very important to ensure that they match each other in number, shape of teeth and outer diameter. To increase the power of the working attachment of a homemade drill, it is necessary to fix a gear of a larger diameter on its shaft, and a gear of a smaller diameter to fix it on the shaft of the drive motor.
Selecting the motor and gears
The diameters of the mounting holes in the gears that you select to equip the drive mechanism of your homemade drill will most likely not correspond to the dimensions of the electric motor shafts and the working attachment. This problem can be solved quite simply: by drilling mounting holes of the required diameter in the gears. To ensure a tight and reliable fit of the plastic gears on the motor shafts and the engraver attachment, holes should be drilled with a smaller diameter (0.1–0.2 mm) than the dimensions of the shafts themselves.
The drive unit of your homemade drill, consisting of an electric motor, two gears and the tail part of the attachment shaft, will work correctly and without failures if all elements of such a mechanism are securely fixed in the appropriate position. This problem can be solved by the simplest device, made from an aluminum plate 2 mm thick. Such a plate can be given absolutely any configuration (the main thing is that it does not create inconvenience when working with a homemade drill).
We calculate and manufacture the mounting plate
It is necessary to drill two holes in the mounting plate, one of which is intended to accommodate the electric motor, and the second is for fixing the working nozzle. It is very important to correctly calculate the distance between the centers of such holes, which should be equal to the distance between the axes of the two gears used that are in mesh with each other. If such a distance is calculated and maintained correctly during drilling, then the gears will rotate without jamming or slipping through the teeth while using a homemade drill. If the hole in the mounting plate, in which the working attachment of the drill will be fixed, is made in the shape of an ellipse, it is possible to level out the errors made when performing the calculations described above.
We fix the parts and check the operation of our gearbox
To make the mutual rotation of the drive gears easier, it is necessary to ensure that there is a small gap (0.1–0.2 mm) between their teeth in the meshed state. The strict perpendicularity of the axes of their mounting holes to their side surface helps to avoid horizontal runout of such gears during rotation.
Installing the attachment holder and power switch
Assembling a homemade drill and combining it with an engraver attachment is carried out in the following sequence:
- The tail part of the working nozzle is fixed to the mounting plate using a pre-prepared nut.
- The drive motor is secured with two screws connecting its housing to the mounting plate.
- After fixing the electric motor and the working attachment on the mounting plate, plastic gears are put on their shafts.
- To start using the assembled drill, you need to install the tool holder on the working attachment and connect the drive motor to the power supply.
- To make your homemade engraving machine more convenient to use, you can additionally equip it with a small switch and a power connector.
The drill is ready for work
If, when using such a homemade drill, you are not satisfied with the fact that it can only be used in conjunction with instruments whose shank diameter does not exceed 2.35 mm, then this problem can be solved. To do this, you need to purchase a collet chuck mounted on a mini-drill, the mounting hole in which has a diameter of 2.3 mm. You need to insert the shank of any high-quality bur with a broken working head into it: it is this shank that will be fixed in the clamping device of your homemade drill.
Can be used with collet or jaw mini chucks
The video below shows the capabilities of this portable drill, made with your own hands in a home workshop.
With your own hands you can make not only a drill of the design described above, but also a more convenient device with a flexible shaft. By purchasing such a convenient device as a flexible shaft, you can turn various technical devices for household use into a drill. This can be a drill from a blender, from a regular electric drill, or from a screwdriver. Many modern models of flexible shafts include a working attachment, and in many cases, a special stand. This stand, on which the tool is placed when not in use, allows it to be kept in working condition for a long time.
Thus, to the question of how to make a mini-drill with your own hands, there are many answers, most of which offer specialized Internet resources.
How to make an engraver for small jobs with your own hands?
If a master does not want to purchase an expensive device, he can make an engraver for small jobs on his own.
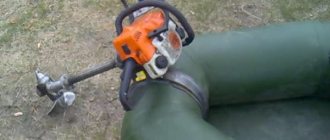
In Soviet times, craftsmen sometimes adapted decommissioned US-30 dental drills, which were faithful friends of the dentist and a nightmare for the patient, for engraving work or for wood carving. If a less powerful, but more compact option was needed, electric shavers from Berdsk or Kharkov were used. Nowadays, a homemade drill can also be made from an electric razor, for example, Philips.
Necessary components and their characteristics:
- A flexible shaft, as well as a working attachment, which will allow you to fix the device in its clamping mechanism. A cable can be used as a flexible shaft to activate the car's speedometer. The working nozzle is made of a textolite block: it is ground to the required dimensions and equipped with a stepped hole on the inside. The diameter of the hole is selected based on the dimensions of the fixed area of the cable: it must be securely fixed in it. The front nozzle area is equipped with a tube, inside of which is placed a freely rotating clamping chuck made of 2 halves, fixed to each other with a screw. A tool having a 2-5 mm shank diameter can be inserted into a balanced chuck.
- Tools for processing.
- A drive motor is any motor that operates at a voltage of 220 volts: from a tape recorder, washing machine, electric toothbrush. The best option is considered to be a motor from a sewing machine, since it is equipped with a rheostat that allows you to regulate the speed characteristics of the shaft.
During the work, you will also need an electric drill, a sharpening machine, and a set of plumbing tools. Do-it-yourself assembly of the device is carried out on the basis of the following drawings.
Assembling a drill
After preparing all the structural elements, you can begin assembling the device.
A homemade device is made according to the following instructions:
- The first step is to make a simple base frame. This base will allow you to securely fix all the elements of the device. In the manufacturing process of this element, a textolite or thick plywood sheet can be used. A piece of the required size is cut out of the material.
- According to the arrangement of elements, an electric motor and a bracket equipped with a clamp are attached to the base. The latter will serve as the basis for fixing the rear tip of the flexible shaft.
- Pulleys taken from unnecessary household appliances are fixed to the electric motor shaft, the movable core of the flexible shaft. To perform fixation, holes are made in the flange area of the pulleys, as well as on the shafts, necessary for placing the pins. You can make connections more reliable using epoxy resin.
- Then the future drill is equipped with a rubber belt. This element is installed on the pulleys of the flexible shaft and electric motor.
- The motor is connected to the electrical supply.
- The working nozzle is fixed on the front end of the flexible shaft.
After preparing all the structural elements, you can begin assembling the device
To ensure safe operation of the tool, a plywood casing is required for the electric motor and belt feed. Before starting work, it is necessary to test the serviceability of the manufactured device.
Principle, features of work
A self-made engraver resembles a drill or a grinding machine. However, its main purpose is considered to be the processing of small parts. A homemade hand engraver allows you to perform the following actions:
- drill;
- mill;
- polish;
- engrave.
Soft woods, hard steel, ceramics, glass with a high level of fragility, plastic, and bone can be selected for processing. During the processing process, it is necessary to use various attachments that are selected for each specific material.
A machine made according to the instructions described above will work according to the following principle:
- With the help of pulleys and a rubber belt, electric motor rotation is transmitted to the flexible shaft area.
- It is sent via a flexible shaft to the working attachment.
- The working nozzle processes the fixed element.
This tool can be made using a different scheme. It requires connecting a flexible shaft to an electric motor using an adapter coupling. Fixation occurs according to the following scheme: one tip of the coupling is mounted on the electric motor shaft and secured with a pin, the movable tip of the flexible shaft is fixed in a square hole located at the other end of the coupling.