Greetings, dear users of the site “rems-info.ru”. I am glad to introduce you to a new, very useful and interesting article. Let's talk about how to create a plaster product of any shape and size with your own hands. Silicone molds for stucco molding made of plaster and polyurethane.
Now it is very fashionable to decorate your interiors with stucco, however, as before, this type of finishing material is considered expensive. Its rather high price is usually motivated by the fact that stucco is primarily a handmade artistic material. But believe me, dear readers, your hands are capable of such artistic work. And no, you don't have to attend sculpting classes. All you need is careful reading and a little diligence.
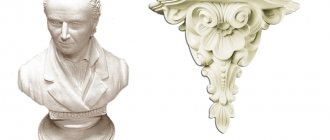
The main beauty of the technology for making molds for stucco, which I will talk about now, is that using it, you can create a plaster copy of anything. Thus, in order to create your own stucco molding for interior decoration, you only need the original material or, as it is also called, the matrix. Simply put, something you will embody a copy of in plaster. To create this very copy, we first need to make a form based on it. Now I’m going to tell and show you how to make a mold for stucco with your own hands.
In my specific case, I will describe the process of creating a form for pilasters. For those who don’t know what it is, I’ll tell you: it’s a decorative, vertical projection of a wall. For us, this protrusion will be made in the form of a semi-column. However, you will see everything in the photographs.
Materials and tools
To make it more convenient, I will initially write down a list of the main materials that we will need to create the form:
Materials for making molds for stucco:
- Acrylic silicone.
- Release agent.
- Construction gypsum.
- PVA glue.
- Cement.
- Silicone oil.
Tools and accessories:
- table top with a flat surface;
- polyethylene film;
- staple gun;
- narrow and wide spatula;
- small measuring cup;
- brush, preferably narrow;
- silicone gun.
Perhaps I missed something, or in your particular case something else will be needed, so do not take these lists as exact instructions. This is for informational purposes only.
Product protective treatment
The optimal temperature for drying gypsum products is 16-25 degrees. Sculptures made by molding should be removed from the molds after complete hardening. At this stage, you can smooth out any uneven areas with a brush or wet sponge. If you are completely satisfied with the shape of the plaster sculptures, leave them for a while to dry completely. The next stage is preparing the figures for painting. Apply a special primer in several layers to the entire surface of the product. You can replace it with PVA glue diluted with water. If you have made a sculpture that will stand outside, you can treat it with drying oil or shellac for additional protection.
Now we can proceed to a more detailed description of the process
The entire technology for making molds for stucco molding will be described in relation to my case. Don't pay attention to the fact that I'm talking exclusively about pilasters. This can be done with everything.
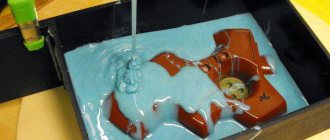
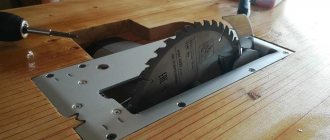
So, the beginning of creating the form is determined by the preparation of the base on which it is laid (see photo above). The form will freeze on it, so pay special attention to ensure that everything is even. As a base for the pilaster shape, I used a homemade tabletop of a suitable size made from boards and drywall. The drywall was pre-sheathed with plastic film, securing it to the table with staples.
This is necessary for tightness. Next, coat the entire surface of the pilaster with a release agent. If this is not done, the silicone with which we will coat the pilaster will stick dead to the copied product.
Features of caring for garden plaster decorations
If the manufacturing and processing technology is followed, plaster figurines will last for many years, but proper care is integral to preserving the appearance of the products. Therefore, you should consider:
- when cold weather sets in and the air temperature drops to below zero, as well as during prolonged rains, you need to remove garden figurines from the garden for storage in a warm and dry room;
- It is best to place the figures on a base made of natural stone or concrete, which will prevent insects from being exposed to moisture near the base;
- The varnish on the figures should be renewed every 2 or 3 years, which will protect the color of the products.
Proper care is the key to maintaining the bright color of plaster figures
Preparation of the silicone mixture, which is the basis of the future mold
Essentially, you need two elements: silicone and silicone oil, which are mixed together.
Oil is necessary to make the silicone even more elastic. However, if your form is relatively simple and does not have a large number of protrusions or any other decorative elements, it is not necessary to use silicone oil.
When everything is ready, you can move on to the most important part. The product to be copied must be coated with the silicone mixture. This should be done extremely carefully. It is important that the silicone gets into all pores. To speed up this process you should use a brush. Using smooth strokes, the silicone is driven into all the grooves and at the same time air bubbles are removed.
Speaking of bubbles, make sure there are none at all. Because after the silicone dries, shells remain in such places, which will spoil all subsequent products made from this form.
Several layers of silicone will have to be applied. After the first layer, it is necessary to carry out reinforcement so that in the future our form will be elastic, but at the same time durable. For this I used ordinary gauze. When laying it on the product, make sure that it fits tightly, but without stretching. The gauze is slightly recessed into the already applied layer of silicone.
Then, subsequent silicone layers are applied on top of the slightly recessed gauze.
Let the silicone dry a little. In weak places, in our case these are the sides of the pilaster, we arrange an additional thickening of the form. The same silicone will help us with this. It is more convenient to take silicone in tubes, which are charged into a silicone gun. A strip of silicone is applied along the edges and smeared along the edge of the product with a brush or finger. Oddly enough, it is advisable to use your finger, just moisten it with water first so that the silicone does not stick to it.
Again, let the entire product dry a little and upon completion of this process, proceed to the next step.
How to restore plaster garden figures
Gypsum or alabaster are not strong enough materials; when impacted, from humidity and frost, they easily crack and lose color. In such cases, you can carry out the restoration yourself:
- Small chips can be eliminated by applying gypsum putty to the damaged area. After drying, this part is painted, varnished and decorated in the same way as the entire figure. You can repaint the entire craft;
- When the figure is broken in half, it is easy to glue it back together. If additional pieces were broken off, they are first fixed with waterproof glue, and then the halves of the figurine are fastened together. The joint is coated with putty, tinted, and varnished;
- Scratches on the figurine are removed with putty. After it has dried, the surface is re-tinted and varnished;
- The cracked varnish is carefully peeled off with fine sandpaper and a new layer is applied with a brush.
Multi-colored snails will easily complement a Japanese bonsai or flower bed
"Bed for Form"
Now you most likely have a question: “What kind of bed?” This is a special plaster base into which the silicone mold will be inserted. The gypsum bed is necessary so that during the manufacturing process of the product in silicone mold, it retains its original appearance and does not deform.
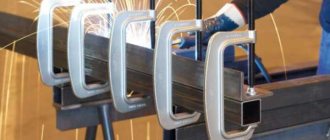
The construction of a bed begins with the creation of formwork. In my case, rubber plates were used, which I secured with masking tape to seal them. And on the sides and ends I pressed it with concrete bricks so that the structure would not move apart. For greater reliability and sealing, the rubber plates are also glued to the base with silicone.
This completes the silicone work. There's a little bad news: the brush you used to coat your pores when filling them with silicone can now only be thrown away.
The next stage is creating a gypsum mixture for the bed
To do this, mix PVA glue with water, which is then added to the plaster. A little cement is added there to give additional strength. As for the glue, it plays the role of a plasticizer.
We pour the resulting gypsum mixture into our formwork onto the product.
During this process, you should also coat all pores with a brush. When pouring the gypsum mixture into the formwork, the resulting layers should be leveled with a spatula.
Main characteristics of gypsum
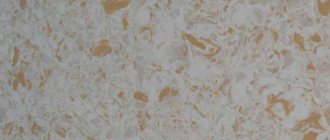
In any hardware store you will find gypsum powder or gypsum plasters. The material is made from sedimentary rock - gypsum stone. Gypsum owes such a diverse and widespread use in construction work to its availability combined with low cost. Working with this material is quite simple. It is necessary to dilute it with water, after which you can begin pouring molds or modeling. Attention: gypsum hardens very quickly in air and at the same time increases slightly in volume (no more than 1%). Prepare the solution for one time, immediately before starting to work with it. The material is capable of conveying the smallest details. If desired, plaster sculptures can be decorated with paints and other finishing compounds to create a high-quality imitation of precious stone or metal.
Finishing touches on making the mold for stucco molding
When enough gypsum has been poured, you need to remove excess moisture from its surface. This is done in two ways. The first is slower - bailing out water.
The second is to make a hole in the corner of the formwork and use a spatula to drive water there, after placing a bucket.
We give the resulting product time to dry. In my case it took 24 hours. When the plaster has set thoroughly, we can evaluate the result of our work for the first time. If something was done wrong, only now will you be able to see it. Therefore, at this stage you will either be happy or significantly upset.
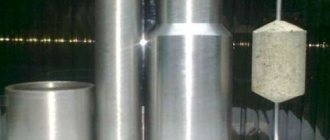
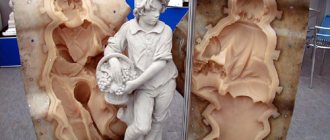
The final point - assessing the mold for making gypsum pilasters
We turn the product over with the plaster bed facing down and out of the silicone mold that we made. We remove the pilaster to be copied. We do this very carefully, everything is still fresh! Then take out the silicone mold itself.
Leave the bed to dry separately.
This way, both will dry faster.
Release agent for molds
Based on your requests, we are supplementing our article with information about separator lubricant for silicone molds.
There are several types of lubricant:
Release agents for silicone molds
- silicone
- waxy
- oil
- soapy
Each type of lubricant has its own advantages
Silicone Grease
To lubricate the inner walls of stucco molds, you can use a special silicone grease. It is sold in cans and is applied by spraying a thin layer onto the walls of the mold. It is easy to use. Does not clog the texture of the form itself. Typically, one coat of release agent is sufficient to prevent the mold from sticking to the material. This is a more convenient but more expensive type of lubricant.
Wax lubricant
This lubricant is wax based. This separator for stucco molding is very unpretentious. It has a thicker consistency than its counterparts. The main problem with this lubricant is that it clogs the shape of the mold after each use. That is, it just needs to be rinsed well after each pouring of the mold. But buying such a lubricant will not hurt your wallet. They are also sold in cans and applied with a brush or spray.
Oil lubrication
This type of lubricant is made from kerosene or regular sunflower oil. These are homemade lubricants that are prepared by diluting kerosene with water, or various oils in pure or diluted form. But we do not recommend these types of lubricants as they are toxic and not very convenient to use. They can also damage the shape.
Soap lubricant
The most economical and cheapest form lubricant option is a soap solution. You will spend virtually no money on it. It is prepared from laundry soap and warm water. The solution is prepared in the ratio 1 * 2.5-3.
- 1 part finely shaved soap
- 2-3 parts warm water
Stir the solution thoroughly until the soap is completely dissolved, and place it in a plastic bottle with a spray bottle. Apply 2 or 3 layers to the mold. Before applying each layer, the previous layer must dry.
Drawing conclusions
After a couple of days, you can safely pour plaster into the mold and make as many copies of the pilasters as your heart desires. Although you have spent a lot of money on silicone, you will now make products for pennies, since all the ingredients for preparing a mold for stucco are cheap.
This method is suitable for those who plan to place a large amount of the same type of stucco in their house or apartment. But if you only need two or three identical products, it’s better to buy them right away in the store. I deliberately did not indicate the exact proportions in the article. The fact is that all manufacturers have different gypsum and other components. Therefore, everyone experimentally selects the necessary ratios for themselves. I will tell you in more detail how to make a plaster product, having a ready-made mold, in the article: “Creating gypsum stucco using a silicone mold.”
The site rems-info.ru wishes you all successful repairs!
We invite you to watch this fascinating video: