Among the available welding machines for purchase and initial practical training, the most suitable for self-taught welders will be inexpensive, reliable, lightweight and reliable models that have the main and undeniable property - ease of use.
Modern electric arc welding machines, created using new technologies and incorporating almost all the most significant innovations - welding inverters, have these almost ideal properties.
Like any other electric welding, a welding inverter is used for simple and reliable connection of metal structures.
It is quite difficult to more precisely outline the scope of application of this technology, since welded joints are almost universally applicable - in construction, mechanical engineering, agriculture and everyday life, in general, where it is necessary to easily and simply connect metal to each other.
Required materials/tools/protection
Directly for work, a novice welder will need the following tools:
- Welding inverter with a set of wires (with a ground terminal and an electrode holder.
- Consumables – welding electrodes for manual electric arc welding (for starters, 3 mm in diameter will be suitable for training).
- Metal brush.
- A small hammer (as a rule, such a hammer is included with the inverter, but it is better to buy a special welder’s hammer - with a spring handle and pointed ends with a flat and a peaked shape).
- Clamps for pressing the parts to be welded.
Suitable materials for initial training:
- Metal iron objects - pipes, metal strips, construction fittings.
Attention! When taking your first steps, it is important to know that welding aluminum, cast iron, and stainless steel requires special electrodes and very confident welding skills.
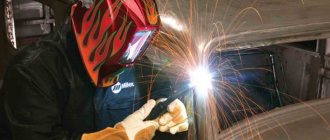
And most importantly, to carry out the work you need special protective armor:
- Be sure to wear a mask with a special light filter that blocks bright light from the welding arc.
- Protective gloves - after all, you will have to deal with molten scrap metal.
- Special suit , preferably made of fire-resistant tarpaulin.
- Work boots with thick, durable soles and high tops are a simple and reliable way to protect your feet from burns.
https://www.youtube.com/watch?v=NnaJTrs2qQA
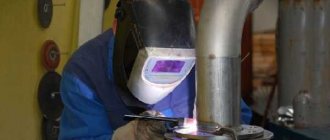
Connecting pipes by soldering with reinforcement
Let's look at how to properly solder reinforced polypropylene pipes. Here it is mandatory to remove the protective material. The presence of a reinforced layer (aluminum foil) in the pipe structure requires additional heating. But that's not the main thing.
Typically, such products have an increased diameter and do not fit standard soldering iron tips. They need to be cleaned before the soldering process. The exception is fiberglass reinforced pipes. They are soldered as standard.
Given the variety of technologies for reinforcing polypropylene pipes, various processing methods are used before soldering. Traditionally, a seamstress is used for stripping.
This name has a special device in the form of a metal sleeve with knives. The seamer is put on the end part of the pipe to be soldered, and with rotational movements around the axis of the pipe, the reinforced layer is cleaned to clean plastic.
If the reinforced layer is located in the middle part of the wall of the plastic pipe, it is more reasonable to use another tool for processing - a plastic pipe cutter.
Another device is a trimmer, needed for welding reinforced pipes. As a rule, the end trimmer is used on pipes whose wall structure contains a reinforced layer in the central area
The device is not much different from a seamstress, except for the placement and design of the cutting elements. After processing with a trimmer, the end part of the pipe is aligned with the end, plus a part of the reinforced layer is cut out to a depth of 2 mm along the entire circumference. This treatment allows soldering to be performed without defects.
Step-by-step instructions for performing the work
Preparatory steps:
- Step one - first you need to prepare the workplace, remove the room from unnecessary objects and flammable materials and liquids;
- Provide adequate lighting for the creative research area.
- Prepare the material for welding and the necessary tools.
- Check that the cable connections are correct and secure when using electrical extension cords.
As for the work itself, here you need to master the sequence and order of actions once and for all, this should become the rule and develop all movements to the point of automatism:
- Welding cables are unwound and straightened , connected to the inverter sockets.
- The parts to be welded are laid out , the correctness of the connections is checked and, if possible, secured in a vice or clamps.
- Protective equipment is put on and a mask is prepared.
- Ground terminal - a clamp with a plus sign to one of the surfaces to be welded.
- The electrode is inserted into the holder.
- The connection of the device itself to the electrical network is checked, without turning on the power supply key.
- The power is turned on , after 15-20 seconds the device is ready for use.
- The electrode is brought to the site of the intended seam , the protective mask is brought to the face, and the arc is ignited.
- With light movements, a weld pool is formed and a seam is formed.
When connecting small parts where the seam is short, it is recommended not to turn off the device during quality control and removal of slag deposits; for large volumes of work, it is recommended, despite the presence of forced cooling, to turn off the inverter and take a short break.
Upon completion of work, it is recommended:
- Remove the hand with the holder and stop the formation of an electric arc.
- Turn off the power to the device.
- Let the seam cool for 3-5 minutes , and lightly tap the slag and check the quality of the seam - ideally, it should look like laid scales, like on a fish - one should seem to overlap the other.
Preparing for work
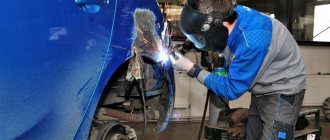
The connection of profile pipes without welding is mainly carried out using specialized clamps and bolts. Over time, the fasteners weaken, so when caring for the product, it is necessary to constantly check the strength of the structure. To reduce operational problems, welding is used to assemble the structure.
To obtain a strong weld, the surface of the pipe must be prepared. For this:
pipe sections are cut to the required length;
Using a grinder to cut pipes
It is recommended to cut pipes with special tools, for example, a hacksaw, which allows you to make the cut as even as possible.
- if it is necessary to connect elements at an angle, then the pipes are carefully adjusted to each other so that there are as few gaps as possible. This will increase the quality of the weld and, as a result, the reliability of the finished product;
- the places where the weld is supposed to be located are cleaned of rust, burrs and other foreign deposits. Any inclusion negatively affects the strength of the seam. Cleaning can be done with a simple metal brush or specialized equipment, for example, a grinding machine.
Surface preparation before welding
Safety precautions
The welding inverter is an electrical device, and therefore it is prohibited to work in high humidity, in the open air or in the rain.
It is necessary to work only in a protective mask, in a special fire-resistant suit and shoes, and in welding gloves. The workplace should be spacious; there should be no flammable or explosive materials, liquids, or cylinders in the workplace.
It is prohibited to carry out welding work with objects that have dangerous contents - in cans, gas tanks, and various ammunition.
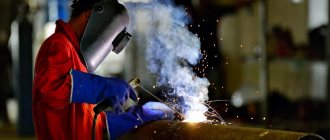
Organization of the workplace and reliable equipment for the welder
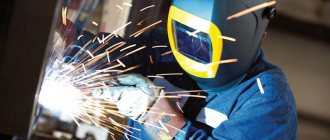
When welding with electrodes, strong infrared radiation occurs. To protect your eyes and skin, you must use a special welding mask and protective clothing made of dense material .
It is better to buy a welding helmet with chameleon glass, with the ability to adjust the degree of darkening of the glass. You need to wear split leather gloves or mittens on your hands. Protective clothing should be used regardless of whether you are a beginner welder or an expert.
The welding site must be fenced with protective screens to prevent damage to the eyes of others, especially at home. Welding shoes should not be nailed.
In such shoes, the welder will constantly dance even with slight dampness in the air. Before welding, be sure to ensure that your work area is properly grounded.
Having completed the preparatory work, you can begin learning welding and learning the basics.
Arc gap control
Welding arc diagram
You can speak with confidence about the initial skills of a welder when you develop the skill of correctly forming and holding the arc gap - the welding arc.
In fact, this is a simple process, the main thing in it is the understanding that the arc will be constant and melt the electrode most efficiently with the correct, slightly slow movement of the holder.
In many ways, this is achieved by trial and error - a consolidated skill will appear when, when moving the electrode, a homogeneous seam begins to form, connecting both parts being connected.
Which coupling should I use after stripping the pipe?
After processing the outer surface of the pipe, its diameter decreases by 2 mm. Therefore, it becomes unclear which coupling can be used after stripping the pipe and whether standard models are suitable. To solve this you will need a ruler, or better yet a caliper.
Before starting processing, the outer diameter of the pipe is measured. If it is larger than normal by 1.5-2 mm, then they will be removed after cleaning. Example: initially the outer diameter of the pipe was 22 mm, after processing it became 20 mm. This means you can solder it into a coupling with a standard internal cross-section.
How to eliminate errors when selecting components for a pipeline:
- buy elements from one manufacturer, preferably one series;
- study the drawing of each element with linear dimensions;
- before purchasing, measure the external diameters of pipelines and internal couplings;
- Using a trial method, find out the thickness of the layer to be removed for the existing model of the stripping tool.
HDPE couplings for pipes: compression, welded, electric welded, transitional, connecting, protective, what are these and the differences in installation HDPE coupling (fitting made of low-pressure polyethylene) is a fastening device used to connect pipes. Made from polyethylene by pressing under high pressure. Used for…
There will be no such problems with facing, since the outer radius of the nozzle will remain unchanged after processing. Regardless of the preparation method, before starting work, you need to do several control rations. This will help avoid inaccuracies and errors when installing a plumbing or heating system.
The video material describes the features of processing polymer pipelines and their types:
Rules for forming a weld seam
Obtaining a strong and reliable weld joint is largely the result of proper movement of the electrode in the weld pool. Quite primitively, this can be described roughly as the process of learning to write.
The movement of the hand with the holder is reminiscent of a first-grader's copybook, when the skills are quite weak and you have to draw zigzags, circles, or oblique lines. But at the same time, in addition to movement in one plane, when welding, you need to either bring the electrode closer or, on the contrary, remove it.
Such movements make it possible to form layers of metal in the weld pool, as if overlapping each other, and this ensures a perfectly formed connecting seam.
Movement of the holder
For proper welding, it is necessary to hold the tip of the electrode core at a distance of at least 2 mm and see the weld pool.
The problem for beginners is the need to perform several actions at once. To better fill the joint bead, it is necessary to guide the electrode in several ways.
For welding metal whose thickness is more than 6 mm, it is better to use a triangle motion. And for parts less than this thickness, it is better to use a broken zigzag welding line.
At first, only these methods of guiding the electrode will be required. Pay attention to the constant size of the oscillatory movements. You may first need to simply guide the electrode in a straight line to gain proficiency.
Don't think that you will succeed on the first try. This is a long process, so you need to be patient while mastering the basics.
Direct and reverse polarity during inverter welding
The usual connection of the welding cables of the holder to the “minus”, and the “ground” clamp to the “plus” of the inverter allows you to easily weld all permissible connections, while this polarity allows you to increase the amount of heat generated during welding.
Reverse connection of cables, and the inverter has such a possibility, “plus” is supplied to the electrode, and “minus” is applied to the parts being welded, which allows you to reduce the amount of heat and, accordingly, connect parts made of thin metal without the formation of burns.
General information about welding.
Classification of different types of welding
Welding is the process of obtaining a permanent connection of any solid materials by local melting or plastic deformation, as a result of which strong bonds are formed between the atoms of the materials being welded.
Metal welding is divided into various types according to physical, technical and technological characteristics.
Classification of metal welding by physical characteristics
Classification by physical characteristics is carried out depending on the form of energy used to form the welded joint. As a result, welding processes are divided into three classes:
— thermal;
— thermomechanical;
— mechanical.
The thermal class includes types of welding that are carried out by melting using thermal energy: arc, electron beam, electroslag, plasma, ion beam, light, glow discharge welding, induction, thermite, gas and foundry.
The thermomechanical class of welding includes those types that are produced both using thermal energy and using pressure. These include: resistance welding, induction-press, diffusion, gas-press, thermo-compression, arc-press, slag-press, furnace and thermite-press.
The mechanical class of welding includes varieties carried out using mechanical energy and pressure: cold, ultrasonic, explosion, friction and magnetic pulse.
Classification of metal welding according to technical characteristics
Technical features include the following:
— method of protecting metal in the welding zone;
— degree of continuity of the welding process;
— degree of mechanization of the process.
From the point of view of the method of metal protection, a distinction is made between welding in air, vacuum, various protective gases, submerged arc, flux welding, foam welding, and with combined protection.
Based on the continuity of the welding process, continuous and intermittent types are distinguished; According to the degree of mechanization, manual, mechanized, automated and automatic types of welding are distinguished.
Brief description of the main types of welding
Arc welding is the most common and versatile type of welding. Refers to fusion welding.
Melting of the base and filler metal is carried out by an electric arc burning between the electrode and the metal being welded. The molten base and filler metal (electrode or welding wire) form the so-called weld pool; As a result of crystallization of the metal of the weld pool, a weld is formed.
To protect the weld from oxidation, thickly coated electrodes with a coating are used, which releases liquid slag and reducing gases (for example, CO2; hydrogen) when the arc burns.
Welding with carbon electrodes with dependent (Fig. 2, b
) or an independent (Fig. 2,
c)
arc with filler rods is used to a limited extent, mainly for welding thin-walled products made of non-ferrous metals. Carbon electrodes are more widely used for arc cutting (especially for cutting ground steels).
Figure 2 - Manual arc welding
Automatic submerged arc welding
This type of welding is used on large scales of production to connect parts with straight and circular seams (Fig. 3). The electrode is hollow welding wire 1.
The productivity of this process is 5-10 times higher than with manual arc welding. The quality of the welds is also high.
Figure 3 - Automatic submerged arc welding
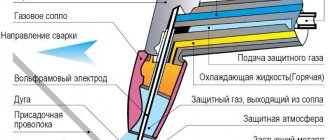
Gas shielded welding
Welding is carried out with consumables (Fig. 4, a)
or non-consumable (tungsten) electrodes (Fig. 4, b) in a stream of inert gases.
Figure 4 - Welding in shielding gases
This method is used when welding parts made of high-alloy steels, titanium, nickel, aluminum and magnesium alloys. When welding carbon steels, cheaper carbon dioxide is used.
Electroslag welding
In this type of welding, the melting of the base and filler metals is carried out by heat, which is released when an electric current passes through the molten slag during the steady-state welding process.
Electroslag welding is classified according to the type of electrode, the presence of electrode vibrations, the number of electrodes and some other characteristics. Used for joining massive workpieces (casing parts of large machines, high-pressure tanks, etc.).
Gas welding
This type of welding is based on melting base and filler metals with a high-temperature gas-oxygen flame. A variety of gases are used as fuel for combustion in oxygen: hydrogen, acetylene, propane-butane mixture, gasoline vapor, kerosene vapor, city gas, natural gas, lamp gas, coke oven gas, petroleum gas and other gases.
Oxy-acetylene welding (Fig. 5) is carried out in the flame of an injection torch. The filler metal is wire or rods made of metal similar in composition to the metal of the parts being welded. The quality of joints in oxy-acetylene welding is lower than in electric arc welding.
Figure 5 - Oxy-acetylene welding
contact welding
Resistance butt welding is used, as a rule, to connect parts with small cross-sections. The ends of the parts are compressed with a hydraulic press, then the electric current is turned on. The metal at the junction is brought to a plastic state.
Another type of resistance welding is flash welding. With this method, the joint is first compressed with a slight force, then the current is turned on. As a result, a large number of microarcs are formed at the junction, melting the metal (Fig. 6, b). After melting, the joint is compressed with a hydraulic press (Fig. 6, c).
Flash welding is used to join parts of large sections, and also parts made of dissimilar materials.
Another type of resistance welding is spot welding, divided into single-point, two-point and multi-point.
Resistance welding can be performed by various types of electric current - constant, alternating, pulsating.
Figure 6 - Butt welding
The concept of metal weldability
Weldability in welding production is the ability of homogeneous and dissimilar metals (as well as their alloys) to form a welded joint that can operate under given loads, environment, temperature and other conditions.
In fusion welding, only metals that have good mutual solubility are welded. All homogeneous metals can be welded well, that is, steel with steel, cast iron with cast iron, copper with copper, etc. Copper and lead do not have mutual solubility and in the molten (liquid) state form non-mixing layers, so it is almost impossible to weld copper and lead. It is difficult to weld iron with lead, aluminum with bismuth, iron with magnesium, etc. Therefore, in such cases, to ensure the weldability of dissimilar metals, a third metal is usually used, which has good mutual solubility with both metals being welded.
In addition to the properties of the base metal, weldability depends on the type and mode of welding, the composition of the filler metal and flux, and the type of shielding gas. For example, it is impossible to weld carbon steel in a nitrogen environment, because the weld metal will be saturated with nitrogen, and as a result, the metal will age. Welding copper in nitrogen, on the other hand, is favorable because molten copper is practically neutral to nitrogen.
More than 150 methods are used in practice to determine the weldability of metals and their alloys.
Literature: 1 main. [3-18], 2bas. [7-21], 1-3 add.
Control questions
1. What process is called welding?
2. By what physical characteristics are welding processes classified?
3. Give some examples of different types of welding.
4. What is meant by the weldability of metals?
Classification of different types of welding
Welding is the process of obtaining a permanent connection of any solid materials by local melting or plastic deformation, as a result of which strong bonds are formed between the atoms of the materials being welded.
Metal welding is divided into various types according to physical, technical and technological characteristics.
Classification of metal welding by physical characteristics
Classification by physical characteristics is carried out depending on the form of energy used to form the welded joint. As a result, welding processes are divided into three classes:
— thermal;
— thermomechanical;
— mechanical.
The thermal class includes types of welding that are carried out by melting using thermal energy: arc, electron beam, electroslag, plasma, ion beam, light, glow discharge welding, induction, thermite, gas and foundry.
The thermomechanical class of welding includes those types that are produced both using thermal energy and using pressure. These include: resistance welding, induction-press, diffusion, gas-press, thermo-compression, arc-press, slag-press, furnace and thermite-press.
The mechanical class of welding includes varieties carried out using mechanical energy and pressure: cold, ultrasonic, explosion, friction and magnetic pulse.
Classification of metal welding according to technical characteristics
Technical features include the following:
— method of protecting metal in the welding zone;
— degree of continuity of the welding process;
— degree of mechanization of the process.
From the point of view of the method of metal protection, a distinction is made between welding in air, vacuum, various protective gases, submerged arc, flux welding, foam welding, and with combined protection.
Based on the continuity of the welding process, continuous and intermittent types are distinguished; According to the degree of mechanization, manual, mechanized, automated and automatic types of welding are distinguished.
Brief description of the main types of welding
Arc welding is the most common and versatile type of welding. Refers to fusion welding.
Melting of the base and filler metal is carried out by an electric arc burning between the electrode and the metal being welded. The molten base and filler metal (electrode or welding wire) form the so-called weld pool; As a result of crystallization of the metal of the weld pool, a weld is formed.
To protect the weld from oxidation, thickly coated electrodes with a coating are used, which releases liquid slag and reducing gases (for example, CO2; hydrogen) when the arc burns.
Welding with carbon electrodes with dependent (Fig. 2, b
) or an independent (Fig. 2,
c)
arc with filler rods is used to a limited extent, mainly for welding thin-walled products made of non-ferrous metals. Carbon electrodes are more widely used for arc cutting (especially for cutting ground steels).
Figure 2 - Manual arc welding
Automatic submerged arc welding
This type of welding is used on large scales of production to connect parts with straight and circular seams (Fig. 3). The electrode is hollow welding wire 1.
The productivity of this process is 5-10 times higher than with manual arc welding. The quality of the welds is also high.
Figure 3 - Automatic submerged arc welding
Gas shielded welding
Welding is carried out with consumables (Fig. 4, a)
or non-consumable (tungsten) electrodes (Fig. 4, b) in a stream of inert gases.
Figure 4 - Welding in shielding gases
This method is used when welding parts made of high-alloy steels, titanium, nickel, aluminum and magnesium alloys. When welding carbon steels, cheaper carbon dioxide is used.
Electroslag welding
In this type of welding, the melting of the base and filler metals is carried out by heat, which is released when an electric current passes through the molten slag during the steady-state welding process.
Electroslag welding is classified according to the type of electrode, the presence of electrode vibrations, the number of electrodes and some other characteristics. Used for joining massive workpieces (casing parts of large machines, high-pressure tanks, etc.).
Gas welding
This type of welding is based on melting base and filler metals with a high-temperature gas-oxygen flame. A variety of gases are used as fuel for combustion in oxygen: hydrogen, acetylene, propane-butane mixture, gasoline vapor, kerosene vapor, city gas, natural gas, lamp gas, coke oven gas, petroleum gas and other gases.
Oxy-acetylene welding (Fig. 5) is carried out in the flame of an injection torch. The filler metal is wire or rods made of metal similar in composition to the metal of the parts being welded. The quality of joints in oxy-acetylene welding is lower than in electric arc welding.
Figure 5 - Oxy-acetylene welding
contact welding
Resistance butt welding is used, as a rule, to connect parts with small cross-sections. The ends of the parts are compressed with a hydraulic press, then the electric current is turned on. The metal at the junction is brought to a plastic state.
Another type of resistance welding is flash welding. With this method, the joint is first compressed with a slight force, then the current is turned on. As a result, a large number of microarcs are formed at the junction, melting the metal (Fig. 6, b). After melting, the joint is compressed with a hydraulic press (Fig. 6, c).
Flash welding is used to join parts of large sections, and also parts made of dissimilar materials.
Another type of resistance welding is spot welding, divided into single-point, two-point and multi-point.
Resistance welding can be performed by various types of electric current - constant, alternating, pulsating.
Figure 6 - Butt welding
The concept of metal weldability
Weldability in welding production is the ability of homogeneous and dissimilar metals (as well as their alloys) to form a welded joint that can operate under given loads, environment, temperature and other conditions.
In fusion welding, only metals that have good mutual solubility are welded. All homogeneous metals can be welded well, that is, steel with steel, cast iron with cast iron, copper with copper, etc. Copper and lead do not have mutual solubility and in the molten (liquid) state form non-mixing layers, so it is almost impossible to weld copper and lead. It is difficult to weld iron with lead, aluminum with bismuth, iron with magnesium, etc. Therefore, in such cases, to ensure the weldability of dissimilar metals, a third metal is usually used, which has good mutual solubility with both metals being welded.
In addition to the properties of the base metal, weldability depends on the type and mode of welding, the composition of the filler metal and flux, and the type of shielding gas. For example, it is impossible to weld carbon steel in a nitrogen environment, because the weld metal will be saturated with nitrogen, and as a result, the metal will age. Welding copper in nitrogen, on the other hand, is favorable because molten copper is practically neutral to nitrogen.
More than 150 methods are used in practice to determine the weldability of metals and their alloys.
Literature: 1 main. [3-18], 2bas. [7-21], 1-3 add.
Control questions
1. What process is called welding?
2. By what physical characteristics are welding processes classified?
3. Give some examples of different types of welding.
4. What is meant by the weldability of metals?
Working with thin metal
Selection of electrodes
The option of working with an inverter with thin metal is not easy for beginners the first time, but even professionals do not always succeed.
However, you should know:
- When welding thin metal, it is recommended to use reverse polarity.
- When connecting thin metal and thicker metal , to achieve the result, you need to press the thin metal tightly against the thicker one and weld from thick to thin to prevent overheating and burning.
- Both parts must be well cleaned and rust must be removed to avoid the formation of additional slag.
What parts do polypropylene pipes connect to?
The products are combined with connecting elements made of steel and polyethylene. Fittings consisting of a metal and plastic part are used. The metal part has a thread, the plastic is joined using heat during welding or soldering.
The following types of connecting fittings are used:
- couplings are designed to connect sections of the same diameter;
- Crosses or tees are necessary to obtain a branch line of the pipeline;
- plugs cover the end sections of the water supply system;
- adapters are required to join elements of different diameters;
- a fitting will be needed to connect flexible hoses to the pipeline.
Using these elements, you can create a plumbing network of any complexity.
Advantages and disadvantages
When starting to work with an inverter welding machine, it is useful, in addition to the operating instructions, to familiarize yourself with even more in-depth publications on electric welding equipment; in any case, you need to clearly understand all the pros and cons of such tools.
The “advantages” of welding inverters clearly include:
- Light weight.
- The ability to work at a fairly low voltage in the network , the electronics hold the arc perfectly even at 160-180 volts in the mains.
- Smooth adjustment of the electric current produced by the device.
- Ability to work with almost all types of electrodes.
- Easy and efficient arc ignition.
- Possibility of adjustment to work with various materials , both in terms of the thickness of the metal being spliced, and with various metals - for example, aluminum, cast iron.
- Almost complete absence of voltage surges when working even on overloaded networks.
Unfortunately, there are also disadvantages, but most of them are not related to the direct operation of the tool:
- High price compared to transformer models.
- Demanding working conditions – positive temperature, acceptable humidity, slight dustiness.
- High cost of repair – used electronic components are most often repaired either in specialized service centers, or it is cheaper to buy a new inverter.
The essence of the welding inverter technology is that the alternating current of the electrical network through the operation of electronic components is converted first into direct current, and then once again into alternating current, but with different quality indicators - high frequency (about 20,000–50,000 Hz) and high power current - 100–200 Amperes, but with a low voltage of about 60-90 V.
Assembling elements without soldering
The use of compression fittings and modern adhesives makes it possible to install polypropylene pipes efficiently, quickly and with minimal material investment.
Option #1 - installing a compression fitting
To implement this connection method, you will need to purchase compression fittings and use a crimp wrench.
Compression fittings are equipped with sealing clamp rings that act as dampers when shock impulse loads occur (unlike simple union nuts)
Installation of a compression fitting includes three main steps:
- Place a blue nut on the end of the pipe, cut at a right angle and cleared of burrs. When placing a white crimp ring, it must be given a position in which the thickened part is directed towards the tail of the pipe.
- The pipe is inserted into the fitting until it stops, pushing the clamping ring to the maximum.
- Tighten the blue nut, “tightening” it first by hand, and then tightening it with a wrench.
Assembly of compression fittings does not require special knowledge or skills. Products are supplied for sale completely ready for installation. Their installation can be performed under any temperature conditions.
Option #2 - gluing elements
The adhesive method is used to assemble a water pipeline through which it is planned to transport only cold water. To apply the “cold” welding method, you will need to use an “aggressive” adhesive composition such as LN-915.
The glue is capable of dissolving the surfaces of the joined parts by one third, thereby creating conditions for cold diffusion welding
To protect the skin of your hands from accidental contact with the composition and “corrosion” by its active components, it is better to perform gluing operations while wearing protective gloves.
Sequence of actions when gluing products:
- Check the correspondence of the cut angles of the joined sections and mark the places for gluing with a pencil.
- Clean and degrease the ends of the pipes to be connected.
- An adhesive composition is applied evenly to the ends of the pipes and the area of the fitting sockets.
- The pipe sections are inserted into the fitting holes, focusing on the marks made in pencil. The structure is kept in a fixed position for three minutes, after which excess compounds are removed with a napkin.
- The combined elements are laid out on a flat surface and left for 5-6 hours until completely dry.
You can run water to check the quality of gluing only a day after completion of installation.
When implementing this technology for installing PP pipes, it is important to observe two main conditions: temperature and humidity conditions. All work must be performed at air temperatures from +5, +35 °C
When gluing in hot weather conditions, the work should be done as quickly as possible so that the glue does not have time to dry before installation is completed.
Tips and possible mistakes
When starting to use a welding inverter, the most important thing you need is to be patient; more than one pack of electrodes will go away before you get a really beautiful seam.
But you need to strive for this from the first time you turn on the device, and the following points will help a lot:
- At the initial stage , it is enough to learn how to hold the arc so that the electrode heats up evenly.
- In the first lessons, it is recommended to first learn how to form a horizontal seam, and only then diversify the tasks - welding vertical and ceiling elements.
- It is important to get into the habit of cleaning rust and deposits from the joints.
Basic rules for joining parts
After you have mastered the basics of welding, you need to weld metal structures yourself and move on to performing simple assembly and tack operations at home. As a rule, a home craftsman does not weld thick metal, so cutting edges is not required. First, you can practice connecting a profile pipe. To do this, you will need to cut sharp corners at the ends of the parts for a larger penetration area.
The parts are inserted into the corner clamp and secured with a clamping bar. Now you need to first grab it from several sides. To do this, light an arc and place a small point.
There is no need to withstand a large leg, you just need to fix the parts. After checking the diagonals, tacks are performed on all accessible sides. Now the structure is removed and welded with a reliable and high-quality seam.
If the lessons on the angle of inclination and laying metal in a molten weld pool are well learned, then the operations of assembling metal structures will not cause difficulties even for dummies in welding.
Having studied the basics of welding and gained theoretical knowledge, you need to practice as often as possible, put on welding equipment, turn on the welding machine and hone your skills for a long time. Only practice will allow you to become a high-class welder.