Home - Articles - How to age wood with your own hands - 4 ways Perhaps one of the very interesting and undoubtedly fashionable ways to add beauty to all kinds of wooden objects is artificial aging; how to do this with your own hands will be described in detail below. There is no doubt that wood exists the lightest of materials that can be subjected to various types of processing. This allows manufacturers of these products to delight their customers with various types of finishing and decoration of wooden products.
Perhaps one of the most interesting methods of adding beauty to wood products is its artificial aging. To carry out this procedure, you only need a little effort and time so that such expensive time will appear on your furniture in a few days.
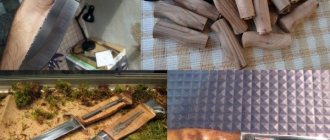
Brushing method
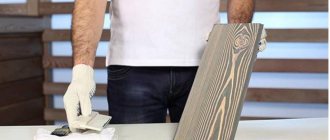
The first method that will help add honorable age to our wooden products is (brushing), this method is very popular in various kinds of workshops engaged in these types of work. The name of this method of aging wood comes from the English. Brush which in translation sounds like (brush) After all, it plays the main role in this aging method, the only thing is that it is metal.
With the help of a metal brush, soft fibers are slowly removed from a wooden object and after this procedure, pronounced rings appear on the surfaces of the products, signs of the years the tree has lived through. Typically, such rings have a tree that has lived for many years, but here you will get them in a couple of hours. Of course, without a doubt, just brushed wood looks, to put it mildly, unimportant, so after this rough processing you need to bring the wood blank to aesthetics.
Using sandpaper, you need to make the surface smooth, after that we finally sand it, cover it with stain and let it dry for 5-6 hours, after time has passed, or when it has completely dried, we open the product with varnish. At the same time, there is a method of painting individual parts in different tones to create an effect (Patina) that looks very impressive on the floor.
The method (brushing) is often used when aging rough wood, for example floors, doors or walls. But you also need to take into account that not every type of wood can be aged by brushing. Excellent materials for this method are doors of oak, larch, and pine. But trees such as maple, beech and birch are not entirely suitable for this method, since they have vague outlines of the rings. Blaching is also not used on MDF products.
How to age wood with your own hands
Today I would like to talk and show a simple way of aging wood and the option of using this process in the decor of your home or cottage or other place.
I will describe this method with an eye to how we do our work. Since there is a lot of information about this process on the Internet, I would like not to reinvent the wheel, but to show exactly how we do it, having tried several different options and finding the easiest one, both in operation and in terms of duration.
Let's first decipher the word brushing.
Brushing (from the English Brush - brush) is a special and non-standard process for finishing wood
So, what do we need for this process:
The first is of course a tree! We work with coniferous wood, as during the finishing process it produces a brighter and more expressive texture.
Next, we take a simple burner and burn the wood. Depending on what we will use the tree for, we do it either strongly, weakly, or medium. We burn as hard as possible. Then you will understand why we are doing this.
Firing wood helps us bring out the texture of the wood more clearly. But firing helps us for one more moment, which will complete the entire aging process.
Next we need the following kit:
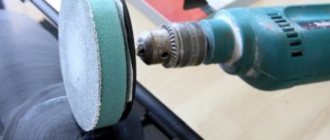
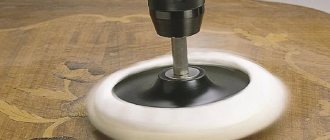
Metal brush
Disc nozzle with stiff wire bristles.
First of all, we take a disk attachment and begin to remove the soft layers of wood. It is advisable to drive this object carefully, try to do it along the grain, and not across it!
The final processing is carried out with a metal brush to reveal a clearer texture.
After processing, use a brush to remove all shavings and dust from the wood fibers so that when applying the following materials there will be no shavings or dust.
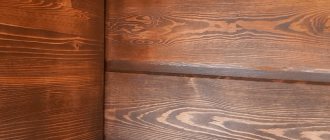
The wood is ready for further processing with decorative materials, and we will show an example of what can be done with the wood after brushing and how to use it in your home or cottage. I spotted this idea at an exhibition on home construction, where one company, offering its products, used lining and other finishing materials for interior and exterior decoration. With the help of this product, ordinary lining takes on the appearance of an original finish.
We take brushed wood and cover it with colored oil for decoration. Unfortunately, I can’t say the company, but there are quite a lot of them on the market, the only drawback of this product is its price.
After we have covered the entire surface of the wood with oil, let it dry for 2 minutes.
After the surface has dried, take a regular window cleaning tool with a rubber surface or a soft spatula and remove the top layer of oil.
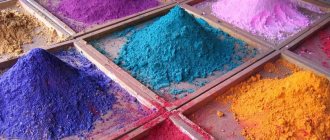
We get this interesting wood texture. Manufacturers have different colors of this oil and they can also be applied in two layers, giving the wood a unique color and texture.
Due to the fact that after processing the wood, having a texture, the oil impregnates the bottom layer of wood, and we remove the top layer, giving the wood a beautiful texture. Thanks to this, your interior will begin to play more brightly and will be different from everyone else!
Let's summarize. Thanks to these materials, dedicated time and low energy consumption, we get the result that you saw above.
I hope my master class will help you and was interesting. If you have any questions, please contact us at any time of the day, I will try to answer all your questions as quickly and completely as possible.
Best regards, Dmitry.
Patching
But there is a method for processing these types of wood, for example, patina. So, if we want to age doors made of maple or beech wood, we will use the patina method. Initially, we will select a paint that will match the original tone of the door or furniture. The surface of the wood is covered with this tone in 1 layer, after which we allow it to dry completely, now we apply a second layer of paint, taking into account that it should be thin and not very bright, if you take a bright or too light tone of paint on the second layer, then your a piece of furniture will look new, but we are achieving the opposite effect, that is, antiquity. We also let the second tone of paint dry thoroughly.
When the tinting is finished and it is dried, it’s time to create the effect of an antique piece of furniture, for this we will need fine-profile sandpaper with which abrasions are applied to the surface of the wood, and we need to achieve the result so that through the upper tone, the lower tone begins to be visible, as if painted more than once. You can adjust the aging method yourself, bringing it to the age you need.
Provence, shabby chic and vintage in design
Many popular modern design styles are characterized by the use of worn and shabby objects and details in the interior, pastel tones and romantic decorative elements.
Did you know? Every year, for their needs, people cut down about 15 billion trees of the entire green fund of the planet, while replenishing it with only 5 billion new seedlings.
Provence
This style was first discussed in the 19th century by the French living in the province of the same name. Their traditions, intertwined with everyday peasant chores and southern nature, became the basis for the development of a new direction in design.
Provencal houses were distinguished by their elegance and simultaneous simplicity, with a reverent attitude towards the things of their ancestors. It was these family heirlooms that became the personification of the spirit of southern France.
This style is characterized by:
- predominance of white and all shades of beige;
- fragments artificially faded in the sun;
- multi-colored palette in decor, accessories (flower patterns, stripes, pastoral and checkered patterns are often found);
- many elements made of wood in decoration;
- artificially worn ceramic tiles (chips, untreated stone, brick, ethnic);
- porcelain dishes, forged mirror frames, textile napkins and tablecloths;
- lighting items with elements of forging, cotton and linen;
- lathed panoramic windows;
- rustic furniture of classic shapes with elements of wood, forging and wickerwork.
Did you know? The tallest tree in the world is considered to be the sequoia from California. Its trunk has grown to a height of 115 meters, and its diameter reaches 8 m.
Shabby chic
It represents a completely new direction in interior design. It originated in Great Britain about 30 years ago.
Its basis is the characteristic British restraint, conservatism, frugality and passion for everything that is old but of good quality.
The shabby chic style is manifested in the following characteristics:
- lack of white tones;
- the prevalence of pale shades: blue, pink, lavender, yellow and milky;
- bright contrasting colors;
- using ceramic tiles to look like weathered painted wood, wild stone or plaster, as well as with small floral patterns;
- on the white plastered ceiling there is classical stucco molding in the tone of gold leaf, as well as bleached fragments of the ceiling;
- wood and metal textures that imitate aging;
- The interior items used are mainly restored antiques, textiles, artificially aged photo frames, antique candelabra, fresh flowers, porcelain dolls and figurines of angels;
- the lighting contains crystal, forging, fabric lampshades and ancient pendants;
- restored furniture made of expensive wood, painted forged metal parts.
Did you know? In the United States of America, all crafts made before 1830 are classified as antiques, in Canada - before 1847, and in the UK - before 1917.
Vintage
It was invented by the French, laying the fundamental foundations from the uniqueness and emphasized originality of ancient worn-out interior items.
Initially, this was the name for wine aged for many years, but over time a whole design style was formed.
Its main feature is the use of antique items, which must accurately correspond to the fashion trends of their era.
Vintage interiors are characterized by:
- prevailing white, beige and milky shades, as well as contrasting shades - burgundy, green, graphite, purple;
- drawings with flowers and vegetation;
- artificially made flaws;
- flooring made of wood, marble or ceramics, but always with a worn effect;
- not overloaded in decor (only valuable antique objects, photographs, mirrors, paintings, candelabra are used in doses);
- stucco molding in a classic style;
- use of natural materials, forged elements, crystal, linen, wool;
- the spirit of restraint and elegance present in the interior design;
- antique furniture made of wood and wrought metal.
Important! For artificial aging, lumber from the following wood species is recommended: pine, spruce, oak, ash, larch, walnut, wenge, doussia, metobo, kempas, merbau. The board may have knots and other flaws - this is even better.
Wood wear
Method (wood wear). There is also a way to create unnatural abrasions - like applying wax to wooden surfaces. To do this, we rub with wax individual parts of the desired wooden product, which was previously antique-painted and dried, after which we cover the wood with a new, lighter tone than the main paint. Then, using a spatula, remove the layer of wax, and carefully sand the product, and after sanding, we tint the wooden surface with stain and treat it with paraffin.
Using this method, a very good and truthful result is obtained.
Using stain
A method of aging using stain. Covering wooden surfaces with stain is probably the most common and effective method of making wood age. With its help, you can age both doors and any piece of wooden furniture. First, we completely cover the wooden product with a layer of stain, preferably water-based. After this procedure, we take a soft, clean rag and wash it off from predetermined places, as a rule, this is the middle part of the board, while leaving the corners and any cracks untouched, hard-to-reach places can be opened with stain using a brush. After the wooden product has completely dried, we apply the last layer of stain, preferably with white spirit, and then let the wooden product dry completely.
After drying, we proceed to filling the pores of the wood with alkali primer using a brush or sponge. This procedure helps to fix the color given to the product. After this, antique paraffin is rubbed into the wooden surface using a metal brush specially designed for this purpose. After these procedures, the wood receives a good texture and the effect lasts for a long time. And in case of reluctance or lack of time, you can always purchase a high-quality and professionally aged wooden product in the store.
Wood aging methods
Masters, as a rule, use three proven and effective methods:
- Mechanical surface treatment. At the same time, individual fragments are slightly erased and scratched, creating irregularities identical to long-term external influences.
- You can imitate a tree like an old tree by playing with colors. Stains, various special compounds, paints, and varnishes are used. By skillfully applying technology, it is easy to achieve a network of cracks. You will get the impression of an object that has seen a lot in its lifetime.
- Chemical treatment with caustic substances.
Note! Ammonia, vitriol, and alkalis give good results, but it is not recommended to use them on your own. This requires experience and strict adherence to safety measures.