Brass plating, it's easy
Introduction
Sometimes, in addition to functionality, you want to give some details a beautiful appearance. It happens that iron parts simply need to be protected from exposure to water, air and other aggressive influences. The simplest, cheapest and most common way to solve such problems is painting. But this method has many disadvantages and limitations. And sometimes, you just want something better. Qualities of a different order. And we will, of course, talk about the galvanic method of applying metal.
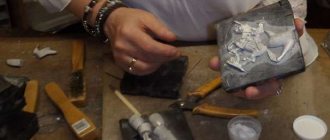
One day, I came across a real locomotive cast-iron whistle, which I was restoring for my steam motorcycle. Of course, the easiest way would be to cover it with black paint. But, as they say, we are not looking for easy ways. I wanted something special. In the end I plated it with brass. Partly I wanted to maintain the “Steampunk” style in my steam motorcycle, and partly I wanted to master new technology and experiment.
When I started to understand the technology of applying brass, it turned out that there are several different methods, but the information is rather sparse. There are no sufficiently detailed descriptions with all the subtleties, nuances and hidden pitfalls. Therefore, I had to take basic information and, through long experiments, understand everything myself. Now that the goal has been successfully achieved, I will gladly share my knowledge and experience with everyone.
Preparation
Well... Let's take a closer look at how to coat iron parts with brass. To begin with, of course, your part must be well prepared, because galvanizing is not paint that fills all the cracks and potholes. Therefore, before applying brass, your part should already be thoroughly sanded and polished to a shine. Next, it is very important to choose the right container for electrolysis. The main rule here is that the container should not be metal! Otherwise, she will certainly react to the core. Next, our container should be lined with so-called sacrificial brass. Why sacrificial? Because it is she who will participate in the process and ultimately be applied to our part. And there is one very important subtlety!
The container is lined with sacrificial brass (anode)
You must do everything in such a way that the distance between your part and the brass is from 3 to 10 centimeters, and is approximately the same in all areas. This is very important to observe so that the current density is approximately the same and uniform in all areas, since it is the current density that will determine the shade of the coating.
Electrolyte
When it comes to home or garage electrolysis, the availability of components is of utmost importance. I found several different recipes, and almost all of them use some kind of difficult-to-pronounce chemistry, which I don’t know where they get it from and where in everyday life it can be used. Therefore, to create my electrolyte, I decided to use the “old-fashioned method,” so to speak. Chemicals for which could be obtained within a radius of 1 - 2 kilometers from any home. This method was practiced back in Soviet times, was forgotten, but in my opinion, has not lost its relevance in our time.
Lemon acid
And so, the first component that is needed for our electrolyte is citric acid. It is widely used in cooking and as an anti-scale agent. Sold in almost all grocery stores and household chemical departments. 80 approximately costs 40-50r.
Ammonia solution (ammonia)
The second component is ammonia water, or as it is also called, ammonia. You won’t have any problems with it either, since it is sold in almost every pharmacy.
To create an electrolyte you will need: for 1 liter of water, 60 grams of citric acid and approximately 80 ml of ammonia water. I’ll explain approximately why below. Calculate by proportion how many ingredients you need and purchase the required amount of chemicals. When all preparations and purchases are made, we can begin to prepare the electrolyte.
In general, in this old ancestral method, another chemical was used called “Trilon B” (disodium salt of ethylenediaminetetraacetic acid). This component performs two functions. Reduction of metals and, as the fathers put it, dissolution of the insoluble. It will require 6-10 g per liter of water.
Previously, in Soviet times, it could be found almost everywhere. It has been used as a fertilizer, as a cleaning agent, as a rust reducer, and even in medicine. But nowadays, for some reason I couldn’t find it anywhere. In principle, you can do it without it. “Trilon B”, in this case, has no greater effect on the quality of the coating, but on the efficiency and speed of the process.
So. Let's start making the electrolyte. To begin, pour hot water into a separate bowl. All ingredients dissolve much better in hot water. Then, pour all the prepared citric acid, measured in advance, into this bucket and mix thoroughly until the sediment is completely dissolved. But with ammonia, everything is not so simple. Ammonia water needs to be added slowly, in small portions, stirring occasionally and constantly monitoring the smell of the electrolyte, and if there is pH indicator paper, control it by color. As soon as the electrolyte begins to smell like ammonia (the color begins to change from red to colorless), it means enough. I want to warn you right away that you need to do this with safety glasses and in a ventilated area! Once mixed with an acidic environment, ammonia is neutralized and ceases to be so dangerous. But practice shows that electrolysis works much better if the pH of the electrolyte is slightly shifted towards the alkaline side. Therefore, the best electrolyte will smell a little like ammonia (litmus will begin to turn blue), which means that all work is best done with safety glasses.
In order for the electrolyte to be ready and begin to function correctly, it is not enough to simply mix the components. You also need to prepare it electrically by passing an increased current through it. And since the electrochemical preparation of the electrolyte smoothly flows into electrolysis itself, we will do it, as they say, along the way.
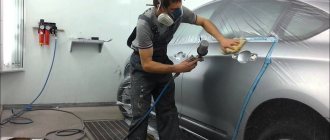
We carefully degrease our part with acetone, pour the electrolyte into a prepared metallized bucket, and immerse the part there.
Next, we need a DC power supply. It is very important that it be equipped with an ammeter! It is according to his testimony that we will adjust the regime. I must warn you right away that just electricity from an outlet will not work for you! We connect the plus (anode) to the foil, and the minus (cathode) to the part and turn on the power supply. We set the current in such a way that hydrogen actively begins to be released on the part. If your part is large enough and the power supply is weak, you can use several power supplies in parallel. Which is exactly what I had to do. For my cast iron, 5 kg whistle, I set the current to 15 amperes, and I dialed it using two power supplies.
And now we wait. For some time, no metal deposition will occur. The electrolyte should be ready. And the first signal that the electrolyte is ready will be a strong blackening of your part. Don't be alarmed, this is normal! With clean, degreased hands, thoroughly wash our part in warm water. Next begins the most difficult and most delicate work. It is necessary to select the correct electrolysis current.
Electrolysis
Brass is an alloy of copper and zinc. And the physics of electrolysis is such that at low currents copper is predominantly deposited, which means the color of your coating will turn pink and even red. If there is too much current, most of the zinc will be deposited, which means the color of the coating will lighten, and even turn white. In other words, if there is not enough current, it will be red, and if there is too much current, it will be white.
The shade can be created to suit your taste
Knowing this, you can easily choose any shade that interests you. The instructions write a specific current density, 0.1...0.3 A per Dm2, but in practice these values will not work, since the required current for the shade you need depends on many factors. Temperature, electrolyte density, distance from the part to the Electrode (brass), etc. Therefore, focus on the resulting color of the part. It was for my dimensions of the part and my electrolyte density that the ideal current turned out to be 11 amperes. The larger the surface area of your part, the more current you will need.
So, this is what, in my opinion, the most correct electrolysis process should look like. We immerse the part in the electrolyte (30-50*C), set the approximate current parameters, and wait 15 minutes. After this time, we take out the part, wash it thoroughly, and control the color of the coating. We adjust the current in the desired direction and repeat the process for the next 15 minutes. And in these 15-minute stages, we achieve the required shade and the required coating thickness. And here I must tell you about one very important and dangerous nuance that awaits you! Over time, your electrolyte will degrade, so to speak. This means the current required for your shade will decrease. This is why it is important to constantly monitor the shade and adjust the current.
Of course, the electrolyte can be easily restored by adding a little more ammonia water, but I don’t recommend you do that! Because then all your hue and current settings will be completely lost. And you will have to select everything again. It took me six hours of electrolysis to understand all these subtleties and nuances. So, take my advice and don't repeat my mistakes. “Old-timers” also say that surfactants have a good effect on the electrolysis process. In our case, it will be a tiny drop of “Fary”. But, to be honest, I tried both “Fary” and “Rooms”, and didn’t notice any particular difference. But, nevertheless, if you experiment, I’ll share this information.
Well, then friends, everything is at your discretion. You can leave your product matte, you can varnish it, and if you have the patience to apply a thick enough layer, you can polish it to a mirror, which, in fact, is what I decided to do.
Conclusion
This method is very simple, cheap, and easily accessible in terms of components. But I want to warn you right away that this method can only cover iron parts with brass; it is difficult to coat stainless steel, and is completely unsuitable for aluminum, chromium and most other metals and their alloys.
For greater clarity, I made a special 9-minute video where I talk about all the subtleties and nuances.
Well, friends, I told everything I knew, I shared everything that happened. If you use this recipe, write, share your experience, send photos of your details. I hope that thanks to this article, many beautiful and unique masterpieces will appear.
Links to articles about steam motorcycle:
Old world energy
A look into the past. 18th century technology
Use of copper
Due to its numerous advantages, this metal has become widespread. Today, copper and its numerous alloys are widely used in industry. The metal is relevant for aircraft manufacturing, automotive manufacturing, instrument making and other industries. Metal and products made from it are no less popular in the domestic sphere. Copper plating itself is one of the best ways to coat a metal surface with a thin layer. At home, copper plating can be done in several ways.
Home copper plating
This procedure is relevant for various cases, since applying a layer of copper can be used for aluminum cutlery, souvenirs, candlesticks, etc. Non-metal products on which a layer of copper has been applied have a unique effect. These can be plant stems, leaves, etc. Due to the fact that the objects being coated do not have a conductive layer, a special electrically conductive varnish is used instead, which is applied to the surface.
The varnish contains a number of organic solvents, foaming agents and finely dispersed graphite powder, which creates electrical conductivity. The varnish is applied in a thin layer to a dry surface, and after drying in an hour, you can begin copper plating. If desired, copper can be given different color shades using special methods. The high quality and uniqueness of such products is deservedly equated to real jewelry.
Galvanic copper plating at home
- Copper sulfate;
- Water;
- Hydrochloric acid in its pure form.
Galvanic copper plating at home
Preparation of the solution
Copper sulfate
We make a saturated solution of copper sulfate, after which you will need to add 1/3 of this solution to hydrochloric acid. After preparing the copper sulfate solution, it should be thoroughly stirred so that there are no particles. Next, you need to add hydrochloric acid in a thin stream to this solution. Don't forget about safety precautions and use gloves and safety glasses. After you have added hydrochloric acid to the solution, it should be mixed thoroughly.
So, the solution is ready and you can start copper plating at home. To do this, you need to take the metal part on which you are going to apply a layer of copper and prepare it for work. Preparation includes sanding it with sandpaper. This procedure allows you to not only clean the metal surface, but also degrease it. The same procedure will be relevant for parts made of brass or lead. After this, the coating must be thoroughly washed in a solution of soda ash. This will allow the material to be degreased more thoroughly.
Soda ash for degreasing material
Next, the surface must be immersed in a solution of copper sulfate and hydrochloric acid. Please note that the first layer of copper is very thin and weak, so it is advisable to remove it with a wire brush. After you have done this, the surface of the steel or lead should be washed again in a solution of soda ash and again immersed in the copper plating solution. These manipulations will lead to the fact that the layer of copper on the surface at home will be much thicker and much stronger, since it can be removed from the object only using sandpaper, and not a metal brush as before.
Wholesale and retail
We sell wholesale and retail. In the Himsnab-SPB catalog you can order a wide range of substances of various qualifications: “Technical” (“tech.”); “Clean” (“h.”); “Pure for analysis” (“analytical grade”); “Chemically pure” (“chemically pure”); “Particularly pure” (“special purity”); imp.: inorganic reagents, organic reagents, highly pure substances, solutions (buffer solutions, solutions for cleaning and storing electrodes, solutions for conductivity meters), chemical raw materials and components. Products for laboratory research.
Heat treatment of non-ferrous alloys
HEAT TREATMENT OF COPPER AND BRASS
It is the most common non-ferrous metal in technology and industry, with high ductility, thermal conductivity and electrical conductivity. Based on copper, technical alloys are formed - brass and bronze.
Copper is used to produce sheets, strips, and wires using the cold deformation method. During deformation, it loses plasticity and gains elasticity. Loss of ductility makes calcination, broaching and drawing difficult, and in some cases makes further processing of the metal impossible.
To remove hardening or hardening and restore the plastic properties of copper, recrystallization annealing is carried out according to the following regime: heating to a temperature of 450-500 ° C at a speed of 200-220 ° C/h, holding depending on the configuration and weight of the product from 0.5 to 1.5 h, cooling in still air. The structure of the metal after annealing consists of equiaxed crystals, strength σв = 190 MPa, relative elongation δ = 22%.
An alloy of copper and zinc is called brass. There are two-component (simple) brasses, consisting only of copper, zinc and some impurities, and multi-component (special) brasses, into which one or more alloying elements (lead, silicon, tin) are introduced to give the alloy certain properties.
Depending on the processing method, two-component brass is divided into wrought and cast brass.
deformable two-component brasses (L96, L90, L80, L63, etc.) have high ductility and are well processed by pressure; they are used for the manufacture of sheets, tape, strips, pipes, wire and rods of various profiles.
Foundry brass is used for casting shaped parts. In the process of cold working, two-component brasses, like copper, are hardened, as a result of which strength increases and ductility decreases. Therefore, such brass is subjected to heat treatment - recrystallization annealing according to the regime: heating to 450-650 ° C, at a rate of 180-200 ° C / h, holding for 1.5-2.0 hours and cooling in still air. Strength of brass after annealing σΒ = 240-320 MPa, relative elongation δ = 49-52%
Brass products with high internal stress in the metal are susceptible to cracking. When stored in air for a long time, longitudinal and transverse cracks form on them. To avoid this, products are subjected to low-temperature annealing at 250-300° C before long-term storage.
The presence of alloying elements (manganese, tin, nickel, lead and silicon) in multi-component (special) brasses gives them increased strength, hardness and high corrosion resistance in atmospheric conditions and sea water . Brasses alloyed with tin have the highest stability in sea water, for example LO70-1, LA77-2 and LAN59-3-2, called marine brass; they are used mainly for the manufacture of parts for marine vessels.
Areas of use of copper plating
Generally, electroplating copper plating can be used:
- For decorative purposes. Given the enormous popularity of antique copper products these days. There are methods of artificial aging of steel products;
- In galvanoplasty. Widely used in jewelry, among souvenirs, for making bas-reliefs, etc.;
- In the technical industry. Copper plating of metal is very important in the electrical field. The low cost of copper plating compared to gold or silver coatings makes it possible to reduce the cost of manufacturing electrodes, electrical busbars, contacts and other elements from lead steel.
Copper plating occurs together with the application of other galvanic coatings
- If you need to apply a multi-layer protective and decorative coating to a layer of steel. In the vast majority of cases, copper is used here together with nickel and chromium. This allows you to improve adhesion to the base metal and obtain a shiny, high-strength coating;
- To avoid cementation of the area. Copper plating of lead will prevent carbonization from occurring on steel areas. To apply the copper layer, use only those areas where cutting will be carried out;
- When performing restoration and restoration work. This method is most often used to restore chrome parts of cars and motorcycles. For these purposes, a fairly thick layer of copper is applied, about 100-250 microns or more, which makes it possible to cover all defects and damage to the metal for applying subsequent coatings;
Order brass removal
By clicking on the “Submit” button I agree to the processing of my personal data
| Metal | up to 50 kg. | Price (per 1 kg.) from 50 to 300 kg. | from 300 to 1000 kg. |
| BRASS | 205 rub. | 210 rub. | 215 rub. |
| BRASS SHAVINGS | 170 rub. | 180 rub. | 185 rub. |
| BRASS RADIATORS | 200 rub. | 205 rub. | 210 rub. |