WikiHow works like a wiki, which means that many of our articles are written by multiple authors. During the creation of this article, 10 people, including anonymously, worked to edit and improve it.
To knit you need a good crochet hook. If you love crafting or couldn't find the right size hook at your local store, you can easily cut one yourself. Hand-cut hooks may become your favorite, even if you already have store-bought ones.
Hook for knitting rugs with your own hands - type, application
All needlewomen have tried knitting at least once, because knitting is an interesting and useful activity, widespread all over the world. Having acquired the skills of this skill, every housewife will bring not only more comfort to her home, but will also be able to please her loved ones with interesting knitted things. To make the process more enjoyable, you need to choose the right tool.
Crochet hooks range in length from 120 to 160 mm, their thickness is from 0.5 to 1 cm. They consist of a shaft, a head and a barb. When buying a tool, it is important to focus on the head: make sure that it is not very pointed. Otherwise, there may be a risk of pricking yourself. But if the head is excessively flat and rounded, then this is also not good.
What does the product consist of?
The selection must be made based on who, what image you want and what threads you will use. If you use thin threads and knit with the same crochet, the loops will come out small and the fabric will be thin. And on the contrary, the knitting will be too tight if you use thick threads and thin tools.
Important! The crochet hook must be 2-2.5 times thicker than the thread.
Numbering and thickness
Hooks are made from various materials. They come in these types:
- made of plastic;
- made of wood;
- made of aluminum;
- bone;
- combined.
Types of knitting devices
Plastic ones are characterized by the cheapness of the material, therefore they are considered the most relevant. They are quite convenient to use, except that the thread can become electrified. To prevent such a problem from arising, you can use an antiseptic: simply treat the yarn and the object of labor with it. It is important to check when purchasing so that the hook is not overly flexible. This option is often chosen when a tool is needed for knitting items of large dimensions, with No. 5 and above, because it is light and durable.
Wooden crafts
Wooden hooks are rarely used by needlewomen. They strongly electrify the thread. The surface of such a tool quickly deteriorates, and the thread stops sliding along it. In this case, knitting will be awkward.
How to knit from scraps
Aluminum hooks. Such products are quite convenient to use, since they are not electrified, and are affordable. However, such material leaves stains on light threads and stains your hands. Due to the softness of aluminum, the tool is easy to bend and there is also a chance of nicks appearing. In this case, the hook will not serve you for long.
Aluminum product
Bone knitting tools are prized for their ease of knitting with thicker yarns. Just keep in mind that this material is fragile and should be handled with care. They are not cheap in terms of cost.
Bone hooks
Combination hooks are made from a combination of several materials. Basically, the handle is made of wood or plastic, and the base is a metal rod. It is important to focus on the connection between the base and the handle.
Combined type of device
So which material should you choose? To make a knitted product of high quality, you need to take into account the type of yarn. But experienced craftswomen advise and themselves prefer metal crochet hooks, because they are strong and very durable.
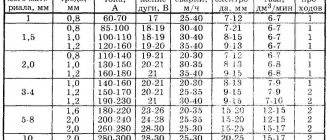
There are hooks of different thicknesses. The number can be determined by the size of the head. For example, a tool with a head thickness of 2 mm will have number 2. Thin ones are used when knitting openwork products: napkins, collars, capes, etc. To make it easier for you to choose a hook for a particular yarn, on skeins of thread the number and type of knitting tools are indicated.
Which tools go with which threads:
- 0.6–1 mm is used when knitting with thin cotton threads.
- 1.25–1.75 mm – for knitting with thin cotton threads or others of the same thickness.
- 2–3.5 mm corresponds to medium thickness yarn.
- 4–5 mm is suitable for medium thickness yarn for double thread knitting.
- 5.4–6 mm – for double fluffy yarn.
- 7–8 mm – for regular wool or double wool thread.
- 9–10 mm – suitable for thickly twisted thread, bulky yarn.
When choosing, you should focus on the surface - it should be smooth, without any snags. For good work, the beard should be slightly rounded and pointed so that the thread that is hooked is held perfectly. This way you won't get hurt or tear the yarn.
Stylish hand knitted rug
If the rug is made with passion and love, it will radiate positive energy. Using a crochet hook you can knit wonderful rugs that will highlight the design of any room. There are different options for knitting rugs. By adding accessories made by your own hands to your home, you will notice how the aura in your home will change in a positive way.
It is worth noting that knitters have learned to make rugs for different rooms, not only from yarn, but also from used things: plastic bags, old blankets, unnecessary clothes. The fabric is simply cut into thin strips and knitted into rugs. Hand-knitted products are extraordinary, but they are reliable and very practical in everyday life.
Cozy rug
Options for knitting rugs:
- "grandmother's" round method;
- star;
- oval;
- on a fillet mesh;
To make a rug using the “grandmother’s” method, you need a size 10 hook and multi-colored pieces of fabric. The method is simple. The strips can be sewn or knitted, or wound into a skein. We knit the product in a circle using single crochets. It is necessary to understand the so-called “rule of the circle”. The connected accessory can be used not only as a floor covering, but also placed on a chair.
Round rug
A polygonal knitted rug looks unique and attractive in the exterior of a home. Knitting a rug with a star can be made from different materials: bags, fabric, threads. The “star” is knitted in circular lines to the required size, and then each resulting “ray” is knitted separately. You can knit such a rug from soft thick thread, then you will get a warm blanket or bedspread.
Star shape
A good invention of our housewives was the use of knitting bags. The good thing about accessories made from bags is that they are easy to clean and dry quickly. For the bathroom, restroom and kitchen, this product can become an indispensable item, since the mat is not afraid of water; you just need to shake it off and dry it.
For the base of the mat, you need to prepare material - bags. For a medium-sized rug, approximately 40 bags are used, they are cut into strips 2-3 cm wide, sewn with thread or glued with a hot iron through fabric and rolled into a ball. Weaving is done by crocheting 4 numbers. Typically, 2 types of loops are used: chain loops and single crochet stitches.
Rug made from bags
Knitting rugs using a fillet mesh is considered another innovation invented by needlewomen. Products of this type look luxurious and magnificent. At first glance, it may seem that such a product is difficult to make. But in fact, everything is done simply and quickly - you just need to learn how to knit chain stitches and double crochets.
DIY fillet mesh rug
Round pouf
- For this product you will need 800 grams of yarn (acrylic or cotton are suitable): the main shade should be 300 g and 5 more colors should be 100 g each.
- Work in a double crochet pattern, starting with 5 hanging stitches, increasing one each row, using different colors.
- Having reached the middle, you no longer need to add, here you need to make several rows of the main color (the number is at your discretion).
- After this, there is a decrease in one loop on each row.
- When you get a small hole, insert a filler into it, it can be padding polyester or foam rubber.
- Pull the last six loops together with a needle. The ottoman is ready!
DIY knitting device
Knitting for every needlewoman is a continuous process. True fans of their craft engage in their favorite hobby always and everywhere - on a trip, in transport, in nature and while walking with a child. And if a hobby turns into a job, then you can’t do without special devices that make life easier.
Modern stores for needlewomen offer a huge selection of various devices designed to make the process easier and simpler. Thread separators for jacquard knitting, finger guards that protect hands from damage, special holders for yarn. Most devices can be made with your own hands. For this you will need available materials and a little imagination.
Thread holder
A useful and necessary device for knitting is a holder that will prevent balls from rolling out throughout the apartment. This device is especially useful for those who knit with several threads. And for working with jacquard, when the yarns are constantly tangled with each other, this device is indispensable.
To work, you need several plastic bottles. Their number depends on how many threads of different colors are in use at the same time. The volume of the bottle affects what size skein you can put inside.
First, the neck of the bottle is cut off using a utility knife. The marker marks the lines along which the container will be cut. Most of the plastic is cut off, leaving a thin strip about 2.5 cm wide. To make the tip take the shape of a hook, a match or lighter is carefully placed under the strip of plastic.
This must be done very carefully, not allowing the material to melt. When the strip at the end takes the form of a loop, you will need to wait for the mold to completely harden. It is convenient to attach such a hook to the back of a chair or the handle of a desk drawer, and put a ball inside. A conveniently packaged thread will not be able to roll into the far corner.
Yarn separator
Often when knitting, the question arises of how to make sure that the threads do not intertwine. A knitting device consisting of an ordinary plastic bucket will help to achieve this (you can take a large food container or a container of under-water). Stationery clips are attached to the edge of the container along the perimeter. The loop of the clamp is removed and a thread is threaded through it, then the clamp is attached to the container. Yarn threaded through such a device will not get tangled.
To prevent the balls from running over one another, you can make cardboard dividers inside. To do this, 3 or 4 strips of cardboard are cut out with a length equal to the diameter of the container, and the width should be chosen with a margin so that it is enough for the size of the ball. Such strips are inserted one into another. A cut is made in the middle of each, and they are put on each other in a herringbone pattern.
Experts offer this type of device as a ceramic knitting bowl. Similar knitting devices are made by craftsmen who work with clay. However, a similar design can be made from a plastic shampoo container or bottle. To do this, 2/3 of the neck of the container is cut off.
It is better to treat the edges of such a device - paste it with tape or colored adhesive paper. If you have a heat gun, then a layer of glue applied in two or three approaches will perfectly cover sharp cuts. The slot should not be too shallow. As a rule, 0.5-0.7 mm is enough for even thick yarn to fit perfectly in the container.
For those needlewomen who cannot spend a minute without their favorite activity, a yarn organizer or bag would be an excellent solution. Such knitting devices are convenient because they take up little space. They are attached to the hand and do not fall off anywhere. You can put a skein of the necessary yarn inside - this way it will always be at hand and will not fall and get dirty.
To create a pattern, you need to take measurements - wrist circumference. A letter “T” with a wide head and a thinner perpendicular leg is drawn on paper. The pattern must be mirrored symmetrically. The edges of the thin stem are immediately processed to avoid fraying.
For this, adhesive material is used, or the fabric is overwrapped or overcast by hand. Then the handbag is sewn from the wrong side, without grabbing the narrow “legs”. This bag is very light and comfortable.
Knitting socks
Almost every knitter's first item after a scarf is socks. Knitting them is quite easy, but working with several knitting needles at the same time requires some skill. For those who want to knit socks, a knitting device called a lum, or tenerife, will come to the rescue. It looks like this device is one row away from a knitting machine.
The device has hooks or rods on which the thread is attached. Then, by hand or using a special hook, the thread is thrown over and the fabric is formed. The hook can also be simple, for knitting. Too large a bend, which is in a classic crochet hook, prevents the thread from flying off. However, there is also no possibility in this weaving method to throw the thread quickly. You can also make a hook yourself.
This device for knitting socks at home is made from scrap materials. For example, to make a rectangular stand, you will need a board 3-4 cm wide and about 50 cm long. Nails are driven in along the perimeter of the board. The distance between them is chosen independently, but the optimal option, which will suit most of the yarn, is no more than 1 cm.
Depending on the intended pattern, the shape of the machine and the location of the fasteners may vary. In order to knit socks on such a device, it is better to use a different form option. You need a foam or plastic round base. A silicone lid works well. Push pins are inserted around the perimeter at a distance of about 0.7 cm. A hole is cut in the center, the diameter of which is 5 cm.
Knitting process
This device is suitable for knitting socks and mitts. To secure the loop, you must move clockwise. The tail of the thread is held in the left hand, and a turn is made on the button with the right hand. Having made a full move, perform another row. And in the third row, the previous loops (loops of the first row) are thrown over the loops of the second row.
To do this, use a hook or hand to lift the loop of the bottom row, slightly pull it up and drop it from the paperclip. Row after row of yarn knitted together lengthens. Knitting using this technique is loose but elastic. Due to this, you don’t have to knit the heel on the toes - the fabric will sit comfortably on your leg.
Knit this way until the sock or mitt reaches the required length (to the big toe or heel). To decrease the loops, they make gaps in knitting - they throw the yarn not on each axis, but through one.
Anyone can make an unusual but useful knitting device for themselves. The main thing is to understand what is needed - convenience, functionality, increased speed. A device for knitting mitts, socks, and scarves can be designed to suit the needs of the craftsman.
Note to knitters: 15 useful tips for knitting...
We are all familiar with the desire to save energy and time on routine little things and the techniques that allow us to do this - life hacks. Let me introduce you to some of these knitting techniques today. Ball holders.
All kinds of devices designed to ensure that the ball does not “run away” anywhere.
Using a paper clip, build a knitting device - place the ball in the bowl, attach the clip to its wall and thread the thread through the metal eye. The thread will not run away.
How to easily and simply prevent a ball of thread from running away from you? Cut out the neck of the bottle and leave a strip of plastic that you can attach to the back of a chair and then secure to the neck of the bottle. An indispensable item for multi-color knitting.
Another idea for multi-color knitting. Crochet yourself a thimble like this - and the thread will not go anywhere.
You can make leaves like this out of cardboard to store the name and number and color of knitting threads. An original idea for storing knitting needles. You buy a photo album and put in knitting needles - circular and sock. A file folder can also be used for the same purpose.
A beautiful design is up to your taste. This simple device will help you not to lose the desired row: Having finished knitting, put ordinary wine corks on the knitting needles - and not a single stitch will “run away”. You can use an eraser instead of corks.
Rubber softeners from ballpoint pens will help make crochet hooks more comfortable. Do you knit everywhere and always? Bend the tip of the crochet hook to make it easy to carry on your keychain.
For knitting on the road and any other places with insufficient lighting, you can use luminous knitting needles and illuminated crochet hooks. You can order such a tool in American and Asian online stores.
A new type of needlework - knitting with laser swords! So that an auxiliary knitting needle, a hook and other necessary metal things are always at hand, make yourself a bracelet like this: If you haven’t finished knitting, you’re afraid of pricking yourself - sew these cuffs: And, finally, my favorite For those who want to knit always and everywhere , some ideas for knitting handbags:
Bonus! And here is the pattern of such a handbag
1. ALWAYS knit a swatch. Do not waste time and expensive yarn on this. You knit with knitting needles that you plan to use to knit at least 1-2 repeats, cast off the stitches, wash with warm water and dry. Only then can you measure the sample and calculate the loops for a large product.
2. It is not at all necessary to choose the number of knitting needles according to the recommendation indicated on the yarn package. Each needlewoman has her own special knitting style: loose or, conversely, tight. Using the size of the knitting needles, you can adjust the density of the fabric to suit your style.
3. After the product is knitted and sewn, it is necessary to wash it in order to wash off the factory wax and moth treatment. Wash with liquid wool detergent in warm (not hot) water. Rinse several times. Wring out with a towel, gently twisting. Leave to dry on a horizontal surface on a dry towel, giving the desired shape with your hands.
4. Don't skimp on yarn. Life is too short to knit from synthetics and low-quality wool. Remember how, as a child, you didn’t like a prickly hat and biting mittens.
For children's clothing, choose merino. It is soft and does not prick at all. By saving, you will spend time knitting something that will lose its appearance after washing. The thread will stretch and the paint will fade.
Good yarn lasts in a product for years.
5. How to make invisible, beautiful decreases: hide the purl stitches under the knit stitches. We knit the facial loops in arans together last. “Eat” everything around the ornament. Change the needle size to a smaller one in places where you decrease.
6. After unraveling the product, if you decide to knit something new from this yarn, you must wash the yarn. It will become smooth, it will be more convenient for you to knit.
Wrap the yarn in long loops, like a skein, around the back of a chair, for example. Tie with a contrasting thread to avoid tangling. Wash, leave to dry, hanging by one of the fastening threads.
Once dry, rewind into balls.
7. It is better to knit hats, snoods, sweaters, sleeves in the round without a seam. For hats and snoods, it is better to use knitting needles on 40 cm fishing line. For sweaters, 60, 80 cm fishing line. Sleeves and mittens can be knitted using 80, 100 cm fishing line.
8. Paired items can be knitted simultaneously on knitting needles with fishing line using the “magic loop” method. Use knitting needles with a smooth connection to the fishing line (for example, detachable ones from Knit pro) and fishing line 80, 100 cm long.
9. You can knit in 2 threads from one ball: the thread is outside and inside the skein. Or, for example, take 2 ends for knitting using the “magic loop” method.
10. Write down the initial data on the product: name of yarn, article number/color name, number of knitting needles, number of cast-on loops. When you want to repeat, you won't have to remember or calculate.
11. Elastic bands are knitted with knitting needles of a smaller diameter, the “rice” and “pearl” patterns make the item more voluminous, aranas and braids compress the item. Aranas and braids, jacquard are knitted with knitting needles of larger diameter.
12. It is easier to knit a hat of the desired shape using different sizes of knitting needles: the elastic is 1/1.5 smaller in size, the main part is with the knitting needles indicated on the yarn package, closer to the crown we again switch to a smaller size to smoothly narrow the product.
Every needlewoman knows that a competent combination of colors is 50% of success! When starting to create a new product, you need to think through everything down to the smallest detail. A color chart and amazing palettes will help you choose the right yarn colors.
Artists use a color chart to understand how colors work together.
Blue, red and yellow are the primary colors. Orange, green and purple are secondary. The remaining colors are tertiary. The segments that are next to each other are very harmonious. Colors that are directly opposite provide beneficial contrast.
Conventionally, the color chart can be divided into 2 parts: warm shades and cold shades. The warm part of the color spectrum consists of red, yellow, brown, and orange tones. Use these colors to create brightness and depth. The combination of warm shades can greatly enrich the finished product.
Blue, green and purple are on the cool side of the color chart. By adding cool tones you can balance out warm tones. Advice for all needlewomen: before choosing yarn, constantly touch the thread to your face to determine if this color scheme suits you.
How to speed up hand knitting: a set of secrets
How to make a crochet hook from an old toothbrush, detailed master class.
I would call this master class very strange. Agree: it’s unclear why you should spend your time making a crochet hook if you can buy a similar plastic tool in a store at a ridiculous price? But after giving it some thought, I realized that this was a very good idea. How many toothbrushes does your family throw away per year?
Most people throw them in the general trash bin, so these pieces of plastic cannot be recycled. They will lie in landfills for centuries and pollute the environment. It would be much smarter to turn toothbrushes into hooks, thereby preventing the overproduction of plastic hooks. So crafts made from a toothbrush are very useful, join us!
To make a hook you will need any old toothbrush. The condition of the stubble does not matter.
In addition to bristles, take a file, pliers, sandpaper and a sharp utility knife.
How to make a crochet hook? Work process.
First of all, you need to get rid of the part of the brush on which the bristles are located. Feel free to take a sharp utility knife (you can even take a construction knife) and cut off this part.
Of course, you won’t be able to cut through plastic with an ordinary stationery knife: you will only be able to make a notch. But this is not bad either: the rest of the work can be done by grasping the bristles with pliers. Pinch this part of the brush and unscrew it.
The result is a brush without bristles.
Using a file, rub the tip of the brush a little to smooth it out.
Using the same blade, cut a small triangle at the tip of the brush. The kind of triangle you see in a regular crochet hook. If you look in profile, this notch should be in the shape of the number “7”.
You can compare what you got with any handicraft crochet. Or you can create exactly the same product, “copying” from a natural hook step by step.
Immediately take a working thread (preferably of a suitable thickness) and try to knit with this crochet hook. If the yarn does not jump off the tool while working, then you are on the right track!
Pay special attention to the recess itself: it should not be catastrophically narrow. Otherwise, during knitting the hook will break under the pressure of the yarn.
Use a file to file the notch: move it from the deepest point of the hook to the handle of the tool. Make the transition from handle to recess as smooth as possible.
You should get something like this hook. If the tool comes out rough, sand the surface with sandpaper. But remember: the plastic used to make toothbrushes is soft, so you should use fine sandpaper.
Now you know how to make a crochet hook!
From different brushes you can make hooks of different sizes to work with different threads.
The undoubted advantage of such hooks is that, thanks to the care of brush manufacturers, these tools will be very comfortable to hold in your hands!
Instructions for making a hook
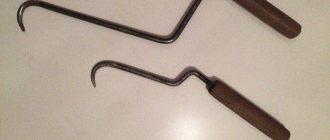
Factory-made products often cannot fully satisfy the needs of builders, especially when there is a large amount of work to be done on knitting the frame for the foundation. Let's look at how to make a hook for tying reinforcement with your own hands.
Most often, workers point to the insufficient length of the rod, which makes it impossible to tie knots in hard-to-reach places, or to the incorrect bending of the tip. In such cases, you have to make a crochet hook right on the construction site from scrap materials.
From reinforcement
It will take no more than two hours to make a homemade hook. The fitter makes such a tool according to the required dimensions to suit his hand. To make a hook from reinforcement, you need to prepare:
- a piece of corrugated reinforcement 350-500 mm long. The thickness of the rod is no more than 10 mm;
- blank for handle made of wood or plastic;
- two washers with an internal diameter equal to the thickness of the rod;
- two nuts or two bearings;
- pliers;
- axe;
- electric drill with 10 mm wood drill;
- angle grinder with a disc for cutting metal;
- sandpaper.
The sequence of actions when making a hook for knitting reinforcement with your own hands:
- To give the future product a smooth surface, the iron ribs are cut from the rod with an angle grinder. This point could be skipped if you immediately took a smooth reinforcing rod, but corrugated rods have higher strength and are better suited for making homemade tools.
- The wooden blank is drilled in the center, adjusting the hole to the diameter of the rod. You need to make a hole exactly in the center of the handle. After adjusting the handle, it is sanded with sandpaper.
- A lock nut is welded onto one end of the rod to prevent the handle from flying off. A bearing can also be used for this purpose. A washer, a wooden handle, a washer and a nut are then successively placed on the rod. In order for the handle to rotate well when knitting wire, there should be a small distance between the washers. Therefore, when welding the second nut, you need to place paper folded several times between the handle and the washer, which can then be easily removed.
- The second end of the rod is sharpened using an angle grinder and a metal disc.
- Stepping back 15-20 mm from the handle, the rod is bent at an angle of 140 degrees, as shown in the figure. Having retreated another 20 mm from the bend, the rod is bent again at an angle of 100 degrees. When working, you need to ensure that all bends do not extend beyond the same plane.
- To prevent the handle from drying out and cracking, it is painted with impregnation twice. After the impregnation has dried, varnish is applied.
After completion of the work, a test knitting is carried out. If necessary, change the bend angles of the rod, adjusting the tool to suit you.
From the electrode
If you need to do a small amount of work, you can make a hook for knitting reinforcement with your own hands from an electrode. You will need:
- angle grinder;
- pliers;
- electrode 4 mm.
Even an inexperienced craftsman will spend no more than 10 minutes making a hook from an electrode. The algorithm of actions is as follows:
- Flux is removed from the electrode;
- step back 20 mm from the end and bend the rod at an angle of 90 degrees;
- make an indent of 40 mm from the second end and also bend the rod at an angle of 90 degrees;
- moving from the second end further, at a distance of 120 mm from the first bend, the rod is again bent at an angle of 90 degrees;
- set aside another 50 mm and make another bend at the same angle;
- The end of the tool is sharpened with an angle grinder.
From a screwdriver
It’s even easier to make a semi-automatic knitting machine yourself from a screwdriver. Instead of standard bits, a roofing nail is inserted into it, the head of which is bitten off with pliers. The tip of the nail is bent at the desired angle - the tool is ready
How to use it correctly
The construction of a frame made of reinforcement for pouring monolithic foundations, load-bearing walls, flights of stairs or floor slabs has practically no differences. The joints of individual rods are tied together with wire using manual or semi-automatic hooks.
To tie the elements together, use pieces of wire cut into 300-400 mm pieces. In order to save material, the optimal length of the segment is selected experimentally, focusing on the thickness of the reinforcement.
Sequence of tying reinforcement:
- The wire is cut to the specified size.
- Each piece is folded in half and rotated around the central axis.
- The finished piece is pushed under the junction of the rods from below.
- The hook hooks the free end of the segment and the loop.
- By turning the hook, the wire is pulled into a knot.
- The knot is pulled until a strong connection is obtained.
The process of tying reinforcement does not cause problems even for novice builders, but it would be a good idea to look at a photo or video with an example of this work below.
Kitchen decor
Many interesting details for decorating a table or tableware can be created using a hook. Patterns of knitted crafts for your kitchen:
Themed decorations
Knitted New Year's crafts will definitely play a big role in raising the festive mood.
Give space to your imagination, and your guests will certainly appreciate this creative approach to decorating your home. Below are diagrams and photos of knitted toys that can be hung on the Christmas tree.
Covers for Easter eggs are a very cute and interesting decoration for the holiday table.
- For them you will need threads and a hook for fine knitting.
- To determine the size and shape of the product, you need to knit a ring into which the egg will fit freely.
- After this, a pattern of columns is created according to the diagrams.
- You need to finish knitting the cover with a pattern with a hole to put it on the egg.
- If desired, the product can be tied with ribbons, decorated with sequins or beads.
The first loop or how it all began
All lovers of exact dates will immediately be upset - no one knows the exact date of the origin of knitting. However, it is known that the founders of this type of needlework were men.
It is believed that Arabs already 2000 years ago could knit complex multi-color patterns using special devices. In appearance, they resembled bone knitting needles. Moreover, in the 17th century, Parisian hosiery workers documented that they would not accept a single woman into the artel. Their fears, as time has shown, were justified.
According to another version, the first loop was knitted in Ancient Egypt back in the 3rd century BC. During excavations, archaeologists found a knitted children's shoe, which was more than 4 thousand years old. Also, as arguments in favor of their version, numerous drawings made on the walls of the tombs are cited. But it’s very problematic to say unambiguously whether the clothes depicted on them are knitted or some other kind.
The rise in popularity of knitting in Europe dates back to the 16th century. At the same time, knitted stockings, leggings, and gloves became an integral part of the wardrobe of Europeans. The Irish made a great contribution to the development of knitting techniques. As you might have guessed, we are talking about the famous Irish lace. But that's not all. The famous braids and arans are also their invention.
In Russia, the history of knitting is usually associated with the name of Peter I, who brought knitters from Venice. They had to teach Russian girls this art. The idea frankly failed, and the complex technique of knitting with a needle and bobbins did not catch on.
But our craftswomen were able to creatively rework the “overseas” technique, and this is how the world-famous Vologda lace appeared. Orenburg down scarves are also an original Russian invention, there are no analogues in the world.
Knitting is not something static and frozen in time. It is developing dynamically, new materials, techniques and tools are appearing.
What materials and tools will be needed
It would seem that the question is rather rhetorical. Hooks and knitting needles are available in huge quantities at any craft store. And there is no shortage of yarn for knitting. This is where the catch lies. Many beginning knitters give up this type of needlework only because they choose a tool that is not suitable for the type of yarn. Or they choose threads without considering what products they are recommended to be used for. The result is complete disappointment in the result and regret about the money and time spent. Let's figure it out together.