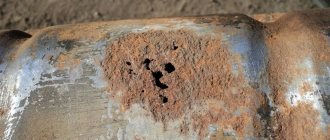
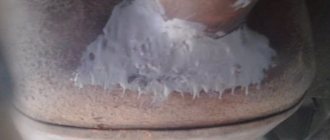
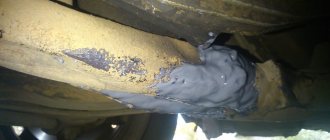
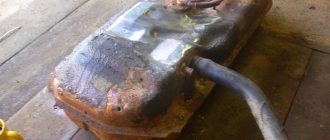
A leak in the gas tank occurs as a result of physical wear or due to damage with collapse of the housing. Fuel vapor accumulates in an empty tank, so welding and heating can cause an explosion. Many motorists ask how to properly seal a gas tank. There are several repair methods: argon arc and cold welding, soldering. Let's look at each of them in more detail.
Causes of cracks
Most modern cars have a front-engine layout.
Space for the fuel tank remains only in the rear of the body. This arrangement has a number of advantages, in particular, it increases the safety of the driver and passengers. However, the location features expose the tank to negative external influences, which shorten the service life of the unit. The most common causes of defects are:
- Corrosion . Almost all cars produced in the last century were equipped with metal or aluminum tanks. Metal fatigue contributes to the appearance of microcracks, which gradually grow to full-fledged holes.
The use of plastic made it possible to completely solve the problem of corrosion. Nowadays, a metal tank can only be seen on trucks or special vehicles. The only disadvantage of plastic is its low resistance to mechanical damage.
- Mechanical damage . The quality of domestic roads leaves much to be desired. When exiting the federal highway, you may find a complete lack of road surface. Getting injured in such conditions is common.
- Power system malfunction. A rare event. It is characterized by increased pressure on the walls of the tank during operation, which can lead to the appearance of defects.
What to do if your tank leaks
The appearance of holes in the tank can cause serious trouble. We are talking not only about natural leaks of fuel, which can ignite from the slightest spark. Through the hole, road dust and debris enter the fuel, settling at the bottom. While driving, foreign elements will penetrate the fuel lines. In the worst case, the car owner will face major engine repairs.
Therefore, if a defect is detected, the tightness of the tank should be restored as soon as possible.
What you need to know about the tank before welding
A hole or crack in the gas tank
Most likely, you decided to seal the tank after discovering a small leak, or after serious damage. In many cars, the gas tank underneath is not protected by anything, and damage is a common problem. Before any repair of a gas tank, you need to know the following: “The car’s gas tank is tinned, that is, covered with a thin layer of tin inside and out. It is also treated with special compounds designed to protect the metal from corrosion.” Now look - the welding process involves intense heat. And if the corrosion in the tank is insignificant (a small hole), then during welding you will definitely burn the protective coating and tinning. The result is that after a year, the gas tank will leak again, and this time it will leak more seriously. As a result, replacing the tank is inevitable. And one more thing – gas tank protection. Due to the temperature difference between the fuel in the tank and the air, condensation may form on the gas tank. If you cover the tank from below with any protection, dirt and moisture will inevitably collect there, which will lead to rust and damage to the tank. Drop this idea.
General repair rules
Regardless of the material of manufacture and type of fuel, when carrying out repair work the following rules must be observed:
- Before repairing damage, the fuel must be completely drained.
- For cleaning, use special detergents to remove petroleum products. Gasoline vapor is an explosive substance.
- After washing, the tank should be rinsed with running water and dried.
- Carry out a thorough inspection - there may be several leaks.
The repair method depends on the size of the hole and the type of material.
How to check a gas tank for leaks after soldering
After completing repair work on the gas tank, it is necessary to perform a leak test. To do this, it is necessary to create a pressure of about 7–15 kPa in the tank, having previously plugged all the holes for the hoses and leaving only one for the pump. After this, soapy water is applied to the container. The absence of bubbles indicates a successful repair and no leaks. If it is possible to immerse the tank completely in water, then the tightness is checked in this way. However, in this case you will have to put in a lot of effort, because completely lowering the tank under water is not so easy.
There are different ways to restore a gas tank; the specific one you choose depends on the nature of the damage and its extent. Repairs do not require extensive experience or special equipment. Using a tool that almost every motorist has, restoring the tank is possible in a garage. The main thing is to follow the rules and follow the algorithm exactly.
DIY pump repair for Zhiguli VAZ 2101-07 cars
Flushing the gas tank with your own hands: means, techniques, recommendations
Repair
Let's consider the procedure for performing the work, possible difficulties and ways to solve them.
How to remove?
The specifics of dismantling work depend on the make of the car.
Having a medium-sized tool kit is enough to remove almost any tank. The procedure is as follows :
- We empty the tank . The remaining fuel is poured into a container prepared in advance. Most models have a drain plug at the bottom of the container. If this is not available, use a special hose to manually pump out the liquid.
- Disconnect the sensors and ventilation hose . Modern models are equipped with quick-release connections that are located under the rear seat or in the luggage compartment.
- We remove the fuel supply . To do this, loosen the fastening clamps and then tighten the tubes.
- Removing the tank fastenings . As a rule, most units have two clamps that are secured with nuts. This work is best done with an assistant who will hold the container.
- Unscrew the filler plug and pull it out of the seal.
- Removing the ground terminal.
Once these steps are completed, the tank can be removed from the vehicle.
If the leak is caused by mechanical damage, assess the extent of the damage. It is possible to carry out work without dismantling - the main thing is that the welding electrode gets into the gas tank, or rather, into the area of the defect.
Cleaning
As stated above, it is necessary to carry out external and internal cleaning with complete removal of all contaminants, including petroleum products. After this, they decide how to weld the gas tank using electric welding, or choose other methods of solving the problem, which will be discussed below.
How to solder?
According to safety requirements, before using the welding machine, it is necessary to fill the tank with water to avoid detonation of fuel vapors. The preparatory stage includes cleaning the area of paint and rust.
An affordable way to repair minor damage. The algorithm of actions is quite simple:
- We find a leak.
- Clean the work area to a clean surface. If the geometry of the node is violated, we restore it.
- We degrease the soldering area with any solvent.
- We treat the area with soldering acid.
- Heat the surface with a hairdryer or incandescent lamp.
- We carry out surfacing. If the defect is significant, it is necessary to apply several layers.
- Remove any remaining rosin using a solvent.
How to brew with a semi-automatic machine?
In addition to the semi-automatic machine, the use of argon arc welding is acceptable for the restoration of metal containers.
Cold welding repair
Novice car enthusiasts often ask the question: “Is it possible to seal a gas tank using cold welding?” This repair method is applicable to any type of material .
If there is free access to the crack, the tank does not need to be removed. Information on the list of materials to be joined and the degree of surface preparation can be obtained from the instructions for the product. Cold welding for a gas tank can be purchased not only at an automotive supply store, but also at any construction supermarket. Availability is one of the advantages of this product.
When performing work, do not forget about safety precautions - do not work without glasses and protective gloves.
Also on our website you can find an article on how to repair a muffler using cold welding
Sealing a crack with epoxy resin
A good method for repairing leaks in the field. Epoxy resin should be used in combination with reinforcing mesh - this will increase the strength of the connection . Along with cold welding, this method can rightly be called a “quick repair”, because the different properties of the material and weak bending strength will force you to turn to specialists after some time.
Welding stages
At the initial stage of welding, boards must be placed under the corners of the sheet that will serve as the bottom.
It is important that the thickness of the substrate be the same. This will give an even plane along the entire length and in the corners of the structure.
During the welding process, it is necessary to constantly check that the sides do not extend beyond the base. You can immediately grab all sides together, then weld them to the base.
The sheets should fit tightly to each other. The next stage is the final welding of the seams. Welding can be done inside the tank or outside.
There should be no lack of penetration. Self-welding takes about 7-8 working hours.
It is recommended to make the structure rigid. To do this, use squares inside the tank and on the outside. To drain the water, a pipe with a control valve is welded into the lower part.
You definitely need to put aside your laziness and check the structure for leaks. After completing the work, you should prepare a chalk solution and apply it to the seams from the inside.
When it dries, use a cloth soaked in kerosene to go along the seams of the tank from the outside. Purpose: identifying “lack of penetration” clogged with slag. It only takes a few minutes to control.
If the liquid does not appear, then everything is fine. If stains appear, the problem area should be boiled again. It is best to check and re-weld immediately before painting.
Installation can be done on pre-laid bricks, but it is better to use a stand. Next, fill the tank with water and observe for several days: no liquid appears on the walls of the structure.
Repairing a cracked plastic gas tank
Manufacturers of modern transport use plastic everywhere . As a basis for a gas tank, it has several advantages:
- Low cost;
- Corrosion resistance;
- Weight.
Naturally, there are also negative properties that affect service life. The main problem is considered to be high elasticity , since the slightest pressure fluctuations change the geometry of the tank, narrowing and expanding it. This property contributes to the appearance of cracks, which, under the influence of external factors, grow into full-fledged breakdowns.
How to prepare
The process of preparing a plastic container is no different from its metal counterpart. The only difference is in the use of detergents that will be used for cleaning. During the inspection, pay special attention to the area where the two halves of the tank connect - this is the weakest point of the structure.
How to seal a crack
This method will not help repair the tank for a long time , but it will work as a temporary measure. Work is carried out on a clean, grease-free surface, otherwise there will be no effect. The crack should be sealed with Moment or its analogues. The technology of the work is simple - a piece of fabric is impregnated with glue and applied to the damaged area. The action is repeated several times until the required patch density is achieved. Instead of glue, epoxy resin with a plasticizer using the same technology is sometimes used.
Soldering
In terms of the physical characteristics of plastic, soldering is the right solution . This technology is used in the case of eliminating extensive damage. There are two ways to seal holes:
- Method of fusing reinforcing mesh onto a damaged area;
- Applying a patch of similar material using a soldering iron.
To eliminate leaks in plastic containers, we do not recommend using cold welding - universal compounds have low adhesion to technical plastic. The technology of work is similar to gluing.[stextbox]
Repair with a screw or rivet
You can screw a self-tapping screw into a small hole by first placing a rubber seal under it. In some situations, aluminum rivets are used as a plug. Despite its simplicity, the service life of a screw or rivet will be very long.
Recommendations from the experts
We've collected some tips from professional welders. They will be useful for beginners and garden craftsmen.
It is better to use stainless steel grade 8-12Х18Н10 or AISI 430 08Х17 as a material. These brands are best suited for storing water, including long-term storage. However, it is still better to drain the water before winter.
Before welding a stainless steel water tank, you need to decide on its volume and make a drawing based on this. For a bathhouse, a tank of up to 60 liters will be enough for two or three people. On average, about 20-30 liters of water are needed per person.
If you are cooking a tank for household needs, it is better to stock up on a volume of 100 liters or more. 200 liters is just right for watering gardens and collecting rainwater.
It is better to abandon the idea of welding a water tank from aluminum. It is not easy to make high-quality sealed seams at home. Stainless steel is also not easy to cook, but this task is quite doable. But to work with aluminum you will need experience and a good welding machine.
Depending on the size of the tank and your experience, the entire process can take anywhere from a couple of hours to several days. If you have never cooked before, it is better to practice on unnecessary pieces of metal. After all, stainless steel is far from a cheap material. And you are unlikely to be happy if, out of ignorance, you weld a tank with defective seams, and it turns out to be unusable.
Expert advice
If you nevertheless decide to carry out your plans on your own, you should take into account that the most suitable grades of steel for storing water in this case will be 08Х17 (aisi 430) and 8-12Х18Н10 (304).
As for the volume of the stainless structure, in a bathhouse designed for 2-3 people, it is more advisable to install a water tank from 50 to 80 liters. According to the formula, 25-30 liters of water per visitor.
Manufacturers usually offer 1 mm thick sheets for tanks. When welding yourself, it is recommended to use sheets with a thickness of 1.2-1.8 mm. Design options may vary in size and shape.
Welding water tanks made of aluminum is a complex process that requires the master to have practical skills in working with this metal, an understanding of the drawings and two hands that are friendly with the tool.
Application of welded metal containers.
Steel vertical containers come in several types, namely:
- with pontoon and fixed roof. The main task of the pontoon is to reduce the rate of vapor saturation of the stored substance;
- without pontoon and with a fixed roof. Used for storing substances with low volatility and flammable products;
- with a floating roof. The protective roof reduces product evaporation, and its buoyancy is ensured by sealed boxes;
- cylindrical with a protective wall. Designed for installation near residential buildings and bodies of water, ensuring environmental safety.
Steel horizontal containers are used for storing water, petroleum products, lubricants, alcohols and food products, the volume of which is up to 100 cubic meters. m., and for large volumes vertical tanks are used. The cost of horizontal tanks depends on the grade of steel used and the thickness of the structural elements.
Horizontal containers are single-walled and double-walled, above-ground and underground, and the space between the walls is filled with nitrogen or liquid. Welded containers can be single-section or multi-section, and the latter can store different types of liquids.
For many residents of high-rise buildings, the problems of owners of private houses are not known. For example, welding a tank to fill it with water can only cause an ironic smile among city residents. Meanwhile, the question is not idle. The urgency of the problem lies in the question of which path to take - order a finished product or weld a water container yourself.
Welding a fuel tanker barrel without steaming
This is how my experience shows that rednecks don’t want to pay real money for such work. Therefore, let them do whatever they want with this tank, scrape, wash, steam, as long as it doesn’t smell. And before welding, I’ll make sure to put a hose from a powerful compressor into the welding zone.
There is a fuel tanker on an AM Ural chassis, you need to weld an aluminum barrel, there are two cracks of 10 cm each. One is located on the edge at the bottom, the second at the very top, right there. There is a large volume of water (from the hydrant) and that’s all. How to protect yourself when welding? I suggest rinsing water, then leave 200 liters of water in it, pour in 10 liters of washing concentrate, foam the entire volume with carbon dioxide, then cook. What do you recommend to the forum gurus? Like the one in the photo
My advice is not to think too much, but to take it and cook it.
I cooked a diesel fuel barrel from the inside, almost blindly (I didn’t know where exactly it was leaking). It’s an iron barrel, I don’t know if there’s a big difference. I heated the intended place with a cutter (I was looking for a crack) then cooked it. I cooked it with ordinary ANO-21, there’s nothing better I didn’t have it on hand. I brewed it on the first try))). My advice is not to think too much, but to take it and cook it.
When paying for such life-threatening work, you can dance from the cost of possible losses for the owner of the tank. For example, if they don’t weld the tank, buy a new one for 100 thousand (notional price). Charge them for the work WITHOUT CONSUMABLES at least 30% of 100 thousand. Or option No. 2 - you come up with a price for the work “so that the number itself makes you scared,” and then you multiply it by two and in the bidding process you give in a little. If the customer does not agree, let them cover up this hole with snot or buy a new piece of hardware.
Source
Application options
Storage tanks are relevant in places where there are interruptions in water supply. Indoors, water tanks are most often installed in a horizontal position.
The tanks are used to store rainwater and tap water. With their help, you can organize an outdoor shower or keep them for fire safety purposes so that you can extinguish the fire.
They can store water for watering plants, gardens and vegetable gardens. Often round tanks are installed in a bathhouse to store water. There are many designs that can be round, rectangular or other shapes.
It is important to understand what the tank is for. If it is used inactively, the water in it promotes the growth of algae and microorganisms
Moreover, if the container is constantly located in an open area under the sun's rays.
Therefore, choosing the volume of the tank is one of the main tasks before starting its manufacture. Ferrous metal tanks must be primed and painted to prevent them from rusting.
