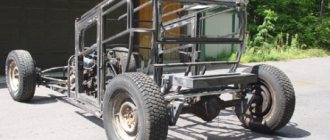
I arrived again at the garage.
They pushed the car out of the garage (it was hot in there and there was not enough space)
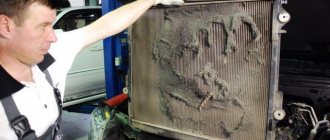
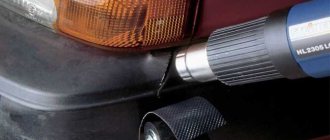
We started removing it, the process itself is very simple (but to keep the engine cold): - Drain the liquid - Unscrew the two pipes and the hose from the expansion tank - Unscrew the radiator itself - and pull it out (you don’t have to remove the protection) Well, that’s all for now. The repair process stopped, they found a hole, to my surprise it turned out to be very small (and I thought there was a hole there the size of an arm). I'll have to fix it on Tuesday/Wednesday, I'll let you know about the results.
Loss of radiator seal is a common vehicle malfunction. In many cases, it can be eliminated without replacing the radiator with a new one. To do this, perform local repairs of the damaged element of the device. How to solder a radiator so that it restores its functionality for a long time? Let's look at the basic techniques.
The main reasons for the loss of radiator tightness, signs, repair features
Loss of tightness of the radiator of the cooling system may be due to the following reasons:
- Natural wear and tear. The approximate lifespan of a radiator is about 10-12 years. As the device wears out, its internal working surface becomes covered with a layer of scale and deposits formed as a result of chemical and thermodynamic processes. The walls of the radiator plates and tubes become thinner. Since the liquid in the device is under pressure, microcracks are possible, as a result of which the liquid begins to leave the system.
Considering that the sizes of microcracks are small, a strong leak is not observed in this case. Wet traces of leakage may disappear after cooling the engine and antifreeze. It is advisable to immediately detect the consequences and place of fluid leakage. The sooner repairs are made in this situation, the less damage will have to be repaired. Can be successfully repaired by cold welding .
- Filling the cooling system with water. Freezing in the cold season. If there is a slight leak of antifreeze, many drivers add limited amounts of water to the system. During the warm season of vehicle operation, the number of such top-ups can be large. As a result, the concentration and characteristics of antifreeze change. In winter, even at slightly below zero temperatures, it can freeze. In this case, volume expansion occurs. The radiator may “break”.
The resulting crack is usually large in size. It can occur at the junction of plastic and metal radiator elements. In most cases, such damage is difficult to repair.
- Filling the cooling system with low-quality antifreeze. Overpressure. In most modern engines, the coolant is under pressure. At the same time, the boiling point of antifreeze increases to more than 100 degrees Celsius. This allows you to increase the efficiency of the engine. If low-quality antifreeze is poured into the system, it may boil at a lower temperature. This may damage the radiator. It may be small. In such cases, it is better to use the soldering repair method, as it provides better performance in terms of resistance to increased pressure. Soldering is easy to do at home .
- Mechanical damage . This malfunction may be due to:
- foreign objects entering the radiator area;
- road accident;
- destruction of fan blades;
- poor quality repairs.
Depending on the location and size of the damage, cold welding and soldering methods can be used for repairs.
How to find a crack or faulty radiator
When the crack is very small, you can detect the location of the antifreeze leak with a simple inspection to determine the source of the leaks. Severe damage is also easily detected by eye.
If the initial inspection fails to identify the location of the leak, experienced technicians do the following:
- The clamps are removed from the pipes and the radiator is dismantled.
- Take a tube from a bicycle or car, cut a piece so that the nipple is in the middle.
- The pipes are compacted tightly with rags.
- Then water is poured through the neck and closed with a cut-out chamber so that the nipple is in the middle. For convenience, you can put on a collar.
- The pump is connected and air is pumped.
- The pressure created inside will begin to force water out of the crack.
If the leak is very small, it is better to additionally mark it with a marker. After this, remove the rags and drain the water. All that remains is to decide on the repair method.
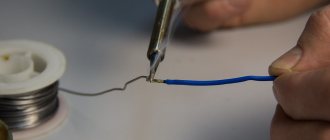
Soldering a radiator at home
Soldering cooling system radiators is a classic repair method. It was used at the beginning of the last century. At that time, radiators were made of copper or its alloys (usually brass). Soldering technology was mature at that time. A copper kettle could be repaired in any city. The soldering process is performed at the melting temperature of the solder used. To perform soldering, the following materials and tools are required:
- a powerful soldering iron of 220 Volts (it is better to use a hammer type with a power of 250 or 200 Watts, if not available, at least 100 Watts);
- medium grit sandpaper;
- active flux;
- tin-lead solder POS-60 or POS-40;
- solvent for surface cleaning.
Advantages and disadvantages
The technology allows you to eliminate pipe leaks with high reliability. This procedure is safe to perform, which cannot be said about conventional welding. Other benefits are:
- convenience, ease of the technique even for beginners;
- excellent seam quality, which depends mainly on the type of material, and not on the speed of work;
- no need to purchase special tools, equipment, machinery and expensive materials;
- minimum energy consumption;
- fire, anti-explosion properties of epoxy;
- low cost of repairs;
- Availability of cold welding - adhesives are sold in any store.
The technology also has disadvantages. Welding of this type is not designed for too high loads - pressure, high heat. Therefore, if there is a serious defect in a pipe or radiator, it is better to use hot welding or replace the area completely. It is important to follow the preparation measures - otherwise the quality of the weld will decrease. The durability of cold welding is lower than that of standard welding - repaired pipes will not last for many years, but will require new repairs. In fact, such repairs are considered by specialists to be a temporary measure.
Features of soldering aluminum radiators
Modern cars mainly use aluminum radiators. Aluminum material does not solder well. Almost instantly after stripping, it becomes covered with a layer of oxide, which prevents soldering. On radio markets you can find a special active flux for aluminum. It greatly simplifies the soldering process.
You can use small metal shavings when soldering. It is applied to the repair site mixed with flux. During the application of solder, shavings scratch the surface of the aluminum. Under the layer of flux, the metal does not have time to oxidize, and soldering is successful. Please note that aluminum is a soft material, so you should not apply excessive force to avoid damaging the radiator.
On the advisability of self-repair
The feasibility of repairing a radiator directly depends on the extent of its damage:
- if several small cracks are found in the device or a couple of ribs are deformed, then such a breakdown can be completely repaired without leaving the garage;
- and if fragments of the fan got into the radiator and only rags remained from the tubes with fins, it will not be possible to repair this on your own. Moreover, devices with such damage are not always sent for service. Typically, drivers simply buy new radiators and install them, saving time and money.
If the car owner nevertheless decides to use the services of a car service, then the cost of the work will vary within very wide limits, since it depends not only on the degree of damage, but also on the make of the car (repairing domestic radiators is cheaper, foreign ones are more expensive). The price range today is as follows:
- eliminating small cracks with glue or sealant - from 600 to 2000 rubles;
- soldering of broken tubes and complete restoration of deformed ribs - from 4,000 to 8,000 rubles.
Welding as a method of radiator repair
At home, it is difficult to use welding to repair radiators. This requires special skills and special welding equipment. Otherwise, the thin metal of the walls will burn through, and instead of being repaired, the radiator may become completely unusable.
Cold welding
Cold welding refers to the joining of materials using a special glue. Usually this is a two-component adhesive based on mastics, epoxy compounds, metal powders to strengthen the structure of the joint, and additives.
The technological process for repairing radiators for almost all types of cold welding is approximately the same. The repair area is first cleaned with solvent and sandpaper. Then the glue components are thoroughly mixed (the mastic is kneaded). After this, the composition is applied to the repair site and left in a warm place.
To increase the reliability of cold welding, extensive repairs are usually performed. To do this, limit the leakage of glue from adjacent areas and from the back surface of the radiator. A kind of “bowl” is created into which glue is poured. This allows you to increase the reliability of the connection. Thermal expansion blocks antifreeze leakage.
A special feature of operating a vehicle after cold welding is the need for periodic monitoring of the repair site for a month. During operation, the radiator is subjected to large mechanical, thermal, and chemical loads. The bonding site may collapse, crack, and undesirable chemical reactions may occur there.
The radiator is primarily responsible for cooling the engine. Its serviceability is an indispensable condition for the performance of the engine.
Did you like the article? Share on social media networks:
An aluminum radiator has many advantages, thanks to which it is installed in many homes. But sometimes it can “please” with the appearance of holes and coolant leakage.
There are two ways to get rid of this drawback:
Soldering aluminum is more difficult.
Cold welding composition
Adhesive for metal and plastic is made from epoxy resin, a polymer with high strength characteristics. It is this resin that is responsible for the homogeneity, plasticity of the mass, the ability to seal even minimal cracks and fill holes. Epoxy can thicken only when in contact with the hardener that comes with the kit (in some products it is in solid form and is activated after exposure to air and mixing).
Cold welding contains various fillers that optimize technical properties: steel powder (strengthening additive), sulfur, plasticizers. When repairing radiators, you must definitely pay attention to such additives; they must be in the putty.
What is the difficulty of soldering aluminum?
This metal quickly reacts with oxygen and any acids. Most often, an aluminum radiator interacts with oxygen. As a result, the metal surface is oxidized and covered with a thin layer of aluminum oxide. It is also known as “oxide film”. This layer evenly covers the entire surface of the product.
On the one hand, this film is useful, because it eliminates any possibility of contact of pure aluminum with oxygen and all other chemical elements or substances. That is, it is a kind of protective barrier. However, this barrier does not allow for high-quality soldering, because the solder must be in direct contact with the aluminum.
Argon arc technology
Argon welding is used to repair tanks with fairly thick walls. An attempt to weld damage to honeycombs with a metal thickness of 0.3 mm can lead to its increase. However, a high-class specialist sometimes manages to successfully cope with this task.
Argon arc welding of a car radiator
To weld aluminum radiators, filler rods made of the same material and non-consumable electrodes are used to create an arc. To prevent oxides formed from the interaction of aluminum with atmospheric oxygen and splashing from interfering with the process, it is produced in an argon environment. To weld a car radiator from copper, an appropriate rod is used for the additive.
Of all the repair methods, welding in an argon environment is the most reliable. The strength of the seams created is not inferior to the factory one. However, for this you will have to contact a car service, since using this technology at home without special equipment and experience is impossible.
Soldering the radiator: method 1
It includes the following steps:
- Surface preparation. This process must be done carefully. It consists of cleaning the treated area from all dirt and paint residues. Clean the aluminum surface using emery cloth and solvent. Preparation also includes degreasing the treated area (for this, preparations containing alcohol are used), as well as wiping the metal dry.
- Preparation of iron rosin flux. To do this, the crucible is placed on a gas stove and heated. You can heat it with a blowtorch. A piece of rosin is placed in a heated crucible. It needs to be completely melted. Next, add iron filings little by little and immediately stir the mixture. The ratio of rosin and sawdust should be 2:1.
- Applying flux to the prepared area. The solution is applied so that the desired part of the radiator surface is completely covered. Otherwise, oxygen will have access to the aluminum, and the hole will not be soldered well. At the end, the entire soldering surface should be under a layer of flux.
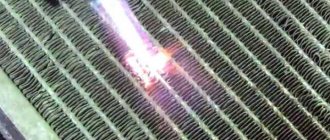
- Soldering. It involves introducing solder into a liquid flux environment. You need to take small portions of solder onto the soldering iron. Solder is applied to the soldering area so that it is under the flux layer. At the same time, perform circular movements. During these movements, the soldering iron constantly dislodges some particles of solder. The displacement of iron particles leads to the destruction of the oxide film. Rosin prevents air from penetrating the aluminum.
This method should be used to eliminate small defects. If the damage is large, then you can only solder the radiator using homemade flux.
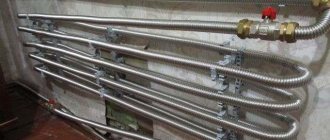
The most common problems with cast iron radiators
First of all, it is necessary to outline the range of problems that can be solved using cold welding or adhesive when repairing heating radiators.
Traditionally, cast iron batteries are considered the most vulnerable. Here, many problems lie in the design and properties of the metal itself. First of all, cast iron, unlike steel radiators or bimetallic batteries, is very fragile. Yes, cast iron is very strong, but at the same time it is a fragile material - it can withstand great pressure, and with a small impact it can crack.
The second point is the property of cast iron - it is a porous material, which contributes to the formation of craters on the inner surface and the gradual destruction of the wall.
Third, when assembling modern radiators, sections are connected using internal nuts, and the space between the sections is treated with a special compound that reliably cements the connection. In the recent past, flax and red lead were used to seal these joints, which over time led to a breakdown in the tightness of the joint.
So based on the above, the most common problems with cast iron radiators are:
- Violation of the tightness of the battery section after mechanical impact - an impact from the outside or a sharp increase in pressure from the inside;
- Leakage through the body of the radiator due to the formation of a hole in the wall due to metal corrosion;
- Failure to seal the connection points of the radiator sections, pipe supply points, and plug nuts.
As for other types of radiators, similar problems are less common; here, most often the cause of damage to the body of the section is metal corrosion or mechanical deformation of the walls when the battery freezes, when freezing water ruptures the metal.
Soldering: method 2
This method involves the use of tin-lead-bismuth solder and homemade flux. You need to do the latter from:
- cryolite (the proportion in the solution should be 10%);
- sodium sulfate (share 4%);
- lithium chloride (share 23%);
- potassium chloride (share 56%);
- table salt (share 7%).
Tin-lead-bismuth solder can be purchased in stores (it looks like a rod or wire) or you can make it yourself. The second option is implemented by adding bismuth to molten tin-lead solder. The mass of bismuth in the mass of the finished solution should be 5%. You can calculate the mass of bismuth by dividing the mass of the original solder by 95 and multiplying the resulting figure by 5. To solder fairly large defects in an aluminum radiator, you need:
- Prepare the area where there is a hole. The result of the preparation should be clean, dry, non-greasy aluminum.
- Make flux. This procedure begins by grinding each component in a mortar. Grind until powder is formed. In this case, each element is brought to the state of powder separately. Afterwards, all the “ingredients” are poured into a glass container and mixed until a homogeneous mixture is formed. It is advisable to take a dark, hermetically sealed glass container. This is necessary to protect the mixture from moisture and sunlight when you need to take some breaks. Before soldering, the mixture is poured into a crucible and melted over a gas stove.
- Molten flux is poured onto aluminum and soldering is performed. The features of soldering are no different from the features of the process described above.
Types of welding
All products belonging to this type are divided into plastic and fluid. The latter are necessarily two-component mixtures - one bottle contains epoxy resin with additives, the second contains a hardener. Plastic masses are sold in tubes, bottles, jars; they can be used to coat a pipe or radiator without dilution. The mass looks like plasticine, consisting of two blocks that need to be mixed together by kneading with your fingers. It is possible to separate a small piece of the mass and save the rest until the next need.
Using glue
Holes of small and medium sizes, cracks can be sealed. This option is temporary and is only suitable so as not to drain water from the riser or deprive the room of a heat source. After the heating season, the aluminum radiator must be removed in order to carry out high-quality repairs.
You can seal the hole using:
- Epoxy glue.
- Cement.
- A solution called “cold welding”.
Repairing holes with epoxy glue
To use epoxy resin glue, you need to prepare fiberglass or thick fabric . Since any of these materials must be wrapped around the radiator, the use of such adhesive is limited. After all, not every place can be wrapped easily and tightly. For some versions of aluminum radiators, this method is not suitable at all.
To seal holes or cracks:
- Cut the fabric into long narrow strips.
- Clean the area from which water is flowing. That is, remove all paint that has peeled off and all particles that are easily removed. This is done with a spatula. Next, take a brush with metal bristles and clean the surface. There should be pure metal left. It happens that a crack appears in a place where it is impossible to reach with a brush. An iron cable can help in this situation. It is pushed through the desired part of the radiator and pulled by the ends one by one, cleaning the desired area. This area is then dried.
- Apply glue to the treated area and wrap it with cloth.
- Apply glue to the fabric and wind another turn. This should be done until there are 4-5 turns. No glue is applied to the top layer of fabric.
- Secure the fiberglass using clamps or wire.
- Wait for the glue to dry. It dries from 2 hours to 3 days. If the room temperature is 20-25 °C, then it will dry in 2-3 hours.
To enhance the properties of the glue, you can add aluminum or bronze powder to it. Such powder is obtained by grinding off an unnecessary aluminum or bronze part with a rasp. Before use, the glue and powder must be mixed well.
Cracks are repaired in the same way using cement. However, medical bandages should be used instead of cloth. They need to be soaked in the solution and wound around the radiator.
Sealing plastic parts of a car radiator
Most plastic repair products are two-component - ready-made compounds do not provide such powerful adhesion to the surface. How to properly seal damage to a radiator? Here is the technique step by step:
- Prepare both components for welding the seam on the cooling tank, as well as sandpaper, gloves, cotton swabs, and degreaser (acetone).
- Clean the area around the leak from dirt, dust, and grease using acetone.
- Mix the glue components as indicated in the instructions. Apply the product to the crack area. Some compounds are applied in a different way. First, you need to sprinkle the plastic with powder, and then cover it with liquid.
- If the hole is large, do the procedure in several stages until it is completely tightened.
- After 15 minutes, sand the seam until smooth with fine-grain sandpaper.
You can also glue the edges of the crack on the plastic using epoxy glue. The radiator is removed, the area is sanded, and degreased. Epoxy resin is poured over the damaged area and dried for a day. You should not rely on the durability of such a seam - it can last a couple of weeks at most, then you need to purchase a new car part.
Leak test
After repairing the damage, the radiator must be checked for leaks. Here's how it's done:
- All additional radiator pipes are carefully sealed (the plugs for them can be cut from a piece of rubber).
- Water is poured into the main pipe. So that the radiator is filled to the top.
- Next, the device should be placed on a dry surface and left there for 30–40 minutes. If after this time no water appears under the radiator, it is sealed and can be installed in the car.
A second test option is also possible, using air:
- You need to take a container into which the radiator can easily fit (a medium-sized basin is best for this).
- The container is filled with water.
- The radiator pipes are clogged with plugs. A regular car pump is connected to the main pipe (you can use an adapter for the connection, and if you don’t have one, the hose is simply wound to the pipe with electrical tape).
- Using a pump, excess pressure is created in the device.
Escaped air bubbles indicate that the radiator is not sealed. - The radiator inflated with air is placed in a basin of water. If no escaping air bubbles are visible anywhere, the device is sealed.
Looking for a leak
A clear sign that the radiator is leaking is the presence of traces of coolant on the ground under the car, on the engine guard, or on the engine itself. Finding the location of the leak without dismantling the device is almost impossible. But before you remove it, you should make sure that the problem is in it, and not in the pipes or, for example, in the leaky plug of the upper tank. When this is done, you can safely drain the coolant and remove the radiator for diagnostics.
If a visual inspection of the device does not yield any results, check it by immersing it in water. To do this, take a container of a suitable size and fill it with water. Close all pipes with plugs and immerse the radiator in water. Now all that remains is to create air pressure in the device. This can be achieved by simply blowing into the filler neck of the upper tank or by coming up with another option with a compressor (pump). The escaping air bubbles will show you exactly where the damage is.
Determining the location of damage
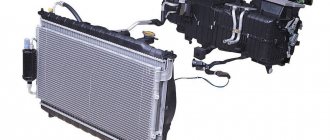
Car radiators are at greatest risk of damage, as they operate in temperatures with different signs and under the influence of strong vibrations. Cases of mechanical damage to such devices cannot be excluded.
Radiators of air conditioners, which are used as condensers and evaporators, are less often repaired. But such cases also happen. It’s very unpleasant when the climate control suddenly stops working in a luxury car during the hot season.
One of the most effective and affordable repair methods is soldering radiators.
If a car radiator is damaged, it is very important to promptly identify the problem and try to fix it.
The auto radiator, which is part of the engine cooling system, is a very important component. Structurally, this device consists of two vertical tanks connected by a large number of thin horizontal tubes. The coolant circulating in them releases heat into the air through natural heat exchange and cools down. To improve heat transfer, the surfaces of the tubes in contact with the surrounding air are increased. To do this, thin metal plates - fins - are soldered to them.
Signs of damage to the radiator are an increase in engine temperature during operation, as well as a decrease in the coolant level. Of course, fluid loss can occur not only through the radiator, but most often the cause is this particular unit. Visually, major damage can be determined by observing the coolant leak. But it will be quite difficult to do this on a hot engine, since the antifreeze will immediately evaporate. Some compositions are painted with special pigments that remain on the surface of the part after drying, which helps to identify the location of damage.
If it is determined that the leak occurred in the radiator, but no damage is visible, it is necessary to remove the device from the car, first draining the coolant. After this, you need to close all the holes, leaving one, and supply air under slight pressure into it, lowering the radiator into a container of water. The location of the hole can be determined by the escaping air bubbles.
Why do radiators leak?
It is no exaggeration to say that the radiator plays a central role in the cooling system of a car engine. While it is in good working order, most drivers even forget about its existence. But the conditions in which this device operates are far from greenhouse.
The radiator, in addition to being subject to constant temperature fluctuations, especially in winter, also absorbs all the blows of the elements: exposure to chemical reagents from the road surface, insect attacks, bombardment of stones from the wheels of oncoming cars, and finally, pricks from dry branches when driving along forest road.
It's not surprising that one day a leak might occur. This will be noticeable by a decrease in the coolant level in the expansion tank. What could be the reason? This is mainly caused by malfunctions of the engine cooling system:
mechanical damage to the tank or cooling tubes as a result of external influences (road accident, collision with a sharp object, careless handling when servicing the engine unit); cracks in the pipes due to natural wear or as a result of increased pressure in the system (the safety valve of the filler neck has gone sour, the breakthrough of hot gases through a broken head gasket, engine overheating); loosening the clamp clamps on the coolant inlet and outlet pipes; leakage of the gasket between the tank and the expander (on combined structures).
Briefly about the design of the heat exchanger
To troubleshoot and subsequently repair a radiator, you need to understand its structure. “Experts” who claim that a leaking unit should simply be welded up do not have much knowledge of the design and materials from which car engine cooling heat exchangers are made.
The radiator consists of the following elements:
- a system of copper or aluminum tubes (otherwise known as honeycombs), combined with the help of heat exchange plates made of the appropriate metal;
- 2 plastic tanks with antifreeze inlet and outlet ports (there are models with an additional filler pipe);
- brackets for fastening to the car body and the electric fan casing;
- other elements - a steam outlet pipe, a socket for installing a temperature sensor, and so on.
Plastic containers are boxes that are open on one side, covering the ends of all tubes and seated on sealing gaskets. The incoming antifreeze fills the first tank, passes through the honeycomb and, after cooling, is collected in the second tank, from where it flows back into the engine.
We recommend: ECM: what is it in a car
Quick ways to repair cracks
There are several simple ways that allow the driver to repair a cracked radiator on his own.
Application of sealant
Radiator sealant is a polymer powder containing tiny binder fibers. It is diluted with water in a certain proportion. The resulting mixture is poured into the radiator and eliminates the leak. LAVR products are the most popular among domestic motorists.
LAVR compositions are of high quality and reasonable price
Their sealants are of good quality and affordable prices. The repair sequence is as follows:
- The air conditioner radiator is removed from the car. It should be noted that this point depends on the design of the machine. On some cars (for example, Ford and Mitsubishi) you can do without removing the radiator.
- A sealant-based mixture is poured into the radiator. The proportions for preparing the mixture and its quantity depend on the brand of sealant and are always indicated on the packaging.
- After pouring the mixture, you must wait 30–40 minutes. This is usually enough for the sealant to reach the cracks and fill them. After this, the radiator is washed with water to remove any remaining sealant from the tubes, and then dried.
- The dried radiator is checked for leaks, then installed in place and filled with freon.
Using glue
Special epoxy glue allows you to seal even large cracks in radiators.
Epoxy Plastic is the most popular epoxy adhesive among domestic car enthusiasts
Sequencing:
- The area where the glue is applied to the radiator is thoroughly cleaned with fine sandpaper and degreased with acetone.
- A patch of the appropriate size is cut out of a suitable sheet of tin using metal scissors. Its surface must also be cleaned and degreased.
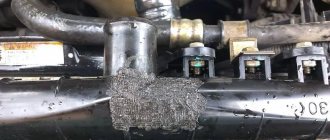
- Thin layers of glue are applied to the patch and to the surface of the heatsink. It needs to be allowed to dry for 2-3 minutes. After this, the patch is installed on the crack and pressed firmly against it.
Radiator with a patch mounted on epoxy resin - The glue must be allowed to dry, so you can use the radiator only after a day.
"Cold welding"
Another common repair option. “Cold welding” is a two-component composition. A pair of small bars, in appearance and shape reminiscent of children's plasticine. One of them is an adhesive base, the second is a catalyst. You can purchase “cold welding” at any auto parts store.
"Cold welding" is the fastest way to repair a crack in a radiator
The sequence of work is simple:
- The damaged surface of the radiator is cleaned with sandpaper and degreased with acetone.
- The cold welding components are mixed together. You just need to knead them thoroughly in your hands until a single-color mass forms.
- A small strip is formed from this mass, which is carefully pressed into the crack on the radiator.