Currently, all electronic devices contain a complex design consisting of many components. From time to time there is a need to repair such devices.
Repair usually consists of replacing faulty parts with new ones. And if earlier it was possible to simply use a soldering iron for this, then with the advent of components in BGA packages, even the use of hot-air soldering is not always successful.
Experts use an IR soldering iron or soldering station that emits infrared waves.
What breakdowns and malfunctions are most likely?
Let’s take the “bull by the horns” and immediately name the most likely reasons for the inappropriate behavior of the blowtorch:
- it is not possible to create and maintain sufficient air pressure in the fuel container to spray fuel;
- fuel leaks anywhere, but not through the nozzle;
- the fuel from the nozzle is not sprayed, but flows out in a stream, and not evenly, like that of a well-known animal.
Most often, the listed “adventures” can be resolved with the help of basic cleaning of “sore” areas. To do this you need to have a certain set of tools.
It also happens that it is not possible to revive the instrument without replacing parts. In such a situation, most problems can be eliminated with the help of a special repair kit, which is better to purchase in advance.
Repair kit for blowtorch
Most likely, the pressure problem is caused by a faulty pump. If there is a spare one, it is simply replaced. Otherwise, you will have to work hard to repair it yourself.
If you have to constantly pump air, it means it comes out through a safety or service valve or threaded connections. It helps to clean the surfaces of these components and replace the gaskets.
If the fuel from the nozzle is not sprayed, but comes out in some other form, a normal flame will not work. The most likely cause is dirty fuel. You will have to drain the gasoline and fill it with clean gasoline, after rinsing the container. Of course, the nozzle and all fuel supply channels should be cleaned, rinsed and purged before refilling the lamp.
It happens that cleaning does not help and fuel continues to flow out in a stream. This will happen if the tool is not warmed up sufficiently. If warming up does not help, you will have to change the burner nozzle.
Sometimes gasoline flows down the flame adjustment valve rod. So the fire is not far away! We stop work, disassemble the control valve and change its seal, which is the stuffing box.
Gasoline and kerosene
A blowtorch running on kerosene, like a gasoline one, consists of a tank in which the fuel is compressed to several atmospheres, and a burner. During compression, the fuel is partially mixed with air.
Reservoir and pump
The reservoir has a volume of 1-2 liters. Its body has a built-in filler plug, a pump to create pressure and a tube that connects the body to the burner, providing fuel to the latter.
To use the maximum amount of fuel from the tank and reduce the number of refills, the free “receiving” end of the tube is located almost at the bottom. All parts are built into the tank in such a way as to ensure tightness.
The simplest pump design is a cylinder with a piston. At the lower end of the cylinder there is a simple check valve that prevents air from escaping from the reservoir.
The piston is a cup-shaped cuff that compresses air when moving towards the cylinder valve, and when moving in the opposite direction, it allows air to flow, filling the cylinder.
Burner device
The burner consists of a nozzle, a control valve, an ejector tube and an ignition cup. From the injector, fuel is injected under pressure into a tube in which it is mixed with air captured from its rear hole.
To ensure complete combustion of the fuel, it must first be heated. This is ensured thanks to the design of the ejector tube. Fuel under pressure, before reaching the injector nozzle, is heated in the “jacket” of the tube, inside which a flame burns.
The initial heating of the tube is carried out when preparing the lamp for operation by igniting the fuel in the bowl. The adjusting screw ensures the required flame temperature by limiting the amount of injected fuel.
Fuel requirements
Fuel for use in a blowtorch must be clean, otherwise mechanical impurities may cause clogging of the nozzle. For the same reason, it is recommended to use gasoline with a low octane number, as it contains fewer additives.
If the hole is clogged, it can be cleaned with a soft wire of suitable diameter. Steel wire should not be used so as not to damage the nozzle by changing its geometry. Very often, gasoline and kerosene blowtorches come with a special wire cleaner.
https://youtube.com/watch?v=gbZ-HmK5O9g
The difference between and on kerosene is the diameter of the nozzle hole. In addition, in older designs of kerosene blowtorches, a small coil was located inside the ejector, which allowed the fuel to be heated more intensively. This design was a consequence of the fact that the combustion temperature of kerosene is slightly lower than that of gasoline.
Start and end of work
To start working, the device must be filled with fuel in an amount of no more than 2/3 of the volume of the fuel tank, and pressure must be created using a pump.
Then you should fill the burner bowl with fuel and carefully set it on fire. As the burner warms up, slowly open the control valve and increase the pressure in the tank.
When the fuel stream ignites, the nozzle nozzle must be directed into a fireproof, refractory surface, such as a brick wall or a sheet of asbestos. This will speed up the heating of the burner.
After completing the work, the flame is extinguished by stopping the fuel supply to the nozzle. Only after the lamp has cooled can the fuel tank be opened. It is allowed to refill the lamp if its temperature does not exceed 50 ℃.
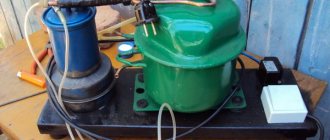
Waste oil furnace
Considering that petroleum products are expensive, it is beneficial to use a forge using waste oil. To make the forge during mining, parts that have served their useful life are used. After processing the furnaces, a significant drawback emerged - the spent mixture did not ignite well. To eliminate this problem, an additional compartment was built into the mining forge. Here the oil is preheated with coal or wood. To improve combustion, waste fuel passes through filters and diesel fuel or gasoline is added to it.
As a result, the mining forge has the advantages of a yellow flame and stable temperature.
You can make it yourself:
- It is made from fireclay bricks, dimensions: 85×48×40 cm.
- The vault is made in the form of an arch to maintain temperature.
- The body is completely covered with sheets of iron. A thickness of 1.5 mm is used on the sides, and the top and bottom are lined with 2 mm sheets.
- The supports are made from angles based on the weight of the structure.
Air is pumped into the chamber by a fan. A waste tank is installed on a hill. From it, the oil enters the chamber through a pipeline, where it is picked up by air, which moves under a pressure of 2 atm. The waste is broken up and fed into the nozzle.
Scheme of the furnace during development:
The principle of operation of a blowtorch
The blowtorch can run on kerosene and gasoline.
After refueling the device, air is pumped into the tank using a pump, which creates increased pressure inside the fuel cylinder. Excessive air pressure forces fuel into the burner, where it burns and forms a flame. To ignite the burner and ensure stable operation, it must be preheated to a certain level. To carry out heating, a fuel cup is used, which is mounted under the burner. The capacity of one cup is usually enough to heat the burner to the desired temperature.
When a certain burner heating temperature is reached, the fuel supplied from the reservoir to the burner evaporates in the evaporator. Gaseous fuel enters the combustion area and forms a flame through a special nozzle. During the combustion of evaporated fuel, oxygen is sucked into the combustion area and the process is maintained.
During the process of heating the burner, air is not pumped into the tank for safety reasons, and the shut-off valve must be closed at this moment. The shut-off valve opens only after the burner and evaporator have warmed up. After opening the shut-off valve, the flame strength is adjusted. After finishing work with the device, turn it off by screwing in the shut-off valve.
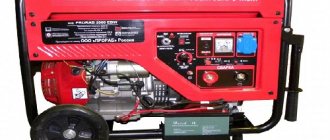
Model IK-650 PRO
One of the most common professional-level infrared soldering stations is the IK-650 PRO. In Russia, this device was one of the first capable of successfully repairing equipment with BGA circuits.
The soldering is done so well that a strong opinion has arisen about the absolute reliability of devices whose boards were mounted using this infrared soldering station.
The software allows you to very accurately maintain the temperature profile, which is important for creating strong, reliable contacts. After all, for high-quality soldering it is necessary not only to create a temperature sufficient to melt the solder, but also to raise it smoothly and then smoothly lower it, avoiding a sharp cooling of the contact.
Only then will a strong crystal lattice be created in a drop of solder connecting the contact of the microcircuit with the mounting patch.
The infrared station has a modular design and allows you to assemble many possible configurations for preliminary and auxiliary work:
- it is possible to use various types of thermal tables;
- connecting an electron microscope;
- automatic control of heating and cooling temperatures;
- There are additional modules for restoring BGA pins (this is called reballing).
The soldering station also includes vacuum tweezers, which are convenient for installing small parts on the board.
The cost of the infrared soldering station IK-650 PRO is currently more than 150,000 rubles. It is professional equipment and, of course, is practically inaccessible for amateur use.
Handling old lamps
Old blowtorches that have not been used for a long time should first be inspected from the outside. During inspection, you need to check how easily all the valves and the tank lid open. The adjustment valve should turn easily. After this, you need to check the housing for leaks. To do this, use a pump to pump air into a lamp that is not filled with fuel. Then, using a brush, apply a thick soap solution to all threaded connections and the faucet. You need to check it closed and open.
If all connections are tight and the pump is properly creating pressure in the housing, the tap performs its functions by opening and closing the burner, the lamp can be refilled and started.
Assembly
An infrared head with a power of about 400-450 W must be mounted on a tripod using fasteners, the elements of which can be easily purchased in a retail chain; to control the temperature of the upper heating unit, a second thermocouple must be used.
It must be installed together with the heater. The cable can be laid in a flexible metal hose. The soldering station tripod must be mounted in such a way that the IR head can move freely over the entire surface.
It is necessary to provide brackets for fixing the board on the body of the thermal table. It should be located a few centimeters above halogen lamps. Suitable aluminum profiles can be used for the brackets.
The controller for the infrared soldering station is placed in a housing that can be made independently from sheet metal, preferably galvanized steel.
If necessary, you can build into the case the same cooling fans that are used in the computer case.
After assembling the structure itself, the entire circuit of the infrared soldering station will need to be debugged. This is done experimentally by repeatedly running the circuit and taking measurements. The process is not easy, but after setting it up it will give its results - the soldering station will work correctly.
Design of a gasoline blowtorch
In the design of a gasoline blowtorch, there are two main structural parts - a tank for storing fuel reserves and a burner.
An ejector is a device in which kinetic energy is transferred from one medium moving at a higher speed to another.
The burner is called an ejector. The ejector has a design that promotes the flow of air and decaying combustion products during the combustion process. The operating principle of this device is based on creating thrust due to fuel combustion.
A supply of fuel is poured into the tank, after which it is closed with a tight lid with a seal. The lid with a seal prevents fuel leakage during storage of the device, as well as during its operation. The tank for storing a supply of gasoline is equipped with a pumping device that allows air to be pumped into the tank to create excess pressure in it. Excess pressure contributes to the transportation of gasoline from the tank to the burner during operation of the device.
A typical device contains the following structural elements:
- fuel tank;
- handle for holding the device during operation;
- hermetically sealed fuel filler neck;
- pump with valve - to create excess pressure in the tank;
- siphon tube providing fuel supply to the evaporator;
- a needle valve used to regulate the fuel supply;
- evaporator;
- nozzle;
- ejector;
- nozzle cleaning device.
The fuel filled into the device tank is a consumable item. The smokiness of the flame and the clogging of the nozzle depend on the quality of the fuel used; in addition, the degree of explosion hazard that occurs during the use of the device depends on the quality of the fuel. For normal operation of gasoline devices, it is necessary to use special gasoline or gasoline with an octane rating of at least 80. If low-quality fuel is used, the device may require repairs.
Gas horn
A DIY gas forge should be practical. Its walls are made of fireclay bricks.
The manufacturing procedure is as follows:
- Refractory bricks are being prepared.
- The walls of the forge are folded. The amount of material varies depending on the complexity and size of the case.
- Surfaces are processed using a hacksaw.
- All elements fit tightly. The presence of cracks is not allowed.
- A threshold is installed in the front part.
- A rectangular hole is cut at the back. It serves both for ventilation and for working with long workpieces.
- A hole of the appropriate diameter is cut out on the side for the gas burner.
- The gas burner is made of stainless steel. This is a pipe welded at one end and with a metal mesh at the other.
Such a forge has its advantages:
- The furnace is structurally simpler than a coal forge.
- Simple fuel supply and simple temperature adjustment.
- Light weight.
- Low cost.
There are other types of gas forges made of metal. There are no fundamental differences between them.
Figure 3: Burner drawing for a gas forge
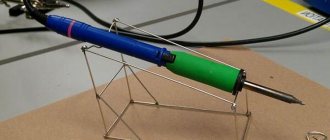
Making a gasoline burner with your own hands
Not everyone can purchase a new burner that runs on gas or a fuel-air mixture, which is due to the relative high cost of the device . And the purchased model does not always cope with the assigned tasks, especially if it has already been used. This may be due to the presence of hidden defects or breakdowns.
To avoid becoming a victim of such an unwise purchase, many men prefer homemade solutions, which are particularly affordable and easy to assemble. As mentioned earlier, even the most inexperienced welder can easily install such a device using improvised means, saving himself from high costs.
If a homemade gasoline burner is made taking into account the basic rules and recommendations, it should produce fire immediately after a lit match is brought to it. In this case, stable and steady combustion of the fuel-air mixture will be noticeable for another 3-7 minutes. During the combustion process, it is possible to reach temperatures up to 1000 degrees Celsius. Using such a device, you can successfully melt all kinds of solder, including hard solder, as well as metals and glass. In addition, the burner easily solves the problem of heat treatment of small-sized products.
To make a device with your own hands, it is enough to use a number of materials. Among them:
- Frame.
- Pen.
- Sleeve.
- Hook.
- Emphasis.
- A tube.
- Balloon.
- Ring.
- Rubber bulb.
- Filler.
By the way, it is not necessary to create such elements with your own hands - they are present in many other tools that are available in the home workshop. For example: instead of a rubber bulb, you can use a spray bottle .
Step-by-step instruction
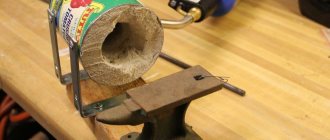
A lathe is used to turn the body of the future device. Products from different manufacturers are used as steel. In this case, the body of such an important part is made composite so that one end remains open and the other is closed with a plug.
The latter case involves making a hole 0.1 millimeters larger than the outer diameter. This nuance will allow the body to move tightly within the tube, maintaining the necessary tightness.
- A ring is fixed in the inner part of the body, which is made of slag wool or durable metal mesh.
- At the next stage, the stop and bushing with a hook are manufactured, which involves the use of a durable steel sheet. Then a handle for a gasoline burner is cut out of oak or beech.
- Then all that remains is to prepare the tube by very carefully drilling two holes so that they are parallel to each other. The finished product is processed using special sandpaper, covered with colorless varnish in three to four layers.
- The last manufacturing step is to prepare the tube. The end of the element is passed through the middle of the body, which allows the formation of a nozzle. Using hard solder PMC-54, the end of the tube is soldered, and then a hole with a diameter of 0.2 millimeters is made along its axis.
Solder is optionally made from copper or zinc . In the first case, copper wire is used, which is fired and cut into several pieces using scissors. When choosing the second option, use a glass from a regular electric battery, which is first cleared of its contents and hardened by fire. After this, the glass is placed in a container with cold water and a weak solution of hydrochloric acid, cut into small pieces after such treatment.
Next, you need to combine pieces of zinc and copper in equal proportions, placing them in a crucible and sprinkling with borax. The fusion of metals is carried out on a burner. As a result, the block is cooled, secured in a vice and leveled using a file. The collected sawdust is collected and mixed with borax.
Other features and creation methods
It is not always possible to buy a ready-made burner that runs on a fuel-air mixture or gas, which is due to many reasons. Sometimes this is explained by the too high cost of the equipment, and sometimes by a simple lack of time to visit the store. Therefore, more and more people are becoming interested in making a burner with their own hands. By the way, homemade solutions look no worse than purchased ones. Their productivity is quite high, and there are practically no .
As mentioned above, if you bring a lighter or a lit match to a homemade burner, a fire will immediately break out from the corresponding window, which will burn for about 5-7 minutes, reaching a temperature of over 1000 degrees Celsius.
Due to these features, the device can be used for productive melting of hard solders, heat treatment of small tools, melting of all kinds of metals, solders, and sometimes even glass.
Most of the parts of a homemade burner are created using improvised materials, since they can be borrowed from other unnecessary things.
The burner device itself includes:
- Frame.
- Sleeve with hook.
- Emphasis.
- Handle.
- Rubber ring.
- Balloon.
- Pear (can be taken from a spray bottle).
- Filler.
№
If we talk about this method of making a gasoline burner, then it may be familiar even to those people who have never before asked the question of creating such a device . When completing this task, you need to take two aluminum cans, which must be empty. Cans of beer, condensed milk, Coca-Cola and other products are suitable.
- After thoroughly washing and drying the container, you can begin work. Four punctures are made in the central part of the bottom of the first jar. You can use a nail for this. Similar holes are made around the perimeter of the rim of the can. As a result, it is possible to produce a base part that will supply the flames.
- After this, you need to cut off the part that was made earlier from the rest of the container. The length of the side is three to four centimeters. If you cannot cut the product using ordinary scissors, you will have to use any other sharp object.
- The next step is to prepare a second jar, the bottom of which is simply cut off. Try to perform this step with extreme caution to prevent nicks from occurring. If there are nicks, it is enough to sand them off with sandpaper.
- In the end, all that remains is to connect the two resulting parts. By the way, at this stage, novice welders often have difficulties, because the cans have the same diameter and this significantly complicates the work. To solve the problem, it is enough to make a small cut in the side of one of the cans, wrapping the entire structure with aluminum tape to increase the tightness.
In order for the gasoline burner to be ready for use, all that remains is to fill it with gasoline and then heat the area with a lighter. It is better to thoroughly warm up the burner for 5-10 seconds, after which it will be able to maintain the optimal level without your help.
Now you see that creating such an indispensable device with your own hands is very simple.
№
Another method is used to make burners. It is significantly more complex than the previous one, but allows you to achieve higher reliability, strength and operational durability. Therefore, if you place emphasis on such features, then it is better to make the burner using the second method. True, this will require a lot of effort, patience and time.
So, to successfully manufacture the structure you should take:
- Compressor. You can use an old car inner tube that is constantly inflated, or a basic compressor from an unused refrigerator (if you have one).
- Receiver. Here you can use a regular plastic canister with a volume of up to 10 liters. You also need to find a dense translucent cork.
- Fuel tank. It uses a two-liter metal barrel that will store the fuel mixture.
- Burner. This element is created with your own hands or purchased at the appropriate store.
If all the necessary parts have been collected, all that remains is to follow the instructions and assemble the future device. If you strictly follow the basic rules and follow the step-by-step guide, the end result will exceed all your expectations and you will be pleasantly surprised by the quality of the homemade burner. The main thing is to be ready to devote several hours of time and patience to the upcoming event.
Manufacturing Features
Do-it-yourself sauna stove: types, manufacturing and installation instructions
The design features are that it is very easy to operate; there are no traces of soot or repulsive odors when using the gas burner. This device is compact and can be used virtually anywhere. The main component of the burner is the industrial valve. You can purchase a new part, however, and used ones that are in working order are quite suitable. The process of making a burner with your own hands begins with the handle, then the body and nozzle are made.
In order to obtain a burner that is safe to operate and does not waste fuel, you need to make it a rule to avoid scaling and adjusting the example circuits.
To be fair, it is worth noting that not all gas appliances are calculated according to the laws of gas dynamics. But if the manufacturer changes the dimensions of the design parts, then the Reynolds number of the fuel (or intake air) will go beyond the limits indicated in the original product. The burner with such “improvisation”, if we give an optimistic forecast, will begin to smoke and will be “gluttonous”, or even be completely dangerous in operation.
And one more important note regarding the manufacturing features of the burners: it is impossible to increase its power above 10 kW. And that's why
With a burner efficiency of 95% (which is an excellent indicator for an amateur invention), with a device power of 1 kW, it will take 50 W to self-heat. It is theoretically possible to get burned on the structure, but it is not fraught with explosion. But if you build a burner with a capacity of 20 kW, 1 kW will be superfluous. Threshold manifestation is expressed by the structure being hot or bursting into flames. Therefore, those burner drawings that are oriented at 7-8 kW should not be considered.
How to build a relationship with an old lamp
If you get your hands on a rare old instrument, you should not rush to put it into operation. The same should apply to a tool that has simply not been used for a long time. It is useful to start by cleaning the outside of the lamp and inspecting it carefully. You should make sure that the control valve rotates without problems, the container lid opens and seals securely.
Before using the pump, it is useful to disassemble it and lubricate the cuff with lithol. Now we assemble the pump and check its operation, as well as the tightness of the tank. We pump air into the container without fuel. We apply a solution of water and soap with a brush to all connections and seals: air should not pass anywhere.
Before refilling an old lamp, it is useful to rinse the inside of the tank with gasoline, thus removing possible rust products. If all the pressure is maintained and the tap is working, fill the tool and get to work. Good luck to everyone and may the following video serve as a clear illustration of the above.
Tags
make a blowtorch blowtorch blowtorch pump blowtorch pump the whole blowtorch. used blowtorches operation of a blowtorch use a blowtorch. with a blowtorch the blowtorch its own blowtorch appear in the lamp can in the lamp rinse the lamp clean the blowtorch consists of the blowtorch will use the lamp very blowtorch. old lamps screwdriver you will need it If you need to use it needs to be washed and inspected need to check this needs to be checked Need to be checked in
gasesgastimepipeoilhealing or valvemiglooworkingbabingtonforge