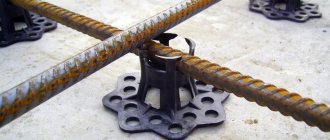
When constructing a reinforcement cage for concrete structures, the rods must be tied together. For knitting, wire is used, which is twisted with a special hook. A hook for tying reinforcement is sold at any hardware store. However, an easy-to-use tool can be made independently using available materials.
What is a hook for tying reinforcement
A large number of fittings connected using a cooking apparatus are most often subject to corrosion, which leads to a loss of structural quality. It is recommended to connect frame parts made of reinforcing bars using a knitting method, which can ensure the strength and stability of the structure.
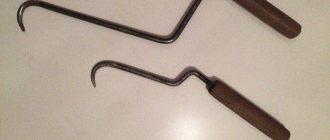
In this case, the knitting wire is tightened using a reinforcing hook. The device is a comfortable handle that holds a metal hook in the form of a rod with a curved tip. This configuration of the handheld device helps to grip the wire during tying.
A crochet hook allows you to reduce the labor intensity of work on forming a reinforcement frame. The frame is used in the construction of foundations, columns, walls, ceilings or fences. Knitting should not take a lot of effort and time, so as not to increase the delivery time of the project and correctly distribute working time on the construction site.
Automatic hook for tying reinforcement
A special device with a reverse operating principle allows you to speed up and automate the twisting process. At first glance, it looks like a standard manual device, but differs in the presence of a screw mechanism consisting of the following parts:
- plastic handle with internal screw thread;
- working body with a screw thread on the rod.
When assembled, these elements form a mechanism with a reciprocating principle of operation. The reversible device works quite simply - moving the handle causes rotation of the working element on which the wire loop is put.
Advantages of the reversible device:
- increased wire binding performance;
- Possibility of use in areas with limited access;
Automatic hook for tying reinforcement
- ease of knitting operations;
- durability of the device with regular lubrication.
The device has the only drawback - its increased price when compared with the cost of a conventional hand tool.
Using a reversible tool, the knitter can perform an increased amount of work without getting tired. The screw device is superior in efficiency to the manual device when it is necessary to manually pull and twist the wire ends. Without reinstalling the working hook, by cyclically moving the handle you can achieve reliable fastening.
Procedure for using the device:
- Insert the hook of the tool into the twisted loop.
- Pull the handle towards you along the working axis.
- Return the handle to the starting position.
- Perform the next movement cycle.
You can also make your own semi-automatic tightening device using a regular screwdriver. You will need a bent nail without a head or an L-shaped rod, the end of which must be inserted into the tool chuck. With a little practice, it is not difficult to master the principles of operation using this device.
Methods for connecting reinforcement
There are several methods for connecting reinforcing bars to form a stable frame. Builders use four main methods of fastening:
- welding using a machine;
- knitting using wire;
- laying overlapping reinforcement;
- connection of rods with steel couplings.
Most often, when constructing buildings and structures, the first two methods are used: welding and knitting with wire material.
Fastening the reinforcement cage using a welding machine is effective, but not always justified.
The disadvantages of using welding include:
- the need for professional skills, which leads to an increase in the cost of the construction project;
- lack of strength at welded joints;
- some types of reinforcement cannot be connected by welding, for example, fiberglass or class A-400 rods;
- the likelihood of damage to reinforcement joints during concrete compaction using a vibrator.
In such cases, it is rational to use a crochet hook. Advantages of forming a reinforcement cage:
- the use of a crochet hook speeds up the work;
- in case of shortcomings and deviations, errors are easy to correct;
- the broken wire material can not be removed by applying an additional layer;
- The reinforcement is fastened directly in the formwork;
- low cost of work.
Disadvantages include instability and unsteadiness of the reinforcement frame when moving. When transferring the structure into the formwork, the reinforcement may sag and lose tension at the attachment points.
Types of hooks
The structure and method of application of hooks can vary significantly. Among the varieties of devices for fastening reinforcement, three main types can be distinguished.
Simple hooks
A primitive product that consists of a rod ending with a hook at the end. The design allows for easy gripping of the wire loop. The tool rod has a curved shape, which, in combination with a bearing in the handle, provides the device with a high rotation speed.
Manual rotation of the device at a sufficient speed allows you to tighten the wire tightly. The simple hook design is suitable for small jobs in home construction. The advantages of such a tool:
- low market value;
- ease of operation;
- ease of use in hard-to-reach places.
Disadvantages include the inconvenience of use on large-scale construction projects.
Screw hooks
The semi-automatic tool tightens the wire by rotating the hook-shaped tip. The device has a different design from a simple tool, but at the same time makes the work of the master easier. During the knitting process, the rotational movement is ensured by the translational force of the tool, which is transmitted using a worm gear.
A screw hook for tying reinforcement provides high speed of work, but the cost of the device is slightly higher than a primitive tool. A device for knitting reinforcement is called differently - reversible. This tool has some advantages:
- long operation;
- ease of use;
- significant speed of knitting.
Purchasing tools makes sense for large volumes of work on a construction site.
Tying gun
The hook design is characterized by high performance, so it is mainly used on large construction sites. The device of the tool is automated and operates when connected to the network or with batteries.
The principle of operation of the gun is to dock with the tying element and press the release button. In a few seconds, the wire is wound and tightened into a strong knot with uniform tension.
To work with such a tool, wire with certain parameters and rigidity characteristics is used, otherwise the device will break.
The choice of the type of tool for the fastening procedure depends on the characteristics of the installation of the reinforcement and the purpose of using the gun. It is used for both metal and fiberglass reinforcement, for which annealed steel wire, plastic clamps or plastic fasteners are used.
Forming a reinforcement frame using a gun involves a lot of wire consumption. There are pistols powered by central electricity and batteries. The time spent connecting one node is 1 second.
At the same time, pistols have some disadvantages in operation:
- the need for an electrical outlet to operate the tool or to charge the battery;
- high cost of the device;
- The wire for knitting must be of the same diameter.
Why knit if you have a welding machine?
The use of welding when assembling large-volume frames is not welcomed by specialists in the field of monolithic construction. As a rule, such an effect on reinforcement bars accelerates the corrosion process and also deteriorates the quality of the iron. In addition, welding significantly increases the time and cost of reinforcement.
Types of crochet hooks
The binding process involves the use of thin steel wire, cut into pieces, to securely fix the intersections of the reinforcing strips. Today, manufacturers offer three types of ready-made crochet hooks for making armored belts: manual, screw and mechanical.
Hand hook
The simplest hook consists of a handle to which is attached a metal rod with a bend at the end. It easily grips the binding wire. The hook rod rotates around its axis, thus creating nodes that fasten the reinforcement frame.
A simple crochet hook is suitable for both beginners and experienced builders when working on small projects. Its advantage is that working with it allows you to quickly understand the tying algorithm and understand the required level of tension in the twists. A video of the process can be viewed on the Internet. Additionally, the hand hook is affordable and quite durable when used properly.
Semi-automatic hook
This tool also consists of a handle and a rod. Unlike the manual one, the screw one is equipped with a drill-shaped hook. With forward movements of the handle, it is screwed into it, simultaneously tightening the wire into the knot. To make a high-quality twist, the master will need two or three movements. This allows you to complete reinforcement work with a semi-automatic hook in a shorter time.
Mechanical
Professional builders working on large projects use automatic hooks to tie together reinforcement.
They are also called hook gun. This is a fully automatic tool. Thanks to the use of such a high-quality tool, the reinforcement is knitted as quickly as possible and eliminates the large energy consumption of the craftsman.
Buy or make a hook?
There is no point in purchasing an automatic hook for home use. It is expensive and designed for large volumes of wire.
DIY hook for tying reinforcement
When building a country cottage or country house, you can make a hook for tying reinforcement yourself from scrap materials.
Electrode hook
To produce the tool you will need:
- welding electrode with a diameter of 3-4 mm;
- a handle from a construction trowel or a piece of small diameter rubber hose.
The hook is useful for small jobs. With this type of hook, thin wire is used for tying, since using this tool involves manual labor, which can quickly tire your hand.
For tying foundation reinforcement, it is better to use a hook with a more massive structure.
The electrode device is made in stages:
- A piece is cut from the hose and a handle is made to fit the size of the rod.
- The rod and handle are connected using epoxy resin.
- The working part of the future hook is bent at 90°, departing from the handle by about 6 cm.
- In this case, a tip measuring 2 cm is deformed into the shape of an arc.
After all the manipulations, the hook for tying the wire is sharpened with a file.
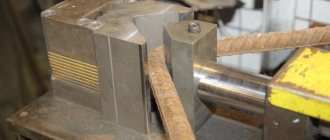
Rebar hook
A hook with a rod made of reinforcement can withstand a fairly large load. To make the tool you will need:
- reinforcing rod with a diameter of 6-8 mm;
- hex washers or nuts that are installed on the rod as clamps;
- a handle from an old tool: a screwdriver or a paint roller.
The fittings are inserted into the handle and secured with a washer or nut. The rod must be bent as in the case of making a hook from an electrode. In this case, the tip of the reinforcing rod is ground off and twisted into a loop.
It must be remembered that the handle must have a hole larger than the cross-section of the rod. This is necessary so that the handle rotates freely around the reinforcing bar.
The process of making a crochet hook from reinforcement is not complicated. At the same time, the design is durable, which will allow you to use the tool for a long time.
Hook using a screwdriver
A simple way to make a semi-automatic tool for tying reinforcement. To do this, use a metal rod or a large nail with the head torn off. The sharp tip of the rod is bent to the shape of a hook. The other side is inserted into the screwdriver hole and secured. Thus, knitting occurs due to the operation of the electric motor of the construction tool, which greatly simplifies and speeds up the process.
How to knit the frame?
When reinforcing a small volume of concrete, builders simply place the reinforcement in the formwork and then fill it with mortar. However, if large concrete products are to be reinforced, for example, a monolithic (slab) or massive strip foundation, then a frame is required. The reinforcement must be distributed evenly throughout the entire volume of concrete in order to reliably perform its function of increasing the strength of the structure. In these cases, a complex frame is made from metal rods.
crochet hook
The first option is the simplest and most accessible. If necessary, you can buy it in a specialized store for a hundred rubles or even cheaper. Moreover, it can be made by hand if the suitable material is available - we will return to this later. The downside is low performance. A novice knitter, with a sufficient supply of wire, will be able to produce 6-10 knitting per minute.
Screw hook
The screw hook is the next step in the development of the tool for knitting reinforcement. Outwardly, it looks a little like a regular one, but thanks to it, the knitting speed will increase, and the worker will get tired much less. If, when working with a regular hook, a specialist must twist the ends of the wire and manually twist them, then a screw hook is much more convenient.
Loop the loop and ends, then gently but firmly pull towards you. The plastic handle will be fixed in the hand, and the hook itself will begin to spin quickly, securely tightening the loop. Such a tool costs from 600 to 1000 rubles, depending on the manufacturer and store. It will be an excellent choice if you need to perform work once on a relatively large object. The knitting speed will increase, however, the wire will still have to be cut and bent by hand.
Knitting technology
There are several types of knitting:
- double;
- corner;
- double row;
- cross;
- "dead node"
The knitting process does not depend on the type of hook used, whether it is a homemade device or a factory-made tool. Before using manual and semi-automatic devices, it is necessary to cut the wire for knitting.
Typically, pieces about 30-40 cm long are cut, the size of the wire generally depends on the diameter of the reinforcing bar.
Before carrying out work, it is recommended to cut several samples of wire material for test twisting. Next, following the instructions, knit the reinforcement cage.
- Fold a piece of wire in half and wrap it around the knot that requires tying.
- Insert the hook into the resulting loop, hook the opposite end of the wire and begin rotating with the twisting tool.
- The first few revolutions are made quite quickly. At the last stage, the pace must be slowed down and the fastening carefully tightened.
- Pull the tool out of the loop and check the strength of the knot.
To check the reliability of fastening, you need to move the reinforcing mesh. The frame rods must be firmly and motionlessly positioned relative to each other.
The process of tying wire using a screw hook looks almost the same, taking into account the nuances of the tool’s design. The wire for the bundle is folded in half and installed at the location where the reinforcement is attached. Then the ends of the wire are bent and placed on the hook.
The action of a screw tool does not involve making circular turns with a brush. To operate, you need to pull the handle towards you, and the displacement leads to rotation of the rod. The handle is released and the action is repeated, the number of which depends on the required rigidity.
Tying a dead knot
A tie, which is called a “dead knot,” is used for structures consisting of reinforcement, rods and clamps.
This type of reinforcement frame is usually used in the construction of beams and columns.
The unit securely and firmly fixes the reinforcing bar into the corner of the clamp. Knitting is done in this way:
- A piece of wire about 20-40 cm long is bent in half.
- Pass the loop forward under the bottom of the reinforcement rod on the left side of the clamp. In this case, leave the ends of the wire approximately 2-4 cm long for twisting the knot.
- Place the wire over the clamp, bending it under the bottom of the reinforcing bar.
- The crochet hook is inserted into the loop and the free end of the wire material is grabbed.
- Pull the hook towards you, making several turns. Do this until the wire is completely clamped.
The binding is checked by loosening the clamp by hand. If the clamp gives in, it means that the knot is made incorrectly, or the wire is not fully tightened. When performing reinforcement of complex structural elements, a combined combination of nodes is used. First, a “dead knot” is performed, and then two simple ones are mounted crosswise.
Methods and patterns for tying reinforcement
First of all, it is necessary to prepare all materials for installation, transfer them to the installation site, if necessary, level the reinforcement and place plastic clamps under it, which are placed between the reinforcement and the formwork and are necessary to ensure that individual parts of the reinforcement do not stick out from under the concrete. Now you can make the connection. Tying reinforcement can occur in several ways, depending on the tools and materials used.
So, if self-tightening plastic clamps , then in principle no questions can arise here, and most importantly, tighten them well. The situation is even simpler with a pistol, which does everything itself literally in an instant. The most complex and labor-intensive process is the process of tying reinforcement using wire and a hook: several basic methods and techniques are used.
Today, there are many options for tying reinforcement, which differ in where the wire is bent. In principle, in terms of reliability and strength, all options are almost the same, and everyone can choose the equipment that is most convenient for them.
Method No. 1
The simplest and most common option, which includes the following sequence of actions:
- fold the piece of wire in half;
- we pass the wire under the reinforcement, at the junction of the two rods;
- thread the hook through the loop of wire;
- We pull the free end of the wire with our fingers to the hook and place it on it, bending it slightly;
- we begin rotational movements of the hook, twisting both ends of the wire;
- after 3-5 turns, when the connection is securely fastened, you can remove the hook from the loop.
Method No. 2
The process has much in common with the previous one, but is still slightly different:
- fold the wire in half and place it under the reinforcement, at the required connection point;
- hook the loop;
- bend the second end over the hook so that an O-shaped loop is formed;
- Twist the resulting loop until a reliable twist is achieved, and then pull out the hook.
Method No. 3
According to many experts, this method is the most convenient, as it frees up one hand:
- we place the wire under the reinforcement;
- insert a hook into the loop and use it to hook the other end of the wire;
- bend the wire down;
- pull the hook towards you, twist it several times, and you're done.
Method No. 4
- fold the wire in half again and place it under the reinforcement;
- We press it well against the rod, and bend the ends towards ourselves;
- insert the hook, make a few turns and remove the hook.
This method allows you to obtain a more reliable twist. The most experienced craftsmen advise bending the wire before twisting so as not to make many turns, because reliability will not be increased, but there is a possibility that the wire will simply break. The optimal number of revolutions is 3-5.
As you can see, all methods are very similar, and differ only in nuances. If you need to knit reinforcement with your own hands, then after several attempts you can get the hang of it and choose the best option for yourself. Some craftsmen claim that the process of hand knitting is simplified if you use screw hooks, but this is a matter of technique and habits.
Wire selection
According to standards, when tying reinforcement, baked steel wire is used. In this case, the cross-section of the wire is selected relative to the parameters of the reinforcing bars, which is prescribed in the building codes.
The following requirements must be met:
- for reinforcement with a cross-section of up to 12 mm, 1.2 mm wire is used;
- with a cross section of 16-18 mm, 1.6 mm wire is used;
- with a cross section of more than 18 mm, 2.0 mm wire is used.
The choice of material for knitting affects the strength of the rod frame and the speed of work.
Important recommendations for choosing reinforcement for the foundation
Diameter
When choosing reinforcement for the foundation, first of all, pay attention to the diameter of the rods. The relationship is simple: the thicker the reinforcement, the more severe loads it can withstand
When determining the optimal diameter, first of all, the characteristics of the soil are taken into account (the main point is heaving) and the expected weight of the finished building, taking into account the weight of its internal arrangement and residents/visitors.
This is how it should be ideally and according to the rules. Along with this, many private developers refuse to draw up design documentation and perform related extensive calculations, adhering to average and generally accepted values. In the case of the construction of relatively small buildings, for example, such as a bathhouse, such an approach is acceptable.
The recommendations are as follows:
- if the structure is erected from relatively light materials (timber, gas blocks and other lightweight building elements from this series), reinforcement with a diameter of 1.2 cm is used. It is impossible to use rods with a diameter of less than 12 mm for arranging the foundation - reinforcement so modest in its overall characteristics is only suitable for use in the construction of supports for fences, gates and other light utility structures;
- if construction is carried out using heavier materials, the recommended diameter of the reinforcement changes accordingly. In most cases, rods with a diameter of 1.4-1.6 mm are used.
Assortment of fittings
Class
The second important indicator is the class of the reinforcement. For a private foundation, class A-3 material is suitable.
Corrugated fittings A3, steel grade A500S, GOST 5781-82
The fittings of this group are very easy to use (easily bends without the use of special tools), durable and reliable. Less commonly used are rods of class A-2 (they can be bent 180 degrees, A-3 – 90 degrees).
Table of reinforcement classes and steel grades
Recommendations for mating
Having selected the wire of the required diameter and prepared the tool for knitting, it is recommended to follow the tips:
- to fix the immobility of perpendicular rods during knitting, you can use boards, clamping the ends of the rods with them;
- after knitting, it is necessary to check the strength of the nodes, since when pouring concrete using a concrete pump, shifts and displacements of the frame may occur;
- Corner rods need stronger reinforcement, so the wire assemblies at the corners are made and checked especially carefully.
You can check the strength of a frame made of reinforcement using the mechanical influence of a person’s weight.
Knitting the reinforcement frame is necessary when forming monolithic reinforced concrete building elements. Since the number of knots when attaching rods is quite large, it becomes necessary to choose the optimal method of twisting the wire. For this, a special hook is used, the design of which may vary. Moreover, each knitting tool has its own advantages that will be useful in certain areas of construction.
Tips for using a knitting gun
Buying or renting this tool is expensive, and in order not to waste money, you need to follow the operating rules.
In the case of this device it is:
- Full charge of the battery, compliance of the wire and reinforcing bars with the parameters and “original” components. It is recommended to be especially careful when using components from Japanese brands; such a tool can easily be broken by using, for example, Chinese wire. Plus, such a breakdown is not included in the warranty agreement.
- It is also recommended to use extensions to form grating units if work is carried out with large horizontal frames. This will make the work much easier.
- Even though the operator can do more work with a knitting gun, an assistant is still needed.
What gun do you use for tying reinforcement?
BatteryMechanical