Sooner or later, the battery pack of a screwdriver exhausts its life. However, the price of a new battery is almost comparable to the cost of the device itself, and therefore the only inexpensive alternative is to replace the batteries in the screwdriver. Let's look at what types of batteries there are and what their features are, how to quickly identify a fault, what recovery methods are available and how, if necessary, to repair or replace individual units.
To restore the battery, you must use batteries with parameters similar to those installed at the factory Source ytimg.com
Types of batteries for screwdrivers
Almost all modern models of screwdrivers have the same battery pack design - elements connected in series into a single circuit. Their shape, dimensions and denomination are always the same. Together they create the final voltage of the device. The only difference between them is the capacity. This makes it easy to trim and replace such batteries.
As a rule, 3 main types of batteries are used:
- Nickel-cadmium.
The rating of each block is 1.2 volts. Their main advantages are as follows:
- Availability due to prevalence and low price.
- Resistance to negative ambient temperatures.
- Preservation of characteristics when stored in a discharged state.
Disadvantages are manifested in small capacity, as well as a number of factors such as:
- Presence of memory effect.
- Self-discharge.
- Small range of charge-discharge cycles.
In addition, due to the toxicity of the production cycle, this type of battery is produced by manufacturers in 3rd world countries, which in itself can manifest itself in manufacturing defects and low quality.
The simplest nickel-cadmium batteries installed in a battery for a screwdriver Source alicdn.com
- Nickel metal hydride.
Batteries of this modification produce a voltage of 1.2 V. Many people prefer them as an alternative to failed units when they need to repair a battery for a screwdriver. This is explained primarily by high quality, since the production line does not pollute the environment, and therefore the technology is widely used in developed countries by well-known manufacturers.
In addition, they have the following number of advantages:
- Minimal memory effect.
- Low self-discharge rate.
- Higher capacity - in comparison with the above variety.
- Maximum operating range of charge-discharge cycles.
Disadvantages are manifested in high cost, inability to operate at low temperatures and deterioration of performance during prolonged storage in a discharged state.
Nickel-metal hydride batteries for installation in a screwdriver battery Source alicdn.com
- Lithium-ion
Batteries of this type provide a nominal value of 3.6 V. The main advantages are as follows:
- Large capacity.
- Several times greater range of operating cycles compared to other modifications.
- No memory effect.
- Minor self-discharge.
- Possibility of reducing the weight of the battery pack - due to the need to use fewer batteries in the circuit due to their greater potential and capacity.
The disadvantages are expressed by the maximum price and limited shelf life. After just 3 years, batteries lose most of their capacity due to chemical breakdown of the filler.
Note! The main cause of screwdriver failure is the failure of the battery, or more precisely, the loss of the nominal value or capacity of its individual elements. Thermistor failure, disconnection of contacts and other reasons are extremely rare.
Lithium-ion batteries for installation in screwdriver batteries Source virtustec.ru
See also: Catalog of companies that specialize in electrical work of any complexity
Re-flashing the capacity of battery cells
How to change elements in a screwdriver battery? Rechargeable batteries with Ni-Cd cells, if the recommended charging mode is violated, begin to lose capacity, but this loss is reversible. This can be done by flashing these elements . Thanks to this method, approximately 80% of the original capacity can be restored. The essence of flashing is to supply current with a voltage 3 times higher than the nominal value. Before starting work, the battery is disassembled into elements. Using pliers, tear off the nickel tape from the poles of the cans. On a high-power charger (you can take a car battery), the pulse mode to 3.6 V. The terminals of the device are placed against the same poles of the non-working cans for 3-5 seconds. Then all elements are measured with a multimeter. If the values exceed 1.4 V, they are restored. Banks in which the voltage indicators have not changed or have not reached the required value are replaced.
Troubleshooting
Due to the fact that the power supply is a chain of series-connected elements, it is necessary to determine which specific member has failed in order to replace it to restore the functionality of the screwdriver battery. Since one non-working link de-energizes the entire chain.
For this purpose, the following algorithm of actions is used:
- The battery is installed in the charger until the charging signal is received.
- The battery pack is being disassembled.
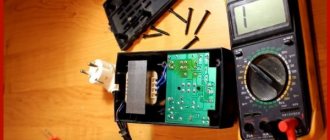
- The voltage of each bank is measured with a voltmeter.
- Marks are placed on all elements whose value is lower than those that normally work. For example, nickel-cadmium devices produce 1.1 or 1.0 volts instead of the required 1.2 V.
- Next, the device is assembled and turned on until the motor power noticeably decreases.
- After this, the disassembly and voltage measurements of all elements are repeated.
Banks whose nominal loss is 0.4 volts or more compared to normal ones are not suitable for further use and require replacement.
A battery for a screwdriver consists of a chain of batteries connected in series Source acums.ru
Advice! An alternative way to create a load for the battery before testing is to connect a light bulb of the appropriate rating. When the lamp begins to dim, the battery cells can be checked for differences in rating.
How to disassemble a screwdriver battery
In general, the batteries of many power tools are built the same way. The voltage and charging currents are different, but the device itself is similar. Battery banks are packed in a detachable plastic case. The body is held together with several screws, with additional fixation using plastic latches.
After unscrewing the screws (special forms of screwdrivers may be required), the battery does not immediately fall apart. It is held in place by the latches. We carefully examine it, determining their location. We found the latches, lightly pressed the plastic in that place, and pulled the second part towards ourselves. No extra effort, the latches are plastic and fragile.
How to restore a screwdriver battery: what’s in the case
Some screwdriver bodies are of the “one-piece” type; they are connected with silicone or glued. We carefully remove it, and then repeat the manipulations of disconnecting the housing. The refurbished battery can be glued back together or electrical tape can be used.
Possibility of recovery
When it comes to a failed lithium-ion battery, the only way to get your screwdriver battery working again is to replace it with a new one. This is the best possible option in this case, since batteries of this type do not have any memory effect, and the reason for their breakdown is associated only with the chemical decomposition of the filler. However, the cause of the malfunction may also be hidden in a violation of the device’s control circuit.
Therefore, to accurately determine the cause of a breakdown, two methods are used:
- Install another, working control circuit, and try to start the device. If the verification method helped, then the reason lies precisely in the breakdown of the circuit.
- Using an adjustable charger, connect the jar to a current of 4 V and 200 mA. An increase in the nominal value on it to the specified 3.6 volts indicates complete serviceability. The cause of the breakdown must be sought either in neighboring batteries or in the control circuit.
To identify a faulty element, you need to check each bank of the screwdriver battery pack Source ytimg.com
Step-by-step repair instructions
At home, you can independently revive the screwdriver battery. To do this, you need to open the battery case and replace the elements (or in other words, the cans).
How to disassemble the battery case
The battery of most screwdrivers has a collapsible housing. But some manufacturers, to prevent self-replacement of elements, make battery cases non-separable. Thus, they force the owner to purchase a new branded battery. In this case, it will be very difficult to disassemble the case without irreversible damage.
The connection of the housing parts can be done using screws, latches or glue. In the first case, you can separate the parts of the case by simply unscrewing the screws with a screwdriver.
If the body parts are glued together, you need to carefully use a knife to push the parts apart by inserting the blade into it. Then you need to wedge the joint by inserting any solid object of suitable size into the resulting gap. Then you need to move along the entire perimeter of the body. After the body is disassembled, its parts will need to be reattached with glue.
Finding faulty cells
After the case is opened, you can see that the battery cells are connected in series to each other. In order to repair a battery for a screwdriver, you will need to identify the faulty element - usually one or two elements - and replace it.
Prolonged soldering cannot be used, as the element can be damaged if it is heated. Lithium-ion batteries are especially sensitive to heat. If you have no experience soldering such batteries, you can purchase batteries with already welded contacts on AliExpress.
They write on the Internet that nickel-cadmium batteries dry out over time and the element (can) can be restored by drilling a hole in it and using a syringe to pour water inside. But this method of restoration can lead to damage to the element and even injury, so we will not consider it.
In order to find faulty cells, you need to check what voltage each battery cell produces individually.
To make accurate measurements, the battery must be fully charged.
You need to remove the contents of the case and lay out all the elements on a flat surface. It will be much easier to measure voltage if you provide free access to each contact of the battery cell.
For convenience, you should draw a diagram on a piece of paper and mark the voltage of each element on it. We measure the voltage using a multimeter, having previously selected the DC voltage measurement mode with a low measurement limit.
The voltage level for each nickel-cadmium cell should be between 1.2 and 1.4 V, and for lithium-ion cells between 3.6 and 3.8 V.
Then you should discharge the battery. To do this, you can connect a load to it. For example, a high-power incandescent lamp, or you can assemble a battery and use a screwdriver until it runs out.
After this, the battery is disassembled again and the voltage is measured. If voltage losses were previously determined on the elements, when measuring again, the multimeter readings will be even lower. It is necessary to replace elements where the difference in voltage readings will be significant: up to 0.5 or 0.7 V for cadmium and less than 2.5 volts for lithium.
Expert opinion
Alexey Bartosh
Specialist in repair and maintenance of electrical equipment and industrial electronics.
Ask a Question
If the battery is very worn out, then even after long-term charging, the voltage on some batteries will be significantly lower than on others (sometimes even close to 0 volts). They need to be changed; they are unlikely to be restored.
Selection of replacement elements
There are several ways to select Li-Ion (lithium-ion) or Ni-Cd (nickel-cadmium) battery cells for replacement. If you have several faulty batteries from one screwdriver, you can find working ones by disassembling them, or find them in electrical goods stores, or on online shopping sites, for example, on AliExpress. As a rule, manufacturers of major brands of screwdrivers use lithium battery models produced by several manufacturers.
Also on AliExpress you can buy the necessary battery cells with additional contacts already welded using resistance welding. This will greatly simplify the replacement process and reduce the likelihood of damage to the element being replaced.
Pay attention to the compliance of the technical characteristics of the replaced elements, especially capacitance and voltage.
How to solder cans to a battery
If you have experience in soldering radio components, then replacing a damaged battery (can) will not cause difficulties:
- Carefully disconnect the damaged element by cutting the connecting plate. When replacing an element, observe the polarity;
- then you need to solder the elements together. Pay attention to the heating time of the contact - it should be minimal, which is especially important for lithium-ion batteries. With prolonged contact, such an element will inevitably fail, and may also spontaneously ignite or explode. Therefore, the soldering movement must be precise and very fast;
- After all the elements are securely soldered, you need to assemble them and fasten them together with tape or insulating tape. The assembly process is similar to disassembly, but in reverse order. After assembly, the contents are placed in the housing and the lid is secured with screws or glue.
Repair and replacement of battery components
When carrying out the procedure, another, more effective way to restore the performance of the battery is to replace the failed elements with serviceable ones. However, for this purpose you will need to purchase new banks or take them from another working battery. In this case, it is extremely important that the dimensions, as well as the electrical characteristics and type of elements being installed, coincide with those originally installed.
The procedure is carried out by cutting out old and soldering new elements into the chain. To do this you will need the following basic set of necessary consumables and tools:
- Wire cutters.
- Soldering iron.
- Solder or tin.
- A flux that does not give rise to a subsequent oxidation reaction.
Screwdriver battery discharge current
It is also necessary to monitor such a parameter as the current strength that the battery can deliver. This parameter is called discharge speed or discharge current. Sometimes (with good parameters) it is indicated in amperes, sometimes it is indicated by the letter “C” with a number behind it. To convert the marking into ampere/hours, we multiply the figure by the amperage of the battery and get the maximum discharge current of the battery.
For example, for 1500 mAh batteries with C 3, the maximum discharge current is 3 * 1.5 A = 4.5 A, for batteries with C 12 there will be 1.5 A * 12 = 18 A. If the battery capacity is 3200 mAh, then you need to multiply by 3.2 A, that is, with the same C 3 and C12 we have 9.6 A and 38.4 A, respectively. The principle of calculation is clear.
An example of a description of batteries from one of the sites
What is the effect of battery discharge current? How much power your tool can develop. If the maximum current consumption of a screwdriver is, for example, 15 A, and the battery can supply only 5 A, then your tool simply will not be able to achieve the declared power. So choose battery banks with a discharge current no less than the maximum current consumption of your screwdriver.
Number of charge/discharge cycles
Another minor parameter that is worth paying attention to is the number of charges and discharges. It is indicated in cycles
Displays the “life” of the battery and indicates how many times the can can be charged/discharged without changing its properties.
Lithium-ion is more compact
It’s clear that the more cycles, the better. But the more cycles, the more expensive. In general, once again we will have to look for a compromise.
With or without plates
If you have already disassembled your battery, then you have seen that the banks are connected to each other by contact plates. When disassembling the battery, do not bite the plates, but try to keep them intact. They can be cleaned and reused.
Sometimes you can find batteries with the plates already soldered. Then you don’t have to worry about careful disassembly. Everything would be fine, but if this is AliExpress, then the quality of the plates themselves and their soldering is rarely normal. Often batteries do not hold a charge or are poorly charged precisely because of the poor quality of the plates and the batteries themselves.
You can solder the plates yourself
You can try to solder the plates yourself. But keep in mind that if the jars overheat, they will fail. You need to solder quickly, using a powerful 100 watt soldering iron and good solder and flux. First clean the contact pad and the soldering area on the plate, treat it with flux, then quickly solder it.
Video description
Video about repairing a failed screwdriver battery:
- The series connection of the batteries must be such that “+” is in contact with “-”. Otherwise it simply won't work.
If you change only some of the batteries in the screwdriver battery, a potential difference will arise between those already used and those not yet used. It can be eliminated through the alignment procedure. To do this, the following series of actions are taken:
- The assembled battery is placed on a full charge - 8-10 hours.
- The battery is left alone for a period of 24 hours.
- Next, the voltage on the banks is measured. It should be approximately the same everywhere.
- After this, the battery is charged and the device turns on at full power. In this case, the load factor on the screwdriver itself is taken into account so that it does not deteriorate.
- Then the “charging-discharging” cycle is repeated 2 more times.
Recommendation! To extend the battery life, it is necessary to erase the memory effect once every 3 months, using several consecutive charge-discharge cycles.
Battery repair methods
Quite often, the battery is not fully charged, and its service life is short. This may not be due to a faulty battery, but because the contact plates on the battery or charger have sagged or oxidized.
How to revive a screwdriver battery: first, check the condition of the contact springs on the battery and on the charger
In this case, it is easy to restore the screwdriver battery. First of all, we check the condition of the plates. We clean them from plaque, dirt, oxides, and rub them until they shine. If the plates are bent, we return them to their former shape. We carry out similar manipulations with the contact plates on the charger (be sure to unplug it from the network). Then we check whether it helped or not. No, let's move on.
Briefly about the main thing
Most modern models of screwdrivers are equipped with 3 types of batteries:
- Nickel-cadmium.
- Lithium-ion.
- Metal hydride.
Each of them has individual pros, cons and application features. All of them are a chain of cans connected in series. The failure of one of them leads to the inoperability of the entire battery. To identify the weak link, you need to perform a charge-discharge cycle and measure the voltage of each element.
The most common nickel-cadmium batteries are reconditioned by flashing and compression-compaction of the electrolyte. Lithium-ion ones can only be changed. In this case, replacing the batteries in the screwdriver battery is carried out by cutting out the old ones and soldering new ones into a common chain, followed by equalizing the potential through a series of “charging-discharging” cycles.
Replacing nickel-cadmium batteries in a screwdriver with lithium ones
Recently, on forums dedicated to electrical tools, the process of replacing nickel-cadmium screwdriver batteries with Li Ion batteries is often described. And this is no coincidence. More modern lithium-based cells have much higher capacity . And the number of work cycles they have is at least one and a half to two times greater.
Very often, cadmium batteries are replaced with the popular lithium 18650, so named based on their size. You can change batteries to lithium if the tool is used daily or very often. The high number of cycles of lithium-ion batteries is ideal for professional craftsmen who use the tool every day.
In order to convert a screwdriver from “cadmium to lithium”, you will need 18650 batteries and a special charging module. This module allows you to charge the battery and transfer the load on the same terminals (the same protective board that was mentioned at the beginning). Such modules have protection against short circuits between elements.
Simple restoration: replacement of several elements
If operations with distilled water and “reflashing” nickel-cadmium batteries require time and skill, then to replace used elements you only need a multimeter, a soldering iron and new battery banks.
Before replacing, it is necessary to diagnose the battery and how to do this is correctly described above. The battery consists of individual elements that need to be desoldered. Low-power soldering irons are used for soldering, otherwise the high temperature can damage the power supplies. Low voltage items should be set aside or labeled.
Advice! If possible, it is better to use a soldering station with power adjustment or spot welding.
After identifying faulty power supplies, they simply need to be replaced with new ones, which are re-soldered into a common battery. The cost of individual cans is much lower than the entire assembly, so the savings will be obvious. After all the elements are assembled into the battery, it is necessary to carry out several charge/discharge cycles of the battery.
How can I replace a screwdriver battery?
If the screwdriver becomes unusable due to a battery failure, you don’t have to go to the store to buy a new one. After all, it costs more than half the electric tool itself. Today we will tell you about one technique that will significantly reduce your costs.
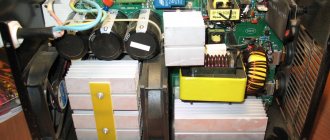
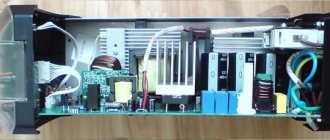
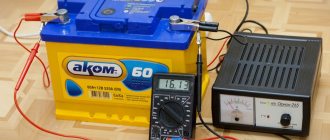
Among the many ways, I would like to highlight one - replacing the charging device with a battery from an interrupter. It has a voltage of 12 volts and a capacity of 7 amps. In practice, this procedure looks like this:
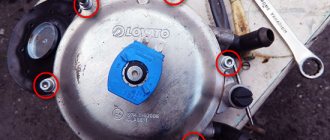
- The first step is to remove excess fasteners at the installation site of the broken factory battery. Since they are plastic, you can conveniently get rid of them using pliers.
- Unscrew the screwdriver handle and remove the wires corresponding to the plus and minus signs.
- The next step is to lengthen these two segments. This manipulation can be carried out using a regular soldering iron and two suitable wires, soldered to the existing ones.
- We fix the extended wires at the bottom of the handle, and then twist the tool back.
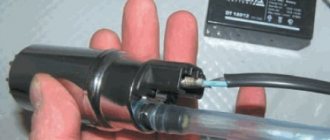
- We attach special terminals to the ends of the wires, putting protection on top of them.
- We attach the terminals to the battery at the plus and minus points on both devices.
- The screwdriver has been brought back to life! All that remains is to secure the battery to the bottom of the screwdriver handle.
Important! When connecting an electric tool to a battery, it is important not to confuse the plus and minus indicators, otherwise a short circuit may occur!