offers systems for various industries. The range includes equipment for the manufacture of kitchen furniture: membrane-vacuum presses SGF and GVP. With their help, you can produce various facades decorated with plastic, natural veneer, PVC films, etc. Due to their versatility, they are suitable for solving a wide variety of production tasks without the need to purchase additional equipment.
Thanks to a wide range of products, machines for the production of furniture facades, cladding, as well as membrane and tape equipment are available to customers. Everyone can find a machine for their own purposes: a vacuum press for veneering, plastic rolling for MDF facades, a vacuum press for sublimation and much more for the manufacture of furniture and kitchen facades.
What is a vacuum press for and how does it work?
Cabinet and upholstered furniture are often made from film furniture facades, since the latter combine such advantages as: • a wide range of colors; • various forms; • low cost.
To produce such facades, special equipment is used, and the main tool in this production is a vacuum press. The device allows you to shrink PVC film onto a workpiece with an MDF base.
The press consists of the following key elements:
• vacuum chamber or table; • thermal module.
The chamber is usually made in a rectangular shape, a rigid material is used for it - when negative pressure is artificially created from inside, this material does not compress. On the outside, PVC film is laid and its edges are sealed with the frame.
The film shrinks in the following order:
• the workpieces are placed on the table; • sealing process; • films heat up; • air is pumped out; • cooling process; • blanks are cut out, excess film is removed from the facade.
Main varieties
Today, two types of vacuum presses are produced:
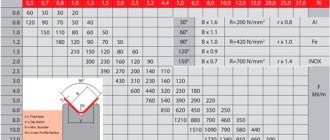
- conventional type equipment (such presses are used in cases where it is necessary to exert the most gentle influence on the workpiece, and are capable of creating a pressure whose value does not exceed 0.95 kg/cm2);
- high-pressure vacuum presses (equipment of this type is capable of providing pressure up to 8.5 kg/cm2).
In a conventional press, the facing material is pressed against the part by atmospheric pressure, and in a press with excess pressure, compressed air is additionally pumped into the cavity above the workpiece
Equipment of the first type is used in cases where it is necessary to cover products with a simple configuration with PVC film or veneer. Vacuum presses capable of creating high pressure are used for veneering or covering with PVC film parts of complex shapes. In addition, such equipment is often used as a vacuum molder, with the help of which three-dimensional products of various configurations are made from sheet plastic.
The most common two layout options for vacuum presses are:
How to make a vacuum table
Vacuum bath
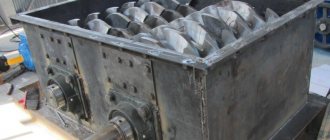
A 2 mm steel sheet is used as the bottom of the vacuum bath. In order to minimize the deflections of the sheet, which will be affected by negative internal pressure, and to make the table surface as even as possible, we proceed to the manufacture of the stiffening frame. We make this design from the same profile pipe 60x40x2.
The pre-cut pipe, as indicated in the project, is laid on the slipway, rigidly secured with clamps, and all connections are welded. When the stiffening frame is ready, a sheet of steel is welded on top of it. At this most critical stage of welding work, a continuous sealed weld must be ensured. It is recommended to do it with double boiling.
To prevent the sheet from warping due to prolonged exposure to high temperature, you can use the following alternative method to weld the sheet to the frame. Before laying the steel sheet on the stiffening frame, we apply a sealing compound around the perimeter of the sheet, which is designed to withstand high temperatures. Here you can use, for example, silicone high-temperature sealant. Welding is not carried out in the form of a continuous seam, here we make regular fixing tacks - a step of approximately 50 mm.
This method ensures that due to short-term local effects of welding, the entire sealant will not be damaged or burned out, but only a small part directly at the tacks. For the most part, the sealant, after it hardens, will perform its function.
How to make a stiffening frame and assemble a vacuum bath:
• welding the stiffening frame; • weld a sheet of steel to it; • around the perimeter of the sheet we hermetically weld a stationary lower frame, which includes a part of the hinge joint that fixes the lifting upper frame.
How to choose the right equipment
When choosing a membrane-vacuum press to solve certain problems, you should focus on its most important parameters.
Pump brand and country of origin
Vacuum presses can be equipped with pumps from foreign (usually Italian) or domestic manufacturers. In the first case, a membrane vacuum press will cost more, but the pump installed on it will be more reliable. Meanwhile, domestic vacuum pumps are also quite reliable, but most importantly, there should be no problems with their repair, since finding spare parts for domestic pumping equipment is not particularly difficult.
The reliability and performance of the press depends primarily on the vacuum pump
Vacuum table lining material
It is very important that it is metal, and not chipboard sheets, which some manufacturers use for such purposes. After a short period of use, tables made from chipboard will simply become unusable.
Dimensions
This is one of the most important characteristics that you should pay special attention to when choosing a membrane vacuum press. The dimensions of the vacuum press primarily determine the number of workpieces that can be processed on it simultaneously. Naturally, the larger this quantity, the more productive the vacuum press will be. Meanwhile, it should also be taken into account that the size of the equipment directly affects its cost, so in this case the best option should be chosen.
Vacuum presses are manufactured in standard sizes, for example, for veneer veneering, the most commonly used sizes are 2500x1500, 3000x1500, 2500x1200 or 3000x1200 mm
Type of heating devices
The vast majority of experts advise choosing vacuum presses equipped with KGT lamps, when using which the film glued to the top of the bent parts does not melt or burn through. In the same case, if you select equipment equipped with heating elements, you will have to constantly monitor that the distance from such heating elements to the very top of the workpiece surface is at least 150 mm.
Press brand
Since vacuum presses are quite expensive equipment, it is not worth choosing a device from unknown manufacturers, which will then have to be constantly repaired.
How to make a lifting, pressing, top frame
We use a 60x40x2 mm profile pipe as the frame material. The clamping frame is made exactly in the same dimensions as the vacuum frame. If it was not possible to get an even profile - not bent or twisted, then we select the straightest sheets in pairs. From these we will make parts of the vacuum table that fit tightly together.
The lifting of the clamping frame will be carried out through adjustable hinge joints. The hinges can be adjusted when a seal is glued in the form of strips of sheet rubber with medium hardness - approximately 2 mm thick.
Welded washers are required to increase the friction area. The hinge pin is in the form of a steel rod D12, the ends of which have threads.
To keep the pressure frame raised, we can use gas elevators.
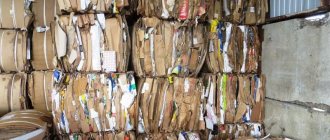
PVC bags
Polyvinyl chloride is one of the most inexpensive and popular materials on the market. Such products are able to withstand different temperature conditions; vacuum pumping equipment is used to pump air out of them.
However, this material is less elastic compared to products made from other materials. Because of this, when using PVC vacuum bags during pressing, ruptures may occur at the sharp ends of the workpieces. As a rule, models of this type are recommended to be used not in enterprises, but in home workshops for veneering or veneering, which is performed no more than 1-3 times a month.
PVC bags
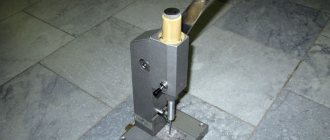
Clamps
To hold the film securely and airtight when vacuum pressing occurs, we press the top frame tightly and evenly against the perimeter of the vacuum frame. This way the rubber seal will fit completely.
Homemade clamps, which operate on the eccentric principle, are made from the following rolled steel:
• 1 pipe DN50: 0.5 m, with an outer diameter of approximately 60 mm; • rod: 2 m, diameter 10 mm; • profile pipe: 2 m, 20x20x2 mm.
We adjust the clamps by installing combination nuts in the desired location on the stud thread and securing them with locknuts. This operation is performed at the final stage of manufacturing the vacuum table, after the rubber seal has been glued.
Learn how to create several tons of pressure per square meter when gluing veneer.
Working with veneer is much easier than you think if you use a vacuum press to compress the glue. To introduce our readers to this process, we turned to professional furniture maker Matt Sailer, who often uses veneer in his work.
According to Matt, veneer offers several advantages.
“It allows you to change the direction of the grain pattern on the facing surfaces and even mix different species, which is difficult and sometimes impossible to do with solid wood. Companies that produce and sell veneer offer products from hundreds of wood species and a huge variety of patterns and shades. This palette is simply amazing.”
WHAT IS NEEDED FOR VACUUM PRESSING
How does this system work?
The vacuum bag evenly distributes significant pressure over a large area, even over concave and convex surfaces, which is difficult and sometimes impossible to achieve with conventional methods. When air is pumped out of a sealed bag, the pressure from outside air compresses the bag and its contents. If you think that such a clamp will be too weak, keep in mind the following: a panel measuring 610x915 mm inside the bag is compressed with a force of about 5.5 tons (if the process occurs at sea level. With increasing altitude, atmospheric pressure decreases, and at an altitude of 1500 m above sea level the force will be 4.8 t).
The photo below shows the main elements of the vacuum system. A basic set of pump, hose with fittings and vinyl bag measuring 125x125 cm can be purchased for S400. To veneer long panels (such as in the Sixties Cabinet project), you need a bag measuring 125x250 cm. A vinyl bag of this size costs about $75, and a more durable polyurethane bag will cost $215. Although the vacuum bag creates a fair amount of pressure, unadhered areas and swellings (so-called “siskins”) may be found on the veneer if additional measures are not taken. Matt makes a "sandwich" by sandwiching the veneer panel between two pressure plates to distribute the pressure more evenly.
Read also: Gradation of circuit breakers by current
Make these plates from 19mm MDF board or laminated chipboard. Their dimensions should be approximately 25 mm larger than the package of parts. Mill 6mm fillets on all edges and corners to avoid damaging the vacuum bag. On one of the plates, use a saw blade to make a grid of 3 mm cuts with a pitch of about 100 mm. This will help completely pump the air out of the bag.
Do not use contact glue. Contact adhesive is considered the best choice for gluing sheets of plastic, but Matt recommends avoiding it if you're gluing wood to wood: "Under veneer, contact adhesive dries out, causing edges and corners to pull away from the backing and become easily damaged."
Choice of base and glue
For strong bonding, veneer requires a smooth surface called a base or substrate. MDF board is excellent for use as a base for panels such as doors, false panels and countertops. For the panels on which the joints are then made, choose maple, beech or birch plywood. “But oak plywood should not be used,” says Matt, “its large pores will show through the thin veneer after pressing.” Since you will be sawing the panels to final dimensions after gluing the veneer, make the base, including the edge caps, approximately 12 mm larger in width and length. The glued overlays must be at least 25 mm wide so that after filing there is enough material left for routing the profiles along the edges.
If you want to cover a panel smaller than 60x60cm with one piece of veneer, you can use regular yellow PVA glue. For larger areas, or if the shirt is assembled from several pieces of veneer, Matt uses a special one-component cold-press adhesive. “It lasts longer so you can work without fuss, and the increased viscosity reduces glue bleed through seams.” Some manufacturers offer light, medium and dark varieties of this glue, and this helps make the glue lines less noticeable.
How to cut veneer
To cut veneer, Matt uses three simple tools: a sharp knife with a retractable blade (for cross cuts), a so-called plywood saw (for rip cuts), and a steel ruler to guide them (photos A and B). Quick tip! Place a strip of 150-grit sandpaper on the underside of the ruler to keep it in place as you work. Place the veneer sheet on a piece of MDF board to avoid leaving scratches on the workbench cover when cutting. Press the ruler against the veneer as tightly as possible to prevent movement. For best results, do not try to cut the veneer in one motion, but make several long, light cuts along the edge of the ruler.
When cutting veneer across the grain, make cuts from both edges to the middle to avoid splitting the edges. Change blades frequently to keep them razor sharp.
For longitudinal cutting in a straight line, use a plywood saw instead of a knife (the blade of the knife often deviates from the ruler in the direction of the grain). Move the tool towards you and make a few light cuts to cut right through the veneer.
If the panel is large, to cover it you have to glue together several pieces of veneer (“pick up a shirt”). To do this, lay the veneer strips face down on a workbench, align and join the cut edges. Make sure that the texture pattern at the junction of the stripes looks the way you want. Then place pieces of masking tape across the joint to temporarily hold the veneer strips together (Photo C).
Turn the shirt over and place a long strip of tape along the seam line on the front side (photo D ).
Apply short strips of masking tape across the joint at intervals of about 10cm to ensure the veneer sheets fit together as tightly as possible.
With the sheets together on the back side, apply a long strip of tape along the seam to the front side (which will be visible on the finished panel).
This will prevent excess glue from squeezing out onto the front side through the seam, and you will spend less time removing it after you remove the panel from the vacuum bag. Turn the veneer over again and remove the short pieces of tape. Quick tip! The strips of tape should not overlap each other, and there should be no wrinkles or folds on them, so that during pressing, dents do not appear on the veneer.
Don't forget the other side
Because the adhesive dries first at the edges of the panel and then in the middle, the difference between the dry edges and the wet middle creates stresses that can arch even a 19mm base. By gluing veneer to both sides of the panel, the stresses will be balanced and the panel will remain flat. Matt says: “The veneer for the back doesn't have to be anything special, and you can use any inexpensive grade of veneer. But it must be glued to the base at the same time as the face veneer, using the same glue.”
Let's start pressing
Orient the veneer shirts as they should be placed on the base. Protect the sides of the pressure plates that will be in contact with the veneer with wax paper, securing its edges with tape. Apply glue to the back of the base (not the veneer!) as shown in Photo E. (If you smear the veneer, it will curl up and be difficult to straighten.) Excess glue from the base can be easily and quickly removed with a putty knife.
To quickly and evenly apply the glue, Matt uses a rubber roller. Having poured the glue from the bottle, he rolls it with a roller over the entire base, leaving no dry spots.
Place veneer on the back side and level it. Its edges may begin to curl into a tube from moisture that is absorbed from the glue. Matt secures these edges with short strips of masking tape. Then flip the panel over, placing it back on the pressure plate, and glue the veneer to the front side. Place a pressure plate with cuts on top of the panel and place the entire “sandwich” in a vacuum bag (photo F ). After straightening out all the folds on the bag, fold the edge, put on the clasp and turn on the pump. “I haven’t seen a bag that’s completely sealed yet,” says Matt, “so keep an eye on the pressure and don’t turn off the pump until the glue dries.” After about an hour, turn off the pump and remove the contents from the bag. Carefully remove the masking tape so that it does not stick to the veneer due to the excess adhesive squeezed out (photo G). Place the panel and pressure plates back into the bag, turn on the pump and leave the glue under pressure for another three hours.
Read also: Set for unscrewing broken bolts
Place the pressure plates with the panel and veneer in a bag. To effectively remove air, the fitting with the valve must be located at the intersection of two cuts (photo insert).
The glue has barely set, so be careful not to pull the veneer away from the base. Pull the tape away from the joint to avoid tearing out individual fibers.
Processing the panel after the press
When the glue has dried, trim one edge with a sharp chisel or knife (photo H). Then saw the panel to final dimensions (Photo I).
Lightly cut away the exposed veneer on both sides of the panel to create a smooth edge to fit the rip fence of the machine.
To reduce chipping on the ends and edges of the panel, apply masking tape along the cutting line to support the veneer fibers when sawing.
Almost invisible repair
Do not despair if an edge or corner of the veneer breaks off when trimming overhangs or filing a panel. “It happens,” Matt says, “but repairs are a lot easier than you think.”
First of all, from the remaining veneer, select a piece whose color and texture pattern matches the damaged area. The greater the similarity, the less noticeable the patch will be. Cut the patch slightly larger so that the edge is parallel to the grain or at an angle (Photo J ). A joint perpendicular to the grain is difficult to make invisible.
Place the patch on the damaged area and run the corner of a chisel along its edge, cutting into the veneer. Then, starting from the edge of the panel, remove the veneer up to the score line (photo K). Reapply the patch and secure it temporarily with tape. A small piece of tape will allow you to see the joint and make sure the fiber pattern matches. If you are happy with the appearance, lift the patch, apply glue (photo L) and press the patch again (photo M), leaving the clamp in place for at least two hours. After sanding, the repair site will not be easy to locate (photo N).
Cut the patch slightly larger and sand or file a straight edge at an angle to the grain to make the joint less noticeable. Determine the exact position of the patch.
Using a sharp chisel, deepen the cut to completely cut through the glued veneer. Then carefully remove the damaged veneer.
Once the patch has been accurately aligned, place a strip of masking tape across the joint. Lift the patch, apply glue to the backing, then apply the clamp.
A clamp made from a piece of MDF board distributes pressure evenly and the patch does not move. The wax paper will prevent the trim from sticking to the veneer.
Thanks to the careful selection of the grain pattern and the perfect line of junction of both parts, the patch is difficult to detect.
The vacuum press is a unit that allows you to produce various furniture facades with PVC film based on MDF, as well as decorative door trims. You can buy it in a specialized store or make it yourself at home. It is necessary to remember that if you decide to make such equipment with your own hands, you will need to try very hard, observing all safety rules.
Presses for gluing timber
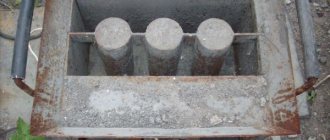
More serious equipment for gluing wooden blanks is a press for gluing timber.
These units are used for cold gluing of boards in order to obtain lumber products of a given size. In width and length, they are widely used in the production of doors, windows and other glued building elements of various sections in furniture and carpentry enterprises of medium and large production.
Presses for gluing timber are a rigid metal frame structure on which pressure cylinders are installed. Optionally, front clamps with pneumatic or manual control, as well as a monitoring and control panel can be installed. The steel structure of the presses is made with a good margin of safety, which makes it possible to achieve a maximum specific pressing force of up to 14-16 kg/cm2, which is required when gluing hard wood.
When choosing a press for gluing timber, you need to take into account the following parameters: - maximum dimensions of the resulting workpiece; — type of pressing force (pneumatic or hydraulic).
Presses for gluing timber can be: - with 1 working zone; — with 2 working zones; — for the production of large-section building structures.
In general, these devices are distinguished by their robust design, maximum ease of use and high performance, which is why the demand for them is constantly increasing.
Market leaders: Hydraulic timber presses SL250-3G, SL250-6G, SL250-9G, SL250-12G. Price: 520,000 – 1,485,000 rubles.
Purpose and principle of operation
Furniture facades are very widely used for the manufacture of furniture due to the following characteristics:
- large selection of colors;
- variety of forms;
- quite low price.
These facades are usually made using special equipment and the main tool is a vacuum press. It is capable of placing PVC film on the surface of a workpiece, which consists of MDF.
The press consists of several elements:
- Vacuum chamber and table.
- Thermal module.
Typically the chamber has a rectangular shape and is made of a rigid material that will not be able to shrink under the artificially created negative pressure that occurs inside. A PVC film is laid on the outside, which is sealed around the edges using a frame.
The film shrinking process consists of several stages:
- Laying the workpiece on the table.
- Sealing.
- Warming up the film.
- Pumping out air.
- Cooling.
- Cutting blanks and removing excess film.
Design features
The vacuum press for furniture facades and other elements of its design consists of the following elements:
- a vacuum table on the surface of which furniture pieces are laid (the surface of such a table must have high rigidity, so it is sheathed with sheet metal or thick tin);
- a vacuum pump, the task of which is to pump out air from under the surface of the film for furniture blanks;
- a clamping frame, which is also made of durable metal (the function of such a frame, equipped with reliable clamping elements, is to ensure the tightness of the air cavity under the film that covers the furniture blanks);
- heating installation, which can be made on the basis of working elements of various types;
- cover of a vacuum press, which can be hinged or roll-type.
Basic elements of a vacuum press
Most models of vacuum presses are additionally equipped with one or more shafts installed at the end of the equipment. Such shafts, which make working on a vacuum press more convenient and reduce the time required to complete technological operations, are used to install rolls of film used for coating.
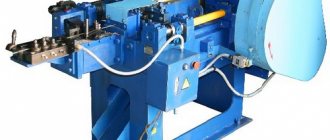
Many modern models of vacuum presses for MDF and chipboard can operate in automatic mode, which is ensured by CNC systems installed on such equipment. The use of CNC vacuum presses is especially relevant for enterprises that produce furniture in series, when such equipment has to be used to cover many similar parts with film or veneer. In such cases, CNC systems installed on such equipment make it possible to increase its productivity and, accordingly, reduce the cost of manufactured products.
Industrial CNC membrane vacuum press with heated top and bottom platen
DIY vacuum installation
Before you start your own vacuum veneer press, you need to remember some instructions:
- When 5 years have passed after installation, the device should be repaired or a new one made.
- All faults should be corrected only within a certain period.
- The device is manufactured with manual control only.
- For work, they use materials that are common and accessible to everyone.
- You should not try to create some beautiful design of the structure; functionality is important here.
- Convenience and speed of operation should be at the level of the factory analogue.
If you approach the issue of purchasing component materials correctly, the cost of a press that you assemble yourself will be significantly lower than the version manufactured at the factory.
Making a bed with your own hands
Before starting to manufacture the bed, it is necessary to select the correct type of heating unit, since this will affect not only the design, but also some elements of the press. When assembling it yourself, you should choose a retractable thermal module that will be easy to assemble and convenient to use. But the downside is the very large size.
To make a bed, you need to purchase some materials:
- Steel profile pipe.
- Rails for thermal module.
The design of the bed is best simulated on a computer using special 3D programs.
When working you will need the following tools:
- small one-handed angle grinder with disc diameter 115 and 125 mm;
- good welding machine;
- electric drill;
- a locksmith's kit, which includes wrenches, a hammer, a tape measure, a pencil and similar materials.
- We cut the steel profile into parts according to the cutting chart.
- We lay everything out on a flat surface in accordance with the project , level it and fix everything with clamps.
- The joints are secured by welding on all sides. If everything is done correctly, then you can immediately begin full welding without tacks.
- We get rid of the resulting slag from the seams and check the quality.
- If necessary, we use a grinder to clean and polish the products using a special grinding wheel.
- We drill holes.
- We clean the surface with a metal brush so that there is no rust on the product.
- We prime the surface very well.
- We paint using spray paint. You can also use a regular brush.
You can choose a welding machine that operates on the basis of an AC transformer, and also uses inverter-type devices or a semi-automatic mechanism.
Other Applications
In addition to gluing the surface of furniture structural elements with veneer and PVC film, a membrane vacuum press (MVP) can be successfully used to solve other problems, which, in particular, include:
- transfer of inscriptions and images to any surface using sublimation;
- formation of volumetric parts for various purposes from plastic sheets.
To transfer images from special paper to almost any (including embossed) surfaces using the sublimation method, equipment such as a thermal vacuum press is used. Using a thermal vacuum membrane press, you can apply inscriptions and images to products made from ceramics, plastic, textiles and other materials.
Tabletop membrane-vacuum press
The principle on which a membrane vacuum heat press works is as follows.
- The product with a sheet of paper attached to it, from which an inscription or image needs to be transferred, is placed on the table of a vacuum press.
- The tight pressure of a sheet of paper with an image or inscription on the product is ensured by the press membrane, under which a vacuum is created.
- Under the press lid, after it is closed, a temperature is created, under the influence of which the image or inscription from the paper is transferred to the surface of the product.
Vacuum heat presses, presented on the modern market with a wide variety of models, are actively used by both large printing enterprises and small companies engaged in the production of souvenirs.
Vacuum press for plastic molding
A vacuum molding press is used to produce relief-shaped products from sheet plastic. Using such a molding machine, which operates on the principle of a membrane-vacuum press, three-dimensional products can be made from flat plastic sheets, the depth of depressions or convexities on the surface of which reaches up to 500 mm. The housings of vacuum presses of this type, as a rule, are designed for fairly large products, which makes it possible to produce a wide range of products using such equipment.
Modern models of vacuum molding presses, equipped with CNC systems, have the option of simultaneously heating different areas of the workpiece to different temperatures. This makes it possible to produce volumetric products with rather complex relief from sheet plastic. The entire processing process on such equipment is controlled and controlled by a CNC system. Thus, do-it-yourself vacuum forming is not performed when using this equipment; the machine operator only sets the program, and the machine does the rest.
Homemade vacuum table
Making a table is a very important stage when assembling a vacuum press with your own hands. At the project stage, it is worth determining the dimensions and all the materials from which it will be created. You should also consider a way to fix and seal the connector elements in order to maintain the integrity of the internal vacuum. A do-it-yourself molding machine is made with the same tools that were used to build the bed.
Read also: Homemade iron wheels on a walk-behind tractor
A vacuum table is a structure that includes some elements:
Vacuum bath
Before you begin assembly, you must accurately calculate all the dimensions of the bathtub. Remember that the longer it is, the more workpieces can be placed , but at the same time you will have to consume more films per working cycle. Practice shows that the optimal length is approximately two and a half meters.
The width of the structure will depend on the chosen PVC film - the width of the film determines the width of the bathroom. Typically, manufacturers produce film 1.4 m wide. When choosing a height, you should take into account the presence of some space between the film and the upper part of the facade.
A steel sheet with a thickness of 2 millimeters is usually used as the bottom, and a regular profile pipe is suitable for the frame. We lay the cut pipe, fix it with clamps and weld the joints. A steel sheet needs to be welded on top of the frame to give greater rigidity to the structure.
Clamp frame and clamps
We use a profile pipe, the dimensions must correspond to the parameters of the bathroom. To keep the clamping frame raised, we use 4 gas lifts capable of supporting the weight.
The clamps are manufactured to provide a good sealed film hold. To do this, the upper part of the frame is pressed tightly and evenly against the bathtub. The clamps are eccentrics; you can make them yourself from steel. To install, you need to drill 8 points in the table. The upper ones should be enlarged and have an oblong shape. Next, they should be adjusted by installing nuts in the threads of the stud, after which everything is fixed with locknuts.
If the table is not made perfectly, then you will have to cut off the welds with a grinder. To ensure evenness, you can treat the table with epoxy.
Polyurethane vacuum bags
This type of vacuum press bag is more expensive than PVC products. On the other hand, such models are more durable and are suitable for angular shapes due to their higher elasticity. Thanks to this, products of this type are suitable for use in fairly complex production processes. Polyurethane practically does not age and can withstand repeated use.
The thickness of the polyurethane bag material is 0.8 mm. This is sufficient for use in both cold and hot pressing. The products have a fairly dense structure and low residual deformation. Polyurethane can stretch five times and at the same time it does not change its performance characteristics. Changes in the structure of the material occur only under conditions of temperature conditions above 120 degrees. This is a universal option that is of high quality at a relatively affordable price.
PVC bags
Vacuum system installation
Manufactured so that air can be pumped out. Thus, the film easily cover the surface of the workpiece. There are some points to consider when installing:
- System components should not be custom-made; it is desirable that they can be purchased at retail.
- It is best to select inexpensive components that have good reliability and ease of use.
- The system must provide an air pumping speed and vacuum depth that will be sufficient to create typical flat facades and overlays.
- The air outlet should not be dependent on the environment and the quality of the power supply.
- The control functions should be simple and always inform about the pressure that the device provides, and they can also be used to regulate the speed of pumping out air.
The system must consist of several elements:
- liquid ring vacuum pump with water tank;
- pipeline for delivering air to the pump;
- tap and device to control pressure;
- the tabletop must pump out air from any point on the table, regardless of the position of the film and the workpiece.
Operating principle of a liquid ring pump
The impeller rotates in the direction of the arrow. Between the wheel hub, housing and water ring there is a working cavity, which is divided into cells by the wheel blades. When the pump operates, water is thrown away from the housing sleeve due to centrifugal force, and the volume of the cell increases and air begins to be sucked in. This volume will then decrease , and the gas will exit through the discharge window when clamped.
Only clean water must flow through the pump. This is necessary for heat removal to occur. Water is supplied to the central hole in the housing and discharged through a device that will separate the gas from the water. This can prevent liquid from leaving the pipe along with air.
The pump is placed on a special foundation or concrete floor, where it is leveled using a level, and then secured using anchors in a standard hole. Nearby you need to place a water tank with a volume of 30 liters or more. Several tubes are connected to it. The first is needed to collect water, the second is to drain the waste liquid into the tank.
When circulating, the water will heat up, and this will negatively affect the pump. To ensure natural cooling, the tank is made of a material that conducts heat well. It can be aluminum or steel.
The pipe that supplies water to the pump must be equipped with a special tap that shuts off the water when not in use. The pump and tank are connected using a flexible hose, and everything is secured with metal clamps.
When the pipeline is completely assembled and secured, the installation can be tested. We provide power to the pump according to a temporary circuit using a circuit breaker. But it is still advisable to carry out this at the moment when the electrics are completely installed.
Features of the use and selection of industrial vacuum bags
Industrial models that are used in the pressing process are distinguished by two side holes. This makes it much easier to process large workpieces. High-quality compression bags are versatile products. This means that the same model can be used for different types of products. Also, products must withstand certain processing temperatures, mechanical, and sometimes physical stresses exerted during the pressing process. If we are talking about industrial production, then an important fact is the ease of maintenance of products and their durability.
It is worth paying attention to resistance to tearing. There are package models that are sold separately, but there are also products that come complete with a matching pump.
Features of the use and selection of industrial vacuum bags
Also, when choosing products, it is necessary to take into account what operating mode the vacuum bag is intended for. Based on this, several types of models are produced:
- For auto mode. This suggests that these products are intended for fully automatic vacuum presses, when the unit is automatically turned on and off when the required vacuum level is created;
- For auto/manual mode. This option is suitable for the semi-automatic operating principle of the unit. This means that part of the processing is done electronically, but another part of the process is controlled by the operator himself. In this case, more universal bags are used that do not lose their characteristics at minimum pressure and in the case of creating an increased vacuum environment.