Which motor should I get?
It is more convenient to work with old washing machines - Oka and Fairy are ideal.
Top-loading barrel-shaped models with a bottom-mounted motor are easy to transport. Expert opinion
Vladislav Ponomarev
Design engineer, inventor
A suitable motor has the following characteristics - power 180 W, engine speed 1350-1420 rpm.
Fairy models have a centrifuge, so the motor makes more revolutions, up to 2850 per minute, but the power is lower. The body is plastic and fragile. From Fairy models they take only the engine, the tank is made from an empty iron barrel, and knives are purchased additionally.
How to make a barrel sauna with your own hands, detailed instructions and drawings
The advantages of having a unit are obvious - the ability to process any volume of grass in a short time. A grass cutter is needed not only by gardeners, but also by owners of subsidiary farms - ground green raw materials are added to food for livestock and poultry.
Preparation stages
The main point is the choice of engine. Minimum power 180 W. If you have an old washing machine at home with a 1.5 kW motor, a ready-made grass cutter can cope with branches up to 2 cm thick. This motor is enough for cutting greenery with a large margin.
Knives are selected depending on the size of the cut. For example, disc blades cut greens and branches. This is convenient if you need to clear the area not only of weeds, but also of young maple, raspberry, etc.
Cleaning the washing machine and filter from dirt and scale: a review of products and methods
Homemade options
To make a grass cutter with your own hands at home, you do not need to have engineering knowledge. In terms of its characteristics, the finished tool will be in no way inferior to factory analogues, and will be more convenient and economical to operate.
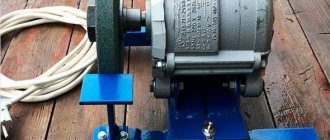
Grass cutter from a grinder
Today, almost everyone on the farm has a power tool like a grinder. This is an ideal option for making a manual herb grinder. In addition to the grinder, you will need the following tools and parts:
- hammer;
- screwdriver;
- engine;
- steel brackets, bolts and nuts;
- shaft;
- frame;
- cutting discs or blades;
- pulleys;
- net;
- container for chopped grass.
The frame is the base of the grass chopping unit. The remaining elements of the product are firmly fixed on it: the electric motor from the grinder, the shaft, the container for raw materials. During operation, the engine will transmit torque to the shaft, directly to which the cutting discs or knives are attached. Shredding of vegetation is carried out in a wooden or iron box mounted on a frame. Its bottom is a mesh through which the chopped grass will fall into a separate container located under it.
Drill herbal grinder
You can make a good tool with your own hands according to the drawings of a grass cutter from an angle grinder. Grinding raw materials with such a device resembles the operation of a household food processor. Operating principle: A standard cylindrical bucket is used as the body of the device, which houses a sharp knife. As a result of the rotation of the knife in a circle at high speed, raw materials are cut.
To operate the grass cutter, an electric motor from a drill with a power of 850 W is used. The knife is made from hacksaw blade
It is important to sharpen the blade correctly so that vegetation does not wrap around it during rotation. The knife should always remain free of grass and clean
One-sided sharpening of its lower plane is performed.
From a washing machine and vacuum cleaner
There is another unique option for making an automatic tool with your own hands for cutting grass using a washing machine and a vacuum cleaner. To do this you will need the following spare parts and tools:
- Vacuum cleaner housing.
- Washing machine electric motor.
- Strong sheet iron for making a cutting knife.
- Two plastic containers for the bunker and grass catcher.
- Metal corners.
- Screws and nuts, other fasteners.
- Electric welding.
- Drill and grinder.
Step-by-step instructions for making the tool:
Preparing the body. According to the diagram, the body is taken from a vacuum cleaner, at the bottom of which a 70x70 cm hole is made to dump crushed raw materials. Electric motor installation. The unit is installed on the bottom of the product body with the shaft up. The motor itself is taken from a washing machine. The knife is cut from sheet iron using a grinder. Its edges are raised slightly upward. Bunker and grass catcher. These two containers are made from plastic buckets
They are lightweight and the material does not rust, which is very important in this case. A bag is placed on top of the catcher for the finished chopped greens so that they do not fly away in different directions during the cutting process. Tool frame
This is an important structural element on which all other parts are fixed. For its manufacture, strong metal corners are used, which are connected to each other using a welding machine.
Design Features
A grass cutter is a special device for chopping grass, which is indispensable in a farmstead.
Once grass clippings are processed, they can be used as soil fertilizer, insulation material in winter, or pet food.
This tool can finely chop a large volume of weeds or grass clippings in just a few seconds. This is a significant saving of time and effort for the owner of a personal plot.
The design of a standard manual grass cutter includes the following parts:
- steel frame;
- electric motor;
- cutting knives;
- working shaft;
- pulley;
- belt;
- container for receiving grass;
- protective casing;
- cable.
Homemade garden grass cutters are compact in size and light in weight, which makes them much easier to use.
At the same time, they have good performance. The unit can be equipped with both a gasoline and an electric motor:
- A gasoline engine is a more powerful device that allows you to chop branches of bushes. Its main advantage is the ability to operate even in areas where there is no electricity. Disadvantages: heavy weight, noisy operation.
- The electric motor is not as powerful as a gasoline engine, but is lighter and more convenient to use. This device is started with one turn of the toggle switch. Its main disadvantages are its dependence on the power grid and the limitation on the thickness of the stems of the processed vegetation.
Grass cutter with electric motor
A DIY electric grass cutter is a useful tool for your own garden plot.
With its help, it is convenient to prepare animal feed from grass and small twigs, especially from nettle, which is considered very useful for livestock.
Grass cutter from trimmer
A garden shredder can be made using a gasoline or electric trimmer. In this case, the tool will work in an upside-down position. To create equipment designed to chop grass and thin twigs, you will need, in addition to a brush cutter with cutting attachments, the following materials:
- plastic or metal container with a volume of at least 50 liters;
- approximately 1 sq.m. steel mesh with small mesh size;
- about 3 meters of metal tube (aluminum or steel) half an inch in diameter;
- a piece of board or moisture-resistant chipboard, plywood of such width that the trimmer fits on it;
- clamps that will attach the brush cutter to the wooden base;
- self-tapping screws, bolts, nuts, washers;
- wooden blocks (5 by 5 cm is enough).
To assemble a chopping mechanism from a trimmer, you will need to use the following tools and devices:
- a screwdriver or screwdriver with bits;
- electric drill with a set of drills for wood and metal;
- an electric jigsaw with files for cutting metal or a manual equivalent;
- hammer;
- open-end or socket wrenches;
- punch;
- an anvil or a flat iron plate.
A punch is needed to make it convenient to drill holes with an electric drill. This tool is pointed at the point where the metal needs to be drilled. Then it is hit with a hammer. The drill does not slip out of the resulting recess when drilling a metal part.
Hole punch set
Preparatory activities
A grass cutter from a brush cutter is manufactured in a number of stages. Initially, they are prepared in a container where the grass and branches will be ground:
- make markings on the bottom (along the perimeter) for four trapezoidal holes with rounded corners;
- drill holes with a cross section of 1 cm in each drawn segment;
- a jigsaw file is inserted into them and trapezoids are cut out;
- process the cuts with a file or sandpaper;
- a hole is drilled in the center of the bottom for the chopper shaft;
- a circle is cut out of steel mesh with dimensions according to the diameter of the bottom;
- using small scraps of boards or blocks, the prepared mesh fragment is secured to the container from below;
- Legs for the container are made from metal tubes, attaching them to the tank with bolts.
The wooden pieces are fixed with self-tapping screws, twisting them from the inside of the tank into metal jumpers between the cut trapezoids. In this way, the mesh is securely attached to the bottom of the container.
The legs are made in the following way:
- bend the tubes in a vice or using a pipe bender in the shape of the letter “P”;
- the ends of future supports are flattened with a hammer;
- 2 holes are drilled into them on each side (6.5 or 8.5 mm cross-section);
- fit the workpieces to the bottom of the container and mark the points of bolted connections;
- drill according to the hole mark;
- using bolts with washers and nuts, attach to the footrest casing.
After preparing the casing, in order to reduce the dimensions of the created mechanism, the following operations are performed:
- disassemble the trimmer, disconnecting the motor, rod and cutting attachment from each other;
- cut off a fragment approximately 20-40 centimeters long from the rod with the cable;
- collect the lawn mower;
- check the performance of the equipment.
Chopper assembly
If the trimmer works well after assembly, then it is used to create a grass grinder.
- The motor of the brush cutter is attached to the board with clamps.
- Fix the bar on a wooden base using clamps and a handle from a brush cutter.
- Connect the cutting attachment to the end of the rod, previously inserted into the hole at the bottom of the casing.
- They start the mechanism and test it in operation.
After these steps, you will get a unit, the photograph of which is presented below.
If the trimmer used to assemble the shredder is equipped with a gasoline engine, then the motor is placed on the base so that it is convenient to fill in fuel, start the device and regulate its operation (speed).
Corn stalk chopper: making your own device
To produce a corn stalk mill, you will need an electric motor with one or three phases, and its power must be at least 500 W. Below in the table we will look at how to assemble such a structure.
| Illustration | Description of action |
| We will prepare all the necessary tools and components, which we discussed in detail above. | |
| We install the engine on the supports. | |
| We attach it to the metal body using bolts, as shown in the photo, with a pre-cut hole. | |
| We place a bushing with a thread for a screw with a diameter of 70 mm. Please note that two metal beads must be welded to the bushing. The distance from the center to the edges of the metal case should be 320 mm. | |
| We take a prepared knife plate 300 mm long with a sharpening side of 120 mm. Install on the bushing. The welded glazing beads must exactly match the holes located on the knife. We fix the knife with a bolt to the thread of the sleeve. | |
| We scroll the plate manually and make sure that the edge of the knife does not touch the body. This is how the cutting element in the chopper should be installed. | |
| Close the lid and secure it. Don't forget about the cut out window for feeding the stems. Its parameters are described in the photo. We weld a plate to the bottom of the resulting window on which the stems will be laid out for processing. The gap between this plate and the area of its contact with the working knife should be no more than 1 mm. |
Approach the invention of the device responsibly, otherwise, instead of the desired result, you will get a bunch of torn, rather than finely chopped, grass.
Safety precautions when working with a chopper and during its manufacture
Since the design of the garden shredder includes piercing and cutting elements driven by a powerful engine, in order to avoid injuries you should follow the safety rules when working with it:
- Before starting work, it is necessary to protect your face, eyes and head from wood chips, which can fly in different directions during the grinding process. This point is especially relevant when processing large branches. To do this, it is recommended to wear special safety glasses, a hat and a mask. You also need to select protective gloves that are sized so that they do not fall off your hands while loading raw materials.
- The garden shredder must be installed on a flat surface to avoid it being thrown over during the working process. It is strictly forbidden to operate electric grass cutters in rainy or windy weather.
- You can push and straighten the branches located in the funnel of the device only with a special pusher, but not with your hands.
- Breaking branches should be of the recommended thickness, which will help avoid equipment breakdown.
- Before loading the grass into the grinder, it is recommended to first sort it out, removing foreign objects from it (stones, metal, glass, plastic, etc.).
- It is recommended to use only fresh branches for crushing. To avoid short circuits, do not use units with a damaged wire or socket, or allow moisture to come into contact with the cable. When refueling a petrol shredder, do not use an open fire near it, or smoke.
- Before cleaning the device, you must wait until all units have completely stopped and disconnect the chopper from the power supply.
A garden shredder is an indispensable and useful thing for gardeners and farmers, which can be easily purchased at markets or made with your own hands. The main thing is to follow safety precautions and properly maintain the unit.
https://naogorode.net/izmelchitel-travy-svoimi-rukami/ https://sotka.guru/dachnye-prisposobleniya/izmelchiteli/samodelnyy-izmelchitel-travy-iz-stiralnoy-mashiny.html https://7ogorod.ru /prochee/izmelcitel-travy.html
Apparatus from a household cultivator
The device, made on the basis of a drive from a cultivator, is similar in design to a crusher made from a drill. The device has increased productivity and allows you to simultaneously process a significant amount of grass. In the process of assembling the grass cutter, the following is used:
- Cultivator drive;
- Knife made of hacksaw blade;
- Bushing for attaching the knife;
- Self-tapping screws;
- Capacity;
- Tabletop;
- Frame for tabletop.
After securing the drive to the table top with a hole for the motor, using self-tapping screws and staples, you need to fix the mechanism casing to the block. A funnel from a drain can be used as a socket; the entire assembled structure is installed and secured on the table. To prevent the tabletop with the device from slipping due to vibration, it is recommended to install limiters.
We make a motorbike
Home craftsmen managed to make a more practical vehicle out of an ordinary bicycle - they replaced it with an engine from a lawn mower. At the same time, options with both a gasoline engine and an electric motor are practically implemented.
Required tools, materials and parts
The electric motor for a bicycle is powered by a battery, which, depending on the power of the unit (it is taken 0.35-1.2 kW), lasts from 30 minutes to 2 hours.
To convert a bicycle, two- or four-stroke gasoline engines are used. The latter option consumes less fuel and is less noisy during operation. The recommended power is from 1.5 hp, and the optimal option is 2 hp. When using a motor with a lower parameter, the motorbike will barely move or will not be able to move at all.
The rotational movement from the gasoline engine to the bicycle wheel occurs through the use of a belt or chain drive. Because of this, you will additionally need to make the following details:
- a metal suspension in the form of a frame with sides to secure the motor to the bicycle frame;
- driven and driven pulleys or sprockets for attachment to the engine and wheel, respectively.
To implement the project, you will need to select a suitable gearbox. After installing the pulleys, select the belt of the desired size.
The dimensions of the frame for the engine depend on its dimensions. The suspension itself is secured to the frame of the motorbike:
- bolted connection;
- using welding.
The last option is the best in terms of strength if the welder is good. If the design of the bicycle frame allows, then the suspension is replaced with a clamp that secures the engine. This mounting option is more practical. The method of fixing the motor should be convenient, reliable and allow it to be quickly removed if necessary.
Doing all the work yourself with an old, functioning trimmer, a bicycle and a small set of tools will require time and patience from the performer.
Sequence of assembly of the structure
To independently assemble a bicycle with a gasoline engine, you will also need, in addition to the materials and parts considered, the following:
- controller;
- cable for adjusting motor operation;
- fuse;
- welded exhaust pipe;
- sleeve;
- washers;
- bolts;
- chain tensioner.
The motorbike is assembled according to the following algorithm:
- put a sprocket on the rear bicycle wheel;
- use a clamp to fix the engine (with a sprocket on the shaft) on the frame behind the seat or on the trunk, if the design features of the bicycle allow, otherwise you will need to choose another convenient place for this purpose;
- put the chain on the sprockets of the wheel and motor;
- attach the tensioner;
- adjust chain tension;
- fix the throttle;
- stretch a cable from it to the engine;
- secure the fuel tank;
- install the carburetor.
For the purpose of personal safety when operating a motorbike, the braking system is modernized, the wheel tires are replaced with non-slip products, and the integrity and stability in motion of the created structure is checked. After the entire structure is assembled, it is tested, having previously been inspected for defects.
Do-it-yourself crusher for branches and wood waste for home and garden: production technology
To manufacture this unit, it is imperative to have bearings and durable metal panels with a thickness of at least 20 mm in your arsenal of tools.
Any old working engine can be used for production
- It is necessary to acquire a special engine with a power of 2.5–3.5 kW. If this indicator does not correspond to the specified range, you will not be able to split larger branches. A diesel engine can have a power of 5–6 liters. With.
- Calculate so that your crusher operates at 1500 rpm. The developing torque is of great importance.
- Pay attention to the dimensions of the drive pulley; its size should be no more than 100 mm, while the diameter of the driven pulley will be 200 m.
- Pay attention to what pulleys for agricultural shredders should look like
- Disc knives can be used as knives for crushing branches and small twigs. It is ideal to arrange them in groups on one shaft, see photo.
It is advisable to place the knives sequentially. This way they will create a more rigid cutter that can cope with crushing a whole bunch of twigs and branches
You can make knives for crushers yourself or order a part specifically for rotary propulsion devices. They meet the requirements of quality and rigidity.
How to assemble a cutting element yourself
To make a milling knife you will need:
- circular saws (10-12 pcs.). Their quantity may differ from the indicated amount, both smaller and larger. The more disks are installed, the smaller the chips will be at the output;
- threaded rod M20;
- bearings (internal Ø 20 mm);
- dense soft plastic for making spacer washers;
- washers and nuts for fastening.
- Place the disk on the pin (its diameter of 20 mm coincides with the hole of the saws).
- A washer cut out of plastic should be installed between adjacent disks. It is necessary so that the cutting edges of adjacent saws (they are wider than the blade of the blade) do not cling to one another.
- The outer disks are secured with washers and nuts. As a result, you will get a shaft with circular saw blades located on it. All that remains is to install the bar with saws on the frame using bearings, bushings and clamps.
Types of cutting attachments used
Homemade products, like factory units, are equipped with cutting attachments of various types:
- disc (with three blades);
- milling;
- milling-turbine (universal).
The first type is flat blades. When they rotate, they grind plant debris. If you have to process branches, then such blades quickly become dull. Milling knives are a cutting shaft in the form of gears from circular saws. They grind dry waste from branches and grass well, and clog the cutters with wet waste. Milling-turbine cutting attachments can cope with thick and undried branches, but making them yourself is difficult.
At home, knives from lawn mowers or made from wood saws are often used.
It should be taken into account that the degree of processing of plant waste directly depends on the installed cutting attachments. The output is pieces of branches from 10 cm long or shavings or dust.
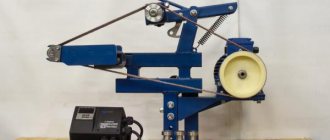
How to build a herb grinder from an old washing machine
Using a grass and twig shredder when cleaning your garden allows you to profitably use green waste. After processing in a device that some call a grass cutter, the greens will turn into organic fertilizer in a compost pit better and of higher quality. The shredder is sold in gardening equipment stores, but it is quite possible to assemble it yourself. Products based on a washing machine tank have proven themselves well.
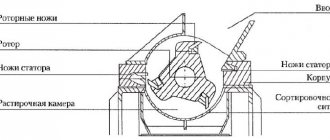
Design and principle of operation of a grass chopper
To dispose of grass and thin twigs from a small area, gardeners usually use a cutting tool. But manual labor is not effective for processing large quantities of green waste. An unnecessary or non-working washing machine will do well as the basis for a common model of a homemade shredder. It will work on the principle of a food processor. Key nodes:
- shaft with radially fixed knives;
- engine;
- receiving tank;
- container for collecting processed mass;
- frame.
The shredder model involves using a metal tank from a Soviet-style washing machine as a receiving container. For example, from Oka or Fairy. The grass will be loaded into this container and ground in it with a knife. The body of a Typhoon vacuum cleaner can also become a tank.
How the device works
Essentially, a grass cutter is a large blender equipped with knives. The chopper is constructed from a motor, connecting wiring, a container for grass and collecting raw materials, a shaft, knives and a frame.
The popular bookmaker has released a mobile application for Android, you can follow the link absolutely free.
In order not to carry the grass to the machine, but to work “on the spot,” the grass cutter is placed on wheels.
Operating principle: the engine transmits rotation to a shaft with knives that chop the grass. The raw materials are transported to a container for chopped greens, from where the mass is removed into compost pits.
Assembling the body
Let's start making a grass cutter with our own hands from the top container into which the grass is thrown. And in which it will be crushed. To do this, the body of the washing machine needs to be cut in height, thereby making it more convenient. At the bottom side of the body we make a rectangular hole measuring approximately 20x7 cm so that the knives are located slightly above the hole, or at least level with it.
Around the hole you need to make a casing from a metal plate. The cover will prevent grass from flying in all directions. The casing can be secured with bolts. Next, we will make a stand from a metal corner by welding. Its height will depend on what you will be placing under the silo. If it’s a basin, then you can get by with a low stand; if it’s a bucket, then it should be higher.
As for the engine, you first need to make two holes with a diameter of about 7 mm on its shaft using a drill. Then a bushing, also with holes and a thread at the end, is placed on the shaft and secured to the bolts with your own hands.
Now you need to secure the engine to the bottom of the tank using studs. Then put the knives cut and sharpened in a special way onto the shaft and carefully secure them with nuts, for example, 32 mm water nuts. Knives should not touch the walls of the container.
Next, the container together with the engine is rigidly fixed to the stand by welding. The design must be reliable. The stand for the wood and grass shredder can be covered with a metal sheet, but first connect the starter mechanism and electrical wire to the motor.
Tools and materials for making grass cutters
The master will need:
- grinder or angle grinder;
- drill with a set of drills;
- welding machine;
- winding testing device;
- Screwdriver Set;
- hammer;
- bolts with nuts and washers;
- a set of open-end wrenches or pliers;
- washing machine tank;
- motor with a power of 180 W;
- knives;
- electrical cable and plug;
- container for collecting cut raw materials;
- metal sheet for the casing;
- metal corners;
- control buttons (on/off).
When performing work, the master will not be hindered by personal protective equipment.
The nuances of operating homemade equipment
A self-made shredder is essentially three in one: a chopper for branches, a straw cutter, and a mechanism for cutting grass. It helps to significantly facilitate household work associated with the disposal of plant waste, as well as feeding poultry and livestock.
For homemade electrical equipment, it is recommended to install a separate differential circuit breaker to provide reliable protection against electric shock in case of unforeseen circumstances. In any case, when making a garden shredder yourself, you must follow safety regulations. It is also worth adhering to them during operation of the mechanism. Before working with equipment, it is recommended to wear goggles, suitable protective clothing and check that the structural elements are securely fastened. When creating a home-made unit, you should take into account the upcoming amount of work, as well as the nature of the vegetation being processed, in order to select an engine of the required power and the desired design of knives. This will allow the completed device to cope with the assigned tasks without any problems.
What else can a chopper be made from?
There are many different options for creating garden shredders with your own hands: from the simplest ones, which only allow you to grind grass, to more structurally complex, powerful units designed for wood up to 10 cm thick.
Accordingly, the practical implementation of the plan will require different details, different amounts of time and money. To assemble equipment for processing plant waste, in addition to the considered options for old or unnecessary tools or equipment, you can use the following devices:
- drill or hammer drill;
- an old working vacuum cleaner;
- unnecessary electric saw;
- motor from the pump;
- gasoline or electric walk-behind tractor;
- any electric motor of suitable power.
A drill with a hammer drill, if you use them to chop grass, you don’t need to redo it at all. It is enough to make only a nozzle with blades. The created device will work like a blender, grinding soft plant stems into a container in small portions.
Types of Shredders
There are different types of feed for livestock and poultry, succulent types of feed, grain and grass varieties. Each design implies manufacturing for convenient use and the production of a high-quality product.
Homemade grain grinder
The variety of designs makes it possible to use the device in various fields. We produce manual feed cutters with a track mechanism, straw cutters, as well as hand mills. Do-it-yourself mechanized feed cutters are, in most cases, equipped with electric motors for maximum productivity in household or industrial settings. There are universal devices that can grind various types of feed by replacing the cutting element.
Juicy feed chopper
Juicy feed is crushed using a grater with large notches. When the process requires mechanization, an electric motor is used, to which a bucket and grater are attached. The feed cutter is manufactured in accordance with a pre-prepared drawing, the bucket is reinforced by welded strips at the edging, with a width of 1 cm. Holes for the buddy are made across the entire area of the bucket in the desired order.
Homemade vegetable cutter
To make the frame, a small table is used, which is installed a few centimeters below the rear part. Filling with food uses a homemade box, which is installed at an angle of up to 40⁰ relative to the main container. At the very bottom there is a tray for collecting finished products. The low-speed engine drives the chopper, which is located as close to the walls as possible for better grinding.
Cereal grinder
Grain crops are processed using a universal type of feed cutter. The main difference is the use of a different type of cutting element and engine speed. The presence of a mesh in the design allows you to regulate the degree of grinding of grain crops; the throughput is controlled by opening the door. For a reliable slave, a single-phase two-speed motor with a maximum speed of up to 3000 per minute is used.
The size of the finished raw material can be adjusted with your own hands by installing different types of sieves. Ground grain or other materials may be passed through the machine several times to achieve the desired result.
Grass chopper
The design features do not differ from the above examples, however, special parameters are observed. The container for the shredder is selected with your own hands depending on the volume of work; the shape must correspond to the cylinder. A rectangular hole is made in the lower part, adapted for the ejection of finished products through a box fastened with rivets.
DIY stem cutter
The power of the feed cutter engine is selected depending on the selected container, the main criterion is the number of revolutions, it should be maintained at 3 thousand/min. The cutting element is made from available stainless steel products.
Feed cutter grater
The most common method of processing raw materials in the household is a feed cutter from a grater. A homemade feed cutter of this kind allows you to produce ready-made feed for a small household. Making a structure with your own hands is not difficult; drawings may not be needed at all. Some basic elements for making the case:
- Stainless steel sheet, a 30x50 piece will do.
- Plate connecting elements.
- The lever with which the rotation will occur.
- Table top for mounting.
Feed cutter-grater
Making a manual feed cutter with your own hands is quite easy; you need to follow the correct sequence of steps. The lid holes are cut to the required diameter for high-quality cutting. The manufacturing process will not take much time if you have the accompanying materials and tools.
Types of engines, pros and cons
Shredders come complete with either an internal combustion engine or an electric motor. Both options have their own operating nuances, advantages and disadvantages. Let's look at this issue.
Electric motor
More often used for oversized units for home use, whose power does not exceed 2.6 kW. For a dacha or a compact garden not exceeding 6-7 acres in area, this is a completely acceptable option that will cope with the task assigned to it in eliminating plant waste.
The undeniable advantage of such devices is their lightness: it will not be difficult to move the unit around the site and power it from the mains. In addition, electrical devices are easy to operate and do not require special skills. Maintenance is also reduced to a minimum. But in the conditions of large farms or greenhouses, a shredder with an electric drive will no longer be functional.
In addition, the device is dependent on the power supply, which becomes somewhat problematic when working in large areas - you will need an extension cord, and this will limit the user’s freedom of action. Along with this, there are weather restrictions when working with an electric shredder due to the danger of electric shock: the unit cannot be operated in rain or high humidity.
Chopper with petrol engine
This is the most rational choice for “field” conditions, when there is no possibility of power supply from the mains, and the amount of work significantly exceeds the standard six hundred square meters of the average dacha.
Devices equipped with a gasoline power unit attract attention with their autonomy and unpretentiousness. Most often, a two-stroke motor is installed on a device of this type, which is distinguished by its reliability, durability and increased power.
Most often, a two-stroke motor is installed on a device of this type, which is distinguished by its reliability, durability and increased power.
So processing tons of grass from the field will no longer be the limit of fantasy, but a very real task that your shredder will be able to do.
But the disadvantages include the fact that when working with a gasoline shredder, you must have basic skills in its operation. In addition, you will have to regularly check the condition of air and gasoline filters, spark plugs and carry out technical work. Although, if you wish, you can learn all this quickly enough.
Diesel shredders
As a rule, diesel engines come complete with professional-level equipment. The advantage of this type of unit is its high operating power: the chopper can operate without failures or shutdowns for many hours.
In addition, a positive point is the ability of diesel units to operate at low speeds.
But, like any unit, the diesel option also has its negative sides: firstly, it is a higher price compared to the two options listed above. Secondly, diesel models are large, and therefore are extremely rarely used in households.
It is extremely difficult to transport a diesel model on your own, so this is an excellent option for large farms, but not for private use.
If you still want to purchase a diesel model because of its high performance characteristics, you can turn your attention to equipping it with a mobile unit equipped with a high-power three-phase electric motor. In this case, it will be possible to move the unit around the site, which means its use will become more rational in the conditions of private land ownership.
Grain crusher, feed cutter, grass cutter in one device - is it really possible to make it?
As they say, one chopper is good, two are even better. But this is not the limit of the dream. After all, most modern industrial models have long had this property. At home, achieving such a universal result will be more difficult, but quite possible. The basis of the design for such a homemade unit can be almost any medium-power motor or household circular saw.
It is important to remember the following:
- the quality of threshing correlates with the strength of the knives and their sharpness;
- For each type of feed, a separate knife or cutter should be installed. When working with cereals, it is better to use 2 knives rotating in the opposite direction;
- when crushing forage crops, the structure can be strengthened with graters, grain - with sieves;
- For homemade products, select only serviceable electric motors and electrical wiring.
In conclusion, I would like to note that your own safety comes first. Therefore, compliance with labor protection and electrical safety standards is an important stage in the creation of any equipment.