Sharpening a knife correctly by hand is quite difficult. It will take some time to develop the habit of maintaining a constant sharpening angle, which is not at all easy. A knife sharpening device can make the task easier. There are factory options. But for good copies you have to pay a couple of hundred dollars, and this is clearly a lot. The good news is that these devices are easy to make yourself. Moreover, many homemade knife sharpeners are no worse in functionality than those from famous manufacturers, but they are many times cheaper.
Correct sharpening of knives
There are types of knives that are impossible to sharpen yourself due to the textured blades. Also, knives made from ceramics cannot be sharpened. But, as a rule, the quality of the steel in such products is high, and they rarely become dull. There are a variety of knives of low quality, and they have to be sharpened very often. As practice shows, if the steel is of poor quality, then sharpening will solve the problem for a while, and then the blade will become dull again.
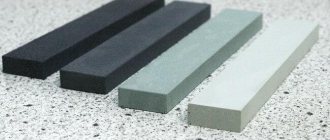
To sharpen knives you will need abrasive wheels. If it is not possible to purchase ready-made circles, you can make them yourself using wooden blocks and sandpaper of different grain sizes.
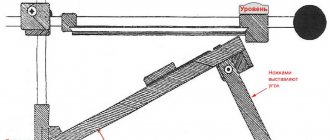
The standard sharpening angle is 20 - 30 degrees. It is quite difficult to maintain the angle during sharpening, and therefore it is necessary to make a simple knife sharpener, in which it is not necessary to maintain the optimal angle. The basic rule in this process is maintaining a precisely specified constant angle. No force required here. The main thing is that the block and blade meet at a certain angle. This is the basic rule of the sharpening technique.
Apex similar sharpening systems
The APEX EDGE PRO sharpening system was developed in the 90s of the last century, and gave rise to a whole class of sharpening devices. It is one of the best samples for professional and amateur knife sharpening.
It is a plastic frame with a pressure table, on which you can use a pressure screw and a stop to adjust the position of the knife for sharpening. In the original system, the knife must be held by hand; numerous replicas began to use powerful neodymium magnets, which makes the sharpening process more comfortable.
There is a rotating unit on the rod, to which an abrasive holder is attached. The sharpening angle varies over a wide range with high accuracy, using a protractor or an application on a smartphone. The kit usually uses high-quality abrasive stones from Boride. A set that allows you to form a cutting line from scratch and polish the leads to a mirror finish.
The only drawback of the system is the rather high cost. Which, in fact, first gave rise to numerous Chinese counterfeits, and then to a whole range of sharpening systems of varying costs and quality levels.
Basic mistakes
As it may seem at first glance, sharpening is simple, but if you delve into the process itself, you will notice a fairly large number of different nuances. Most people make simple mistakes when sharpening knives, which leads to uneven sharpening or damage to the knife. Common mistakes when sharpening:
- The cutting edge was not sharpened . As a result, small burrs form on the sides, which temporarily give sharpness to the blade, and after working with the knife for a short time, the blade again becomes dull. To prevent this problem, you should carefully sharpen both edges, and then, as you sharpen, use sandpaper or a wheel of different grits.
- Presence of paint, oil, dirt on the tip . The bottom line is that during turning, fat, dirt, oil and other components mix with grinding abrasives and lead to scratches and microchips of the blade. After such sharpening, the blade quickly becomes dull.
- Pressure plays an important role . You need to remember one simple rule: sharpness does not depend on the force used, but on the duration of sharpening. Excessively strong pressure leads to chipping of microparticles from the blade and poor sharpening.
- Wrong choice of angle . The angle may vary depending on the grade of steel and the purpose of the tool. For home kitchen knives it is 20 - 25 degrees. For other types of blades that will have to withstand heavy loads and work with hard materials, the angle will be 40 degrees.
Homemade sharpening device
In order to make a knife sharpening machine with your own hands, the first thing you need to do is find a suitable drawing. There are many modifications for its production.
The easiest way
This option does not require special skill or the use of expensive components. To make it you will need:
- Wooden corners with a side of 20-30 centimeters: 2 pieces.
- Screws with nuts in the amount of 10 pieces.
- Protractor for precise angle setting.
- In addition, you will need a drill and drill bits.
To make it, you need to mark the corners and drill 3-4 holes at identical points. Place a block between them at the desired angle and secure with bolts.
To sharpen a knife or scissors, you simply need to run the blade along the surface of the block, holding it strictly vertically.
To change the sharpening angle, you simply need to loosen the fasteners and modify the position of the abrasive part. In order not to pick up a protractor every time, it is recommended to put marks on the base, marking the main positions of the block.
The ability to change the sharpening angle is the only advantage of such a manual knife sharpening machine. In terms of convenience, it is not far from an ordinary bar.
Sharpening machine is more complicated
For more comfortable work, a more complex device will be required. To make it, you need the following parts and tools:
- Plywood, laminate or chipboard.
- A meter strip with a thickness and height of 2-4 centimeters. You can take two pieces, one longer, the other shorter.
- Bolts with nuts - 2 pieces.
- Hacksaw and marking tool.
First you need to make a knife holder. To do this, from a piece of plywood, or whatever is available, you need to cut a rectangle measuring 10 by 4 centimeters (dimensions are approximate). The wide part must be ground at an acute angle to prevent the block from touching its edge when sharpening.
For the base, you need to cut out another piece of plywood with dimensions of 30 by 25 centimeters.
At a distance of 1-2 centimeters from its edge, a holder is placed with the cut outward and secured with bolts. The blade will be located between them.
The next stage is the manufacture of a stand from a long rail, along which the bar moves at a fixed angle. It needs to be installed vertically on the base and the angle measured in relation to the holder. The upper part is cut at the appropriate angle. The second post is cut in a similar way and connected with the rest of the rail on top, so that the result is a U-shaped part.
All that remains is to make the base for the abrasive part. To do this, stick sandpaper with a grit from P600 to P2000 onto a short strip.
To work with such a sharpener, it is better to place it on the edge of the table in such a way that the protruding bolts connecting the base and the blade holder rest against it, thus preventing the device from sliding.
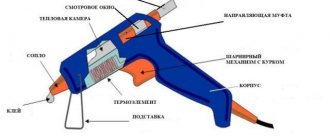
Electrical devices
These are the most versatile devices. When using them, the sharpening angle is selected independently; just select the desired position of the blade. The main part of an electric knife sharpening machine is sanding wheels with different grain sizes and angles. The discs are driven by an electric motor. Therefore, energy dependence is a disadvantage, although not the main one in the use of such equipment.
The main disadvantage of this method of sharpening is the inability to visually control the process, since to ensure safety during sharpening, all rotating mechanisms are completely closed.
It is impossible to make such a device at home. Therefore, it is simpler: a disk or belt abrasive is attached to a conventional electric motor. When using a round stone, a stop is installed with the ability to change the inclination of the blade. Any cutting tools can be restored on such a machine.
Sharpener "Domik"
A good tool for sharpening knives. Despite its simple design, the sharpener does its job well. This structure consists of a rectangular block, the upper edge of which is made in the form of a gable roof. The angle of inclination of one face is 20 - 25 degrees, which is optimal. The product must be installed with a blade close to one of the roof ridges, then take an abrasive wheel or a block with emery and move along a horizontal line. This ensures a constant angle of inclination, which leads to uniform sharpening of the blade.
There are also complex designs for a homemade sharpening machine. For manufacturing you will need the following materials:
- A piece of board measuring 500x150x20 mm.
- A metal pin with a thread that will serve as a guide for the bar.
- M8 bolts and nuts and wood screws.
- Clamping nuts or wing nuts.
- Ordinary PCB or plexiglass, which will serve as a substrate for the knife and a kind of movable frame.
- To attach the knife, use a neodymium magnet. The usual one will not work, since its downforce is quite low.
The board must be cleaned, processed, and then made into a rectangle. Another board should be made rectangular in shape, which will serve as a stand or support. Its height should be such that the slope of the main board is 20 degrees. You can fasten them together with wood screws. Then attach the resulting structure to the workbench or cut out a tabletop in advance, to which one of the studs will be attached. After securely attaching the pin to the tabletop, you need to take a 200x100 block and make two holes in it: one for the main pin, on which the movable carriage with the sharpener will be attached, and the other for the pin, which is attached to the tabletop.
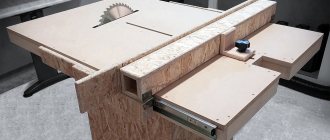
Locking blade machines
Knife sharpening machines with locking blades will attract the attention of those people who want to sharpen a knife not only efficiently, but also quickly. The design, which rigidly fixes the knife blade relative to the sharpening stone moving at a set angle, allows you to accurately set the angle of inclination. To create such a homemade machine with your own hands you will need:
To create such a homemade machine with your own hands you will need:
- The base is a rectangular wooden plate with dimensions 440*92 mm and a thickness of 18 mm.
- Wooden die 92*45*45 mm (for fixing the vertical threaded rod).
- A wooden block 245*92 mm and 18 mm thick (the plate to which the knife will be attached).
- Iron plate 200*65 mm and metal thickness 4 mm.
- Piano hinge, 92 mm long.
- M8 hairpin 325 mm long.
- Nuts and bolts with M8 thread.
- Drill 6.5 mm.
- M8 tap.
- Self-tapping screws 50 mm, 4 pcs.
The die intended for fixing the vertical threaded rod must be drilled through with a 6.5 mm drill. The hole should be located at a distance of 15 mm from the edge of the die, approximately in the center.
Layout of the hole in a wooden die
Next, in the resulting hole you need to cut a thread for an M8 stud. The wooden block prepared in this way must be screwed to the base at a distance of 265 mm from the edge using ordinary self-tapping screws 50 mm long, screwed into the back of the base.
After the block and the base are securely fastened, you need to insert an M8 pin into the hole in the block. The pin should run across the entire cross-section of the beam and the base; thus the risk of changing its position is minimized. The pin at the base of the block must be firmly fixed with an M8 nut, slightly recessed when twisting it into the wood of the block.
The second part of the work involves assembling a clamping device to fix the position of the knife. To do this, a piano loop is attached to a block of wood 245*92 mm with three self-tapping screws from the end of the wooden plate, with the help of which it will be attached to the base of the device.
Attaching the fixing bar to the base using a piano loop
After securing the wooden part of the holding device, you can begin to attach the iron plate. In the center of the 200*65 mm plate, you need to drill an oblong groove, 90 mm long and about 1 cm wide. The groove should be located from the edge of the clamping plate at a distance of 60 mm. Additionally, you need to drill a hole at a distance of 20 mm from the opposite edge and cut a thread in it for an M8 bolt. Then you need to attach the clamping plate to the previously prepared wooden base using this bolt. Using another bolt and a suitable washer, you need to fix the clamping plate in the center of the cut groove. The fixation should be clear, but at the same time neat, so as not to damage the surface of the blade.
Attaching the Iron Clamp Plate
The most difficult part of assembling this device is preparing the control device that will set the sharpening angle of the knife. For this you will need:
- metal square profile 40×40 mm;
- furniture bracket, 40 mm wide;
- a pair of rivets;
- a piece of plywood 42×25 and 18 mm thick;
- bolt and nut M5;
- a pair of M8 wing nuts;
- whetstone;
- steel bar with a diameter of 0.8 cm and a length of 40 cm.
It is necessary to drill a couple of holes on a piece of plywood: a through hole with a diameter of 8 mm along a cross-section of 42×18 mm (the distance from the edge on the 42 mm side should be set at 15 mm) and a through hole with a diameter of 5 mm along the side with a cross-section of 42×25 mm (the distance from edges 10 mm). The square pipe should be cut in half so that you get a “U”-shaped bracket with a width of 40 * 15 mm and ears of 20 mm. You need to drill 8 mm holes in the ears, into which an M8 pin will later be inserted. Connect the resulting bracket to a furniture hinge using rivets. Using the second part of the furniture bracket, attach a block of plywood to the resulting structure with an M5 bolt.
Location on the spoke of the guide mechanism
Connect the touchstone to a guide rod, which is a steel rod with a cross-section of 8 mm. When connecting the keystone and the guide rod, you should strictly ensure that their center lines coincide. If desired, for ease of use of the sharpener, a handle-holder can be attached to the whetstone on the reverse side. All that remains is to secure the whetstone in the guide mechanism, secure it with a thumb and the homemade device for sharpening knives is ready.
Sharpener assembly
Homemade knife
If the farm has a sharpening machine, it will make the process easier, but there is one circumstance. When sharpening on a machine, it is almost impossible to apply even pressure on the knife. Therefore, it is possible to make a device for sharpening knives, which will serve as a guide for the blade and ensure uniform pressure. The result is a simple but effective electric sharpener. To make it you will need the following components:
- Beam.
- Four bolts or four studs with M8 thread.
- Four lambs.
- Self-tapping screws for wood.
Opposite the electric sharpener, a guide is attached along which the slider will move. The guide itself can be attached to the workbench or a pre-made frame can be made. It must be mobile. To do this, you can cut a longitudinal groove in the frame and secure the tripod with two studs. Then take two bars, drill holes on the sides, insert studs and tighten them with screws on both sides. The next step will be the mount on which the cutting product will rest. This can be done using small pieces of timber, which should be attached to the sides of the moving carriage.
Guide drawing
All you need for a guide that will fit perfectly is the following:
- A spool with an M6 thread, which must be sawed off using a hacksaw so that it is 16 cm long. The main thing is to ensure that there are no burrs so that they do not slow down the sharpening process itself.
- Also, electrodes with a soft and elastic cylinder can be useful in work; they must be bent into the letter “g” using pliers. The main thing during the work period is not to forget to periodically look at the product drawing.
- Metal scraps are useful for using clamps; they need to be cut and holes installed using a drilling machine. A hand tap will help in marking the threads. And in order to reduce friction, use a drop of oil, which can subsequently be easily removed with a soap solution.
- When finishing work with the guide, according to the drawing, you should twist all the parts and, for fixation, drop regular nail polish onto the junction of the clamp and the pin.
Sharpener LM
If in the future you plan to do professional sharpening of tools in large quantities, then you can make a sharpener called: Lansky-Metabo. Drawings of a device for sharpening knives with your own hands look like this:
If the product is clamped in the clamps with the root part, the sharpening angle will be greatest. A knife with this angle can be used as a “cleaver” and for processing hard wood. You can also easily sharpen knives using a jointer. Knife clamps can be made from angle iron or wood. The disadvantage of this design is the complexity of assembly and the large number of parts.
Made by hand
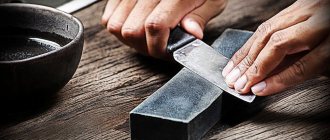
Now we get to the most interesting part. The conversation about manual sharpening was raised at the very beginning, it’s worth returning to it, since it is really, really necessary for the most novice craftsmen.
As already written above, this magical and grueling action is necessary to understand steel itself. You need to feel it. It takes a lot of sweat to learn how to do this manually. This procedure is done with files, and, in the end, “caught up” with sharpening stones of different grain sizes.
How much do you need to grind? You will answer this question for yourself when you sharpen a dozen other blanks. And if you are not lazy and do it manually, you will be called a true master of your craft.
Yes, sometimes you should resort to special mechanical “assistants” in exceptional cases. Feeling the steel manually can be called “aerobatics.” Moreover, the blade will always feel the warmth of your hands, and perhaps you will put a piece of your soul into it.