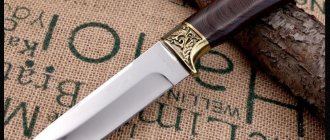
To obtain the necessary characteristics of the future knife, a sketch of it is drawn from a file as a blank on paper. It is better to choose an old tool with a worn notch. High-carbon steel provides the future knife with high cutting performance. The production of such a tool will be inexpensive, and its quality will surpass many factory samples.
Required tools and materials
The process of making a knife involves many difficulties, including the selection of materials. For manufacturing, you need to select a file more than 3 cm wide; it is advisable to look for a Soviet-made tool. The cross-section of the file surface should be flat or diamond-shaped; if the latter is found, this will be the best option, since the shape of the steel is stronger and will withstand loads.
The manufacturing process will require the following tools and items:
- Rivets made of brass alloy.
- Etching is performed with ferric chloride.
- Magnet for checking the degree of hardening.
- To process surfaces you will need sandpaper.
Processing is carried out with a grinder or grinder. You also need to decide on the material of the handle of the future knife. A file knife can have a metal or wooden handle, its weight and purpose depend on this. Before manufacturing, it is worth preparing a sketch of the future product; usually it is drawn on paper.
The process of making a knife from a file
Advantages and disadvantages
To make it, it is not necessary to purchase a new file; an old one, whose surface has turned from embossed to smooth from repeated use, is quite suitable.
You can make a knife from a file with your own hands as a universal kitchen knife, as well as for hunting, fishing, tourism, and even a folding one. Regardless of the variety, each tool, made independently, has a number of advantages:
- Long service life. The product will last a long time, since the hardened steel is very durable and will not bend or break when cutting hard objects.
- Availability of materials. Many people have old files, and the labor intensity of the process is compensated by the resulting cheap knife.
- The thickness of the knife is more than 6 mm, so it will not belong to the category of edged weapons.
In addition to the advantages, the homemade tool has some disadvantages. The manufacturing process is complex and requires attention and accuracy. Errors during operation are unacceptable, as the product may turn out to be insufficiently strong or completely unsuitable for use.
In addition, a steel blade does not make a flexible blade, and it can simply crumble when bent, causing injury. A knife made from a file has its pros and cons, but overall the product is strong, durable, and durable.
Required materials and tools
To make a knife with your own hands, you need a file; its width should not exceed 3 cm. It is best if it was made in Soviet times, that is, it is especially durable.
The most suitable steel for making a knife is U10 steel, which is equipped with carbon, or modern improved steels. The cross-section of the tool must be flat or diamond-shaped. In addition to the file, other available materials and tools are required. These include:
- ferric chloride for the blade etching process;
- epoxy;
- a magnet used to check the degree of hardening;
- brass rivets;
- magnet;
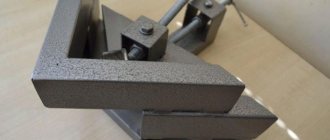
- vice;
- sandpaper that will be used to process the surfaces.
Processing will be done using a grinder or grinder. In addition to the tools and materials for making the blade, materials for the future handle are required: metal, wood. Before work, it is necessary to make a sketch of the future design, which is done on paper.
Firing the workpiece
The metal used to make files is very hard, so it is not possible to simply strip the blade and form a cutting edge by turning it on a machine. When heated on sharpening equipment, the cutting surface will not hold an edge and may crumble.
Therefore, the file must be fired, that is, the alloy must be returned to the technical parameters that it had before it was processed in the factory. To burn a file, you need to place it in a fire: a fire, a container (barrel), a stove, a gas stove. It is important that the fire is constant for 4-6 hours.
Then the file will reach a temperature of up to 700 degrees. If firing is carried out on a gas stove, then it is enough to heat the area that will become the blade; it is not necessary to heat the entire workpiece. But the heat from the burner will not be enough to reach the required temperature for firing.
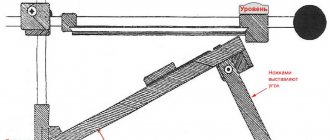
Therefore, experienced specialists recommend placing unique metal stops with a thickness that should be greater than the thickness of the workpiece, for example, bolts, on the tile grid, along the side parts of the product. They place a metal plate, but not very thin, a saucepan, a kettle.
Thus, an object made of metal reflects the heat that rises. Regular table salt used in the kitchen will help control the combustion temperature. Salt is sprinkled on the surface of the file, and if it does not melt, then the temperature is not enough, therefore, it must be added.
The workpiece should have the appearance of molten metal, and its color should be uniform within 3-4 hours. The intensity of combustion decreases smoothly, over approximately an hour, at least 50 minutes. Cooling is also done gradually; it is better to leave the workpiece in the place where the firing took place until it has cooled completely.
Formation
After cooling, the file is clamped in a vice and the excess sections are removed and shaped in accordance with the previously completed drawing.
You can use an abrasive disc for turning. If you need to make a knife from a file with a small blade, then you should not cut off the excess part from the workpiece.
It is useful for making a full-fledged handle or will serve as a basis in which holes are made to secure plates made of wood, plastic, or metal. The drawing is cut out from a sheet of paper, and a blank is attached to it. Using a marker, trace the outline of the layout on a file.
Firing the workpiece
The files are made from U10 steel, which is enriched with carbon; a file made from this steel is fragile and can easily crack under load. In order for the metal to be hard and not crumble when struck, it must be hardened. Usually the procedure is carried out in a special oven, the temperature of which reaches 700 °C.
To harden a knife made from a file, which you made yourself, you can use a regular gas stove.
The combustion temperature on the stove is not high, reaching no more than 300 degrees. To achieve the required heat, you need to use a kind of screen. In the absence of a special thermometer, you can use ordinary table salt, its melting point is equal to the hardening of knife steel.
Knife hardening
Hardening of the file is necessary only in the cutting part. Checking for uniform hardening occurs visually; after reaching the temperature, the knife should be uniformly reddish in color. The product must be kept at maximum temperatures for at least 4 hours. Cooling is done smoothly; if you cool the part right away, it will simply crack. Cooling of the part occurs through a gradual decrease in temperature; heating decreases every hour by a quarter of its initial intensity.
How to harden a knife from a file
After firing, you can begin to form the future product. The workpiece is secured in a vice, the parts are processed with a grinder and all excess slag and layers of metal are removed. The sharpening machine is used with a coarse-grained abrasive wheel. The degree and shape of sharpening is carried out according to the prepared sketch. On the handle compartment you need to drill one or two holes to attach the handle.
After the tool is hardened from the file, it is necessary to treat the entire surface except the handle. A burner can be a tool for hardening, since the temperature is higher and the knife will harden faster. Uniform tempering of a knife from a file will give strength to the future product. The correct hardening of a knife made from a file can be determined with a magnet; if there is no reaction with the metal, then it is suitable for further use. After the process, the metal needs to be cooled, just put it in a bucket of water.
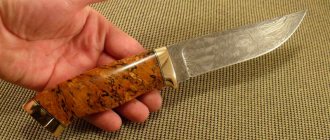
File knife and drawing for it
There is such a thing as metal stress. With this action, the metal crumbles and crumbles. To avoid adverse consequences, it is necessary to heat the instrument in the oven at the maximum temperature for several hours.
Blade manufacturing steps
Homemade knives from a file without forging can be made in several stages. They are as follows:
- burning;
- formation of the device;
- hardening.
The final stage is to create a homemade handle. It is almost impossible to make a high-quality knife that will last for a long period without heat treatment. Brittle steel wears out quickly and loses its quality.
Burning
When making a file, manufacturers often use steel grade U10, which is enriched with carbon. Under heavy load, the working part may burst, and hardening solves the problem. In most cases, the procedure is carried out in a special or home-made oven at a temperature of 700 °C.
If you don’t have a special oven, you can harden a knife from a file at home on a regular gas stove. Heat treatment begins with firing. In the combustion zone, the temperature reaches only 300 °C; to increase this indicator, a homemade screen is created, through which the heat can be redirected. It is recommended to check the temperature with ordinary table salt, since its melting point is equal to the hardening temperature of grade U10.
Knives are subjected to heat treatment only in the cutting zone. The procedure consists of uniform heating of the specified part, after which gradual cooling is carried out. Not many people know how to harden a knife from a file on a gas stove, since this method is rarely used. It takes about 4 hours to heat up. The uniformity of changes in the metal structure is checked visually - the surface should be the same red color. After this, air cooling occurs.
Formation
Only after firing is it possible to begin shaping the cutting edge. All work can be divided into several stages:
- The workpiece is fixed in a vice, after which the surface is processed with a grinder, slag and metal layers that formed during firing are removed.
- Using a sharpening machine on which a coarse-grained wheel is installed, the cutting edge is formed according to the prepared sketch.
- To fix the handle, two holes are made in the lower part of the workpiece. A drilling machine is used for this.
In the future, it will be difficult to form the cutting part. This is due to the fact that the surface of the metal becomes harder.
Hardening
The working part is heated during hardening using a gas burner. The heating temperature is checked with table salt. If you harden files this way, it takes much less time to heat up. The degree of hardening is checked using a magnet. If there is no reaction with the metal, then the workpiece is suitable for use. Cooling is carried out in cold water. An important condition that determines a long service life is the low internal stress of the metal. This indicator can be reduced by heating the workpiece in the oven at maximum temperature for several hours.
Making the handle
Before making a handle for a product, you should decide on the appearance, materials and shape. You can use any material that is at hand. A wooden handle is considered a harmonious option.
File knife handle
The process includes several stages:
- Selection of materials, it is possible to use different types of wood for a unique design.
- It is necessary to make a bolster, the lower part of the knife. The remainder of a file or other metal is used.
- Wooden pieces are placed on top of each other and glued together with epoxy glue.
- To glue the pieces together better and faster, you need to use a press.
- The excess parts are trimmed with a saw, after which they are processed with sandpaper to the required shape.
- When finished, the handle is varnished for greater preservation; it is possible to use stain to darken it.
It is important to understand that all knives, regardless of category, are considered edged weapons. However, a cutting product whose blade length is no more than 90 cm and whose thickness is more than 6 mm can be removed from the category of edged weapons.
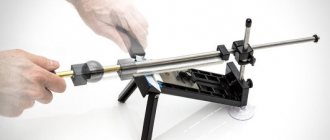
Sharpening is done in the usual way on a grinding machine.
The handle can be made of leather, deer antler or other materials. Installation depends on the form; each type requires an individual approach. The leather belt is tightly placed over the handle area, glued with special glue.
The nuances of making a handle
When making knives, many people do not pay attention to the quality of the handle, although it should be durable and comfortable. At the time of drawing up the sketch, a suitable material is selected:
- tree;
- leather;
- metal;
- textolite
Wood is most often chosen, as this material can last for several years, is well processed and inexpensive. Step-by-step creation of the handle is carried out as follows:
- Based on a pre-prepared sketch, two halves of the handle are created. This can be done on a machine or manually.
- The lower part of the converted file is prepared.
- The two halves are correctly applied to each other, gluing is carried out with epoxy glue. You can speed up the process and make the connection more durable by using a press.
- The two halves are secured with rivets, for which holes were previously made in the lower part.
The surface of the wooden handle is varnished. Due to this, the material receives protection from moisture. If desired, you can cover the surface with leather or tarpaulin. Stacked handles made from pieces of different materials tightly strung on a shank turn out to be beautiful.
Homemade knives are not included in the category of edged weapons, provided that the cutting part has a length of no more than 90 cm and a thickness of less than 6 mm.
Proper processing
The initial processing of the knife blade is performed with any available tool. Sharpening a knife from a file can be done on a grinding machine, which will speed up the process and make the blade more uniform across the plane. The initial sharpening does not require ideal parameters, since the etching process occurs after it.
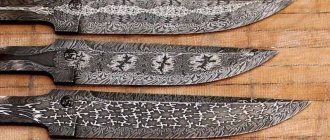
Etching the blade in citric acid
Etching occurs chemically using ferric chloride, which can be purchased at radio components or hardware stores. It is necessary to completely lubricate the product with the solution, or lower it into a flat container with it. The process will give the blade a film formed on the blade, which will provide protection and it is highly not recommended to remove it. At home, you can use citric acid mixed with vinegar for etching.
After all the processes carried out to process and produce a knife from a file, it is necessary to carry out final processing. The blade is carefully sharpened on a grinding machine to give it sharpness. The handle is polished with a solution of wax and turpentine or varnished.
Machining the bearing and preparing the part for forging
An outboard bearing for a car driveshaft or any other with a diameter of 100–150 mm is suitable as a knife blank. For example, it is allowed to use copies of the required sizes from the axial mechanism and drive equipment of machine tools and moving units. The direct source is the most massive part of the product, called the outer race of the bearing. It is made of structural steel grade ШХ15.
There are different methods for disassembling a bearing. Since you won’t need anything other than the outer shell, and you can’t split the shell under any circumstances, we’ll use the most “humane” method - sawing the metal with a grinder. It is better to clamp the bearing in a vice and, if possible, saw the inner ring. It is better to saw the outer ring diagonally, thereby forming the nose of the knife. After cutting with a chisel, the separator is destroyed and all the insides are removed along with the balls. If required, the cut area is opened with a metalwork tool. The circumference should be 1–2 cm longer than the knife, so the extra centimeters of the workpiece are sawed off.