Tacks in welding help to accurately fix the location of parts in a welded structure relative to each other. Tack welds in this case are short welds located in accordance with existing codes and regulations.
The use of tacks helps to avoid displacement of parts of a welded structure during the welding process, reduce gaps between individual parts, reduce residual deformations and at the same time increase the rigidity of the entire welded assembly.
In most cases, pre-assembled components and structures are clamped by spot welding, using stationary machines and special clamps. Clamps are required in order to most accurately assemble a unit or structure prepared for welding. This assembly process can be either automated or manual - based on markings made before assembly, which mark the places where tacks will subsequently be made. The use of clamps can significantly simplify the assembly process, make it more accurate, and make applying tacks more convenient. And the more parts included in a welded structure, the higher the degree of mechanization of the assembly process.
Definition
Tack welding is short welding seams located according to established norms and rules. This is done after assembly into a unit and before the start of welding. It is performed by manual arc welding with single-pass seams and has a certain pitch (distance between the seams).
metal tank assembled on tacks before welding
Purpose:
- no displacement of parts during welding;
- maintaining gaps between parts;
- increasing the rigidity of the node.
Tack welding of pipeline joints
6.26. The assembled joints of pipes and other elements must be secured in several places. Tack welds must be evenly spaced around the perimeter of the joint, their number depends on the diameter of the pipe (Table 8). It is not recommended to apply tacks to the ceiling joint.
The height of the tack is determined depending on the thickness of the pipe and the welding method; it should be equal to:
(0.6-0.7)S, but not less than 3 mm, when performing tack welding by manual electric arc welding or mechanized in carbon dioxide and a thickness of up to 19 mm and 5-6 mm with a wall thickness of more than 10 mm.
2-3 mm - for manual argon arc welding and wall thickness up to 10 mm and 3-4 mm for wall thickness more than 10 mm.
Table 8
| Pipe diameter, mm | Up to 100 | Over 100 to 426 | Over 426 |
| Number of tacks around the perimeter | 1-2 | 3-4 | Every 300-400 mm |
| Length of one tack, mm | 10-20 | 20-40 | 30-50 |
6.27. When applying the main seam, the tacks must be completely welded. The electrodes or welding wire used for tack welding must be of the same grade as that used for welding the main seam.
6.28. The quality of tack welds is subject to the same requirements as the main weld seam. Tacks that have unacceptable defects detected by external inspection should be removed mechanically.
6.29. The assembled and tack welded joints must be accepted by the welding supervisor. After making sure that the assembly and tack are correct, he gives permission to weld.
Heated joints
6.30. The temperature of heating joints before tack welding at an ambient temperature of 0 ºС and above is given in table. 9, and at temperatures below 0 ºС - in paragraph 7.8.
Table 9
| Steel grade of welded parts | Nominal thickness of welded parts, mm | Temperature, ºС preheating before | |
| tack welding and ring welding | welding | ||
| St2sp2, St3sp2, St3sp3, St3sp4, St3ps5, 08, 10, 20 | Up to 100 incl. | — | — |
| 15GS, 16GS, 17GS, 17G1S, 17G1SU | Up to 30 incl. | — | — |
| 12MH, 15ХМ | Up to 10 incl. St. 10 to 30 | — 100-150 | — 150-200 |
| 12Х1МФ* | Up to 10 incl. From 10 to 30 incl. | — 150-200 | — 200-250 |
* For pipe joints with a diameter of 42-89 mm and a wall thickness of 11-14 mm, the heating temperature should be 100-150 ºС.
6.31. The joint can be heated using inductors (industrial or high frequency current), radiation resistance heaters, gas burners, ensuring heating of the joint along the entire perimeter. At the joints of low-alloy steel pipes with a wall thickness of up to 30 mm, the width of the heating zone must be at least 100 mm. Heating must be organized so that immediately after welding it is possible, if necessary, to carry out heat treatment.
Welding technology
General requirements
7.1. Welding of joints should begin immediately after tacking. The time between the end of tack welding and the start of welding joints of pipes made of low-alloy steels should not exceed 4 hours.
Immediately before welding, it is necessary to check the condition of the joint surface and, if necessary, clean it in accordance with clause 6.17.
7.2. Welding of joints made of low-alloy steels should be carried out without interruptions in work until the entire joint is completely welded. During forced breaks in work, it is allowed to stop welding when the groove is filled to 70-80% of the pipe wall thickness.
7.3. In all cases of multilayer welding, the seam is divided into sections in such a way that the joints of the sections (“locks”) in adjacent layers do not coincide, but are offset from one another, and each subsequent section overlaps the previous one. The amount of displacement of the locks and overlap “a” should be (Fig. 9) for manual argon-arc and electric-arc welding 12-18 mm.
Rice. 9. Scheme for applying seam locks
7.4. Manual arc welding is performed with the shortest arc. During work, you should break the arc as rarely as possible so as not to leave unfilled craters. Before extinguishing the arc, the welder must melt the crater by gradually withdrawing the electrode and bringing the arc back 15-20 mm, onto the seam just applied, the subsequent ignition of the arc is carried out on the weld metal, at a distance of 20-25 mm from its end.
7.5. During the work, special attention should be paid to ensuring complete penetration of the root of the seam. After surfacing each bead, it is necessary to completely remove the slag, allowing it to cool. If there are defects on the surface of the weld (cracks, undercuts, porosity, etc.), the defective area should be mechanically cleaned to bare metal and welded again.
7.6. Welded joints must have convexity (reinforcement) within the specified limits (see Table 10).
Table 10
| Pipe wall thickness, mm | Convexity, mm |
| Less than 10 | 0,5-2,0 |
| 10-20 | 0,5-3,0 |
| Over 20 | 0,5-4,0 |
7.7. When welding elements made of hardening steels 15ХМ, 12Х1МФ and castings of similar composition, the ends of the pipes should be plugged or the valves on the pipeline should be closed.
7.8. It is necessary to weld and tack joints of boiler pipes made of carbon, low-alloy structural and heat-resistant steels in winter conditions at ambient temperatures below 0 ºС in compliance with the following requirements:
a) minimum ambient temperature – minus 20 ºС;
b) for pipe joints welded at positive temperatures with heating and subject to subsequent heat treatment, at negative temperatures it is mandatory to perform heat treatment immediately after welding; a break between welding and heat treatment is allowed provided that the accompanying heating temperature is maintained during this time;
c) joints welded at positive temperatures with heating and not subject to subsequent heat treatment, at negative temperatures must be immediately after the end of welding (not allowing the joint to cool) covered with a layer of insulation 8-15 mm thick to ensure slow cooling;
d) for joints welded with heating, the heating temperature during welding in winter conditions should be 50 ºС higher than at positive ambient temperatures indicated in Table. 9;
e) during all thermal operations (tack welding, heat treatment, etc.), pipe joints must be protected from precipitation, wind, and drafts until they cool completely;
f) joints of pipelines and heating surface pipes made of heat-resistant steels, welded at positive temperatures without heating and subsequent heat treatment, at negative temperatures are subject to drying with a gas flame to remove moisture, frost, bringing the metal temperature at the welding site to positive and then covering the welded joints with heat-insulating material .
7.9. If the process of welding a joint is interfered with by a magnetic field resulting in magnetization of the pipe (the so-called “magnetic blowing”), it is eliminated as follows. An inductor wire (six to eight turns) is wound around the joint and passed along it for 2-3 minutes. direct current with a force of 200-300 A. If after this the magnetic field remains, you should pass the current in the opposite direction, that is, connect the welding wires to the opposite terminals of the inductor.
7.10. After welding and stripping, the welder must mark joints of pipes with a diameter of more than 100 mm with a wall thickness of more than 6 mm with the mark assigned to him. It is placed on the weld seam itself near the “lock” (on an area measuring about 20 x 20 mm, cleaned with an abrasive stone or file, or on a pipe at a distance of 30-40 mm from the seam. If during the mechanical treatment of the surface it is necessary to remove the stamps, then they must be restored in the same place.
It is allowed not to mark each welded joint if all welded joints of the boiler were made by one welder. In this case, the welder’s mark should be placed near the nameplate or on another open area of the product and the place of marking should be enclosed in a clearly visible frame made with indelible paint. The place of branding must be indicated in the product passport. If the welded joint was performed by several welders, then the marks of all welders must be placed on it.
At the joints of carbon steel pipes with a working pressure of up to 2.2 MPa (22 kgf/cm2), the mark can be applied by electric welding.
Previous4Next
Conflicts in family life. How can I change this? It is rare that a marriage and relationship exists without conflict and tension. Everyone goes through this...
WHAT IS CONFIDENT BEHAVIOR IN INTERPERSONAL RELATIONSHIPS? Historically, there are three main patterns of differences that exist between...
System of Protected Areas in the USA The study of specially protected natural areas (SPNA) in the USA is of particular interest for many reasons...
What makes your dreams come true? One hundred percent, unshakable confidence in your...
Didn't find what you were looking for? Use Google search on the site:
Straightening and bending of metal: features
When preparing metal for welding, any unevenness, curvature or other defects are eliminated, and this is called straightening the metal. These actions are performed by pressing on the metal using a press or manually with a hammer.
Both ferrous and non-ferrous metals are subject to editing.
There are two editing methods:
- manual straightening - the basis is steel or cast iron straightening plates or various anvils, the work is done with a hammer;
- machine editing - carried out on straightening machines.
When straightening metal, the material can be either cold or hot.
Preparation also includes metal bending. This is metalwork work, during which the workpiece is bent at the desired angle and radius and given the required shape. Bending is also done manually, using bending machines and presses. Bending can be done either by eye or using markings, templates and samples.
What do you need to know?
During welding, the tack is completely welded or removed mechanically. Based on this feature, they can be divided into two types:
- temporary - used to secure parts and are subsequently removed; applied from the reverse welding side;
- the remaining ones are part of the main seam and are made with full penetration.
The sequence of making seams of various lengths:
- Short and medium . The first point is placed in the middle of the future seam, the next one is to the left of it, then to the right. You must continue alternately from different sides at the same distance from the previous point until the edges are stuck.
- Long . The sequence is the opposite of the previous option. First, two points are placed along the edges, then the middle of the seam is tacked, after which the internal points are added.
- Annular. The first point is placed arbitrarily, the second opposite it. The next two are tacked with a turn of 45 degrees from them. Thus, the structure is welded cross to cross. Then, another one is added between each point.
Important ! The quality must be no worse than that of the main weld, therefore, if there are defects, a new weld is removed and applied.
Length
The length depends on the length of the connection of the parts. It is considered common to consider tacks with a length of 10-50 mm, or generally point ones on short connections.
A connection length of less than 10 mm is used for fastening parts made of thin steel, the thickness of which does not exceed 3 mm, and during the assembly of small parts, as well as for preliminary and temporary fastening of the structure. When welding pipes, the length is equal to 2-5 metal thicknesses.
Quantity
The number of tacks determines the step or otherwise the interval through which the points are located. It is influenced by the thickness and rigidity of the parts, as well as the dimensions and configuration of the product being welded.
The connection failed due to lack of tack
Different materials have their own standards. For example, for parts made of sheet metal 0.5-4 mm, the step is 30-60 mm (fusion welding) or 50-150 mm (spot welding).
The quantity depends on the size of the product. A pipe with a diameter of 100 - 400 mm should have 3-4 tacks 30-40 mm long, while for a diameter less than 50 mm one or two about 10 mm long are sufficient.
How long does it last?
As with a weld, strength is affected by:
- quality and composition of the metal,
- technology,
- electrode brand,
- as well as how the seam cooled and many other factors.
Therefore, it is impossible to accurately answer the question of what load the welding tack will withstand.
It is worth considering that initially the tack is designed only to tack the seam, and not to carry the load. However, despite this, it must support sufficient weight so as not to burst during basic welding work.
Requirements
- the electrode is taken similar to the electrode used for welding;
- the thickness should be half that of the weld;
- welding current is selected 20% higher than when welding;
- The tack along its entire length must be cleared of slag and be level, otherwise it may lead to defects
- placed on the front side.
"Tacking low carbon steel parts"
Budgetary professional educational institution of the Omsk region
"Sedelnikovsky School No. 65."
MASTER CLASS
"Tacking low carbon steel parts"
PM.02. Welding and cutting of parts made of various steels, non-ferrous metals and their alloys, cast iron in all spatial positions
by profession 150709.02 Welder (electric welding and gas welding work)
Prepared by: industrial training master
Sedelnikovo, Omsk region, 2015
Nowadays, a lot of buildings and everything else are supported by metal. The modern world cannot exist without it. All tall buildings are constructed using metal. Cars and ships are also made of metal. Metal is applicable both in everyday life and in industry. That is why a person who can connect everything metal is simply necessary in our time. But the topic of today’s conversation is the profession of welder. I have always had great respect for this profession because it is responsible and requires a certain virtuosity. A lot depends on the quality of the welder’s work. Building structures must be durable, and for any equipment its service life is important.
Like all professions, the welding profession has its own history. Few people are interested in the time of the emergence of professions. Back in 1802, when V. Petrov discovered the effect of the electric arc, its effect allows you to create a high temperature that allows you to melt the metal. This discovery was not immediately applied in industry. Only several decades later this method began to be used in various industries. It just began to be used, but also made a whole revolution in construction and joining metals.
Nowadays, the welding profession is of great social importance in society. The work of a welder is used in many industries: structures and communication systems, industry, mechanical engineering, shipbuilding, energy, oil refining, agriculture and others. It is difficult to find one or another production where the labor of a welder is not used.
The welder profession itself has different specializations: manual and arc welding, gas welding, automatic welding (here the specialist is the operator). But all these people do one thing - they connect metal structures, parts of assemblies, etc. Any clothing has seams, and everything that is welded from metal also has seams. The quality of the weld depends on the skill of the welder. Negligence in this work can lead to irreversible consequences or disaster. Imagine a disaster due to poor-quality welding of a gas pipeline... Therefore, the welder must first of all be a professional. Safety and sanitation are of great importance in his work.
The profession of a welder has its pros and cons. Now I will try to reflect them in more detail. This profession is in high demand on the market and is quite prestigious. The welder is in demand both at the level of the state economy and in the private sector. If a specialist is sufficiently qualified, then he will not have to look for a job for a long time - she will find him herself. Even without work experience, a welder can be hired (housing and communal services or private sector). A welder's salary increases depending on his qualifications and work experience. The profession of a welder also has its disadvantages: working conditions are not easy, you often have to work in open areas and in any weather, the welder constantly experiences strain on his eyesight due to the brightness of the electric arc. This profession is considered hazardous due to the release of gases and heat during work.
Master Class
"Tacking low carbon steel parts"
Basic concepts and definitions
Tack welding is the process of securing parts during assembly for welding using short welds called tack welds or "tack welds."
1.1. “Tack welding” is performed by manual arc welding using single-pass seams with a certain pitch or distance between the seams.
The length of the tack welds depends on the length of the connection. The most commonly used tacks are 10 to 60 mm long. The approximate length of the tacks is given in the table.
| Connection length, mm | Length of tack welds, mm |
| up to 100 | 5…10 |
| > 100 to 500 | 15…20 |
| > 500 to 1500 | 25…30 |
| > 1500 | > 30 |
Tacks with a length < 10 mm are called spot tacks.
1.2. Point tacks are used
— for fastening during assembly of parts made of thin sheet steel up to 3 mm thick;
- for securing when assembling small parts; for temporary fixation of parts in a certain position;
- for preliminary fastening of parts.
1.3. Potholders can be:
- deleted or temporary; irremovable or remaining.
1.4. Removable potholders -
These are short welds that are used only to secure parts during assembly and must be removed during the operation of clearing (sampling) the root of the weld.
1.5. Temporary tacks are usually placed on the side opposite to the start of welding.
1.6. Permanent tacks are short seams that not only serve to secure parts during assembly, but are also part of the main weld.
1.7. Permanent potholders
are completely or partially remelted when welding the first pass of a multilayer seam,
1.8. Non-removable tacks in cutting butt joints must be made with full penetration.
1.9. Corner tack welds should be made with penetration of the corner apex.
Requirements for performing tacks
2.1. The tacks should be placed evenly along the entire length or perimeter of the joint with the same distance between them.
2.2. The distance between tack welds is determined depending on the length of the connection and usually ranges from 80 to 350 mm.
2.3. Tack welding of butt joints without cutting edges with a metal thickness > 4 mm is performed with narrow single-pass welds, width b=(l.0...2.0) de, where de is the diameter of the electrode, mm.
2.4. The height of the tack welds applied during the groove depends on the thickness of the metal being welded and is usually (0.5...0.6) d, but not less than 3.0 mm and not more than 7.0 mm; 8 - metal thickness.
2.5. It is recommended to fasten parts with a metal thickness < 3 mm using spot tacks - with a length of ~ 5...9 mm.
Tack welding of butt joints in the presence of increased and uneven gaps should be done with widened seams:
b = (2 ... 3) de;
where de is the diameter of the electrode, mm; b—seam width, mm.
Tacks of T-joints, corner and lap joints are made with short fillet welds: the leg of the tack corner weld should be within (0.5 ... 0.7) 81, but not less than 3 mm and not more than 7 mm; here 81 is the thickness of the thinner part being welded, mm.
2.8. When making an assembly from several parts, it is not recommended to use tacks at the intersections of the seams.
2.9. Tack welding is carried out using electrodes of the same brands as welding.
2.10. The number of tacks should be minimal, but sufficient to securely fasten the parts.
Preparing the welding circuit Assemble the welding circuit: - go to the power source and identify its pole terminals: + and - ;
- connect the welding wire of the electrode holder to the + pole, the return wire to the - pole.
— connect the welding cables to the terminals of the welding arc power source, if the source is alternating current;
- Connect the other end of the return wire to the welding table using a clamp or ground spring clamp.
Start up the welding rectifier, observing the order in which it is connected to the power supply. Determine the value of the welding current for tacking parts in the lower position according to the table, depending on the diameter of the electrode:
- for electrode D - 3 mm, select the current strength in the range from 90 to 120 A. For example, 1st = 100 A.
3.4.Set the welding current value you have chosen using the current regulator (potentiometer) on the front panel of the rectifier.
3.5. Take the electrode and secure it in the electrode holder clamp.
3.6. Test the welding mode on an auxiliary plate, 4 mm thick.
3.7. Excite the arc by touching the end of the electrode to the surface of the plate.
If the current is insufficient, the arc burns unsteadily, often breaks off and goes out. At very low currents, no arcing occurs at all.
3.8.Increase the current by turning the potentiometer knob to the right on the scale and repeat arc ignition.
3.9.Continue to regulate the current, achieving an easy and stable arc initiation process.
3.10.Try the set mode by welding short seams on the auxiliary plate:
— when welding at high current, strong spattering and reddening of the electrode rod is observed;
- at low current, the arc burns with frequent breaks, and a narrow, intermittent seam is formed.
3.11.Adjust the welding current by turning the potentiometer knob to the left (decreasing the current) or to the right (increasing the current) until a stable welding process is obtained:
- with correctly selected welding current, the arc is easily excited, burns quietly without breaks or short circuits; The combustion process occurs quietly with the formation of a small amount of small splashes.
4. Performing spot tacks
4.1. Take a mild steel plate measuring 4x80x200mm and lay it on the workbench using clamps. Clean its surface with a wire brush to remove any possible dirt to a metallic shine.
4.2. Fix the electrode brand UONII-13/45 D - 4 mm in the clamp of the electrode holder.
4.3. Practice the technique of applying spot tacks.
First way
Light the arc and hold it in one place until it naturally breaks.
Remove the electrode, remove the slag and inspect the tack.
The molten metal will crystallize in the form of a flat, round drop of small diameter.
This type of tack has shallow penetration of the base metal and a small cross-section.
Second way
Light the arc and hold it in place with axial feed
electrode to the point of contact for 1-3 seconds. Extinguish the arc with a natural break. Retract the electrode. Clean up the slag
Inspect the potholder:
- the molten electrode metal will crystallize in the form of a tall, round drop; This tack has a larger cross-section than the previous one.
Third way
Light the arc and make a slight translational movement of the electrode to a length of ~ 3-9 mm.
Extinguish the arc with a natural break or by briefly holding the arc in place followed by a natural break.
Remove the electrode and remove the slag.
Inspect the resulting tack:
- the molten electrode metal will crystallize in the form of a short seam, 5...9 mm long.
Repeat spot tack welding on the plate until satisfactory results are obtained.
Test surfacing of spot tacks with electrodes with a diameter of 3 mm, note the change in the size of the spot tacks depending on the diameter of the electrode used.
Use the acquired skills of applying spot tacks when it is necessary to fasten small parts, connections made of thin sheet metal, for preliminary fastening of assembled parts and in other cases.
5. Tacking plates without cutting edges with a narrow seam
5.1. Take 2 mild steel plates St. 3, without bevel edges, size 4x80x300 and place them on the workbench.
5.2. Assemble the plates:
- join the welded edges of the plates with a gap of 1.5-1.6 mm, keeping it uniform along the entire length of the section; 1.5—1.6
- to ensure a uniform gap, install 0 1.6 mm rods between the joined edges, at the end and beginning of the joint;
- holding the rods with your hand, adjust the edges of the plates until both rods are tightly clamped in the gap, thereby fixing a uniform gap of 1.6 mm;
- secure the joined edges with two spot tacks in the 3rd method, with a distance of 10-15 mm from both ends of the joint; set aside the electrode holder and remove the rods from the gap;
- remove the slag from the surface of the tacks.
5.3. Turn the assembled plates over to the reverse side.
Take a wire brush and clean the surface of the plates to a width of 15-20 mm on both sides of the joint.
Sweep away debris with a hair brush or rag.
Take a ruler, chalk or marking pencil and mark the joint into equal sections, 25 mm long;
- place a ruler on one of the plates, parallel to the edge of the joint, with an indentation of 10-15 mm from its edge;
- measuring equal sections, each -25 mm long, mark them with transverse lines on the surface of the plates;
- mark the places where the tacks are applied with solid or dashed longitudinal lines at intervals of 25 mm.
Place the plates on the workbench, placing them in a lower or slightly inclined position (at an angle of 5-15°):
- raise the upper edge of the plates to a height of 30-35 mm, placing under it, for example, a piece of corner 45x45x4, ~ 300-350 mm long.
Take an electrode of the UONII-13/45.0 3 mm brand and secure it in the clamp of the electrode holder.
Lower the protective mask onto your face and, holding the plates with one hand, initiate an arc at the lower point of the joint, with an indentation of 10 mm from the edge at an angle of 15-30°.
5.8. When molten metal appears, tilt the electrode at an angle of 15-30 to the vertical and move it forward in the direction of welding.
5.9. Weld tacks with narrow (thread) seams, according to the markings, in one pass:
— to obtain a narrow seam, move the electrode in the direction of welding along the axis of the gap without transverse vibrations.
5.10. Carry out the forward movement of the electrode in the direction of welding at a uniform speed, keeping the arc length and the angle of inclination of the electrode constant.
5.11. Guide the welding arc strictly along the joint, without allowing the arc to deviate from the gap axis; use the edges of the joint as guides for the forward movement of the electrode.
5.12. Follow the marking lines, finish welding the first seam at the end of the marking of the first segment, 25 mm in length.
5.13. Apply the remaining 25 mm long tacks, maintaining equal intervals between seams of ~ 25 mm and following the welding technique of the first seam.
In order to reduce the deformation of the plates, apply tacks “randomly”, following the sequence shown in the figure.
5.14. Set aside the electrode holder.
Wear safety glasses with clear lenses. Take a slag separator and remove the slag from the surface of the tack welds.
5.15. Inspect the seams and note any possible defects:
— uneven height, width and length of seams, deviation of seams from the joint axis and other defects
— the resulting seam will have deep penetration and a width approximately equal to the diameter of the electrode, i.e. b = 1...2 d3, the shape of the seam will be convex.
Tacking plates without cutting edges using widened seams
6.1. Take the 4x80x300 non-beveled plates and place them on the welding table.
6.2. Join the edges of the plates to be welded with a uniform gap of 2.0 mm:
— take two rods D - 2.0 mm and install them between the joining edges at both ends of the joint;
— holding the rods with your hand, adjust the edges until both rods are tightly clamped.
6.3. Spot tack the joined edges using Method 3 on both sides of the joint ends.
Set aside the electrode holder and remove the rods from the gap.
Clean up the slag.
6.4. Turn the assembled plates over to the reverse side:
- take a wire brush and clean the surface of the plates at a width of ~ 15-20 mm on each side of the joint axis; sweep away debris with a hair brush;
- mark the joint into equal sections, 25 mm long;
— place the assembled plates in an inclined position, raising the upper edge to a height of ~ 30-35 mm.
Take an electrode of the UO-NII-13/45 brand, D - 3 mm and secure it in the clamp of the electrode holder.
6.6. Tack join the two plates using widened seams:
- excite an arc at the lower point of the joint with a distance from the edge of ~ 10-15 mm;
- when molten metal appears, tilt the electrode at an angle of 15-30° to the vertical and move it forward in the direction of welding;
- perform translational movement of the electrode with slight transverse vibrations of the electrode along a zigzag path;
- vibrations are carried out by lightly rocking the end of the electrode across the gap axis with an amplitude of 3-6 mm;
- the width of the resulting seam should be approximately 2-3 de, where de is the diameter of the electrode, mm;
— the depth of penetration of the edges will decrease, the shape of the seam will be flatter with a smooth transition to the base metal;
- the width of the resulting tack weld made with an electrode D - 3 mm with a gap of 2.0 mm should be in the range of 6-9 mm;
— carry out the welding process with a constant arc length and uniform vibration frequency until the end of the seam;
— finish welding the first short seam 25 mm long according to the markings, 1st tack 25 mm.
6.7. Apply the remaining tacks with widened seams, maintaining the planned intervals between seams -25 mm in accordance with the markings.
Follow the sequence of sutures indicated in the figure.
Finish the seams with crater welding.
6.8. Set aside the electrode holder and put on safety glasses with clear lenses;
- take a slag separator
- remove slag from the surface of the completed seams
- take a wire brush and clean the surface of the tacks
- sweep away debris with a hair brush.
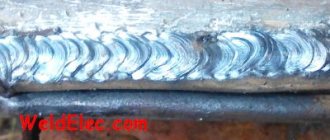
7.9. Inspect the tacks and note possible defects: the seams should have approximately the same dimensions - width, height and length, uniform scaliness and smooth surface contours.
References
Galushkina production of welded structures: a textbook for beginners. prof. education. – M.: Publishing House, 2012; Ovchinnikov manual arc and plasma welding and cutting of metals: a textbook for beginners. prof. education. – M.: Publishing House, 2010; Maslov works6 Textbook. for the beginning prof. education - M.: Publishing House, 2009; Ovchinnikov, technique and technology of welding and cutting of metals: textbook - M.: KNORUS, 2010; Kulikov labor in the production of welding work: textbook. guide for beginners prof. education - M.: Publishing House, 2006; Vinogradov arc welding: a textbook for beginners. prof. Education - M.: Publishing House, 2010.
Number of tacks during welding
How many tacks are needed to reliably fix the parts relative to each other? The number of attachment points is determined by how long the seam itself will be, the thickness of the metal, and the rigidity of the structure.
Most often, specialists are guided by generally accepted standards. So, for example, if you are working with sheet metal with a thickness of 0.5 to 4 mm, the step is usually 3–6 cm long for fusion welding and 5–15 cm for spot joining.
The dimensions of the workpieces also have a certain influence on the distance between the tacks. Thus, the length of the tacks when welding pipes with a diameter of 10–40 cm should be at least about 30 mm, and their number should be 3–4 pieces. If the cross-section does not exceed 5 cm, then 1–2 connection points of 1 cm each will suffice.
What types of tacks are there before welding?
During the cooking process, all small seams are either completely boiled or removed from the surface of the workpieces after joining mechanically. In accordance with this, they are conventionally divided into 2 large categories:
- Temporary. They are used for short-term fixation. Usually they are made on the back side of the workpieces and removed after welding.
- Permanent. They remain even after the seam is completed, because they are part of it and are made with full penetration.
Once you decide on the type of potholder, you can think about its length. The most common option is 10–50 mm seams or points for very short connections. Most often, tacks less than 1 cm are used when working with thin steel, the thickness of which does not exceed 3 mm, and when creating temporary preliminary fasteners. If you are working with pipes, then the length should be no less than 2–5 times the thickness of the base metal.
Assembly of parts
Assembling parts before welding begins is an important and labor-intensive process that takes up to 30% of the time and effort of the total production of the product.
For your information! A significant proportion of defects occur due to insufficiently thorough preparation.
Assembly options:
- All are pre-assembled , after which the process of tack welding and seam welding begins;
- Assembly of parts is carried out one by one
- individual components are assembled, tacked and welded , after which the overall assembly of the product begins. The method is suitable for large-scale structures.
Assembly can take place either with the help of supporting wedges or clamps, which are removed as the seam is formed, or on a special stand. Usually a standard stand is used, which is suitable for most simple work, however, mass production requires the presence of a specialized place.
To assemble a structure from metal sheets, it is permissible to use an electromagnetic stand. This is convenient, but not always possible, because the magnetic field tends to negatively affect the welding arc.
Assembling products for tack welding: basic recommendations
When making tacks, you must understand that although they are needed for temporary fixation, you must approach this matter with all responsibility. That is why we recommend not to forget about several basic recommendations:
- The quality of the tacks should be no worse than that of the main seam. If you allow defects to appear on them, it is better to redo everything in a new way.
- Tacks are made with the same electrode as the main seam.
- When making tacks, set the current higher than when welding by 20%. That is, if you plan to cook with a current of 100 A, then for tacks set the indicator to 120 A.
- Be sure to clean the tacks of slag. To ensure that there are no defects in the main seam, they must be smooth and clean.
As a rule, assembly takes up to a third of the time it takes to completely manufacture the structure. This is an important and time-consuming process, non-compliance with the basic rules of which can most likely lead to a defect.
How are products assembled? As a rule, according to the general algorithm:
- All parts included in the structure are assembled in the place where welding work is planned to be carried out.
- Assembly is carried out gradually, moving from one part to another.
- First, individual components are assembled, and only then they are combined into a complete structure.
During work, you can use special support wedges, magnetic clamps, special stands and welding tables. When the structure is connected, you can start making tacks. But it is important to remember that they cannot be placed at the intersection of the weld. You can order everything you need for electric arc welding: equipment, materials and accessories in our online store Welder Buy. We offer reasonable prices, delivery throughout Belarus, and assistance with the selection of necessary goods. Contact us!
Tack welding before welding: what is it?
Tack welds are small welds made by manual arc welding machines using a coated electrode.
They are carried out in strict accordance with existing standards. That is, there are certain rules by which the sizes of seams and the step between them are selected. Tacks perform several functions during welding. They help maintain the required gap between the elements and prevent their displacement, and also increase the rigidity of the assembly, which is no less important. Small seams are considered part of the preparatory work. It largely depends on them how strong and high-quality the main connection will be, and how comfortable the process of its implementation will be. In some situations, working without tacks is impossible, since not all structures can be assembled on stands, and without fixing it will not be possible to maintain the configuration.
Performance
After the entire structure is connected, the components and parts are connected with tacks.
The location depends on:
- where it is planned to make the weld;
- in which part of the structure is the maximum internal stress expected;
- where deformation is possible.
IMPORTANT! The tack should not be located in the place where the intersection of the weld seam is planned.
The application technique depends on the desired depth of penetration, but, in general, does not differ from the technique of applying a welding seam. Essentially, a tack weld is a short weld made in one pass.
In the case where automatic welding is assumed, the tack is applied on the side opposite to the first pass, unless otherwise required.
How to properly make tacks when welding?
You have decided that you need potholders, you know how many there will be and how long they will be. Now the only thing left to do is make the connection. But even here everything is not as simple as we would like. If you don’t follow a certain algorithm, you can make a lot of mistakes, and in the future all the work will have to be redone.
The sequence of tack welding directly depends on what seam you are currently working with:
- Short or medium. The first tack is made strictly in the center. The next one is to her left, then to her right. All subsequent tacks are located at the same distance from each other, while the alternation continues in the specified manner. Thus, it is necessary to reach the edges of the workpieces.
- Long. Here everything must be done exactly the opposite way than in the previous version. First, grab the edges, and then gradually move towards the middle.
- Annular. In this case, the method of welding tacks is slightly different. The first point is placed arbitrarily. The second one is opposite her. Then from each point you need to turn at an angle of 45 degrees and make tacks there. As a result, you will get elements welded to each other crosswise. Then, between each two points, one more is added to increase reliability, especially if we are talking about pipes with a large diameter.
Cutting metal before welding
When preparing metal for welding, a layer of metal, namely a chamfer, is removed using an edge planer or gas cutting machine. In some cases, the cutting is made with a chisel, which can be manual or pneumatic.
The edges are cut according to the marks made using a nickel marker; they represent two parallel lines. The inner one marks the top edge of the chamfer, the outer one is at the bottom of the chamfer. If there are no marks, the master uses a ruler when cutting.
In order not to make a mistake when cutting chamfers, you need to treat the work with great attention and you need to press the tool evenly. When chamfering, the edges of the sheet must be securely fastened. Sheets that are not in place must be cut off directly on the rack or after laying on the floor, but in either case the material must be clamped to prevent shifting upon impact.
Metal marking
Tools for marking metal.
Before further work is carried out, markings or outlines are made on the metal. When marking sheet metal, the contours of parts are drawn on it, marking the places of bends, the center of the hole and all the subtleties of future parts are marked. When marking is carried out, you must be very careful, since the slightest inaccuracy can lead to defective parts.
After carrying out the work on drawing marking lines, indentations are applied using a center punch so that traces of the markings are preserved during further processing. When marking stainless steel parts, it is recommended not to use a center punch.