How to weld pipes: useful tips for beginners
Cooking pipes is not easy, as evidenced by the many questions on forums from novice welders. In addition to the correct selection of consumables and welding mode, pipes require careful fitting and high-quality cleaning of the metal surface. Only in this way will it be possible to achieve an aesthetic, and most importantly, durable connection that will not leak.
That is why only the best specialists with special permission are allowed to weld pipelines, especially under pressure. As for beginners, they first need to understand the very basics, which will be discussed below in this article on the site.
Some tips for performing quality welding
The quality of welding depends on proper preparation for welding work, the choice of electrodes and process technology, which is somewhat different when connecting joints.
Selecting suitable electrodes
The quality of the weld largely depends on which electrode is used for welding. It is a thin metal rod with a special coating. The inner part of the electrode serves as a conductor to create an electric arc, and the coating ensures its stability and also participates in creating the weld.
Based on the type of core, electrodes are divided into consumable and non-consumable. In the first case, the product is based on steel wire, in the second - a tungsten, carbon or graphite rod.
Based on the type of protective coating, electrodes are divided into:
- cellulose - marked “C” - used for labor-intensive and complex welding work with large-diameter pipes, on long technological lines;
- rutile acid - “RA” - the most used type of electrode for welding water supply and heating utilities;
- rutile - “RR” - can also be used for welding water supply and heating pipes, they are distinguished by greater thickness and better quality of the weld;
- rutile-cellulose - “RC” - provide a more durable seam when using the vertical joining method;
- universal - “B” - suitable for welding pipes of various diameters and thicknesses, in a wide temperature range.
Another classification of welding electrodes is the diameter of the rod. The strength of the electric arc, which can cope with pipes of a certain thickness, depends on it:
- 3 mm – electrodes are suitable for welding pipes up to 5 mm thick;
- 4 mm – electrodes allow you to weld up to 10 mm thick, as well as make multilayer metal seams.
Attention! In addition to the thickness and material of the electrode, for high-quality welding it is also necessary to take into account the current strength, which depends on the method of connecting the pipes. For example, for a simple butt joint an arc from 80 to 110 amperes is suitable, but for overlap welding you will need to switch the machine to 120 amperes
What defects may occur during welding?
The biggest defect in welding is considered to be lack of penetration. Welders who experience such flaws are not allowed to work on pipelines. Sloppy seams and their sagging, as well as other minor defects occur when welding technology is violated. To prevent them, work must be performed in compliance with the following conditions:
- welding is performed with a short arc at minimum current;
- detachment of the electrode is allowed only when replacing;
- careful selection of current;
- proper pipe preparation;
- carrying out work with calcined electrodes;
- the welding site must be protected from wind and precipitation;
- use of high-quality equipment and electrodes.
When mastering this type of welding, the main thing is to learn how to deposit the root of the weld. For training, you can take two metal plates 10 mm thick and grab them with a gap, not forgetting about preparing the joint. By fixing them at different angles, they practice welding skills in clearance horizontally, vertically, and on the ceiling.
Selecting Electrodes
The preparatory stage includes the selection of the most suitable electrode. The quality of this consumable material determines the tightness of the resulting system, as well as the complexity of welding. Today, electrodes are used, which are represented by a conductive rod with a special coating. Through the use of a special composition, the arc is stabilized and a more attractive, high-quality weld is formed. Additionally, in some cases, the included chemicals reduce the likelihood of metal oxidation.
There are quite a large number of different versions of such consumables on sale. According to the type of core there are:
- With a core that does not melt. In their production, graphite or tungsten, as well as electrical coal, are used.
- With a melting rod. In this case, wire is used in manufacturing, the thickness of which can vary over a wide range. When carrying out electric welding, the thickness of the electrode is the most important parameter that needs to be taken into account.
Consumable Rod Electrodes
Classification is also carried out according to what substance is used as a coating. The most widely used versions are:
- Rutile acid is often used to create a heating pipeline system or supply water for domestic purposes. During electric welding, slag can form, which is not difficult to remove.
- Cellulose ones are more suitable for working with products that have a large cross-section. An example is the case of manufacturing a pipeline for supplying gas and water.
- Rutile is used when you need to get a neat seam. Removing slag from the surface is simple and quick. In addition, it is suitable for welding a second or subsequent seam.
- Rutile-cellulose is suitable for welding in almost any plane. This point determines their frequent use when creating a long vertical seam.
- The main coating is considered a universal coating that is suitable for electric welding of a wide variety of parts, including thick-walled products. The resulting fastener is characterized by plasticity and high strength.
Rutile electrodes
It is recommended to pay attention to products from well-known manufacturers, whose declared performance characteristics will correspond to real ones. In addition, when choosing consumables, you need to pay attention to the shelf life of the product.
Tapping methods without welding
You can cut into a main pipeline without using welding. This technology is used by many specialists, since welding work requires compliance with safety rules. In this case, special equipment will be required for welding. Welding work is considered complex and time-consuming.
Non-welding tapping technologies include:
- installing a collector is the optimal solution for a large private house. The compact collector system is also installed in the apartment. A water pipe is installed at the entrance of such a system. The collector has several outputs. Their number depends on the system model. The pipeline is connected to any outlet. Adapters are used to fix the hoses;
- installation of a tee - this insertion method is used if a single outlet is provided. The water supply connection is first unscrewed, and then a tee is installed in this place. The pipeline is expanded or shortened by cutting threads;
- the process of cutting the pipe itself - the technique is optimal if there is no external connection. A grinder is used to perform cutting. A tee with a pre-cut thread is installed;
- the use of a thin pipe - a hole is prepared in the system onto which a seal or clamp is fixed. To install the outlet, tightening screws are used.
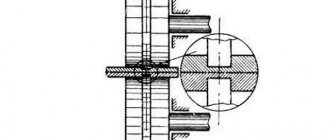
Methods for connecting cast iron pipes
Cast iron pipes are traditionally used for the installation of non-pressure sewerage pipelines. As a rule, in this case, a permanent socket connection is used. To seal the joint, flax hemp or a similar material is used, which is poured either with liquid cement mortar or filled with silicone sealant.
Advice! Since pipes made of cast iron and steel are produced in the same sizes, the connection of cast iron and steel pipes is made using the same technology as the joining of two cast iron pipes.
Such connections are strong and, at the same time, elastic, so the assembled pipelines last for decades. When making a connection, the smooth end of the pipe is inserted into the other socket so that the annular gap between them is equal around the perimeter.
Advice! Not long ago, a technology was developed for connecting cast iron pipes into a socket with the installation of rubber seals. The use of this technology allows installation to be carried out much faster.
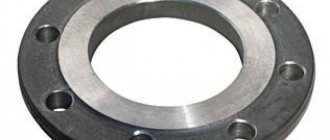
When installing fittings in a cast iron pipeline, flange connections are used. It should be noted that today cast iron is used much less frequently than before. When carrying out repair work, in most cases, old cast iron pipes are replaced with plastic ones.
If the pipeline is only partially changed, then the question arises, how should the connection be made between cast iron pipes and plastic pipes? To solve this problem, it is convenient to use special press fittings sealing the joint with tow or Teflon tape.
Carrying out work
Before starting welding work, you need to put on overalls, prepare a welding mask and gloves. Prepare the welding area. Remove all flammable items. You will need a metal brush to clean the surface of the pipe and a hammer to knock off the slag. And, of course, the welding machine itself, and correctly selected electrodes.
When purchasing electrodes, read the instructions on the package. The manufacturer shows on its product the operating rules and purpose of this type of electrodes. The electrode diameter and current strength are selected by calculation. For any 1 mm of electrode thickness, a current of 30 to 40 amperes is required. As for inverter welding machines, in this case for a 3 mm electrode the required current strength will be 80 A. These parameters are suitable for welding metal, but for cutting it you need to increase the current strength to 100 A.
You need to start the work by securing both pipes in order to avoid displacement of the seam. Light an arc with the electrode inserted into the holder and try to weld a small area. The electrode should have an inclination angle of 70? in relation to the surface to be welded and a gap of about 2–4 mm. It is immediately necessary to make a reservation that these indicators are very approximate and only experience will advise the optimal values in a particular case.
Before you decide to carry out work, you need to prepare as much as possible. It would not be superfluous to study the theoretical side of the issue, or watch relevant videos, or individual consultations with experts.
Welding a fixed vertical joint
The weld is performed in two steps. The perimeter of the joint is conventionally divided by the vertical center line into two sections, each of which has three characteristic positions:
- ceiling (positions 1-3);
- vertical (positions 4-8);
- lower (positions 9-11).
Each section is welded from the ceiling position. Welding is carried out only with a short arc:
lmin=0.5 de, mm, where de is the diameter of the electrode.
Finish the seam in the lower position.
Welding of each section begins with a displacement of 10-20 mm from the vertical axial. The area where the seams overlap—the “lock” connection—depends on the diameter of the pipe and can be from 20 to 40 mm. The larger the pipe diameter, the longer the “lock”
The initial section of the seam is performed in the ceiling position “at an angle back” (pos. 1,2). When switching to a vertical position (positions 3-7), welding is carried out at a “forward angle”. Upon reaching position 8, the electrode is oriented at a right angle, and, having moved to the lower position, welding is again carried out at a “backwards angle”.
Before welding the second section, you need to clean the initial and final sections of the seam with a smooth transition to the gap or to the previous bead. Welding of the second section should be performed in the same way as the first.
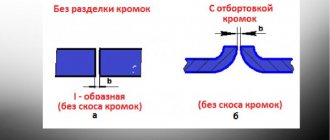
How butt seams are welded
If the edges are not beveled, the bead applied should have a slight flare on each side of the joint. To prevent lack of penetration, it is necessary to create a uniform distribution of molten metal.
Only the correct setting of the current and the competent selection of electrodes will allow for good welding of 6 mm metal if the parts do not have beveled edges. The current value is selected experimentally. Why are several test strips welded?
If the parts have V-shaped bevels, the butt weld can be a single layer or have multiple layers. The main role in this issue is played by the thickness of the metal.
When one layer is welded, the arc should be excited at point “A”, at the bevel boundary, according to Figure 67a. After which the electrode is lowered down. The root of the seam is completely boiled, then the arc is sent to the next edge.
When the electrode moves along the bevels, its movement is specially slowed down to ensure good penetration. At the root of the seam, on the contrary, they speed up the movement to prevent a through burn.
On the reverse side of the welding joint, professionals advise applying an additional weld seam.
In some cases, a 2-3 mm steel lining is mounted on the opposite side of the seam. To do this, increase the welding current by about 20–30% relative to the standard value. In this case, through penetration is completely excluded.
When the weld bead is created, the steel backing is also welded. If it does not interfere with the design of the product, it is left. When welding very important structures, the opposite side of the root of the weld is welded.
If you need to weld a multilayer butt seam, the root of the seam is welded first. For this purpose, electrodes with a diameter of 4–5 millimeters are used. Then the next layers are surfaced with expanded beads, for which large-sized electrodes are used (See Figures 67, b, c).
Proper butt welds
The correct execution of all welding instructions can be assessed by the final appearance of the polyethylene joint. If an incorrect seam is formed and there is a high risk of leakage during further operation, it is better to cut off the joint at the edges and weld a new one.
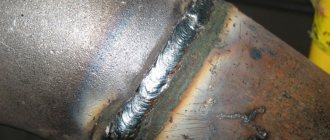
In a correctly executed seam, the dimensions of the burr bead must correspond to the standard values.
Standard parameters are calculated based on laboratory tests. Compliance with them guarantees high reliability of the seam and long service life of the pipeline
There are additional requirements for roller parameters:
- Symmetrical and uniform around the entire circumference of the joint.
- The displacement of the pipe walls in the radial plane should not be more than 10% of their thickness.
- The color of the rollers must be identical to the color of the pipe.
- The depression between the burrs should not go deeper than the level of the outer surface of the pipes.
And of course, the presence of cracks and pores is completely eliminated.
1. Normal weld. The rollers of the correct seam have rounded sizes and shapes that do not exceed the established standards. 2. Seam with a small flash. A small burr indicates insufficient warm-up time or weak compression of the pipes during settling
3. Rollers with oversized dimensions. An enlarged weld may be the result of excessive temperature of the heating equipment or its malfunction. 4. Radial displacement of the rollers. Radial displacement of pipes sharply reduces the strength of the connection and can lead to its rupture already at the installation stage
The reason for the asymmetry of the rollers along the circumference may be poor-quality preliminary trimming or the location of the trimmer at an angle to the pipe.
Need for work
Welding a pipe with water may be required in the following cases:
- Leaks formed as a result of exceeding standard loads or poor-quality installation work. Disconnection in such cases is not welcome, especially if we are talking about main pipelines supplying water to large residential areas.
- The need for a tie-in. Draining liquid from the entire system involves significant temporary losses, so the matter is often limited to turning off the circulation pumps. This measure helps reduce pressure in the circuit, making work easier.
Main difficulties
Welding pipes under pressure is not an easy task, and not every specialist will undertake it.
Problems are associated with the following phenomena:
- the pressure of the liquid does not allow the required temperature of the weld pool to be reached, it is extremely difficult to achieve the required coefficient of adhesion of the deposited metal to the base;
- When water comes into contact with hot material, large volumes of steam are produced. The welder has to work in conditions of limited visibility, the mask fogs up, he has to constantly wipe it, get distracted, waste time;
- It is very difficult to work when the pipes are located at a height, under the ceiling. Water can drip onto the welder, and it can be awkward to hold heavy equipment.
What is needed for electric welding?
To weld pipes using electric welding, you will need a welding machine. Today there are two types of such devices: devices made on the basis of a step-down transformer, and inverters that operate at high frequencies. The first type is used extremely rarely, since it is considered obsolete. An inverter is a more modern device that is simple and portable. It is possible to regulate the welding mode with high precision. True, inverters are considered less reliable in use. Therefore, to work with such equipment you must have certain qualifications.
In addition, heating welding requires the presence of other auxiliary equipment:
- special mask with a light filter. It reliably protects the eyes and face from sparks and particles of molten metal during welding;
- body protection clothing;
- suede gloves. With their help, the device will be held securely in your hand;
- electrodes;
- metal brush. Necessary for cleaning the pipe section before welding, to remove scale;
- a special hammer that is used to knock down scale.
Welding steel pipes
Welding of round pipes is carried out using a continuous seam. That is, if the process began from one point, then it should end at that same point, without lifting the electrode from the surface to be welded. When welding large-diameter pipes (over 110 mm), it is impossible to fill the seam with one electrode. Therefore, it is necessary to use multilayer welding, where the number of layers is determined by the thickness of the pipe walls. Eg:
- If the wall thickness is 6 mm, then two layers of metal are sufficient.
- 6-12 mm – welding is carried out in three layers.
- More than 12 mm - more than four layers.
Attention! Multilayer welding is carried out with one requirement. Before applying the next layer, the previous ones must cool down.
Pipeline assembly
Before welding pipes, to simplify the task, it is necessary to assemble the welding joint. That is, you install the pipes according to the assembly design, clamp them so that they do not move or shift. After which the tack is done. This is when spot welding is done in one place; if the pipeline is assembled from large-diameter products, then tack welding can be done in several places.
In principle, everything is ready, you can weld the pipeline. It would seem that this could be the end of the conversation about welding. But for novice welders it is just beginning, because the welding process associated with pipeline assembly involves a large number of nuances. Here are just a few of them that need to be taken into account.
- Pipes with a thickness of more than 4 mm can be welded using a root weld, this is when the metal fills the space between the edges to the full depth, and a roll weld, when a roller 3 mm high is formed on top of the seam.
- When connecting pipes with a diameter of 30-80 mm with a vertical seam, the technology is slightly different from the bottom location of the seam. First, the volume is filled to 75%, then the rest of the space.
- With multilayer welding technology, a horizontal seam is welded in two layers so that the next one is applied in the opposite direction than the previous one.
- The connection point of the lower layer should not coincide with the same point of the upper layer. The locking point is the end (beginning) of the seam.
- Usually, when welding pipes, the latter must be rotated all the time. This is done manually, so you need to know that the optimal rotation sector is 60-110°. It’s just that in this range the seam is located in a place convenient for the welder. Its length is the maximum, and this allows you to control the continuity of the seam connection.
- The most difficult thing, as many welders believe, is to turn the pipeline 180° at once and at the same time maintain the quality of the weld. Therefore, with such a rotation, it is recommended to change the welding technology. That is, first the seam is welded to a depth of up to 2/3 in one or two layers. The pipeline is then rotated 180°, where the seam is completely filled in several layers. Next, there is a 180° turn again, where the seam is completely filled with the electrode metal. By the way, such joints are called rotary joints.
- But there are also non-rotating joints, this is when pipe is welded to pipe in a fixed structure. If the pipeline is located horizontally, then the joint between its parts must be welded by dividing it into two parts. Welding starts from the bottom point (ceiling) and moves to the top. The second half of the joint is welded in the same way.
And the last stage in pipe welding technology is seam quality control. It must be tapped with a hammer to knock off the slag. Then visually check for cracks, gouges, chips, burns and lack of penetration. If the pipeline is intended for liquids or gases, then after assembly, water or gas is introduced into it to check for leaks.
The welding process is actually a responsible undertaking. And only the experience of a welder can guarantee the quality of the final result the first time. But experience is a gain. We invite you to watch a video on how to properly weld steel pipes.
Quick tips for connection and operation
- When using various fittings , it is advisable not to save much, since most often they are inexpensive and have a short service life.
- Be responsible when applying sealant to threaded connections, because most leaks occur precisely because of poor-quality winding.
- When starting the system for the first time , be sure to check all connections for leaks.
- Pipes connected in different ways must be painted to avoid rusting.
- When installing a water supply network , install a filter that will avoid contamination of the entire system.
- on the mounted elements as possible, do not place heavy things.
Preliminary work with parts
According to the instructions, the following conditions must be met:
- Geometric dimensions.
- Availability of a quality certificate, in particular if it is a pipeline for drinking water.
- Perfectly round shape of pipes - no defects in the ends in the form of a flattened or oval section are allowed.
- The same thickness of pipe walls along their entire length.
- The chemical composition of products must comply with Russian GOSTs for certain systems. This information is obtained from technical documentation or laboratory tests.
Next, you can begin to actually prepare the pipes for joining and welding.
The preparation process includes the following stages:
- check the evenness of the cut at the end of the pipe - it should be 90º;
- the end and an area 10 mm from it must be thoroughly cleaned until a metallic shine appears;
- all traces of oils, rust, paints should be removed and the surface at the end of the pipe should be degreased.
This work can be done with a chamfer, trimmer or grinder. Professionals who work with large diameter pipes use milling machines or gas and plasma cutters.
Welding process
When all the preliminary preparation is over, you can start welding. If you do not have the necessary skills and have never performed such work before, we recommend that you first practice on extra pieces of pipe so as not to ruin the entire system.
Made of metal
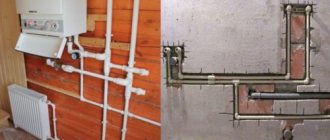
When installing steel internal water supply pipes, small-diameter pipes with a thin wall are used.
Welding of thin-walled steel pipes is carried out using a gas torch or an electric arc. When inserting the internal comb of an apartment into the riser, a T-shaped connection is used. A hole is made in a pipe with a larger cross-section, and the thin walls of the second pipe are slightly ground off with a grinder for better joining.
There is no cutting of edges with this option. Before welding begins, the parts are cleaned of rust and dirt and joined together. Here it is important to ensure the correct location of the joints. They must be perpendicular or at a certain angle.
When working in procurement shops, as a rule, semi-automatic welding is used. At construction sites, preference is given to gas welding.
After proper joining, tack welding is required to secure the connection. On a small cross-section, 2 tacks are enough; as the diameter increases, the number of tacks increases.
For a non-rotating joint, the ceiling is first welded, then a vertical seam is made and welded in the lower position. This type of work requires the involvement of a qualified specialist.
Pipes of different diameters can be connected through metal adapters or inserted into one another.
If metal pipes of different diameters are inserted into one another, then you can make cuts in the larger pipe, bend the edges, and then weld.
Fittings are usually used for threaded connections of steel workpieces. Welding of registers, welding of barrels to a pipeline when moving gas equipment - this is an incomplete list where it may be necessary to weld pipelines of different sections.
Some tips for performing quality welding
The quality of welding depends on proper preparation for welding work, the choice of electrodes and process technology, which is somewhat different when connecting joints.
Selecting suitable electrodes
The quality of the weld largely depends on which electrode is used for welding. It is a thin metal rod with a special coating. The inner part of the electrode serves as a conductor to create an electric arc, and the coating ensures its stability and also participates in creating the weld.
Based on the type of core, electrodes are divided into consumable and non-consumable. In the first case, the product is based on steel wire, in the second - a tungsten, carbon or graphite rod.
Based on the type of protective coating, electrodes are divided into:
- cellulose - marked “C” - used for labor-intensive and complex welding work with large-diameter pipes, on long technological lines;
- rutile acid - “RA” - the most used type of electrode for welding water supply and heating utilities;
- rutile - “RR” - can also be used for welding water supply and heating pipes, they are distinguished by greater thickness and better quality of the weld;
- rutile-cellulose - “RC” - provide a more durable seam when using the vertical joining method;
- universal - “B” - suitable for welding pipes of various diameters and thicknesses, in a wide temperature range.
Another classification of welding electrodes is the diameter of the rod. The strength of the electric arc, which can cope with pipes of a certain thickness, depends on it:
- 3 mm – electrodes are suitable for welding pipes up to 5 mm thick;
- 4 mm – electrodes allow you to weld up to 10 mm thick, as well as make multilayer metal seams.
Made from polyethylene
Welding large-diameter polyethylene pipes requires slightly different work.
Large cross-section pipes are welded using the butt method. To do this, you will need to use a welding machine, a reliable pipe cutter, solvent and rags. A welding machine is a multifunctional unit, which includes a part-centering mechanism, a trimmer, a heater, and a hydraulic station that provides sufficient force when joining heated parts end-to-end.
The equipment runs on electricity. If there are no power supplies nearby, you should prepare a diesel or gasoline generator.
HDPE pipes must be welded in the following order:
- a pipe blank is made according to a sketch or project;
- the parts to be welded are fixed using the machine’s centralizer;
- the ends of the workpiece are treated to remove dirt and oil;
- the trimmer trims edges for welding and cleans parts from chips;
- a heated plate is placed between the ends of the pipes, the ends are pressed firmly against its surface;
- when the ends heat up to melting, the plate is removed, and the workpieces are joined end-to-end;
- Using hydraulics, a certain force is maintained until the joint cools.
In the same way, you can connect HDPE pipes of different diameters. The quality of the connection is affected by the selected heating temperature, the force required to connect the heated parts and the time required to complete all welding cycles.
Weld joint quality control
Having completed the electric welding, an external inspection determines the presence of burns, pores, fistulas and other visible defects. To detect microcracks that are invisible to the naked eye, the mounted area is usually connected to the heating system. If water droplets do not appear on the seams, the work has been done efficiently. This method of checking is acceptable in a private home, where the system can be filled at any time.
In apartments with central heating, the quality of welded joints is checked in the summer using a compressor. Plugs are placed at the ends of the pipes, the joints are coated with soap foam, and air is pumped in under pressure. Places where there are flaws are identified by bubbles on their surface.
It is better to replace or install new heating pipes in the summer, so that most of the welding operations can be performed outside. There should be no flammable materials in the room near the place of work. If you still don’t have enough experience in welding pipes, you can first weld a few unnecessary scraps, so as not to spoil the new workpieces later.
Threaded connection
This type of connection is perhaps the most suitable for installing a home heating system, since you can independently assemble and disassemble any system assembled using this method.
You can buy ready-made pipes with threads, threaded couplings, angles, but you can cut threads on them yourself; the procedure is not complicated, but it requires some effort:
- You need a set of dies (dies), a die holder for cutting external threads.
- We insert the die with the diameter you need into the die.
- the pipe on which threads are needed using a grinder.
- We clamp the part in a vice.
- We chamfer it, that is, we make the outer edge a little rounded so that the die fits better.
- You can lubricate the thread cutting area with machine oil.
- clockwise . This must be done carefully, since a slight misalignment determines how the couplings and angles will be screwed onto a given thread.
- If, after making 2-3 turns , the lever does not want to move, turn it back half a turn and, with a little effort, start moving again.
- After the threads are screwed, remove any remaining oil and metal filings.
- Try screwing the coupling onto the thread.
If you know someone who has an electric drive, this will make the task much easier. And the whole thread cutting process will take a few minutes.
Now let's look at the process of cutting internal threads:
- A set of taps and wrenches is required
- We select taps (rough, medium, finishing) of the required diameter.
- the rough tap in the driver, clamp the pipe in a vice and slowly begin, like a drill, to cut the internal thread.
- If the tap does not move , it is clogged with chips, unscrew it and start again.
- We do the same with the average and fine dreamers.
As for the joining process itself, you will need a sealant (flax, fum tape, sealing thread) and sliding gas keys. A sealant is wound onto the thread, along the thread, we try to ensure that the sealant does not get inside the pipe.
If flax is used, then it is necessary to stretch the linen thread, wind it and lubricate it, for example, with red lead for better compaction. We screw a coupling, angle or other pipe onto the pipe.
If the pipes cannot be twisted
In this case, a coupling, a drive and a lock nut are used:
- onto the squeegee .
- onto the long thread until it stops.
- The short end with the seal is screwed into another coupling, valve, or fitting.
- The coupling , when unscrewed, is screwed onto another thread and tightened with a lock nut
Welding work
Experts believe that the easiest way to insert into a steel external network is welding. A prerequisite for insertion is the ability to turn off the water supply to the system.
An autogenous tool is used to make a hole of a suitable diameter. Then the pipe is welded and the valve is mounted. The last element of the system is covered during further work. If the tapping is completed, the anti-corrosion protection will need to be restored.
If the pipeline is laid from polyethylene pipes, then welding work is not carried out. Taking into account the diameter of the consumable, the clamp is fixed.
Features of welding metal pipes
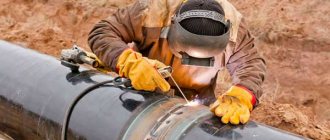
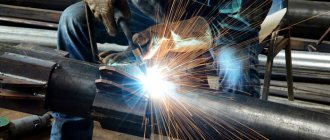
Pipe welding is by far the most common method, as the result is a reliable and durable connection to an electrical or heating main. However, such a result can only be obtained if the process technology is followed. Therefore, such work is the lot of professionals.
Types of pipe welding
The welding process of different types of pipes is divided into two types: pressure welding and fusion welding. In the first case, the metal ends of the parts are heated from a heating source. The metal melts at the edges of the connecting parts under the influence of compressed atmospheric pressure. With this action, the temperature drops, and with melting, it increases.
Fusion manual welding also includes gas welding. This technology for melting metal parts uses a gas flame that is pre-burned in a burner. The method is especially applicable for joining copper products and non-ferrous metals.
Welding of heating pipes is selected taking into account the diameter of the pipeline and the density of the surfaces being welded. This manual method will minimize the possible consumption of molten metal inside the pipe. To avoid this, in both gas and arc welding, a special coupling must be used, which is put on the area where the two pipelines meet. After this, not two parts of the pipe line are connected, but one edge of the coupling is welded to one pipe, and the second part is connected to the second edge.
Welding process
After the arc is ignited, the metal (source and electrode) is melted. The quality of the seam will depend on the diameter of the arc and the power produced by the device.
The supply of electrodes into the arc must be calculated based on the melting speed of the electrodes. An arc having a diameter of 0.7-1.2 mm is standard. To correctly calculate the consumable quantity of the required electrodes, you need to proceed from their brand.
If the arc inverter has a long burner, then the combustion resistance will decrease somewhat, as a result of which the seam is uneven and the melting depth is inaccurate.
First of all, to use arc welding you need to have welding skills in order to ultimately get a high-quality and durable seam.
Also, professionally performed work will allow for the safe installation of a large-diameter pipeline. In addition, butt welding of metal pipes requires the preparation of such devices as:
- grinder for cutting pipes of various compositions;
- nozzles;
- welding manual inverter;
- different brands of electrodes.
Peculiarities
Taking into account the material of which the pipes connected by manual welding are made, various technologies and methods of welding are used.
- The most important requirement for the arc welding process is that the final seam must be strong and free from flaws.
- Fire safety regulations must be included in the process.
- There should be a vat of water in the area where the work is being carried out, which will help eliminate accidental fire. The welder must be equipped with a fireproof suit, welding mask and gloves.
- Given the diameter of the pipeline connection, various electric arc welding methods can be used. An arc soldering connection is often used. In this case, the free space between the pipes should have 4 mm in diameter.
This will make it possible not to use the method of completely melting the metal that makes up the pipe, but only by melting the wire to pave the deformed area. The process is called “butt technology”.
Pipe connection methods
When manually welding various types of pipelines, individual welding technology is used, thanks to which it is possible to obtain an even and durable seam. For galvanized products, flux powder is used, which serves as a protective material against fading of the zinc coating. Flux powder under the influence of a force impulse has the ability to melt and transform into a liquid viscous state, which fully fills all deformed areas of large-diameter pipe lines.
The material is reliable and has increased resistance to corrosion. This technology using a flux composition can be actively used as a connection and filling of cracks in water pipes.
This filler material has no contraindications, since it is soluble in water. Welding galvanized pipes requires safety. To do this, the welding area must be equipped with a fan unit; in the worst case, you can get poisoned by galvanized steam when the metal heats up.
Welding heating pipes under pressure is difficult due to the inconvenient location of the line. To carry out welding work, a hole is cut to get to the deformed area. After the process, the remaining parts of large diameter pipes are welded. The action is carried out starting from the central part of the lower section of the pipeline. The inverter burner is positioned perpendicular to the section of the line to uniformly create a surface seam.
Butt welding of vertical welds may depend on the location of the torch. It should be directed towards the top at an angle. Vertical seams can be created using the point method. After the initial creation of the seam, it is worth welding the area again for stable strength. For professionals, this step can be skipped, since thanks to their skills they can determine by eye the strength of the connection of the parts being welded.
Similar articles
goodsvarka.ru
Welding process technology
To weld pipes, the following connection methods are used: electric arc (manual, semi-automatic and using flux) or gas (using acetylene).
Gas welding
Since it is not always possible to weld pipes using electric welding, in such cases a gas torch is used. This method is applicable in field conditions. At the same time, the quality and fullness of the seams is higher. The risk of internal stress in the metal is reduced, since it is less susceptible to temperature effects.
To carry out the work, a gas generator or acetylene is required. In the second case, the temperature in the working area is higher. The filler wire must be fed so that it is located on the hot metal. If welding of galvanized material is required, then flux is used, and the oxygen concentration in the gas increases. At the same time, it is not necessary to treat the seams with anti-corrosion agents after work.
Manual arc welding
When welding pipes using manual arc welding, the number of penetrations depends on the thickness of their walls. The composition of the electrodes is also important. If the diameter of the products is large, then applying the next layer removes the scale and forges the joint. When applying the first suture, do not rush. After this, the metal is checked for cracks. If there are uneven areas on the seam, they are cut out. Work in these places is carried out again with a displacement (1.5-3 cm). The finishing layer is made with thickly coated electrodes.
Transmission welding of pipes
Many people ask the question: how to weld pipes under clearance? And even some experts do not fully understand how to weld pipes using this method. This is especially true for young people who have just graduated from technical schools and vocational schools.
First of all, when welding a pipe under the clearance, you need to grab the pipes. This will eliminate the possibility of root deformation. How many gripping points need to be made is determined based on the size of the pipes. The parts are grabbed in such a way that the gap at the joint does not converge.
After the joint has been stuck, it must be cleaned. In addition, it is very important to remember that if you find defects on the root (for example, cracks) during welding under the gap, you need to remove them. After the surfaces have been cleaned, the seam is filled. As a rule, filling the seam is considered the simplest step, however, in some cases, filling it takes up to 30% of the root.
It is recommended to leave a small indentation when filling the seam. A depth of 1.5 mm will be sufficient. This is necessary for cladding. If you do this, the facing material will fit very neatly into this small groove and you will get an aesthetic seam. It is very important to remember two rules: when filling a seam, you must maintain the working angle, and also cook on a short arc.
Selection of electrodes for electric welded pipes
There are many types of electrodes suitable for various tasks and differing in material, thickness and characteristics. Before purchasing electrodes, you need to understand their features in order to avoid errors during operation. In addition, it is worth asking how to distinguish a fake product from a real one, and prepare for the costs - good electrodes are not cheap.
When connecting pipes, it is necessary to achieve not only high strength, but also a tight connection, for which you can use a simple method consisting of the following steps:
- The seam is not welded in a circle, but in the shape of a figure eight or horseshoe;
- During such welding, the slag from the metal is gradually squeezed out;
- Each piece of slag must be removed, the result will be not only a reliable, but also a fairly attractive weld.
Installation instructions for polyethylene pipes
To connect polyethylene pipes to water supply elements, the following connections can be used:
- one-piece;
- detachable.
Permanent connections are obtained by soldering pipes to each other or to special welded fittings. This method is cheap, but the resulting structures are often bulky. The use of permanent connections is justified when installing underground stationary water pipelines.
To assemble temporary systems from polyethylene pipes, as well as in the absence of welding equipment, you can use threaded compression fittings, the installation of which will be discussed below.
Attaching a Pipe to a Compression Fitting
Compression fittings are more expensive than welded models, but are dismountable and easy to use. Recommendations for their installation are discussed in the step-by-step instructions below.
Step one - external inspection and trimming
Assembling a system from a polyethylene pipe and a plastic compression fitting begins with inspecting them for cracks and deep scratches. It is better to cut off the defective section of the pipe immediately.
You can cut a polyethylene pipe with a knife or a special pipe cutter. The result should be a perfectly perpendicular cut without snags or waves. To remove uneven edges, you can purchase a manual trimmer.
There are many types of pipe cutters, but they all have a wide base, which ensures a strictly perpendicular position of the pipe relative to the cutting element
Step two - putting the fitting elements on the pipe
First, a clamping nut is put on the hose, then a collet, then a clamping ring, and finally a rubber gasket is tightened.
The complete set of the fitting may be different, so it is important to remember the sequence of its elements when unwinding in order to put them on correctly when assembling the connection
The end of the pipe is inserted into the fitting body until it stops, and the elements put on the hose are pushed into the threads. After this, the clamping nut is tightened tightly by hand. If you have a chain wrench, you can tighten the connection with it.
There is no need to rush to tighten the clamping nut - it may become warped. If the movement is tight, it is better to unscrew the connection once again and repeat the assembly process.
After installing the fitting, it is worth checking the tightness of the connection. In case of leakage, you can easily tighten the nut by adjusting the structural elements.
Inserting a saddle into a pipe
If you need to make a branch from a polyethylene pipe, it is not necessary to buy a tee. It will be enough to drill a hole in it and install a saddle. How to do this will be explained in step-by-step instructions.
Step one - preparation
Initially, you need to inspect the products being joined for scratches and cracks and wipe their surface with a damp cloth.
Step two - assembling the clamp
Place both parts of the clamp on the pipe and tighten the nuts with a wrench. The purpose of the procedure is to firmly fix the saddle.
There are saddles that can be installed under a running water supply. They have a built-in mechanism that drills a hole without depressurizing the structure
Step three - drilling
Mark a point in the center of the saddle hole, and make stripes along the edges of the fitting to remember its position. Unscrew the saddle and remove its parts. Drill the polyethylene pipe in the intended location using a drill of the required diameter.
There are sheathed drills that allow you to make holes in pipes and recesses without the risk of damaging the surrounding walls
Step four - assembling the saddle
Clean the inside of the PE pipe from chips and remove possible snags from the edges of the drilled hole. Attach parts of the fitting to the pipe according to the previously drawn marks and firmly tighten the fixing nuts.
Simple nurses may not be equipped with a clamping mechanism for attaching the pipe. In this case, it is recommended to wrap the threads of the attached fitting or pipe with fum tape
When screwing a pipe or fitting into the seat, you can wrap several layers of fum tape.
The part of the saddle with the outlet hole may have a groove on the pipe side for a rubber sealing ring. Therefore, if there is a sealant, it is necessary to place it between the pipe and the fitting.
If you need to bend a pipe on a certain section of the pipeline, we recommend doing this according to the instructions given here.
How to weld profile pipes at 90 degrees
To obtain a perfectly right angle when welding, the performer needs to have similar experience and strictly follow the technology. There are several important points that will help determine how to weld a profile pipe at 90 degrees:
- first of all, the pipes must be cut;
- work should be carried out on a flat surface;
- to fix the angle, you can use special devices (magnetic squares) or improvised means (corners or scarves);
- welding is carried out in stages: first, a rough connection is made; then the performer makes sure that the 90 degree angle is maintained; Afterwards the welding is completed.
Video
Here is a video of a simple device for welding at an angle of 90 degrees.
And here's another one, three-dimensional.
Selection of welding electrodes
To choose the right electrode, you need to consider several important parameters:
- Workpiece thickness;
- Steel grade.
Depending on the type of electrode, the current value is selected. Welding can be done in a variety of positions. The lower one is divided into groups:
- Horizontal;
- Tavrovaya.
Vertical type welding can be:
- Down up;
- Ceiling;
- Tavrovaya,
Each manufacturer, in the instructions for the electrodes, must indicate the value of the welding current at which they will work normally. The table shows the classic parameters used by experienced welders.
The magnitude of the current is influenced by the spatial position, as well as the size of the gap. For example, to work with a 3 mm electrode, the current must reach 70–80 amperes. This current can be used to perform ceiling welding. This will be sufficient for welding parts when the gap size is much greater than the diameter of the electrode.
To cook from below, in the absence of a gap and the appropriate thickness of the metal, it is allowed to set the current strength to 120 amperes for an ordinary electrode.
Welders with extensive experience recommend using a certain formula for calculations.
To determine the current strength, 30–40 amperes are taken, which must correspond to one millimeter of the diameter of the electrode. In other words, for a 3 mm electrode you need to set the current to 90-120 amperes. If the diameter is 4 mm, the current will be 120–160 amperes. If vertical welding is performed, the current is reduced by 15%.
For 2 mm approximately 40 - 80 amperes are set. Such a “two” is always considered very capricious.
There is an opinion that if the diameter of the electrode is small, it means it is very easy to work with. However, this opinion is wrong. For example, to work with a “two” you need a certain skill. The electrode burns quickly and begins to get very hot when the current is set to high. With such a “deuce” you can weld thin metals at low current, but experience and great patience are required.
Electrode 3 - 3.2 mm. Current strength is 70–80 Amperes. Welding should be carried out using direct current only. Experienced welders believe that above 80 amperes, it is impossible to perform normal welding. This value is suitable for cutting metal.
Welding should start at 70 Amps. If you see that it is impossible to weld the part, add another 5-10 Amps. If there is a lack of penetration of 80 amperes, you can install 120 amperes.
For welding on alternating current, you can set the current strength to 110-130 amperes. In some cases, even 150 Amperes are installed. Such values are typical for a transformer apparatus. When welding with an inverter, these values are much lower.
Electrode 4 mm. Current strength 110-160 Ampere. In this case, the spread of 50 amperes depends on the thickness of the metal, as well as your work experience. "Four" also requires special skill. Professionals advise starting with 110 amperes, gradually increasing the current.
Electrode 5 millimeters or more. Such products are considered professional and are used only by professionals. They are mainly used for surfacing metal. They practically do not participate in the welding process.
Methods for welding PE pipes
Industrial low-density polyethylene (HDPE) is a thermoplastic material whose properties do not change during heating-cooling cycles. Therefore, it is ideal for installing domestic and industrial pipelines.
The connection of individual HDPE pipes and fittings to each other occurs using detachable threaded connections or the following welding methods:
- bell-shaped;
- electrofusion;
- butt.
Pipes with a wall thickness of up to 4.5 mm (diameter up to 50-110 mm) are soldered using the first two methods, and for thicker-walled pipes a fittingless butt welding method is used.
HDPE is sensitive to elevated temperatures, therefore it is used only for water supply with an operating temperature of up to + 40 ° C or a short-term increase to + 60 ° C
Option #1 - butt welding mode
During butt welding, it is important to control critical parameters: tool and plastic temperature, clamping force and operation duration. In the absence of sensors for these values, it is unlikely that it will be possible to consistently obtain a high-quality seam.
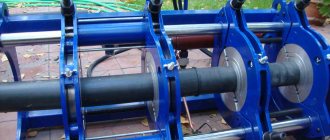
It is better to consider step-by-step instructions for butt welding of polyethylene pipes using the example of semi-automatic equipment with a hydraulic drive.
Butt welding is carried out if the wall thickness of the polyethylene pipe does not exceed 5 mm and its diameter does not exceed 50 cm. The technology includes a number of standard steps:
Image gallery
Photo from
Step 1: Install and Align the Tubes in the Clamps
Step: Setting welding parameters
Step 3: Melting the joined ends and adjacent sections of the pipe
Step 4: Cool the pipe and check for leaks
Step #1 - heating the joints
After processing the ends of the pipes, the welding mirror is heated to a temperature of 200-230 degrees and placed in the middle of the centralizer. Then, using a hydraulic drive, the edges of the HDPE pipes are tightly pressed against it with a force of 4-6 kg/cm2.
After the burr size approaches the minimum permissible values, the force is reduced to 0.2-0.5 kg/cm2 and the plastic continues to be heated for the entire standard time. Welding is permissible at temperatures from 15 below zero to 45 degrees above zero, but in cold conditions the heating time can be increased.
The clamping pressure is controlled by a pressure gauge built into the hydraulic mechanism. In its absence, the required force is determined visually by the appearance of the burrs formed.
Step #2 - connecting pipes
After the necessary heating and melting of the HDPE at the joints, the pipes are spread apart using a hydraulic drive, the mirror is removed and the welded surfaces are again pressed together with a force of 1-3 kg/cm2 using the drive. The size of the burr is controlled visually, so the clamping pressure may vary.
Excessive force when fusing the ends of pipes is no less harmful than its insufficiency. This leads to the formation of a large internal roller, which will create vortex flows and reduce water pressure
Step #3 - Cooling and Inspection
The pipes continue to be pressed against each other until the joint has completely cooled. After removing the force from the hydraulic drive, the pipes are removed from the clamps of the centralizer, and the condition of the weld and bead is assessed. If their parameters are normal, then the pipe is ready for use.
Option #2 - socket welding of HDPE pipes
After preliminary cutting and preparation of HDPE pipes and parts, you can begin their socket welding. The process will be discussed in the form of step-by-step instructions.
Step #1: Prepare the Soldering Iron
The optimal temperature for welding polyethylene pipes ranges from 210 °C, so only soldering irons with adjustable heating are suitable. Before connecting to the network, you need to screw special double-sided attachments (sleeve and mandrel) onto the iron and place the soldering iron on a cross-shaped stand.
The greater the power of the soldering iron, the greater the number of HDPE pipes it can connect per unit of time. For household work, an 800-watt electrical appliance will be sufficient.
When the set temperature is reached, a warning light (usually green) will light up.
Step #2: Heating the Parts
It is safer to work with hot pipes while wearing gloves. To heat the parts, it is necessary to simultaneously pull one part to be connected onto the mandrel, and then insert the second into the metal sleeve.
You need to connect and disconnect HDPE parts with a soldering iron directly without rotational movements. A similar rule applies when connecting heated products.
To maintain the depth of the connection, you can apply a corresponding mark on the pipe with a marker in advance, and then navigate along it when joining heated products.
The data given in the table is indicative only, and you should rely only on the information specified in the instructions for the welding machine
Above is a table with the approximate time frame for heating, joining and cooling of pipes, as well as the depth of insertion into the socket. At sub-zero temperatures, the heating time of the material can be increased by 1-2 seconds.
Step #4: connecting the parts
After warming up, the products must be simultaneously disconnected from the nozzles and with a strong direct movement, insert the pipe into the socket to the marked line. You cannot rotate the parts relative to each other. 5-10 seconds after joining, any movements can lead to a sharp decrease in the strength of the joint.
When connecting heated parts, their axes should be as parallel as possible, since after 20-25 seconds it will be impossible to straighten the curvature
After cooling, it is advisable to inspect the resulting internal seam for the presence of nodules blocking the lumen of the pipe. If it is narrowed, it is better to resolder the connection to prevent a drop in pressure in the system.
Option #3 - electrofusion welding of polyethylene
Welding polyethylene pipes using an electric coupling is the simplest and fastest way. Plastic fittings have a built-in metal spiral, which independently heats the surfaces being connected and melts the PE.
With this method, you have to spend additional money on electric couplings, the cost of which starts at 3-4 dollars apiece. Therefore, such welding is used only in places where the butt and socket methods are not available. The advantage of the electrofusion method is the ability to connect pipes with a thickness of 4.5 mm or less.
Main stages of welding:
- Cleaning and machining of fittings and pipe ends.
- Centering and inserting the pipe into the electrofusion coupling.
- Connecting the fitting to the electrical contacts of a special welding machine, heating the connection.
The last stage is turning off the power and cooling the pipe.
An electrofusion butt joint is stronger than the pipe itself. In tensile tests, the pipe itself ruptures, not the weld.
Electric couplings have a barcode with encoded parameters for heating time, current and voltage. It is read by the scanner of the welding machine, which then carries out the soldering process automatically. The products are tightly and reliably soldered over a large area.
How to weld a squeegee to a heating pipe? — Window Guru's Handbook
Pipeline installation is a serious and responsible undertaking. The welding process for connecting pipes is used quite often.
This method can be used to connect pipes made of various materials, but the process technology in individual specific cases will differ.
Electric welding of metal pipes is very widely used in industrial and private construction.
This method is distinguished by its simplicity, mobility and economic profitability, as it can be carried out both manually and automatically. In private construction, manual arc welding of pipes is most often used, for which it is enough to have welding equipment and electrodes.
Types of welded pipe joints
In construction and industrial production, the following methods of welding steel pipes are used:
- butt welding;
- overlap welding;
- welding of T-joints;
- welding corner joints.
When making connections by welding, the following positions are used, depending on the conditions: horizontal, vertical, bottom and ceiling. The most advantageous and convenient welding position is the lower position, which is possible by rotating the pipe, so preference should be given to this technology.
When constructing large-diameter pipelines, butt joints are most often used.
In such cases, it is extremely important to ensure that the edges are welded throughout the entire thickness.
For thick-walled pipes, double welds are used - external and internal.
To reduce the formation of metal deposits on the inner surface of the pipes, it is necessary to hold the electrode at an angle of 45 degrees relative to the horizontal plane during the welding process.
Range of welding electrodes
Before welding a pipe to a pipe, it is necessary to choose the right electrodes, which are available with different types of coatings, and each type is capable of performing a specific task, which should guide your selection.
- Cellulose coating. This type of electrode is used to weld large-diameter pipes; they are capable of creating circular and vertical seams.
- Rutile coating. Electrodes with such a coating have easy ignition and re-ignition, and the slag crust is characterized by a high degree of fragility. It is very convenient to install tacks, make corner seams and weld root seams on top to create a marketable appearance.
- Rutile-cellulose coating. Such electrodes are convenient for making seams in any position in space, including in the vertical direction, which is the most difficult according to specialists.
- Rutile acid coating. Provides easy separation of slag crust and economical consumption of electrodes when welding pipes.
- Basic coating. Electrodes with such a coating provide the welding seam with high viscosity values. Such seams are not subject to cracking and are used for thick-walled pipes with difficult operating conditions. It is also recommended to use when using pipelines at low temperatures.
Sections: Welding work - how to cook
performing welding work, do-it-yourself welding, Welding - basics
Features of connecting pipelines using welding
The connection of individual elements of pipelines or domestic branches is carried out according to uniform standards. The master uses special equipment, regulated by GOST, which affects the pipe in one way or another (depending on the specific case).
Helpful information! The whole process consists of connecting individual sections of the pipeline through a seam. After completion of the work, it is mandatory to check the welded elements (the so-called quality control).
Based on the type of force applied, pipe welding is divided into four types:
- thermal;
- thermomechanical;
- mechanical;
- cold.
With the thermal method, the edges of the pipe are heated. With thermomechanical, the pipes are connected by heating a special wire. The mechanical method is used, as a rule, for industrial purposes and can be carried out due to friction or a directed explosion. There is also cold welding, which is performed using special chemical compounds. The product is applied to the edges of pipes intended for welding and pressed, resulting in a fairly strong seam after some time.
Most often, metal and polymer pipes are connected using thermal welding
Welding of pipes of different diameters is carried out using special conductors. This may affect the reliability of the connection, however, if all the work is done correctly, then the joint will be strong and airtight and will last a long time.