From the beginning of spring until late autumn, life is in full swing in gardens and summer cottages. You constantly need to bring something, transport it, take it away, and the like. Recently, most summer residents use walk-behind tractors, motor-cultivators and other devices for household needs. They are compact, easy to operate, multifunctional and do not take up much space. The products of the domestic enterprise Neva are most often used. The trailer for the Neva walk-behind tractor will be a good help in your household. In this article we will tell you everything about this equipment.
Manufacturing options
To simplify the work of creating a trolley for a walk-behind tractor, it is recommended to focus on the factory parameters of the trailers offered for purchase.
Thus, according to technical characteristics, all towed devices can be divided into 3 groups:
- Lightweight single-axle trailers with a body length of up to 1.15 m, a width of about 1 m and a load capacity of up to 300 kg (used with walk-behind tractors with a power of up to 5 hp).
- Medium single-axle carts with body dimensions of 1.5 mx1 m. Capable of transporting cargo weighing from 300 to 500 kg (used with equipment with a power of 5 to 10 hp).
- Heavy single-axle or two-axle carts with the following parameters: body length 2–3 m, width – 1.2 m, load capacity 500 – 1000 kg (combinable with units with a power of more than 10 hp).
The height of the trailer sides is usually 30-50 cm.
Of course, these are not mandatory requirements, but for more efficient and long-term operation of both the equipment and the cart itself, it is advisable to adhere to them.
By design, homemade trailers can be classified as follows:
- one-piece, no removable parts;
- with folding body elements;
- with a tilting, mechanical body (dump truck);
- tipper type with hydraulic drive;
The most common are trailers for walk-behind tractors with a power unit of 5-10 hp. (i.e. middle class). Let's consider the production of a single-axle trailer with body dimensions of 1.5x1 m.
Tow hitch for walk-behind tractor
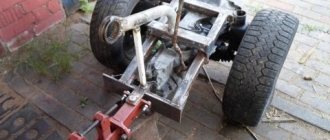
A trailer for a walk-behind tractor is useful on the farm, so it must be durable. The main load falls on the frame, which is the basis of the structure. The towbar also receives enormous loads. The service life of the structure depends on the quality of materials used to create it, as well as the method of fastening.
The trailer hitch for a walk-behind tractor can be purchased ready-made, or you can make it yourself. Drawings and dimensions are easy to find on the Internet, one example is in the photo:
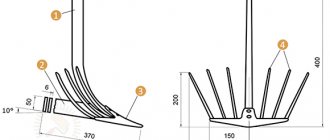
The coupling mechanism can be made in different ways, for example, from a cardan, a cross, or a part in the shape of the letter “P”. The last option is considered by many to be more reliable. The towbar must be made of stainless steel.
Adviсe
Recommendations from experienced DIYers on how to independently assemble a trailer for a walk-behind tractor:
- When installing the body, it is better to use galvanized steel sheet with a thickness of 1 mm. If we consider wooden boards as a manufacturing material, we should take into account that wood is poorly resistant to moisture. Another option is plastic. This material is cheap and moisture resistant, but has low strength. For strength, it is preferable to make the bottom double. It is advisable to use stiffeners in the design;
- It is recommended to use wheels from a motorcycle sidecar and install them complete with the central part of the wheels. You can also adapt wheels from a car (Zhiguli or Moskvich). It should be taken into account that the size of the wheel affects the cross-country ability of the vehicle, the larger the higher;
- the design of the chassis should not be made heavier, as this will reduce the payload on the trailer;
- When manufacturing a trailer for a cultivator with a self-tipping function, it is preferable to purchase a trailer attachment unit to an industrial walk-behind tractor, since it is not easy to make it yourself, and the finished product is quite cheap and accessible. Moreover, buying a finished part will save you a lot of time;
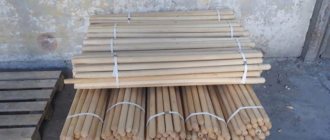
- To create a frame, it is better to use profile pipes of square or rectangular cross-section. You can use a metal corner;
- It is recommended to fasten the trolley parts together using a welding machine, since the bolted connection is considered short-lived. It's even better to combine both methods.
The service life of a homemade trailer depends on the quality of the materials used in its manufacture, as well as on the method of fastening the structural elements.
Types of trailers
There are many different options for assembling trailers, so the first step is to decide for yourself which one is best for you. To make an informed, competent choice, you need to consider all the advantages and disadvantages of designs.
Completely solid structures are reliable, they can carry heavy loads, nothing will fall off, since all the walls are firmly welded to the base. The trolley is ideal for transport.
Transformers increase in size, as the sides can be folded back. The most convenient option is a dump truck. The body rises to a convenient height, and all the debris spills out.
Required tools and materials
Before proceeding with the manufacture of the trailer, you should prepare the materials and tools required to assemble the product.
Materials:
- square profile pipe (40x40mm or 50x50mm, for frame assembly);
- metal corner (thickness – 3 mm, shelf width – 30-40mm);
- wheels 2 pcs. (with pneumatic tires). Usually they take wheels from a motorcycle, as well as from a Zhiguli or Moskvich car. This design will have good maneuverability;
- bridge or steel pipe for making an axle;
- plywood, plastic or iron sheet 1-2 mm (for making a body);
- bolts, nuts and other fastening materials;
- dye.
Tools:
- angle grinder (grinder);
- drill;
- welding machine;
- hammer;
- set of wrenches;
- brush.
When making a homemade trailer for a walk-behind tractor, it is necessary to use design drawings.
a brief description of
Why do you need this unit? Due to its versatility, the trailer for the Neva walk-behind tractor can be used for a huge number of different jobs:
- moving cargo;
- removal of household waste;
- transportation of agricultural products and equipment;
- auxiliary work.
At the same time, it should be noted that it is not recommended to drive a walk-behind tractor onto a busy highway. This is due to the fact that the Neva walk-behind tractor with a trailer has limited speed and maneuverability.
Among the rather impressive range of trailers, the most popular are units with a carrying capacity of two hundred and fifty kilograms to half a ton. Their towbars are made of special metal, which is characterized by increased strength.
For better controllability of the walk-behind tractor, a brake system is installed on the body axle.
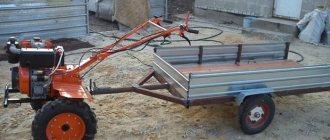
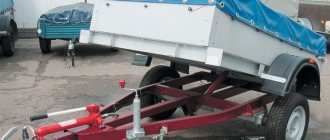
The trailer for the Neva MB 2 walk-behind tractor is in great demand among gardeners. Its special feature is the presence of folding sides. This makes it possible to transport both small and bulk cargo, as well as objects of impressive size.
Preliminary drawings
It is best to develop drawings yourself, according to the model of your walk-behind tractor and the available materials. To do this, you do not need to have any special education, a rough sketch will be enough. Below is a typical design of a single-axle trailer using which you can easily make a trailer for a walk-behind tractor with your own hands.
Trailer drawing. View from below.
Drawing elements:
- 1 – welded frame (angle 40x40 mm);
- 2 – thrust bearing (strip 150x40 mm, 10 mm);
- 3 – bracket (strip 100x40 mm, 10 mm);
- 4 – axle shaft (steel 45);
- 5 – wheel;
- 6 – drawbar (seamless pipe, cold-rolled, Ø 45x4 mm, L = 1.2 m);
- 7 – cardan head;
- 8 – coupling pin;
- 9 – welded poly (pieces of steel angle);
- 10 – rotary axis of the drawbar (hot-rolled round steel Ø 36 mm or a piece of steel pipe Ø 36×6 mm);
- 11 – nut (M36);
- 12 – washer;
- 13 – welded cross member (a piece of steel angle 40×40 mm);
- 14 – spacer axis (hot-rolled round steel Ø 40 mm);
- 15 – scarf (10 mm, Art. Z);
- 16 – nut (M20);
- 17 – Grover washer;
- 18 – bolt (M20).
Drawing of the trolley coupling assembly.
Drawing elements:
- 1 – pivot bushing;
- 2 – overlay;
- 3 – swivel;
- 4 – swivel bushing;
- 5 – drawbar beam;
- 6 – drawbar.
Other details
In addition to the main driver's seat, a simple folding bench is installed, which is mounted on the front side of the body and rests on the side ones. Some trailers for walk-behind tractors are additionally equipped with a spare wheel. It can be placed on the side or bottom of the trailer on the metal bottom using special fasteners.
Near the driver’s seat, for the convenience of storing small tools that may be needed on the road and during repairs, small homemade metal boxes or special bags are secured.
Step-by-step assembly instructions
When making a trolley for a walk-behind tractor yourself, it is advisable to assemble the trailer elements in a certain sequence.
Frame assembly
To create a cart frame, a profile pipe with suitable dimensions is usually used (a round steel pipe can be used):
- Cut the square profile pipe to size according to the drawing. The number and parameters of elements are selected depending on the expected size and load capacity of the trailer.
- Using a welding machine, make a rectangular frame from longitudinal and transverse blanks. Inside it, provide for the insertion of several transverse spacers to increase the reliability of the bottom of the body.
Axle installation
The chassis is the most important part of the trailer design.
- Install wheel hubs at the ends of the axle and weld. The length is chosen so that the wheels do not protrude beyond the dimensions of the body.
- Weld the axle with hubs at the ends firmly to the frame.
- Install wheels.
The use of a tubular axle will significantly increase the strength of the trolley when the permissible load is exceeded.
Trailer body
To cover the sides, you can use sheet metal, corrugated board, plywood or wooden boards.
- Cut out the trailer side elements according to the drawing and connect them using a welding machine (4 pieces, 30-50 cm high). Attach them to the body base (using welding).
- Sheath the sides with steel sheets (can be welded or attached with bolts). To make the structure lighter, it is recommended to use profiled steel sheet, 1.5 mm thick.
- Line the bottom with galvanized sheets and carefully weld along the entire perimeter.
- Weld door hinges onto the rear side and install them on the frame. This will allow you to fold it back when unloading (if necessary, you can also make the sides foldable).
- Install a structure that allows you to fix the tailgate. Reliable locks can be made from steel strip, iron rod and pipe.
Or you can use a regular latch.
Hitch and seat
The trailer is connected to the walk-behind tractor using a special coupling. Its dimensions and design may vary depending on the walk-behind tractor model.
Work on creating the coupling is carried out in the following sequence:
- At the junction of the drawbar pipes, weld a piece of pipe with a diameter of 40 mm and a length of 100 mm.
- Press two bearings inside the pipe. On the trailer side, install a washer on the pipe to fix the towbar axle. The diameter of the washer hole must correspond to the diameter of the towbar axle.
- Form a hitch from a square profile pipe. To do this, drill a through hole for the fixing pin (the diameter of the hole must be equal to the transverse dimensions of the pin). For higher reliability, the pipe can be reinforced with a sheet of metal.
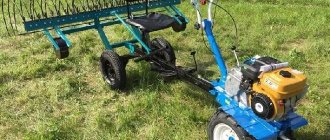
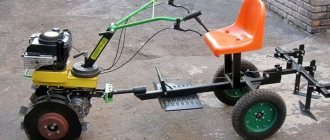
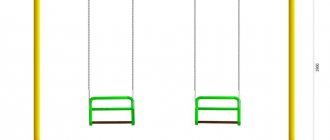
There are a lot of options for making a trailer seat. You can make a prefabricated structure from metal corners, or you can use a regular seat, attaching it to the frame of the trailer. There is a variety in the form of a box in which you can put tools and other necessary things.
Below are several options for driver's seats for a walk-behind tractor trailer.
How to make trailer brakes for a walk-behind tractor
For safety reasons, it is recommended to equip a hand-made trolley for a walk-behind tractor with a parking brake.
There are many options for creating brakes for a trolley, but as practice has shown, the most effective are motorcycle brakes.
To make brakes for a trailer for a walk-behind tractor, you must have a rod, a cable and a metal drum from a motorcycle wheel. The diagram below will help you assemble the brake system; all that remains is to attach it to the cultivator.
Drawing diagram of the brake system
The brake is usually installed on one wheel. The force it creates is sufficient both to hold the trailer when parked and to stop while moving.
Procedure:
- Remove the rod and cable from the disk.
- Make a disc groove.
- Place the drum on the hub. Fill the free space between the protrusions with thick wire.
- Place the machined metal disc on the axle and secure it with a bushing (to prevent the disc from turning, you need to weld a piece of pipe to it).
- At the end, you need to make a lever and pull the cable to it (to control the brake system). You can use any lever from a Soviet passenger car.
How to make a trailer for your walk-behind tractor yourself: shown in detail in the video:
Thus, making a cart for a walk-behind tractor with your own hands is not easy, but if you have the equipment and materials, everyone can do it. And, according to statistics, a homemade cart will cost at least 2 times cheaper than a factory-made analogue.
Preparatory work
First of all, you need to think about what size the trailer should be so that it fits a specific walk-behind tractor and is convenient to use. After this, you will need to sketch out a drawing or sketch of the cart, on which you will display the structure from different angles, put down all the dimensions and draw the nodes.
Trailer mechanisms
You need to think through everything down to the smallest detail so that no difficulties arise during assembly of the equipment. To do this you need to understand:
- non-separable units and parts will be connected by screwing, riveting or welding;
- how the axles, bearings, bushings, hinges will be connected;
- which seat is better to install (simple or rotating);
- what to make the stand for the parking leg from;
- do you need a tipping body, to which you will have to add a mechanical tipper or a self-resetting unit with a special handle;
- which connection unit to the walk-behind tractor to choose (on bearings, bushings or hinged).
Having dealt with all these issues, you can begin to prepare a list of necessary materials and calculate the approximate cost of the future trailer.
Installing a hitch on a walk-behind tractor
To the walk-behind tractor brackets, the hitch brackets are installed using pins. For more reliable fastening, it is recommended to fix the bracket using M14 bolts.
Installation of equipment on the hitch
To install additional equipment, the hitch axle must be mounted to the equipment bracket; by the way, it is removable. Next, the axle is inserted into the outer hole of the hitch. It is necessary to tighten the bolt, aligning the holes on the housing and the equipment rack. Next, all that remains is to secure the contact with an M12 bolt and a corresponding nut.
Why does a walk-behind tractor need a hitch? no need to explain, the same adapter, an irreplaceable thing, but without a hitch you can’t go anywhere.
Varieties
When selecting a hitch for a unit, you should take as a basis the most relevant type of element.
There are several varieties.
- Single and double – used when there are different models of attachments. It all depends on which ones are practiced and in what numbers.
- Reinforced – ideal for heavy motorcycles. Its distinctive feature is that it is more impressive - it is longer and thicker, which allows the auxiliary equipment to sink deeper into the soil.
- Customizable – with the option to change the angle of the shaft, through which you can adjust the level of fixation of attachments and thereby increase work productivity.
- Universal coupling device - involves aggregation with many modifications.
If a coupling device for a motorcycle of the required modification is not commercially available or there are individual requirements for it, creating it on your own will not be difficult, since we are talking about a rather simple mechanism.
Craftsmen, who make most of the “accessories” for motorcycles with their own hands, construct the “pipe-in-pipe” trailer coupling device from a crosspiece, from a cardan and other improvised elements preserved from various devices. The owners of such devices claim that it is possible to create such a unit without any problems by sharing personal experience and drawings of the coupling device on the Internet.
Which trailer is better: TOP 5 best brands and their price
SCOUT-700
If you are looking for a reliable model of a walk-behind trailer and don’t want to spend a lot of money, then the Scout will clearly suit you. The unit is quite easy to use. Moreover, the presence of reliable disc brakes on it is a guarantee of trouble-free operation.
The price of the Scout-700 trailer is approximately 48 thousand rubles.
Characteristics:
- load capacity – 1 t;
- purpose – transportation of goods.
Advantages:
- the presence of a folding side facilitates the loading and unloading process;
- Ease of Management;
- presence of an additional protective block for the driver.
Flaws:
none.
Belarus PM
Indispensable for large areas. Moreover, it is ideal for farming.
The price is about 45 thousand rubles.
Characteristics:
- material of manufacture – steel;
- purpose – transportation of goods;
- cargo weight – up to 0.5 t;
- maximum speed – 90 km/h;
- dimensions – 3085×1510×920 mm;
- volume of the body part – 0.7 m3;
- ground clearance - 270 mm.
Advantages:
- ease of loading and unloading;
- availability of well-developed instructions;
- Ease of Management.
Flaws:
none.
AMPK-1
A fairly convenient adapter if you use it on medium-sized and large-sized garden plots. Moreover, the ratio between its price and quality is optimal.
Price – about 33 thousand ₽.
Characteristics:
- load capacity – 0.5 t;
- purpose - performing work within personal plots;
- dimensions – 1480×1160×780 mm;
- ground clearance - 150 mm.
Advantages:
- the presence of anti-corrosion coating and large wheels;
- high level of sustainability;
- the presence of disc brakes and a comfortable seat.
Flaws:
- often quickly needs repairs;
- swaying when moving.