A gasoline trimmer is a unit with sufficient power and autonomy. It is convenient when performing various agricultural work. However, it needs different types of attachments to enhance its functionality. One of them is the cultivator attachment. What is it, what are the advantages and disadvantages of this equipment?
What it is?
Cultivator-type attachments for a gasoline trimmer are attachments for cultivating land. In essence, this is a loosening unit, through which you can simplify the cultivation of a small plot of land.
Depending on the type of nozzle, it may vary slightly, however, it is not suitable for several types of work. It cannot be used to plow or huddle the land. She just loosens the soil.
Advantages and disadvantages
The cultivator attachment for a gas trimmer, regardless of its type, increases the weight of the assembled unit to 5-6 kg. This is a product that is quite in demand among buyers and is easy to maintain. This device is characterized by a more reasonable cost compared to equipment for a motor cultivator. The cultivator attachment for a gasoline trimmer is convenient in greenhouse conditions; it not only loosens the soil, but also saturates it with oxygen.
Considering that this device is made with high-quality assembly, it is durable, which cannot but please the user. The devices themselves really simplify the work of the summer resident and allow him to speed up his work.
Using this device, you can loosen the soil in a flower bed, flower garden, greenhouse, small beds and even around bushes and trees. On average, the device is capable of capturing soil up to 25 cm wide in one pass.
As for the disadvantages of cultivator attachments for gas trimmers, many buyers note their weight. The lack of weight of the device is the reason that, when faced with difficult soil, it may not go deep into the soil at all, but only scratch its top layer. In addition, as practice shows, with such attachments it is impossible to press the cutters to the ground. This risks the rod starting to spring back, and, as a result, the equipment quickly wears out.
If you try to press the device to the ground more strongly, the rod cannot stand it and bends, which can cause the scythe or the working attachment itself to break. The drive rod is quite long; vibrations cannot be avoided during cultivation, the magnitude of which is directly related to the length of the rod itself. In addition, it depends on the complexity of the area being processed, because the load on the discs and cutters will be greater in the case of dense soil.
Holding a vibrating tool for a long time is difficult, as is managing it. In this case, it is also worth knowing that constant work with a vibrating tool can be fraught with negative consequences for human health. For example, constant vibration can damage the blood vessels and nerves in the fingers of those who have problems with blood supply. When using a brush cutter with a cultivation attachment for a long time, problems can also occur in healthy people.
If you are going to take a hitch for cultivating land, then it is better to choose the disk option. It is equipped with a safety guard, although this makes the user's work somewhat more difficult. As for making the nozzle yourself, this process does not always give an effective result. In addition to the fact that the work of making a hitch for soil cultivation is labor-intensive, it is not always of high quality and reliable. In addition, home-made products do not always cope with turf.
Do not use the device without the protective casing. During tillage, it is necessary to ensure that not only stones, but also glass fragments do not fall on the knives themselves and protective devices. If this happens due to negligence, it is necessary to immediately stop the engine and disconnect the wire from the spark plug.
To wash the cutters, you need to remove the equipment. In addition, the device needs to be lubricated with oil from time to time. Given the sharpness of the blade, you should wear gloves. During soil cultivation, you cannot go to high speed. In order to correctly put on a protective screen with a line stop, you need to remove the stop nut from it, insert the bracket into the slot and rotate the screen until it passes through the groove of the bracket. After this, you need to tighten the wing nut tightly onto the bolt.
To install the attachment on the brush cutter, you need to remove the plug from the attachment rod. After this, the connection is made so that the locking (releasing) button fits into the recess on the hitch. The nozzle is pushed forward until the button snaps into place. Before starting the work process, you need to tighten the handle tightly by turning it clockwise. If the holes do not fit, this attachment cannot be used for your existing gas trimmer.
Depending on the type, the device may or may not have cutters. Based on this feature, it can be classified into gear or disk. Products of the first type are characterized by the presence of cutters, which are located on both sides of the drive shaft. The second options work using cutting discs. However, the presence or absence of cutters does not affect the functionality - cultivator attachments for a gasoline trimmer are purchased for loosening the soil.
The differences between varieties lie in the type of soil that the cultivator attachments themselves can handle. For example, gear-type varieties are lighter in weight, however, because of this they are not able to process difficult soil. Disc analogues can work not only with light soil. These nozzles are characterized by greater rigidity, they are stronger and more durable.
It is easier to process long beds with nozzles of this type, since in this case there are fewer turns. These devices are not universal, and therefore you need to purchase them for a specific model, because in this case everything will depend on the number of slots. Also, it is imperative to take into account the power of the trimmer itself.
Design and mounting options
The design of such a device is usually equipped with one or two pairs of cutting parts. Instead of a gearbox, they are attached to the trimmer at the bottom of the rod or near the motor of the device. Weeding with a brush cutter is done by burning liquid fuel. In order to enhance the strength and reliability of the structure, it has a straight reinforced rod, the diameter of which is at least 25 mm. The bar is designed for optimal working load.
Read also: The reducer on the gas cylinder is leaking
Based on the type of device, it often provides for adjusting the grip width of the cutting elements. As a rule, its indicators vary between 13-25 cm. As for disk cultivator attachments for a gas trimmer, their design can be equipped not only with a pair, but also with several disks with blades attached to them, bent at a certain angle. As a rule, these hinges also have a protective flap that prevents soil from entering during operation of the device.
The design of gear attachments can also have more than two cutting elements. Curved knives can be arranged in a row. At the same time, an increase in the number of knives increases the weight of the cultivator attachment. On average it weighs about 5 kg.
The transmission of torque from the gas trimmer engine to the attachment is carried out via a shaft arranged in the rod. Such a unit is not interchangeable; moreover, it differs in the number of splines available at the end of the rod. There are 7 or 9 of them. This feature is taken into account when selecting an attachment for an existing gas trimmer. A cultivator attachment for a brush cutter with an input shaft of 9 splines and a 26 mm rod is attached instead of the lower gearbox.
The spline method of connecting disks allows freedom of movement of cutting parts. This is convenient specifically for soil cultivation, since it allows loosening the soil with a wide grip in one pass. In this case, there is no need for a large amplitude of movement of the rod.
Motor scooter
There is an analogy here with the mechanization of a bicycle, but you need to take into account that the height of the wheels of a scooter is much smaller; a wide wheel for a pulley cannot be used. But the speed of movement of a scooter is not the same as that of a bicycle, so a small torque is enough.
As can be seen from the description, with skillful hands and a working head, one tool can be adapted to work in different areas. But you need to remember that the motor rotates the spindle at high speed, so the fastenings must be reliable.
How to choose?
When buying a cultivator attachment for a gas trimmer, in addition to the power of the gas trimmer engine, they rely on several factors. These are the processing width, weight, cutter diameter and number of revolutions per minute. On average, the diameter of the cutters can be 20 cm, the number of revolutions can be 180.
Considering that cultivation attachments for gasoline trimmers do not work well with compacted soil, you need to choose an option with a disk-type shield. At the same time, it is important to take into account the maintenance factor, because it is better to loosen the soil after weeding it. It is important that the handle is T-shaped, in this case the direction will be as reliable and correct as possible.
As for the design of the boom, it is useless to buy a cultivation attachment for a flexible shaft ; it will damage the unit quite quickly. The ideal option would be to purchase a product with a multi-slotted rod paired with a cardan drive. Such a unit will perform more efficiently and be reliable. To prevent the engine from overheating, it is important that the power be at least 1000 W, otherwise labor productivity will decrease.
Features of operation
Taking into account the capabilities of the trimmer and the attachment itself, work with the attachment is carried out before the period when the weeds have not yet grown and become stronger. Thus, the user’s work will be more efficient, because it is easier to cut short grass than to deal with coarse and thick stems. Timely loosening of the soil using a cultivator attachment will contribute to the accelerated growth and strengthening of planted crops and, as a result, high yields.
It is important to securely attach the attachment itself to the gasoline trimmer. It is important to take into account the fact that not every gardener can work with a brush cutter with a cultivator attachment, the reason for which is the weight of the scythe and attachment. If the engine of the unit is not designed for a power of more than 1500 W, this attachment can only be used as a ripper or a light hiller. It is important to understand that the attachment for cultivating soil using a gas mower in no way replaces the unit for weeding, plowing and hilling. This is a mini device for small purposes.
Knives rotating during operation are quite dangerous, and therefore you must work with a gasoline trimmer with extreme caution. Do not attempt to clear weed blades while the device is on. This can only be done when the engine is completely stopped. Do not grab knives with your hands or try to block them. The device must be inspected in a timely manner, eliminating breakdowns and worn parts.
The unit must be refueled outside. It is important to ensure that there is no oil or fuel leakage. Do not allow the engine to overheat. During operation, the operator must stay away from rotating elements, since the cutters can damage limbs. Before starting work, you need to inspect the area of future processing and rid it of solid objects. For example, it is advisable to get rid of stones that can cause the cutters to stop or even break.
If this happens, you must immediately stop the unit and inspect it for damage. You cannot operate a broken device.
You can learn more about the cultivator attachment for a gasoline trimmer in the video below.
All owners of personal plots are faced with the problem of mowing grass, which grows literally before our eyes, and during the season it is necessary to improve their plot several times. The usual hand scythe has long been replaced by gas trimmers and electric trimmers. But the price for them does not decrease and is quite significant for many owners of dachas and private houses. Craftsmen nevertheless found a way out of this situation and learned to make trimmers with their own hands literally from improvised means, using gas and electric tools not intended for these purposes.
Cultivator attachment for trimmer. Is it worth buying?
By purchasing a gasoline trimmer, owners of country houses and summer cottages receive a fairly powerful and autonomous tool for various agricultural work. Moreover, manufacturers often offer a variety of attachments for them - brush cutters, dead wood shredders, blowers... Today we will talk in detail about the cultivator attachment for the trimmer.
From the Bulgarian
Most often, a homemade electric trimmer is made on the basis of an ordinary grinder, which is available to every home craftsman. This tool is almost ideal for converting into a trimmer. It has more power and a higher number of revolutions per minute than store-bought machines. In addition, the standard nut used in the grinder to secure the discs already has holes through which it is easy to insert a fishing line (cord).
So, there are many options for what to make a barbell (holder) from. The simplest one is a wooden holder that is longer than for a shovel. An angle grinder is attached to the end of it at the desired angle using regular tape. The fishing line is inserted into the 2 holes of the nut, after which it is tightened. Thus, in a few minutes you get a trimmer with which you can mow the grass without any problems.
To ensure safe operation of a homemade device, you can improve it by making a protective casing (how to do this will be discussed later).
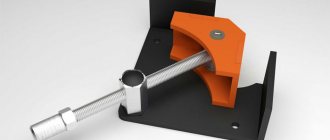
For advanced craftsmen who have a welding machine, we can recommend a more advanced design for securing the grinder and protective casing. It is made of an aluminum tube (serves as a holder) and a metal square profile. Looking at the figure below, you can understand the principle of making the holder.
The grinder is secured to the holder with bolts inserted into the holes that are intended for attaching the handle to the device.
The following photo shows what this design looks like from below.
Read also: Spider for lifting loads
Next, the “original” casing of the angle grinder is removed, and instead of the disk, either a fishing line or a metal disk blade is installed.
By the way, you can also screw the holder (bar) to the holes for attaching the handle when you want to make a simple trimmer that is easy to assemble and just as easy to disassemble if you need to use the grinder for its intended purpose.
To make it more convenient to hold the trimmer in your hands while working, and for it not to rotate around the axis of the rod, you can attach a side handle made from a bent pipe to it.
Cultivator from trimmer
If you have to cultivate the soil in your dacha all year round, then, without a doubt, a converted trimmer into a cultivator will become a real assistant in this difficult task. We immediately need to make a reservation and say that you can purchase ready-made trimmer attachments for cultivating the soil, but you can, like us, start making them yourself.
First, you will need to prepare all the necessary materials and tools:
- A piece of sheet metal 3 mm thick, but a little more is possible. The base for the cultivator knives will be cut from the metal;
- Thick metal wire (wire rod), which will subsequently be cut into pieces, flattened and welded to a piece of metal;
- Suitable tools for making cultivator blades. First of all, this is an angle grinder, a welding machine, some plumbing tools, of course, a hammer, etc.
The process of making a cultivator from a trimmer is best divided into several separate stages. The first step is to prepare a base from a piece of sheet metal. For these purposes, you need to cut two circles with a diameter of 25-30 cm from a steel sheet. Then you will need to cut the wire into pieces no more than 10 cm long and flatten the ends on it. The large length of the cultivator blades will create a strong load on the trimmer, as a result of which the internal combustion engine may fail.
Once the wire is ready, it can be welded to metal circles. 3-4 pieces of wire are enough to effectively weed the ground. Exactly the same operation is carried out with the second circle of metal. After the homemade cutters for the cultivator are ready, they can be attached to the trimmer.
The ideal option in this case would be a reverse thread and a welded tube with a nut onto homemade cutters. In this case, the nozzle is simply screwed onto the trimmer shaft, so alterations to the tool will be reduced to nothing. If an electric trimmer is used to make a cultivator, then you will need to provide a sufficiently long extension cord, which would be enough for the entire treated area.
From a vacuum cleaner
A trimmer from a vacuum cleaner engine is made according to the same principle as from an angle grinder. The motor must be mounted on a rod, and either knives or a plastic or metal disk must be attached to the motor shaft, into which the fishing line must be inserted. The top of the cutting tool is covered with a protective casing.
To prevent dust and small particles of mowed grass from getting into the motor removed from the vacuum cleaner, it can also be hidden in a plastic casing made from a sewer pipe, as shown in the following photo.
Since the motor in the vacuum cleaner is high-speed, it needs to be cooled. Therefore, under the washer into which the fishing line is inserted, it is recommended to insert a homemade disk with slotted and curved blades so that it acts as a fan that creates a vacuum. It is required so that air is sucked through the hose from above and cools the engine.
In order to ease the load on the hands of the mower operator, the unit can be installed on a platform with wheels. In this case, you will get something similar to a lawn mower.
To secure the fishing line, you can also use either a pulley with a suitable mounting hole or a plastic wheel from a cart.
What else can you do with a trimmer?
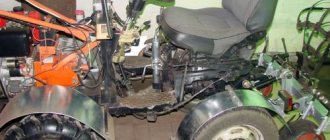
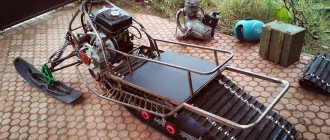
A homemade motor scooter is a vehicle for traveling short distances on sidewalks and park paths. The mechanism reaches speeds of up to 40 km/h, due to the small wheels it has low stability, and is not intended for heavy loads and transportation of goods.
An old scooter that is mechanized is suitable for assembling the product:
- install stiffeners using a square metal profile to strengthen the frame;
- select stable and wide wheels, for example from a garden cart;
- a gearbox is made to transmit power from the engine to the rear wheel via a chain drive;
- install brake, gas handles and cables.
A motorized scooter is a good technique, but it must be remembered that children should not be given such a “toy”.
Source: specmahina.ru
From a drill
The simplest mower is made in a matter of minutes from a drill or screwdriver . But first you must make a knife from a sharpened metal plate with a hole drilled in the center. A bolt is inserted into this hole and tightened with a nut.
Next, the bolt is clamped in the drill chuck, and the trimmer is ready.
Since a drill with this attachment does not have a protective casing, such a tool is quite dangerous for the user. To protect yourself, you can place the drill, like a grinder (discussed above), on the handle of a shovel or on an aluminum pipe.
Also, to protect the user of the mower from knives, a casing can be attached to the drill (attached to a plastic pipe and placed on the body of the device).
The drill is attached to the rod using clamps.
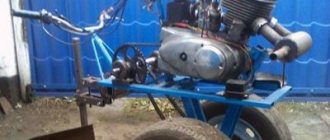
Bicycle with engine from trimmer
A homemade bicycle with a trimmer motor is a high-tech vehicle that differs from simple analogues in its high riding speed, practicality and reduced cost due to the use of cheap equipment.
To assemble a motorbike, the following equipment is required:
- the bike is in working order;
- trimmer motor;
- chain;
- tensioner;
- star;
- clamp;
- cable;
- fuse;
- controller;
- exhaust pipe;
- bushing, bolts, washers.
Converting a bicycle to a bike:
- 2 rubber spacers are attached to the rear wheel: the first - between the spokes, the second - behind them.
- The sprocket must fit the trimmer motor. It is inserted into the bushing, which is located on the outer part of the wheel. A crescent moon is attached to the inside.
- The engine is mounted on the trunk or behind the seat using a clamp purchased or made from a steel plate with your own hands.
- Install the chain on the sprocket and power unit and adjust it with a tensioner. It is not recommended to use belts instead of a chain. Under the influence of friction, they often become unusable and their service life is minimal.
- The throttle handle and the engine are connected by a cable.
- Attach the fuel tank and carburetor.
- The exhaust pipe is welded with a weld seam.
Some craftsmen create a braking system and replace standard wheel tires with non-slip ones. After assembling all the components, be sure to check the operation of the bicycle. The functionality of the mechanism and its own safety will depend on this.
An ice drill made from a trimmer is a low-power unit for winter fishing enthusiasts, characterized by its low weight and easy transportation. In order to save money on the purchase of new equipment and the effort required when manually drilling ice, fishermen make them from old trimmers. For this you need:
- petrol mower;
- factory or homemade drill;
- improvised materials.
It is difficult to make an ice screw at home. The parts to pay attention to are the screws and the blade base.
To create augers you need:
- Calculate the sizes of product segments.
- Prepare metal blanks, mark, cut out a sector, weld the segments together. The result is a steel spring welded on one side.
- Stretch the spring by a given step on a special machine in order to weld the segments on the other side.
- Grab the flange and weld it to the pipe.
- Boil the screw connections and paint.
- When choosing auger rotation, take into account the direction of rotation of the gas-powered tool.
Converting a trimmer into a gas auger is suitable for units with a folding boom. The connection adapter is the easiest to prepare.
If it is necessary to increase the rigidity and stability of the mechanism, a durable frame is made to mount the gearbox and motor.
Motorized drills are units for making holes for installing wooden piles, laying foundations, and drilling wells. The operating principle and manufacturing method are similar.
From a chainsaw
Many different attachments have already been invented for chainsaws that expand the capabilities of this unit, for example, a cultivator, a drill, a boat motor, and also a scythe attachment. You can see what it looks like in this video. If you want to make a trimmer out of a chainsaw, the most you can make is a lawn mower on wheels, since the engine of the unit is quite heavy, and it will not be possible to apply the above-described options for making trimmers (with a bottom drive) to it.
Therefore, the trolley is made first. It can be welded from a 25x25 mm corner. The frame dimensions should be 500x600 mm. The wheels are attached to the corners of the frame.
Next, you need to unscrew the “steering wheel” and tire from the unit. The cart handle can be made from water pipes. The “steering wheel” is screwed to it. It is also necessary to lengthen the fuel hose and throttle cable.
When installing the trolley handle, make sure that it does not block the winder (starter).
The gasoline engine is installed (screwed through the holes to secure the tire) onto the frame so that the gearbox is rotated 90 degrees and the shaft is at the bottom.
Now all that remains is to attach the cutting tool to the shaft of the unit. This is done as follows.
- It is necessary to weld a small piece of pipe, 80 mm long and 50 mm in diameter, to the “star” of the device. It is better to cut the pipe on a lathe so that the ends are perfectly straight.
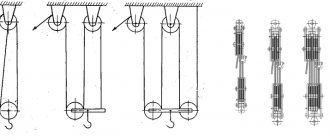
- Next, find a pipe with a slightly larger diameter - equal to 58 mm. It also needs to be cut to a length of 80 mm. Thus, you will receive a telescopic shaft, which is connected using 2 bolts (m6) located opposite each other. The bolts must have locknuts. Below is a diagram of how the trimmer head is made, which is used to secure the cutting tool.
Several holes need to be made in the telescopic pipes so that the height of the knives above the ground can be adjusted.
It is better to make a knife of such a design as in the following figure.
Due to the fact that movable knives are attached to the disk with rivets, they will simply bounce off when they encounter a stone or a dry branch . This will protect the shaft and gearbox from damage that may occur when the tool jams.
The rivets that hold the knives to the disk must be metal.
The diameter of the disk (made from 4 mm sheet steel) should be 180 mm. The knives are made from strips 30 mm wide and 120 mm long, cut with a grinder from a hacksaw blade for wood.
Trimmer blade attachment
Going shopping in search of spare parts is a thankless task, and I immediately abandoned this idea. What's the point of wasting time and money if the new part will last no longer than the previous one, but only until the first meeting with some piece of iron lurking in the grass. It’s better to immediately replace the broken coil with a homemade nozzle with stainless steel petal knives (see photo)
.
The design of the nozzle is very simple. To make it, it was necessary to make only four parts: a central bushing, a washer and two petal knives (see figure)
.
I made the central sleeve from a piece of ordinary water pipe. To adjust its internal diameter to the diameter of the shaft, I made a through longitudinal cut on one side of the workpiece and lightly hammered it down. The bushing should fit tightly on the shaft, without play.
I managed to find a ready-made washer of suitable sizes. But, if one is not found, it is not difficult to cut it out with a chisel from sheet steel 3...4 mm thick and finish it with a file. He put the washer on the bushing and welded it at four points. This is quite enough.
I cut the petal knives from stainless steel sheets 1 mm thick. The knives are attached to the washer with rivets. They must be steel. I used M4 screws as rivets. They must be riveted so that the knives are not tightly pressed to the washer, but can rotate freely. This is a very important point. If the knives are fixed tightly, they will probably bend or break at the first meeting with a stem that they cannot cut in one revolution of the trimmer shaft.
The assembled nozzle is put on the trimmer shaft and secured with a copper cotter pin ∅3 mm. It is better to drill the hole for the cotter pin locally.
The first tests of the trimmer with the new blade attachment confirmed its effectiveness. The knives easily “took” almost any grass. And during leisurely work, the electric motor was practically not overloaded. In a word, what you need!
However, we should not forget that metal knives pose a more serious danger than a thin, almost weightless fishing line. Therefore, it is advisable to mow the grass around the house when there are no people or pets nearby. And, of course, you need to constantly monitor the wear of the knives and the rivets that secure them.
DIY trimmer knife
If you need to mow plants with thick or tough stems, then ordinary fishing line will not cope with this task. Therefore, you cannot do without a special metal knife. Trimmer knives can be bought at a specialized store, or you can make them yourself, for example, from an old circular saw blade (without soldering). The knife is made as follows.
- First, markings are made on the disk. You can make as many “petals” as you wish, for example, two, three, four or five, as in this description.
- Next, using a grinder, 2 radial cuts are made according to the markings.
- After radial cuts, you need to use the same grinder to connect 2 cuts, making a longitudinal groove of sufficient depth so that you can break off the cut piece of the disk.
- Clamp the almost cut part of the workpiece in a vice and break it off.
- Do this operation with all the “petals” of the future knife. All irregularities can be ground on an abrasive wheel.
- When the workpiece is ready, sharpen one side of each “petal” at an angle of 45°.
Homemade protective casing
If you are making a homemade mower, then you will definitely need a protective cover. It will protect your eyes, body and legs from injury from small pebbles and knife fragments if they break.
The trimmer housing can be made from a sheet of aluminum or thin sheet metal.
- First, in the corner of a metal square, you need to drill a hole of the required diameter (depending on the type of drive of your unit) using a crown.
- Then you will need to make markings for the fasteners. As a base to which the homemade protection will be screwed, you can use a standard casing from an angle grinder if you are making a trimmer from it.
- Clamp the workpiece with a clamp and, using a tape measure and a pencil, draw the first circle with a radius of about 270 mm. The center of the circle will be the corner of the workpiece. It is impossible to give exact recommendations regarding the radius, since it will depend on the diameter of the cutting tool that you will use with the unit. Therefore, first decide which knives you will use and what line reach will be optimal.
- Next, draw a second arc (this will be a bend), slightly retreating from the first. In this case, 5 centimeters. This way you measured the height of the future shield. In general, it is recommended to make the height of the casing such that when you place it flat on the ground, the cutting tool does not reach it by about 2 cm.
- After marking the second line, you need to cut a workpiece along it using a hacksaw or a jigsaw with a metal file.
- In addition, it is necessary to make radial cuts (up to the first arc) and bend the resulting parts with pliers at an angle of 90°.
- Next, the shield is attached to the protective casing of the angle grinder, the cutting tool is installed, and the unit is ready for work.
Read also: Switching an electric motor from star to delta
In this way, you can make and install a protective cover on a trimmer purchased in a store if the shield has cracked for some reason. The shields in factory devices are made of plastic and often break if you unsuccessfully hit the trimmer head on the ground to lengthen the fishing line.