Sawing is the processing of metal with a cutting tool - a file, with the help of which a layer of metal is removed from the surface of the part/workpiece. Thus, the parts are given the required dimensions, a given shape, the required accuracy and surface roughness. The following are subjected to filing in plumbing:
- external flat and curved surfaces
- external and internal, complex shaped surfaces
- recesses
- holes
- grooves
- projections
Filing is divided into preliminary (roughing) and final (finishing and finishing). Rough and fine filing is performed with different files. Files are made from tool and carbon steel. The length of a file is considered to be only the length of its cut part (working length). Files are made with lengths from 100 to 400 mm.
Filing tool - types
The size of the file cut is selected depending on the thickness of the layer being removed, the required surface cleanliness and processing accuracy. Rasp-cut files are used for processing wood, leather, rubber, rubber, bone, etc. Babbitt, lead, zinc and other metals are sawn with a rasp. Files with a single cut are used for processing soft metals (brass, zinc, babbitt, lead, etc.), as well as for processing wood. Double cut files are used for machining steel and cast iron. It is not recommended to file soft metals with “velvet” files, as their teeth quickly become clogged with shavings and stop cutting. The length of the file is selected depending on the size of the surface being processed. The larger it is, the larger the file should be. The length of the file must be at least 150 mm greater than the length of the surface to be filed.
Metal filing. Processing metal with a file.
What is metal filing?!
Filing is the process of manually processing a surface using files. A file is a tool with a large number of notches or cuts, forming very small teeth, which are used to remove chips during the translational movement of the file (Fig. 1).
Rice. 1. File:
1 – nose; 2 – edge (wide and narrow); 3 – rib; 4 – heel; 5 – tail; 6 – handle.
File names.
Files can be divided into regular files, needle files, rasps and machine files. Files are manufactured with single-row and double-row cuts. Based on the size of the notch pitch, files with a large pitch are called bastard files, with a medium pitch - personal files, and with a small pitch - velvet files.
File shapes.
The shapes of files are: flat, blunt-nosed and sharp-nosed with a smooth or notched edge, semicircular, square triangular and round (Fig. 2).
Rice. 2. File shapes:
a – flat; b – semicircular; c – square; g – triangular; d – round; e – needle file.
In boiler production, filing is used in rare cases:
- for small craft work;
- for particularly careful fitting of parts.
Since the filing operation is very expensive and ineffective.
Storing files.
Files should be stored in a tool box, laid out in one row, with spaces between them, protected from dirt, oil, water and especially sanding dust. After work, files must be cleaned with steel brushes to remove dirt and metal particles.
How to attach a handle to a file?!
The files have wooden handles with a metal ring on the neck. To avoid cracks, the handle attachment must be done carefully. The tail of the file is gradually inserted with a rotational movement into a small hole drilled in the end of the neck of the handle. The sharpened edges of the file tail drill out the hole. At the same time, tap the head of the handle on the workbench. After some deepening, the handle is removed and the file tail is cleared of wood shavings. Then the operation is repeated until the handle fits tightly to the lower edges of the file. Sometimes, instead of drilling, they use a thin steel rod heated red-hot to burn a hole in the handle.
Filing technique.
The success and accuracy of filing depends on the correct pressure on the file and maintaining the file while working in a position parallel to the surface being filed.
Filing occurs more quickly if the pace of movement is low and the pressure on the file is high. When filing wide surfaces, the work is easier and more correct, since the plane itself is a good guide.
Filing techniques.
The greatest labor productivity during filing is ensured when the upper surface of the vise jaws is located at the level of the worker’s elbow. The position of the worker's legs and body during work has a significant impact on filing performance. The most comfortable position is one in which the mechanic's body is approximately 45 degrees with a line passing through the jaws of the vice. The movement of the file must be strictly horizontal, therefore the vertical forces on the handle and nose of the file must vary depending on the position of the point of contact of the file with the workpiece. During the working movement of the file, the force of the left hand must be gradually reduced. By adjusting the pressure on the file, one achieves a smooth filing surface without blockages at the edges. It is necessary to press the file against the workpiece only during the working stroke (from yourself). During the return stroke, the file should only slide along the surface. The rougher the processing, the greater the force during the working stroke. Filing the surface usually ends with its finishing. In metalworking, surfaces are finished with personal and velvet files, paper or linen abrasive skin, which is wrapped around the file, and abrasive stones. In this case, the direction of movement of the file can be transverse, longitudinal or circular strokes.
Plumbing; training manual / V.N. Feshchenko
Tools for filing and their classification
Tools for filing and their classification
Files are used for filing metal
. Filing is divided into preliminary (roughing) and final (finishing and finishing), performed with various files. In order to sand the desired surface well, you need to choose the right file. The choice of file is based on the material and texture of the material being processed, the shape and the desired result.
General file structure
Let's look at the types of files in more detail.
Classification of files:
bastard files
– used for rough processing of metal surfaces, usually removing 05-1.0 mm. metal
Personal files
– Suitable for final precision machining and obtaining a clean, non-jarred surface. Accuracy 0.02 mm.
Brusovki
- used to remove thick layers of metal.
Files
– the most accurate and small files, used mainly for small work and finishing the workpiece to the final result.
Types of files
Files are marked with numbers from 1 to 10, but we will consider only the most necessary files that are used for filing metal in metalwork shops:
1. Round file
– processing of round, oval and concave surfaces;
2. Half round files
– has two sides, flat and round, one side processes planes, the other concave and semicircular surfaces;
3. Triangular files
– processing of surfaces and holes inaccessible to flat files;
4. Square files
– processing of narrow straight surfaces inaccessible to flat files;
5. Flat files with oval edges
– used for processing various types of curves;
6. Files
– used for carrying out precise and small work, processing small surfaces and slots.
Metal filing techniques
Before you start filing, you need to properly organize your workplace, and first of all, arrange the tools and workpieces on it in the most rational way. The marked workpiece is firmly clamped in a vice. In this case, the processing surface should be higher than the level of the vice jaws.
When performing filing, you need to take the correct working position (see Fig. 1.): you should stand half-turned to the workbench at a distance of 150...200 mm from its front edge, your left leg is placed forward in the direction of movement of the file. The rounded part of the file handle should rest against the palm of your right hand. Four fingers are wrapped around the handle, and the thumb is placed on top and pressed against the handle. The extended fingers of the left hand are placed on the toe of the file, retreating from the edge by 20...30 mm.
Fig.1
During operation, the file makes reciprocating movements: forward - working stroke, back - idle. During the working stroke, the tool is pressed against the workpiece; during the idle stroke, it is moved without pressure. The tool must be moved strictly in a horizontal plane. The force of pressing on the tool depends on the position of the file (see Fig. 2). At the beginning of the working stroke, press with the left hand a little harder than with the right. When the middle part of the file is brought to the workpiece, the pressure on the toe and the handle of the tool should be approximately the same. At the end of the working stroke, the right hand presses harder than the left.
Fig.2
There are several filing methods: transverse, longitudinal, cross and circular. Transverse filing (Fig. 3 a) is performed when removing large allowances. When longitudinally filing workpieces (Fig. 3 b), the straightness of the processed surface is ensured. It is better to combine these two filing methods: first, filing is done across, and then along. When filing with a cross stroke (Fig. 3 c), good self-control over the progress and quality of work is ensured. First, they file with an oblique stroke from left to right, then, without interrupting work, with a straight stroke and finish filing again with an oblique stroke, but from right to left. Circular filing (Fig. 3d) is performed in cases where frequent irregularities need to be removed from the surface being treated.
Fig.3
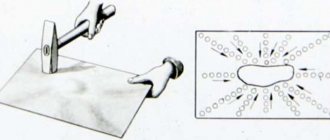
When filing, the palm of the left hand is placed across the file at its end, and the right hand covers the handle of the file. The movement of the file must be strictly horizontal. Sawing metals is similar to processing wood with a rasp (see Fig. 4). It is best to file the surface of the workpiece using the so-called cross-hatch. With this processing, the plane of the part is first filed from right to left at an angle of 30-40 degrees to the side of the vice, and then filing is carried out in the same way from left to right. For filing curved surfaces, files with different cross-sectional shapes are used.
Fig.4
When filing planes located at right angles, first saw one of the surfaces clean, and then process the second surface at a right angle to the first. Filing of surfaces along the internal right angle is carried out so that the edge of the file, which does not have a notch, faces the second surface (see Fig. 5).
Fig.5
The correctness of filing is checked with a ruler or square for clearance (see Fig. 6): if there is no clearance, the surface is flat. The durability of files largely depends on their care.
Fig.6
From long-term use, the file cut becomes chipped and worn out, causing the tool to lose its cutting ability. To extend the service life of the file, it is rubbed with chalk, which protects the notch from clogging with small shavings. If the file notch is still clogged with sawdust, it must be cleaned with a steel brush (see Fig. 7).
Topic 8. METAL FINISHING presentation for a lesson on the topic
Slide 1
Discipline “Technology for performing plumbing work” College of ISTD (branch) NCFU in Pyatigorsk Oleg Yuryevich Goncharov, college teacher
Slide 2
Topic 8. FINISHING OF METAL 1. The essence and purpose of the filing operation. 2. Tools used for filing. 3. Devices for filing. 4. Surface preparation, main types and methods of filing. 5. Rules for manual filing of flat, concave and convex surfaces. 6. Mechanization of work during filing. Tools for mechanization of filing work. Rules for performing work during mechanized filing. 7. Typical defects when filing metal, the reasons for their occurrence and methods of prevention. Study questions:
Slide 3
1. The essence and purpose of the filing operation Filing is an operation to remove a layer of material from the surface of a workpiece using a cutting tool - a file, the purpose of which is to give the workpiece a given shape and size, as well as to ensure a given surface roughness. In metalwork practice, filing is used to process the following surfaces: - flat and curved; - flat, located at an outer or inner angle; - flat parallel to a certain size between them; - shaped complex profile. In addition, filing is used to process recesses, grooves and protrusions. There are rough and fine filing.
Slide 4
2. TOOLS USED IN FINISHING Fig. 2.1. Types of notches: a - single; 6 - double; c - rasp The main working tools used in filing are files, rasps and needle files.
Slide 7
Continuation of question 2 Fig. 2.2. Shapes of file teeth: a - notched: β - cutting angle; γ — front angle; δ—tap angle; α - back angle; b - milled; c - drawn Files are classified into 6 classes depending on the number of cuts per 10 mm of file length. The notches have numbers from 0 to 5, and the lower the notch number, the greater the distance between the notches and, accordingly, the larger the tooth.
Slide 9
Continuation of question 2 Fig. 2.3. Cross-sectional shapes of files and processed surfaces: a, b - flat; c - square; g - triangular; d - round; e - semicircular; g - rhombic; h - hacksaw
Slide 11
Continuation of question 2 Fig. 2.4. Rasps: a - flat, blunt-pointed; 6 - flat pointed; c - round; g - semicircular; L - length of the working part; / - handle length; b - rasp width; h - rasp thickness; d - rasp diameter
Slide 12
Continuation of question 2 Fig. 2.5. Needles: a, b - flat; c - square; g, d - triangular; e - round; g - semicircular; z - olive-shaped; and - rhombic; k - trapezoidal; l - fillet
Slide 13
Continuation of question 2 The cross-sectional profile of the file is selected depending on the shape of the surface to be filed: flat, the flat side of the semicircular - for filing flat and convex curved surfaces; square, flat - for processing grooves, holes and openings of rectangular cross-section; flat, square, flat side of semicircular - when filing surfaces located at an angle of 90°; triangular - when filing surfaces located at an angle of over 60°; hacksaw, rhombic - for filing surfaces located at an angle of more than 10°; triangular, round, semicircular, rhombic, square, hacksaw - for sawing holes (depending on their shape).
Slide 14
Continuation of question 2 The length of the file depends on the type of processing and the size of the surface being processed and should be: -100... 160 mm - for filing thin plates; 160…250 mm - for filing surfaces with a processing length of up to 50 mm; 250...315 mm - with a processing length of up to 100 mm; -315... 400 mm - with a processing length of more than 100 mm; -100... 200 mm - for sawing holes in parts up to 10 mm thick; -315...400 mm - for rough filing; -100... 160 mm - during finishing (needles). The notch number is selected depending on the requirements for the roughness of the machined surface.
Slide 15
Continuation of question 2 Fig. 2.6. File handle Fig.2.7. Quick-change file handle: 1 - sleeve; 2 - spring; 3 - glass; 4- nut; 5 - body
Slide 17
3. Filing devices Fig. 3.1. Frame: 1- partition; 2 - working plates; 3 – screws Fig. 3.2. Plane-parallel bastings: a - basting; b - basting in a vice with a workpiece; 1,2- beads; 3 - working plane; 4 - blank
Slide 18
Continuation of 3 questions Fig. 3.3. Sliding parallels a - rectangular; b – angular Fig. 3.4. Conductor: 1 - conductor; 2 - blank
Slide 19
Continuation of 3 questions Fig. 3.5. Filing prism: 1 - body; 2 — clamp; 3 -gon; 4 - ruler; 5-threaded hole; A - prism guide plane
Slide 20
Continued 3 questions When working with a file, the notch becomes clogged with sawdust, so the file should be cleaned before further use. The method of cleaning files from sawdust and other processing products depends on the type of material being processed and the condition of the file surface: - after processing wood, rubber and fiber, the file should be immersed in hot water for 10... 15 minutes, and then cleaned with a steel brush; -after processing soft materials (lead, copper, aluminum) with files, the notch is cleaned with a scissor brush; -oiled files are rubbed with a piece of charcoal, then cleaned with a sanding brush. Oil from the surface of the file can be removed with a solution of caustic soda, followed by washing and cleaning.
Slide 22
4. Surface preparation, main types and methods of filing Preparing surfaces for filing includes cleaning from oil, dirt, molding sand, and scale. Cleaning is carried out with sanding brushes, as well as by cutting off the remains of the gating system and flash with a chisel, followed by cleaning with coarse sandpaper. Oil is removed with various solvents. The position of the worker when filing is most convenient when his body is turned at an angle of 45 ° to the jaws of the vice (Fig. 3.6, a). The left leg should be pushed forward and be at a distance of approximately 150... 200 mm from the front edge of the workbench, and the right leg should be 200... 30 mm away from the left so that the angle between the feet is 60... 70° (Fig. 3.6, b).
Slide 23
Continuation of 4 questions Fig. 3.6. Worker position: a - position of the arms and body; b - position of the legs
Slide 24
Continuation of 4 questions Fig. 3.7. Hand position when filing: a - on the handle; b - on the toe; c - when filing
Slide 26
Continuation of 4 questions Fig. 3.8. Distribution of forces during filing (balancing) The working stroke during filing is the movement of the file forward from the working one, the reverse stroke is idle, without pressure. Movements during the working stroke must be uniform, smooth, rhythmic, and both hands must move in a horizontal plane. During the reverse stroke, it is not recommended to tear the file off the workpiece.
Slide 28
Continuation of 4 questions Fig. 3.9. Grabbing the file with a “pinch” Finish filing is carried out with personal files (No. 2 and 3) with less effort, which ensures the removal of small chips and obtaining a high-quality surface. The surface finishing after processing is carried out to improve its appearance using a personal file, which is taken with a “pinch”.
Slide 29
Continuation of question 4 Finishing and grinding is carried out with short personal and velvet files (No. 4 and 5). The pressure on the file for this type of processing should be minimal. Sawing of narrow flat surfaces is usually done transversely, which ensures greater processing productivity. When filing wide flat surfaces, three methods are used: - after each double stroke of the file, it is moved in the transverse direction to a distance slightly less than the width of the file; - the file makes a complex movement forward and sideways across the workpiece; - cross filing, in which processing is carried out alternately along the diagonals of the surface being processed, and then along and across this surface.
Slide 33
5. Rules for manual filing of flat, concave and convex surfaces 1. Before starting work, you must check that the configuration and dimensions of the workpiece comply with the requirements of the drawing. 2. It is necessary to firmly secure the workpiece in a vice. 3. When performing finishing finishing operations, filing, it is necessary to use overhead sponges. 4. The number, length and section of the file should be selected in accordance with the technical requirements for processing.
Slide 34
Continuation of question 5 Rules for filing flat surfaces 1. Choose a filing method taking into account the surface being processed: - transverse stroke - for narrow surfaces; - longitudinal stroke - for long surfaces; -cross stroke - for wide surfaces; -grabbing the file with a “pinch” - for finishing filing, finishing under a ruler and to the size of long narrow surfaces; - the edge of a triangular file - when finishing the internal corner of mating surfaces. 2. A checking tool should be used to check the flatness of surfaces as you file. 3. Finish filing of a flat surface should be started only after the rough filing of this surface has been completed exactly to fit the ruler.
Slide 35
Continuation of question 5 4. The checking tool for checking the angle between the mating surfaces should be used only after finishing filing the base surface. 5. Use the tool to control the size between parallel surfaces only after finishing the base surface. 6. When checking flatness, angles and dimensions, observe the following rules: - before checking, it is necessary to clean the treated surface with a sweeping brush or rag, but in no case with your hand; - to check the workpiece after processing should be released from the vice; - the workpiece with the testing tool should be placed between the eyes and the light source;
Slide 36
Continuation of question 5 - you should not tilt the checking (curve) ruler while checking the flatness using the “light slit” method; -do not move testing and measuring tools along the surface of the workpiece to avoid their premature wear; -dimensions should be measured only after the surface has been well filed and checked with a ruler; -measurements of the part should be made in three or four places in order to increase the accuracy of measurements. 7. The final processing of flat narrow surfaces should be done with a longitudinal stroke.
Slide 37
Continuation of question 5 When filing curved surfaces, the following rules must be observed: 1. Choose the right file for filing curved surfaces: - flat and semicircular - for convex ones; -semicircular - for concave with a large (more than 20 mm) radius of curvature; - round - for concave ones with a small (up to 20 mm) radius of curvature. 2. Observe the correct coordination of movements and balancing of the file: - when filing a cylindrical roller (rod) fixed horizontally: at the beginning of the working stroke - the toe of the file is lowered down, the handle is raised up; in the middle of the working stroke - the file is located horizontally; at the end of the working stroke - the toe of the file is raised up, the handle is lowered down (Fig. 5.1, a);
Slide 38
Continuation of question 5 - when filing a cylindrical roller (rod) fixed vertically: at the beginning of the working stroke - the toe of the file is directed to the left; at the end of the working stroke - the toe of the file is directed forward (Fig. 5.1, b); - when filing a concave surface with a large radius of curvature, during the working stroke it is necessary to move the file along the surface to the right or left, turning it slightly; - when filing concave surfaces of small radius of curvature during the working stroke, it is necessary to perform a rotational movement with a file; Rice. 5.1. Filing a round rod: a - located horizontally; b - located vertically
Slide 39
Continuation of question 5 - finishing (finishing according to a pattern) of convex and concave surfaces is carried out with a longitudinal stroke, holding the file with a “pinch”. 4. Convex surfaces of flat parts must first be filed onto a polyhedron with an allowance of 0.5 mm, and then filed according to the markings and template. 5. Finishing should be done only after preliminary (rough) sawing of the surface according to the template.
Slide 40
6. Mechanization of work during filing. Rice. 6.1. Filing discs Fig. 6.2. Bors
Slide 41
Continuation of question 6 Fig. 6.3. Grinding heads: a - semicircular; b - round; c, d, e - conical; e - reverse conical; g - cylindrical
Slide 42
Continuation of question 6 Fig.6.4. Electric filing machine with flexible shaft: 1 - chuck; 2- tool; 3.5 - pulleys; 4 - belt. 6- flexible shaft. 7-electric motor; 8 — bracket; R - support.
Slide 43
Continuation of question 6 Fig. 6.5. Pneumatic filing machine: 1 - tool; 2 - cartridge; 3 - piston; 4 — rotary sleeve; 5 — piston box; 6- hose; 7- cover; 8 - trigger
Slide 44
Continuation of question 6 Fig. 6.5. Filing machine with abrasive belt: 1 - bracket; 2 - lamp; 3 - endless abrasive belt; 4 - table; 5 - base; b - power button
Slide 45
Continuation of question 6 Fig. 6.6. Stationary filing and cleaning machine: a - general view of the machine; b - executive unit; 1 - bed; 2 - casing; 3.5- brackets; 4 - stand; 6 — rod; 7 - file; 8 - workpiece; 9 - table; 10, 12 — screws; 11 - start pedal
Slide 46
Continuation of question 6 Rules for performing work during mechanized filing 1. It is necessary to choose the right tool when mechanized filing curved surfaces: - a roller cutter - for removing a large layer of metal or rough cleaning of an untreated surface and burrs; -curly round files - for precise (up to 0.05 mm) surface processing; - grinding shaped heads - for final cleaning of treated surfaces. 2. The shape of the tool should be selected depending on the shape of the surface being processed. 3. Surface treatment with round rotating files must be carried out by securing them with a shank in the chuck of a hand-held drilling machine with a power of at least 0.5 kW.
Slide 47
7. TYPICAL DEFECTS WHEN FINISHING METAL, REASONS FOR THEIR APPEARANCE AND METHODS OF PREVENTION Defect Cause Method of prevention “Blocks” in the rear part of the plane of the part. The vice is set too high. Adjust the height of the vice according to the height. “Blocks” in the front part of the plane of the part. The vice is set too high. low The same “blockages” of the sawn wide plane of the part Filing was carried out only in one direction When filing a wide flat surface, alternate longitudinal, transverse and cross filing sequentially
Slide 48
Continuation of question 7 Defect Cause Method of prevention It is not possible to file mating flat surfaces to a square The rules for filing mating flat surfaces were not followed First, accurately, under a ruler, and cleanly file the base flat surface of the part, and then saw the mating surface along it flat surface The angle does not fit tightly to the flat surfaces mating at an internal angle The mating angle is poorly finished Finish the angle between the mating flat surfaces using the edge of a triangular file or needle file, make a slot in the corner of the mating surfaces It is not possible to file flat surfaces parallel but to each other The rules for filing flat surfaces are not followed. First, accurately, under a ruler, and cleanly file the base plane of the part. Sawing of the mating plane is carried out, alternating from the very beginning of work by regularly checking its flatness with a ruler and the size of the rod with a compass. The filing locations are determined by the gap between the jaws of the caliper and the surface being filed, as well as on the basis of comparison of measurement results
Slide 49
Continuation of question 7 Rough final finishing of the sawn surface Finishing was done with a “tussock” file. Incorrect methods of surface finishing were used. Surface finishing should be done only with a personal file after high-quality filing of the surface under the ruler with a coarser file. Finish the surface with a longitudinal stroke, using a “pinch” grip of the file. The sawn round rod is not cylindrical (oval, tapered, cut) Irrational sequence of filing and control When filing, more often measure the dimensions of the rod in different places and from different sides. If it is necessary to remove a significant layer of metal, first saw the rod into a polyhedron, checking the size and parallelism, and then bring it to cylindricity
Slide 50
Continuation of question 7 Defect Cause Method of prevention The sawn curved surface of a flat part does not correspond to the profile of the control template The rules for filing curved surfaces of flat parts are not followed When filing convex surfaces, first file on a polyhedron with a finishing allowance of 0.1 ...0.2 mm, then finish with a longitudinal stroke with regular control of the surface using a template. When filing a curved surface with a small radius of curvature, the diameter of the round file must be less than twice the radius of the recess. The sawn mating contour of the part does not correspond to the profile of the control template. Incorrect processing sequence. Follow the typical processing sequence: first file flat parallel surfaces, then convex ones. Finish the processing by filing the concave parts of the surface, carefully monitoring the filing of the joints. Finish with a longitudinal stroke
Theoretical part
Filing is a cutting method in which a layer of material is removed from the surface of the workpiece using a file.
A file is a multi-edged cutting tool that provides relatively high accuracy and low roughness of the processed surface of the workpiece (part).
By filing, parts are given the required shape and size, parts are adjusted to each other during assembly, and other work is performed. Using files, planes, curved surfaces, grooves, grooves, holes of various shapes, surfaces located at different angles, etc. are processed.
Allowances for filing are left small —
from 0.5 to 0.025 mm.
The achieved processing accuracy can be from 0.2 to 0.05 mm, and in some cases - up to 0.005 mm. A file
(Fig. 1,
a)
is a steel bar of a certain profile and length, on the surface of which there is a notch (cut).
Rice.
76. Files: a
- main parts (1 - handle; 2 - shank; 3 - ring; 4 - heel; 5 - edge;
6 - notch; 7 - rib; 8 - nose); b
- single notch;
c -
double notch;
g -
rasp notch;
d -
arc notch;
e —
handle attachment;
g -
removing the file handle.
The notch forms small and sharp teeth, having a wedge-shaped cross section. For files with a notched tooth, the sharpening angle β is usually 70°, the rake angle γ is up to 16°, and the rear angle α is from 32 to 40°.
The notch can be single (simple), double (cross), rasp (point) or arc (Fig. 1, b
-
d
).
Single cut files
remove wide chips equal to the length of the entire cut.
They are used for filing soft metals. Files with double notches
are used when filing steel, cast iron and other hard materials, since the cross notch crushes the chips, making the work easier.
Very soft metals and non-metallic materials are processed with
files with a rasp cut Arc cut files
have large cavities between the teeth, which ensures high productivity and good quality of processed surfaces.
Files are made from U13 or U13 A steel. After cutting the teeth, the files are subjected to heat treatment.
File handles
are usually made from wood (birch, maple, ash and other species).
Techniques for attaching handles are shown in Figure 1, f
and
g.
According to their purpose, files are divided into the following groups: general purpose, special purpose, needle files, rasps, machine files.
For general metalworking work, general purpose files are used. By
the number of notches per 1 cm of length; they are divided into 6 numbers.
Files with notches No. 0 and 1 (garnish) have the largest teeth and are used for rough (rough) filing with an accuracy of 0.5-0.2 mm.
Files with notches No. 2 and 3 (personal) are used for finishing filing of parts with an accuracy of 0.15-0.02 mm.
Files with cuts No. 4 and 5 (velvet) are used for final precision finishing of products. The achieved processing accuracy is 0.01–0.005 mm.
The length of files can be made from 100 to 400 mm.
According to the cross-sectional shape, they are divided into flat, square, triangular, round, semicircular, rhombic and hacksaw (Fig. 2).
Small-sized needle files are used for processing small parts. They are produced in five numbers with the number of notches per 1 cm of length up to 112.
Processing of hardened steel and hard alloys is carried out with special needle files, in which artificial diamond grains are fixed to a steel rod.
Rice.
2. Shapes of file sections: a
and
b
- flat;
c -
square;
g
- triangular;
d -
round;
e
- semicircular;
g -
rhombic;
h -
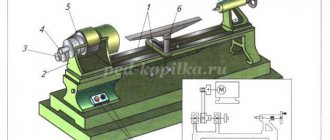
hacksaws. Improving conditions and increasing labor productivity when filing metal is achieved through the use of mechanized (electric and pneumatic) files.
In training workshops, it is possible to use mechanized manual filing machines, which are widely used in production.
A universal grinding machine
(see Fig. 4,
d
), powered by an asynchronous electric motor 1, has a spindle to which a flexible shaft
2
with a holder
3
for securing the working tool, and interchangeable straight and angular heads, allowing the production of filing in hard-to-reach places and at different angles.