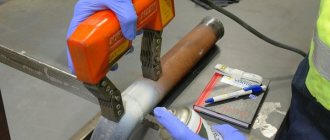
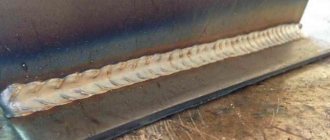
The quality of welding work is determined by how strong the seam is. At the same time, the connection control must be non-destructive, which forces the craftsmen to turn to special testing methods after completing the operation. In some cases, external inspection without instruments is also allowed, but in the case of critical structures, visual inspection cannot be limited. It can be complemented by color flaw detection of welds - one of the most effective, convenient and reliable methods for analyzing such joints.
Features of the verification method
This method of checking welds is a capillary method, but focuses exclusively on external defect detection. That is, it cannot be used to check the internal structure of the joint zone, unlike, for example, ultrasonic flaw detection. Typically, metals prone to cracking are subjected to such testing. In addition, color inspection allows you to effectively identify discontinuities that appear on the surface.
As for the testing principle, it is based on the sensitivity of metals to interaction with flaw detection non-ferrous materials. Contrary to popular belief, the analysis does not use the characteristics of the surface of the workpiece as controlled information, but the changes provoked by irritating the structure with chemicals. The color flaw detection method is based on the processes of chemical exposure, which allows you to process information about changes and provide data on identified metal defects as an output.
The method itself is rarely used alone. It is usually used in a general testing complex - together with ultrasonic testing. First comes color analysis, and then ultrasonic flaw detection.
Various recipes
The chemical composition of the solution used to control the quality of welds varies. As one of the possible options, use a product made according to a simple recipe, which contains the following ingredients:
- Kerosene – 65%.
- Transformer oil – 30%.
- Turpentine – 5%.
By adding a small amount of organic dye, for example aniline, to the resulting mixture, mix everything thoroughly, after which you can begin to work.
Since it is not always possible to ensure precise control of time, and during prolonged treatment with water the coloring solution is washed out of the cracks, its excess can be removed in another way. For example, by carefully wiping the part with a cotton swab or a clean cloth. After this, they begin to apply the developing coating. Regular whitewash or water-based paint are quite suitable for this. When they dry, they will absorb the remaining solution with the dye, forming brightly colored nodes in the defect areas.
The coloring solution, made according to a slightly different recipe, has proven quite good.
- Kerosene – 80%.
- Transformer oil – 15%.
- Turpentine – 5%.
For each liter of the resulting composition, add 15–20 grams of fat orange or Sudan 3 as a dye. The part treated with this mixture is kept for 30–60 minutes, after which it is thoroughly washed with water, completely removing all traces of the dye solution from the surface. If you then apply whitewash to the surface of the product, the layer of which should be as thin as possible, then when it dries, stripes and spots will be clearly visible in places of defects.
Both compositions comply with GOST requirements and are recommended for use for non-destructive quality control of welds.
Materials used
As already mentioned, flaw detection is not complete without the use of special chemicals. A standard color flaw detection kit includes three types of components: indicator penetrant, cleaning agent and developer. That is, color sensitivity control will be activated due to three-stage processing of the working area. At each stage, special materials are used.
Penetrants are essentially coloring substances that can be presented in different forms. Powder products are also used, but for their use additional operations of thermal exposure or mixing with liquids must be introduced. Penetrants suitable for a specific metal for color flaw detection are selected based on several performance properties. In particular, fire resistance, environmental friendliness and toxicity, elimination of the need for subsequent cleaning, etc. are taken into account.
Requirements for the place of control
The flaw detection operation can only be carried out in a specially prepared room. It is important to take into account the requirements for the communication equipment of the place, air characteristics, technical support, etc. The room must be ventilated and not have sources of open flame or intense heating. Lighting should be general and local; lamps close to the operation site should be protected from thermal effects.
You should initially take care of creating an optimal microclimate - only in favorable conditions can color flaw detection be carried out efficiently. GOST 18442-80, in particular, indicates that the air should be dry and warm - if necessary, to achieve these characteristics, you can use an infrared heater, which will ensure drying of the developer at a level of 5 ° C. Technical equipment will depend on the methods of applying chemical components. In particular, paint sprayers, aerosol cans, brushes, etc. can be used to apply the same penetrant.
Advantages and disadvantages
This method of control has both certain advantages and disadvantages.
Advantages
- Identification and elimination of hidden defects inside the product.
- Accuracy of measured readings.
- Calculation of relative and absolute dimensional parameters of the defective section.
- There is no need for a contact device.
- Speed of identifying defects (the method can be used both individually and in flow control).
- Covering technological defects.
- Identifying flaws that cannot be identified in any other way.
- Estimation of concave and convex sizes of welding joints.
Flaws
- The need for complex special equipment, the cost of which is very high, which means that not every institution is able to purchase it due to a limited budget. At home, such a method is unlikely to be appropriate.
- The need for specific consumables, which are difficult to obtain.
- Ensuring strict control over the use of equipment according to instructions and the consumption of materials, since, if they are used and stored incorrectly, the materials can be hazardous to the health and sometimes even the lives of workers (contamination with radioactive elements of equipment, work clothing, the human body, workplaces).
- Personnel working with equipment and materials must be highly qualified, which is not possible for every person.
Radiographic testing does not detect the following defects:
- Cracks and unwelded areas with an opening of less than 0.1 mm, if the thickness of the material being tested is less than 40 mm, 0.2 mm - if the material is from 40 to 100 thick and 0.3 mm - if the material thickness is from 100 to 150 mm.
- Cracks, unwelded areas, the checked planes of which do not coincide with the transmission vector.
- If the length of the flaws in the examined direction is less than double the absolute sensitivity reading of the control equipment.
- If the image of inclusions and intermittent seams coincides on radiographic inspection with the image of foreign parts, sharp-angled areas or sharp changes in the thickness of the parts being welded.
Preparing the base of the seam
The connection area is also prepared for the flaw detection operation. If there are pronounced roughness or contamination on the surface, then you can use fine-grained material and carry out light processing. Next, degreasing is performed. For this task, you can use one of the components of the flaw detection kit, but it is important that it provides the degreasing effect, and even better, increases the sensitivity of the control. It is not recommended to use kerosene for such purposes, but gasoline and acetone can be used. If there is no ventilation in the room, then degreasing is performed only with aqueous solutions based on powdered synthetic agents of low concentration. If color flaw detection is planned for a small part, then complete immersion in a degreasing composition can be used. In other cases, either the technique of spraying onto the target area or applying with a rag soaked in a solution is used.
Without deviating from GOST
First of all, the part will have to be cleaned of dirt. For this purpose, the current standard allows the following processing methods:
- Mechanical cleaning. During its implementation, various technological techniques can be used. The material is treated with a stream of abrasive material such as sand or shot, or simply by hand. Even a regular wire brush will do. You will have to make an effort and work hard, because if even minor contamination remains, all the work will go down the drain.
When mechanical cleaning has been completed, you should begin degreasing the part. In this sense, GOST provides the opportunity to choose from several options. Cleaning can be done:
- Steam, treating the part with vapors of organic solvents.
- Solvents, the simplest of which is water. To obtain better results, detergents are sometimes added to the water. But, if the material of the part allows, you can use solvents with higher chemical activity.
- Chemical reagents that react when introduced into a solution.
- Electrochemically, simultaneously affecting the part with both a chemical solution and electric current.
- Ultrasound, which enhances the cleaning effect of the solvents and chemicals used.
- Thermally. It is recommended in cases where the material of the product can withstand significant heat without damaging its structure.
The listed methods can be varied depending on the available technological capabilities. The main thing is to get a good result. Only after this should the part be treated with penetrant.
Then you can use one of several options for color flaw detection. When choosing them, everything depends on the specific capabilities and conditions for processing parts.
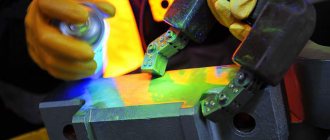
Application of penetrant
First of all, an indicator penetrant is applied. As with degreasing, this procedure can be carried out by spraying, dipping or brushing, depending on the characteristics of the workpiece. Moreover, application should be carried out in several layers (4-6) and so that each previous layer of the composition does not have time to dry. Also, in order for color flaw detection of welds to show an optimally accurate result, each subsequent layer must cover a larger area relative to the previous one. This is due to the fact that each new layer will dissolve the contour of the previous spot, avoiding sharp transitions and sagging, which can be perceived as false cracks. If the operation is carried out in conditions of negative temperature, then the penetrant itself should have a state of about 15 ° C.
How it works
Obviously, in order to assess the capabilities of the technology and the features of its application, it is advisable to know its basic principles. The process is based on X-ray radiation, discovered back in 1895 by Wilhelm Conrad Roentgen. Could the famous scientist who conducted the experiments have known in how many areas of human activity changes would occur thanks to his discovery?!
In all devices using the described flaw detection principle, the source of recorded radiation is X-ray tubes. The characteristics of these tubes affect the capabilities of the equipment and the measurement results. The maximum thickness of metal that an X-ray machine can illuminate directly depends on the radiation, the hardness of which, in turn, is related to the parameters of the current supplied to the tube. Based on the voltage used, equipment is divided into three main groups.
- Small, ranging from 60 to 120 kV.
- Medium, from 200 to 400 kV.
- High voltage, from 1 to 2 MeV.
If the first two types can be made portable, then the latter can be either mobile (installed on a self-propelled or towed chassis) or stationary.
High voltage X-ray tubes can be used to detect defects in parts made from steel up to 500mm thick.
Due to the design features of the X-ray tube, it is possible to adjust the size of the focal spot. The emitter is placed inside a special protective capsule that has a hole or slot through which the rays are directed to the area under study. In some device designs, the spot is focused using additional lenses.
The radiation passing through the material hits the photosensitive material, leaving an imprint on it similar to what is obtained using classical photography technology. In cases where there is a need to continuously obtain data in real time, they resort to the use of so-called scintillators. These substances have the ability to convert invisible hard radiation into light visible to the human eye, making it possible to use a special converter and display the image on the screen. Installations operating on this principle are sometimes called X-ray television.
Penetrant removal
Immediately after application, the indicator film should be removed using a clean napkin or cloth that does not have coarse lint. The material must first be moistened in ethyl alcohol and the surface must be cleaned until the coating is completely removed. Problems may arise if work is carried out on the surface of rough metal - in this case it makes sense to use light abrasives. Next, an oil-kerosene mixture is used. It covers the entire target area and is then also removed with rags or napkins. During the two stages described, color flaw detection should keep the surface around the seam clean and dry. This is important to maintain the accuracy of subsequent control procedures.
Applying developer
As with indicator layers and cleaning compounds, the developer is applied in a variety of ways, from brushes to sprays. The main thing at this stage is to maintain the uniformity and solidity of the formed coating. Therefore, it is necessary to carefully check spraying tools, nozzles and other elements of devices that affect the quality of delivery of the product to the target location. All this will further affect the inspection by color flaw detection, as well as the quality of subsequent inspection operations. After applying the developer, drying occurs. It doesn’t have to be done, waiting for polymerization under natural conditions, but to speed up the process, the use of low-power spot heaters is allowed.
Properties and capabilities of X-ray
The peculiarity of radiography is that the permeability of materials depends on the length of the generated rays.
In dense materials they are scattered and partially absorbed. The lower the density of the connection being tested, the clearer the image will be. The ability of some chemical elements to glow for several seconds under the influence of X-ray radiation makes it possible to expose a special film and obtain an image of existing seam defects.
If the material being tested is homogeneous, the result will be a light and monochromatic image. If there are various defects, cavities, voids, it will have darkening.
In large quantities, X-ray radiation negatively affects the human body, irradiating cells and tissues. Large doses lead to the development of radiation sickness and even death. Therefore, the use of fluoroscopy to control the quality of welds requires strict adherence to safety rules.
Inspection of the controlled area
Once the developer has dried, you can prepare to examine it by waiting about 30 minutes more. Further inspection by color flaw detection involves the use of a magnifying glass providing at least 5x magnification. If the layer-by-layer control technique is used, then inspection can be performed within 2 minutes after treatment with the developer.
During the assessment process, the operator records the characteristics of the stain left - in particular, he records the dimensions of the contours, shape, etc. in a log. The main task posed by color flaw detection is to detect surface flaws that clearly manifest themselves after the procedure is completed. Mechanical damage, traces of corrosion, as well as cracks with excessive sagging may be detected.
Safety when performing flaw detection
Requirements for safety measures are determined by the threat of fire and explosion during flaw detection. Therefore, it is necessary to at least prepare special clothing, including a cotton robe, a hat and rubber gloves, the surface of which must be coated with talcum powder. Safety measures must be fully observed at the site itself. During the procedure there should be no open sources of fire or sparks. If color penetrant flaw detection is performed regularly in the same room, it is necessary to install appropriate signs prohibiting smoking and observing fire protection measures. Rags, wipes and flammable products should be stored in fireproof containers.

