- Home page
- •
- Articles on welding
- •
- Welding helmets: types, characteristics, features of choice
In this article we will look at the features and types of welding helmets, as well as what to look for when choosing
The electric arc emits bright light and ultraviolet rays that can burn the cornea of the eye. To protect your eyesight and clearly see the processes occurring in the weld pool, you need a high-quality welding mask. What they are, how they differ and what to look for when choosing, we will consider in this article.
Setting up the Chameleon welding helmet
Of course, if the Chameleon mask has additional adjustment options, this significantly increases its functionality. By independently adjusting the degree of operation and darkness of the filter, you can fine-tune the mask, both for RDS welding and in a MIG/MAG shielding gas environment.
However, setting up the Chameleon mask yourself will require some knowledge from the welder. This article was created precisely for this purpose.
Review of Foxweld models (video)
The range of Foxweld electric welding shields is quite wide, and has the following model ranges:
- Corundum with enhanced light filter;
- impact-resistant Diamond models;
- Illuminated Comet;
- Space with Artotic glass;
- Gefest Vector with large viewing window;
- Lord with a distinctive stylish design;
- Gladiator with folding glass;
- Swaris with cutting and welding functions;
- Iskra, VARTEG, GEFEST and other models.
The Foxweld welding mask Corundum represents the most popular and numerous series, characterized by the presence of layered light filters, the ability to fully adjust the functions and position on the head. There are series with a larger viewing window (Carbon, Prima), improved characteristics (Korund-2, 5), and others. In the 2022 ranking “Mark of Quality. 6 best welding masks” model Foxweld Corundum 5895 took 2nd place among masks for amateurs as “the lightest chameleon mask”.
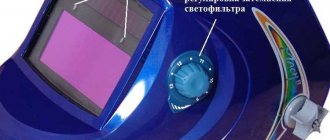
Adjusting the darkness of the mask
In the process of adjusting the Chameleon mask, you can adjust the light filter yourself so that it becomes lighter or, on the contrary, darker. For these purposes, there are switches on the inside of the filter.
An important feature is that the mask can be configured for internal or external adjustment. That is, the welder does not even have to remove the mask from his head to adjust the light filter if you set such parameters in the functions of the Chameleon welding mask.
Welding helmet Resanta MS-1: characteristics
First of all, as mentioned earlier, it is an affordable price, just above 1,500 rubles. At the same time, the mask is made of high-quality materials, it has manual and automatic adjustment. Most automatic Chameleon masks for this price do not have manual settings, and this is a serious drawback.
In general, the Resanta MS-1 mask positions itself as a Chameleon with manual adjustment of the light filter. This means that the welder himself can choose the level of darkening of the filter, ranging from 9 to 13 DIN. The minimum degree of darkening of the filter is only 4 DIN. That is, you can work in a mask without even removing it from your head.
The filter response speed is 1 ms. Additional protective glass can be installed on the filter. And, no less important for many welders, the Resanta MS-1 mask supports the so-called “grinding mode,” which was already mentioned earlier in this site article.
The filter itself is powered by a battery, which is automatically recharged from the solar panel built into the mask. In simple words, when welding, the mask’s battery recharges itself, which significantly increases its service life. The more you cook, the longer the battery of the Chameleon mask will last.
What can I say, the Resanta MS-1 Welding Mask is a worthy choice for both novice welders and professionals. When working in a Chameleon mask, your eyes will always be under reliable protection.
Share on social networks
Adjusting the sensitivity of the welding mask
In addition to the degree of darkness, the mask filter, if it allows it, can be adjusted to a certain degree of sensitivity. This setting allows you to determine whether the mask filter will react and darken only from the welding arc or from any source of bright light, such as a lamp.
This is a very important parameter, since many masks suffer precisely from the speed and sensitivity of dimming. As a result, the Chameleon mask does not work at the right time or opens at a time when the welding arc has not yet gone out. This leads to rapid eye fatigue for the welder.
The sensitivity level of the Chameleon mask is adjusted using the “SENSITIVITY” switch.
Replacing the batteries of the Foxweld GEFEST mask:
Battery life depends on the intensity of use and storage conditions. When the battery charge is low, the low battery indicator on the filter begins to “blink”, after which you have a few more hours of guaranteed operation of the filter. In this case, replace both batteries; after replacing the batteries with new ones, the filter is ready for further operation.
Grinding mode:
Rotate the darkening knob counterclockwise until it clicks to turn on the “GRIND” mode. In this mode, the darkening of the light filter is blocked, for example, when using a welding helmet as a protective shield when cutting angle grinders, grinding tools, or sharpening. During long breaks in using the mask, it is advisable to switch the light filter to the “GRINDING” mode for a longer service life of the built-in batteries.
Installation of corrective lenses (optional):
The filter block has mounts for corrective lenses (lenses are not included). Install lenses if necessary, placing them in the mounts with a shift from above or below the filter.
Chameleon delay adjustment
Next to the filter sensitivity switch, there is also a switch that determines the degree of filter delay. The delay is the moment between closing and opening the filter. This is also an important parameter that does not allow you to “catch rabbits” if the electrode is stuck to the metal.
The thing is that in this case the mask’s light filter may open, and welding will continue. Therefore, the ability to adjust the delay of the light filter in the Chameleon mask is a very useful level of safety for the eyes of a welder, especially an inexperienced one who has just started welding with electric welding.
How to adjust the rack headband of the Foxweld GEFEST welding helmet:
- Top mount: Move the guides so that the welder's eyes are in the middle of the visible area of the filter.
- Rear headband adjuster: press the adjuster and rotate it to change the diameter of the headband; The headband should fit tightly around your head.
- Adjust the distance from the eyes to the filter: select the optimal position of the clamp from three possible ones (max./average/min.)
- Mask lowering angle: set the most comfortable position by locking the limiter in five possible positions.
- In addition to the lowering angle, this mask can be fixed in any other position: to do this, tighten the side “wings” until it stops.
Switch for “Welding-Grinding” mode
The mode of switching from welding to metal grinding, without removing the mask from the head, is also very convenient in modern Chameleon welding helmets. In this case, the mask serves to protect the welder’s eyes, both from harmful ultraviolet radiation and from scale, which can fly into the eye when cleaning metal.
A special lever on the Chameleon mask allows you to quickly activate the grinding mode, and vice versa, metal welding, without resorting to anything unnecessary for these purposes. The lever allows you to disable the welding arc detection function and use the mask as a regular shield for working with metal.
However, upon completion of work with metal, you must remember to move it to the opposite position.
Contacting the service center
Additional options make repairs more difficult and increase the risk of mask failure. If the degree of darkening has decreased significantly, it is necessary to inspect the structure.
Some components cannot be repaired and require mandatory replacement. If you cannot do this yourself, you need to contact a service center. The guarantee is valid only for complete masks. If you managed to delve into it, you will have to pay for the service.
There is no point in undertaking repairs to the system board: this is a matter for professionals. It is better to contact the service center immediately. Unsuccessful DIY repairs can result in additional costs.
Welding work always involves increased eye strain. That is why a welder’s mandatory equipment set, in addition to working clothes, must include a special protective mask. Traditionally, tinted glass has been used as a filter, but it is extremely inconvenient. New welding helmets of the “Chameleon” type are much more practical and functional. But how to choose the right model?
A little about the design
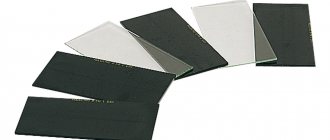
The main element of the mask is a light filter made of a liquid crystal matrix. The principle of operation is to change the degree of light transmission at different voltage values.
Chameleon mask and filter circuit
In addition, the design has an initial filter element that protects against ultraviolet radiation invisible to the eye. The use of this technology has opened up new operational possibilities for welding helmets.
- Possibility of automatic darkening of the filter depending on the light intensity of the welding arc.
- Manual control of functions - response delay time, setting the degree of shading.
- Located sensors automatically activate the matrix when the intensity of light radiation increases.
At first glance, the chameleon welding mask is the best choice. However, in addition to a high-quality light filter, there are several factors that directly affect the ease of use.
Main settings
It should be noted that the chameleon mask differs from the traditional one not only in performance, but also in price. Even the cheapest Chinese model will cost at least 2,500 rubles. Therefore, the choice must be approached with maximum responsibility. Let's consider the main parameters.
Shade level
This parameter specifies the minimum and maximum filter darkening values. In professional models, when inactive, the overview panel remains completely transparent. During welding, voltage is applied to the liquid crystal grid and it darkens. But you need to take into account that when the mask is disconnected from the power supply, the degree of filtration will be maximum.
Selection table by degree of darkness
There is a classification of this characteristic, which is expressed in standard DIN or C indicators. For welding work with an average level of arc radiation intensity, you can use models with a maximum DIN 13. But it is best to first calculate the optimal value for specific work.
Switching speed
The time of exposure to light radiation on the eyes depends on this. It is knitted with a degree of darkness. The larger the range, the slower the switching from one filtering mode to another will be.
For example:
- From DIN4 to DIN13 – 400 ms.
- From DIN4 to DIN9 – 200 ms.
Manufacturers indicate this characteristic as 1/X, where X is the on-time. For home use, you can choose models with a parameter of 1/10000 sec (100 µs). For continuous operation, the turn-on time should be at least two times less - 1/20000 sec (50 µs).
Classification of filters
It is defined by EN379 standards and consists of four parameters: optical class, light scattering, homogeneity and angular darkness. Each of them can have a value from 1 to 3. The accepted notation is as follows - 1/1/1/3.
- Optical class. Determines the clarity of the image through the filter. Ideally, there should be no distortion of the object. There must be clear focusing.
- Light scattering. As light passes through the liquid crystal grating, its direction may change. If this happens, the welder observes the object as slightly darkened. For class 1 devices, light scattering occurs without distortion.
- Homogeneity. Possible uneven darkening of the filter surface. Slight deviation from the norm in the corners is allowed.
- Angular degree of darkness. Characterizes the change in darkening depending on the angle of incidence of light on the filter.
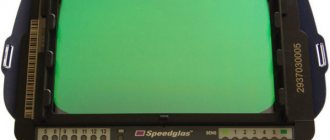
Light filter
Masks with the designation 1/1/1/1 on the filter have the best possible performance parameters. For household use, you can purchase models with ½/12 ratings.
Location of the control panel and number of light sensors
The best work comfort will be provided by masks with the control unit located on the outside. It is usually located on the side. However, this is not always possible to do. Therefore, there are types in which the adjustment blocks are located on the inside.
The activation of the filter depends on the number of sensors. Usually they are installed on the front panel in the amount of 2 pieces. But when side welding, the arc does not always fall within their range of action. In this case, it is recommended to purchase masks with additional side sensors.
Manufacturers and cost
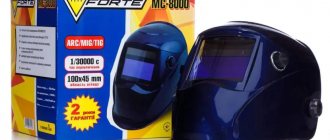
The German company OPTIMA FUBAG specializes in the production of welding equipment. Their product range includes chameleon masks. The main difference is the impact-resistant plastic from which the mask body is made. Buyers in reviews note the reliability of the filter. .
If you need a more affordable model, you can choose one of the Russian-made Caliber masks. In addition to the affordable price, one can note the large size of the filter cartridge (110*90 mm) and its fairly fast operation. .
In addition to these brands, we can note the products of the following companies - Resanta (Russia), Vita (China).
Possible degrees of adjustment
Before purchasing the selected model, it is recommended to try it on. In this case, you should pay attention to the degree of size adjustment, weight and viewing angle. It is often more profitable to buy a chameleon mask that is a little more expensive, but with better characteristics.
Hello! We gave a chameleon mask FUBAG Optima 9-13. I’m a complete amateur when it comes to welding, so I’m afraid to use it because... I don’t understand much about how it works and I’m afraid to do something on my own so as not to harm my health. Tell me how to properly set up this mask in order to protect yourself as much as possible when welding?
First you should check the serviceability of the filter. This can be done in two ways: point it towards a bright lamp or strike it in front of it with a silicon lighter. If the filter is working properly, it should darken. Next, ignite the arc and make settings according to the instructions in the operating instructions, which say the following:
The mask is intended for manual arc, argon and semi-automatic welding. If you are going to use it as PPE for laser or oxy-acetylene welding-cutting, it is not suitable for these purposes. This should be clear based on the data on dimming adjustment 9-13DIN - these are values designed for powerful arc radiation, but not for protection from an oxygen-acetylene torch and the like (read “UVEX Gas Welding Goggles”). The torch will be faintly visible.
The operating temperature of the mask ranges from (-5 ... +55) oC. At temperatures below -5, it stops working, since the liquid crystal elements freeze and do not change. You also need to be prepared for this. In cold weather, use a regular welder's shield with a replaceable filter.
Also, due to safety precautions, our Chinese friends do not advise those who suffer from myopia to wear contact lenses, even if you are working in a mask, since, we quote: “this can lead to gluing of the contact lens and the cornea of the eye,” to which our experienced ones welders answer that “if you apply an X-ray film to the back of your head during the welding process, you can get a clear image of the brain...”. This, of course, is ironic, however, you need to know that the manufacturer does not recommend using lenses, only ordinary distance glasses when welding. Perhaps this is due to moments when the filter can open arbitrarily for various reasons - at this moment dangerous ultraviolet and infrared radiation has its detrimental effect. It is generally not recommended to do any dirty/dusty work or the like in lenses.
Further, the mask will not work correctly with a flickering arc.
It is possible that all the necessary settings are already available. These and other nuances can only be clarified by igniting the arc.
Before ignition, set the operating mode knob to WELDING. Make sure that all parts of the mask are intact and that the sensor windows located on the front of the filter are not dirty. Before igniting the electrode, make sure once again that the light filter is working - strike a lighter in front of it. If you are using FUBAG Optima for the first time or after a long period of inactivity, it is recommended to expose it to the sun for half an hour to recharge.
Before starting work, you need to set the parameters that will allow you to complete the work most comfortably: adjust the degree of darkness, light sensitivity, as well as the delay time - opening speed, selected individually (for more details, see the article “Budget chameleon masks”)
The main thing is to select the degree of darkness by rotating the adjustment knob, from 9 to 13 DIN according to the following table:
Light Sensitivity: In the “Low” position, most welding work is performed. “High” is set in the argon-arc welding mode with a non-consumable electrode at low currents.
Welding helmet operating instructions
PLEASE READ THESE INSTRUCTIONS CAREFULLY BEFORE USING THE WELDING HELK.
ATTENTION!
A welding helmet with an automatic light filter protects the eyes and face from sparks, molten metal splashes and harmful radiation from the welding arc under normal welding conditions. The filter automatically switches from light to dark when the arc is ignited and returns to the light state when welding is completed. The welding helmet with automatic light filter is supplied fully assembled. Before use, you need to install two AAA batteries into the filter, adjust the mask according to your individual characteristics, select and set the required degree of darkness, sensitivity and delay time of the filter.
ATTENTION!
- This mask is not intended for gas and laser welding and cutting.
- Never place the mask and filter on a hot surface.
- Do not open the filter cartridge.
- This welding helmet is not intended to provide protection against severe impacts.
- Do not use this welding helmet while working with explosives or corrosive liquids.
- Do not make any changes to the filter or mask unless otherwise specified in these instructions. Use only spare parts specified in this manual. Making unauthorized modifications or using unauthorized parts will put the welder at risk and void your warranty.
- If the filter does not darken after igniting the arc, stop welding immediately and eliminate the possible causes of the malfunction. If you are unable to resolve the problem yourself, contact a technician or dealer.
- Do not immerse the filter in water.
- Do not use solvents when cleaning the filter and other parts of the mask.
- Use the mask only at temperatures between -10ºC and +55ºC.
- Store the mask and filter in a dry, cool, dark place when the mask is not in use for a long time. Storage temperature from -20ºC to +70ºC.
- Protect the filter from contact with liquid and dirt.
- Regularly clean the surface of the light filter from dust and dirt; do not use strong cleaning solutions. Use a clean, soft, lint-free cloth to clean optical sensors and solar cells.
- Replace the outer protective glass regularly if splashes of molten metal adhere to the surface, or if pitting, cracks, scratches, unevenness or clouding appear.
- The headband may cause an allergic reaction in sensitive people where the adjustment straps come into direct contact with the skin.
- To extend battery life, switch the filter to Grind mode after use. When the red “LOW BATTERY” LED on the inside of the filter lights up, replace the AA batteries.
- Before starting welding work, adjust the mask to your liking to achieve maximum comfort and protection, install two AAA batteries in the filter, select and set the required degree of darkness, sensitivity level and filter lightening delay time depending on the conditions and method of welding.
Preparing for head size
- The circumference of the headband can be increased or decreased by rotating the knob while pressing on the back of the headband (see “Y” in Fig. 1). This procedure is performed with the welding helmet on and allows you to obtain the tension necessary to securely fix the welding helmet on the head.
- If the headband sits too high or too low on your head, adjust the strap that goes over the top of your head. To do this, loosen the end of the belt by pushing the locking pin out of the hole in the belt. Move the two parts of the belt relative to each other to the required length and insert the locking pin into the nearest hole (see “W” in Fig. 1).
- Check the fit of the helmet by raising and lowering the welding helmet while it is on. If the headband feels loose, readjust until you get a secure fit.
Adjusting the distance from the eyes to the filter
- Loosen the locking nuts (see “T” in Fig. 1) and move the mask towards or away from your face. Make sure that the distance between both eyes and the filter is the same to avoid uneven darkening of the filter.
- After adjustment, tighten the locking nuts.
Adjusting the viewing angle of the mask
The viewing angle regulator is located on the right side of the mask (see Fig. 2). Loosen the right lock nut, push the lever pin out of the hole, turn to the required angle and tighten the lock nut.
Adjusting the degree of darkness (SHADE)
In the table “Degrees of darkness”, select the required level of darkness depending on the welding method and the value of the welding current. Set the darkening control located on the outside of the mask to the desired position. The degrees of darkness can be adjusted during welding using an external regulator.
Adjusting sensitivity (SENSITIVITY)
Sensitivity can be “H” (high) or “L” (low). Smooth adjustment of the filter sensitivity is carried out using the “SENSITIVITY” control knob located on the inside of the cartridge (see Fig. 3a). Medium-high sensitivity is recommended for most applications. Maximum sensitivity suitable for low amperage welding, TIG and other special applications. When working in the sun, in a brightly lit room, or near another welder, it is necessary to set the “SENSITIVITY” control knob to the “LO” (low) position (see Fig. 3b). To obtain the optimal effect, it is recommended to first set the sensitivity to high, and then gradually reduce it to a level where the filter begins to respond only to the welding arc, and not to ambient light (sun, bright indoor lighting, arc of another welder, etc.).
Adjusting the delay time (DELAY)
The filter automatically returns to the light state after welding is completed. Adjusting the delay time can prevent premature opening at the end of welding, when there is no longer an arc, but the hot metal still glows brightly, as well as to prevent the “blinking” of the light filter during short pauses. The delay can be short “S” (0.1 sec.) and long “L” (1.0 sec.). Smooth adjustment is carried out using the “DELAY” control knob located on the inside of the cartridge (see Fig. 3b). Short delay is suitable for spot welding, long delay is for high amperage welding. The long delay is also suitable for low current TIG welding and pulsed TIG/MIG/MAG welding.
Operating mode selection
The Weld welding mode is used for most welding jobs. In this mode, the filter automatically darkens when a welding arc is detected by optical sensors. In this mode, the degree of darkness, delay time and sensitivity are adjusted. Before welding, check the sensitivity adjustment and make sure you are already out of grinding mode. The “Grind” grinding mode is used when processing metal with abrasive wheels and grinding. In this mode, the light filter is turned off. The degree of darkness is fixed at 3.5 DIN, which gives clear visibility when working with an angle grinder.
Nutrition
When the red “LOW BATTERY” LED on the inside of the filter lights up, replace the batteries with new ones (see Fig. 5). To replace, use new AAA batteries of the same type. Make sure the batteries have not passed their expiration date.
Test
Before starting welding, to diagnose the functionality of the light filter, press and hold the “TEST” button (see Fig. 5), if everything is in order and installed correctly, the light filter will go into a dark state, and when released, it will automatically return to a light state (3.5 DIN).
MAINTENANCE
Replacement of protective glass filters. Replacement of the protective glasses of the light filter is carried out when they are damaged (scratches, cracks, chips, dirt, clouding). Slide the latches to the middle of the cartridge (see Fig. 6), lift the cartridge and remove the protective glass with rubber frame. Remove the frame and put it on the new glass, put the glass back in place. Snap the cartridge in reverse order. Replace the inner protective glass if it is damaged (scratches, cracks, chips, dirt, clouding). Remove the damaged glass with the end of your finger using the niche located at the bottom edge of the viewing window. Attach the new protective glass in the reverse order.
Replacing the cartridge/filter element. Remove the dimming control knob, unscrew the nut and remove the potentiometer. Slide the latches towards the middle of the cartridge and remove it (Fig. 6 and 6a). Take the new cartridge and insert in reverse order. Snap the cartridge into place and ensure that its front edge is securely held by the locking tabs, as shown in Figure 6. Insert the potentiometer axis into the hole from the inside of the mask, put a washer with a scale on the outside of the axis and tighten the nut. Place the dimmer knob onto the shaft.
Cleaning. Wipe the mask with a soft cloth. Clean the cartridge working surfaces regularly. The use of concentrated cleaning solutions is not permitted. Wipe optical sensors and solar panels with a clean, soft, lint-free cloth moistened with ethyl alcohol. Then wipe dry with a soft, lint-free cloth.
Uneven dimming. Different distance from the eyes to the filter due to incorrect adjustment of the mount. (Adjust the mount so that the distance from the eyes to the filter is equal.)
The filter does not work or flickers. 1. The outer protective glass is dirty or damaged. (Replace the outer protective glass.) 2. The optical sensors are dirty or blocked. (Clean the surface of the sensors, exit the Grind mode.) 3. Welding current is too low. (Set the filter sensitivity to high.) 4. Check the batteries, make sure they are in good condition and inserted correctly, also check the contact surfaces and clean them if necessary.
Slow response. Operating temperature too low. (Do not use the welding helmet when the ambient temperature is below -10°C.)
Bad review. 1. Contamination of the protective glass or filter surface. (Replace the protective glass or clean the filter from dirt.) 2. Insufficient lighting. 3. Incorrect dimming level setting. (Adjust the darkness level). 4. The film has not been removed from the protective glass. (Remove the film).
The mask does not fit well on the head. Incorrect headrest adjustment. (Adjust the headband.)